
- PowerShell Desired State Configuration – Part 1: The Basics
- PowerShell Desired State Configuration – Part 2: LCM and Push Management Model
- PowerShell Desired State Configuration – Part 3: Pull Mode
- PowerShell Desired State Configuration – Part 4: Automating and Monitoring Pull Mode
The ‘pull’ mode of Desired State Configuration (DSC) is not so easy to implement as ‘push’ mode. Firstly, the architecture of this mode requires a ‘pull’ server to centralize the DSC configurations. Secondly, you should, before you start, have some skills in the file protocol used, either IIS or SMB, when setting up the pull server, or to acquire the expertise as time goes by. Finally, the naming of the MOF files is more complex because you need to use the GUID of each node instead of the hostname. In my opinion, it is the main difficulty when we switch from the Push mode to the Pull mode.
In the previous section, we talked about Pull mode implementation, but before you create your DSC configurations, I first need to explain how you can manage these MOF files. Then, in the second part, I will describe a rather obscure but useful component which is called ‘compliance server.’ This component monitors all your nodes.
MOF Files management
When you are managing a large number of machines, the Pull mode is a better technical choice. This method has many advantages but also some disadvantages. It is important to keep in mind that DSC is a new technology that will be set to grow in the coming months and subsequent versions of PowerShell. The DSC community grows day by day and the Microsoft PowerShell team provides a great deal of documentation. However, in my opinion, the management of the MOF files remains the difficult point to grasp when starting off with the PowerShell Desired State Configuration.
As I’ve explained in Part 3 of this series, the name of each MOF files no longer contain a hostname, but rather a GUID.
What is a GUID?
The GUID is a sequence of letters and numbers that are used as a unique reference. GUIDs are commonly displayed as 32 hexadecimal digits with groups separated by hyphens. As part of this series on PowerShell DSC, the GUID allows us to identify unambiguously each node via the “ConfigurationID” property located in the LCM. Once a node requests its configuration from the Pull server, it uses this property to identify and obtain its own configuration. You can get this parameter via the “Get-DscLocalConfigurationManager” cmdlet:
|
1 2 3 4 5 6 7 8 9 10 11 12 13 14 15 16 17 |
PS C:\> Get-DscLocalConfigurationManager AllowModuleOverwrite : False CertificateID : ConfigurationID : 4aa09541-82d7-491f-9408-a1fa10757734 ConfigurationMode : ApplyAndAutoCorrect ConfigurationModeFrequencyMins : 30 Credential : DownloadManagerCustomData : {MSFT_KeyValuePair (key = "ServerUrl"), MSFT_KeyValuePair (key = "AllowUnsecureConnection")} DownloadManagerName : WebDownloadManager RebootNodeIfNeeded : True RefreshFrequencyMins : 15 RefreshMode : Pull PSComputerName : |
The simplest way to create a GUID is to use the NET method NewGuid():
|
1 2 3 4 5 6 7 8 |
# Create a new GUID PS C:\> $GUID = [GUID]::NewGuid() PS C:\> $GUID Guid ---- b25e624a-92f7-4e44-b9d7-ef0fb0f51eb5 |
Remember that it is possible to indicate the GUID that you want. We will see later that it is very useful in the MOF files management.
|
1 2 3 4 5 6 7 8 |
# Create a GUID with a value PS C:\> $GUID = [GUID]("17034f9a-a7fe-4779-986a-0ce9d0303116") PS C:\> $GUID Guid ---- 17034f9a-a7fe-4779-986a-0ce9d0303116 |
It is also possible to convert the GUID into a string:
|
1 2 3 |
PS C:\> $GUID = [GUID]::NewGuid().ToString() PS C:\> $GUID ef8fc34b-c986-47c4-829a-e9a23dd8f1b4 |
Finally, you can create an empty GUID:
|
1 2 3 |
# Create an empty GUID PS C:\> $GUID = [GUID]::Empty |
This GUID is then used in the DSC configuration to ensure that a node gets only its configuration.
|
1 2 3 4 5 6 7 8 9 10 11 12 |
Configuration ConfigurationSample { Node 1C707B86-EF8E-4C29-B7C1-34DA2190AE24 { File xxxx { Ensure = "Present" xxxx = "xxxx" } } } |
Several questions arise at this point, the most obvious being ‘Where and how do we store the GUIDs for each node?’, and ‘How do we link a GUID and a node?’
The first answer to these two questions that occurs to most of us is to create a text file or CSV file and insert a line for each node, as in the example below:
|
1 2 3 4 5 6 7 8 9 10 11 12 13 14 15 16 17 18 19 |
PS C:\> New-Item -Type file -Name dsc-nodes.csv C:\Temp Directory: C:\Temp Mode LastWriteTime Length Name ---- ------------- ------ ---- -a---- 22.05.2016 17:34 0 dsc-nodes.csv PS C:\> "name,guid" | Add-Content -Path C:\Temp\dsc-nodes.csv -PassThru name,guid PS C:\> "adm01,18ca85b8-1500-4aca-8f05-fbf61c1f48b0" | Add-Content -Path C:\Temp\dsc-nodes.csv -PassThru adm01,18ca85b8-1500-4aca-8f05-fbf61c1f48b0 PS C:\> "adm11,4aa09541-82d7-491f-9408-a1fa10757734" | Add-Content -Path C:\Temp\dsc-nodes.csv -PassThru adm11,4aa09541-82d7-491f-9408-a1fa10757734 |
You will obtain a CSV file similar to this one:
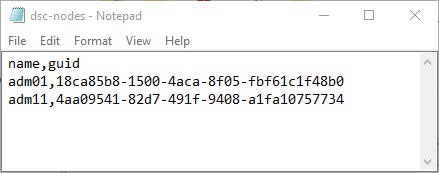
Figure1 – CSV file
This technique, based on a single file, is, simple and effective. It lets you manage Windows and Linux machines in the same way. Furthermore, you will be able to query this file and retrieve the GUID of a node.
However, the major drawback as it stands is that it isn’t yet automated. You need to create a new GUID and then insert it into the file. Fortunately, PowerShell can automate these actions. In the example below, I created a script that accepts several parameters:
- The name of the CSV file
- The name of the node to insert
- The GUID to insert
- And what to do: create the file or update it
|
1 2 3 4 5 6 7 |
param( [string] $FileName = "DSC-Nodes.csv", [string] $FilePath = "C:\Temp", [Parameter(Mandatory=$true)][string] $Action = "", [Parameter(Mandatory=$true)][string] $Node = "", [Parameter(Mandatory=$true)][string] $GUID = "" ) |
The CreateCSVFile function will create the CSV file.
|
1 2 3 4 5 6 7 8 9 10 11 |
Function CreateCSVFile { Param ( [string] $FileName = "DSC-Nodes.csv", [string] $FilePath = "C:\Temp" ) New-Item -Type file -Name $FileName $FilePath "name,guid" | Add-Content -Path $FilePath\$FileName -PassThru Write-Host "$FilePath\$FileName created!" -ForegroundColor Green } |
Then the AddContentToCSVFile function updates the file.
|
1 2 3 4 5 6 7 8 9 10 |
Function AddContentToCSVFile { Param ( [string] $Node = "DSC-Nodes.csv", [string] $GUID = "C:\Temp", [string] $CSVFile = "C:\Temp\DSC-Nodes.csv" ) "$Node,$GUID" | Add-Content -Path $CSVFile -PassThru } |
Finally, according to the desired action, the previous functions are called.
|
1 2 3 4 5 6 7 |
If ($Action -eq "Create") { CreateCSVFile -FileName $FileName -FilePath $FilePath } elseif ($Action -eq "Add") { AddContentToCSVFile -Node $Node -GUID $GUID -CSVFile "$FilePath\$FileName" } else { Write-Host "Unknown action!" -ForegroundColor Red } |
Now, we can simply run the following command to create the CSV file:
|
1 2 3 4 5 6 7 8 9 10 11 |
PS C:\>.\CSVScript.ps1 -Action Create -FilePath C:\Temp -FileName DSC-Nodes.csv Directory: C:\Temp Mode LastWriteTime Length Name ---- ------------- ------ ---- -a---- 22.05.2016 19:26 0 DSC-Nodes.csv name,guid C:\Temp\DSC-Nodes.csv created! |
Then this command adds content to the file:
|
1 |
PS C:\>.\CSVScript.ps1 -Action Add -Node ADM11 -GUID 4aa09541-82d7-491f-9408-a1fa10757734 |
You are probably wondering why you would need to automate this. These functions will be highlighted once we go on to automate the deployment of DSC configuration on the pull server. We will be easily able to query this CSV file.
However, there are other methods for storing the “Hostname=GUID” pair and so overcome the need for the CSV file. Depending on your environment and your technical constraints, there are three other relevant methods:
The first is based on Active Directory. In fact, each computer object in Active Directory has several properties of which one of them is called “ObjectGUID“. This therefore means that each object is uniquely identified. It is therefore possible to take this property that is created by default when a server (or a workstation) joined an Active Directory domain. This method offers several advantages:
- Auto-generate GUID for each node.
- No duplications are possible.
- The link between the GUID andthe node is established simply and unambiguously.
But this also imposes some constraints:
- To have an Active Directory domain in your environment.
- To mainly manage Windows machines. It is quite possible to integrate Linux machines in an Active Directory, but for some of you, this may be technically impossible. To work around this, creating a computer object can be done manually.
- It is Difficult to manage Windows machines that are not integrated with Active Directory (workgroup).
If these limitations are acceptable to you, then here’s how to get the GUID of an object using the graphical interface “Active Directory Users and Computers“. Select “View” and then “Advanced Features“. Once selected, hidden containers, tabs and attributes can be seen when editing object properties.
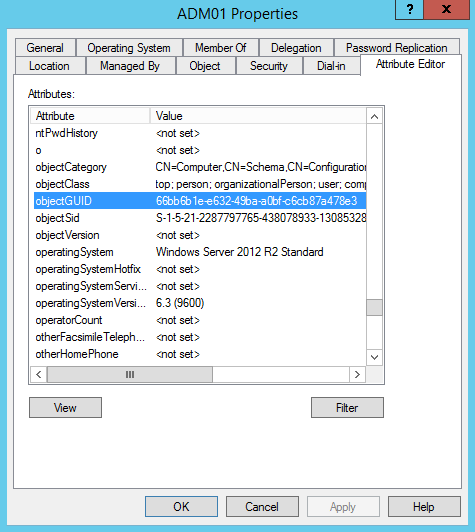
Figure 2: ObjectGUID property
PowerShell allows you to automate this action via the “Get-ADComputer” cmdlet:
|
1 2 3 4 5 6 7 8 9 10 11 12 13 14 15 16 17 18 19 |
PS C:\> Get-ADComputer ADM01 DistinguishedName : CN=ADM01,OU=PROD,DC=Demo,DC=local DNSHostName : ADM01.Demo.local Enabled : True Name : ADM01 ObjectClass : computer ObjectGUID : 66bb6b1e-e632-49ba-a0bf-c6cb87a478e3 SamAccountName : ADM01$ SID : S-1-5-21-2287797765-438078933-1308532817-2119 UserPrincipalName : PS C:\> $GuidADM01 = (Get-ADComputer ADM01).ObjectGUID PS C:\> $GuidADM01 Guid ---- 66bb6b1e-e632-49ba-a0bf-c6cb87a478e3 |
The second method that seems interesting is to use the ID of the Hyper-V or VMWare virtual machines. As with Active Directory objects, each virtual machine has a GUID to identify it uniquely. The main disadvantage of this method is the requirement to have a fully virtualized environment, which is not necessarily the case for everyone. It will not be possible to manage the GUID of physical machines via this method. To implement it, the “Get-VM” cmdlet retrieve the GUID of a Hyper-V virtual machine:
|
1 2 3 4 5 6 7 8 9 10 11 12 |
PS C:\> Get-VM | Format-Table VMName, VMId VMName VMId ------ ---- ADM01 c52d826c-5114-40b2-a679-67257a669ebd PS C:\ > $VMId = (Get-VM | ? {$_.VMName -eq "ADM01"}).VMId PS C:\ > $VMId Guid ---- c52d826c-5114-40b2-a679-67257a669ebd |
In a VMware environment, it is possible to use the Uuid or InstanceUuid. This requires the use of PowerCLI and to enter the following commands:
|
1 2 3 4 5 6 7 |
PowerCLI> Connect-VIServer -Server VC01.demo.local -Protocol https -User xx -Password xx PowerCLI> Get-VM ADM01 | Get-View | % {$_.config} | Format-Table -a *uuid Uuid InstanceUuid ---- ------------ 4209062c-bfa4-2d78-99f0-feb6533d2611 50095f5b-0ff0-6c1f-f192-ef31416c4604 |
Finally, the last method is to store the information in a SQL Server database. A table will thus contain two columns: “Name” and “GUID” into which the name of the node and its associated GUID will be inserted as per the example below:
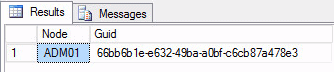
Figure 3: Sample SQL Table
To generate a new GUID, you must use the “NEWUID ()” function in this way:
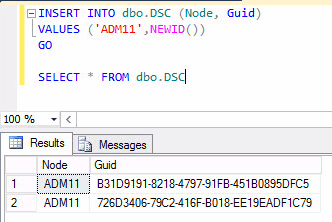
Figure 4: Generate GUID in SQL Server
If you want to go further in this method, I recommend starting with another article here on Simple-Talk: Practical PowerShell for SQL Server Developers and DBAs by Michael Sorens.
Automating deployment
We now have three different methods to generate a GUID, to associate it with its node and store it permanently. The idea is to get this information and to automate the publication of the MOF files on the Pull Server. We saw in the previous chapter the steps required to publish these files:
- Create a DSC configuration
- Generate the MOF files
- Create the “Checksum” files
- Finally, copy all files to the pull server
This article is aimed at being as generic as possible for all readers, so I have chosen to detail the first method which seems to me accessible to everyone. For this, I have automated the deployment process of a MOF file with the following script. This is pretty basic and is divided into four sections:
- # PART1: Contains parameters that will be passed to the script: the filename and path of the CSV file, what to do (create, add, or publish) and finally the name of the node.
- # PART2: Contains the DSC configuration to be applied to the node.
- # PART3: Contains the “Create / Add / Publish” functions used in the following section.
- # PART4: Contains the available actions that the user indicates via the script parameter. It can create the CSV file, update it or publish the DSC configuration on the node.
|
1 2 3 4 5 6 7 8 9 10 11 12 13 14 15 16 17 18 19 20 21 22 23 24 25 26 27 28 29 30 31 32 33 34 35 36 37 38 39 40 41 42 43 44 45 46 47 48 49 50 51 52 53 54 55 56 57 58 59 60 61 62 63 64 65 66 67 68 69 70 71 72 73 74 75 76 77 78 79 80 |
#### PART 1 -Script parameters #### param( [string] $FileName = "DSC-Nodes.csv", [string] $FilePath = "C:\Temp", [Parameter(Mandatory=$true)][string] $Action = "", [string] $Node = "" ) #### PART 2 - DSC Configuration #### Configuration DeployHostFile { Param( [Parameter(Mandatory=$True)] [String[]]$NodeGUID ) Node $NodeGUID { File CopyHostFile { Ensure = "Present" Type = "File" SourcePath = $SourceFile DestinationPath = $DestinationFile } } } #### PART 3 - Functions #### Function CreateCSVFile { Param ([string] $FileName = "DSC-Nodes.csv",[string] $FilePath = "C:\Temp") New-Item -Type file -Name $FileName $FilePath "name,guid" | Add-Content -Path $FilePath\$FileName -PassThru Write-Host "$FilePath\$FileName created!" -ForegroundColor Green } Function AddContentToCSVFile { Param ( [string] $Node = "", [string] $GUID = "", [string] $CSVFile = "C:\Temp\DSC-Nodes.csv" ) "$Node,$GUID" | Add-Content -Path $CSVFile -PassThru } Function PublishMOFFiles { Param ([Parameter(Mandatory=$true)][string] $Node = "",[string]$CSVFile = "C:\Temp\DSC-Nodes.csv") Write-Host "Checking node = GUID and creating MOF File in C:\" -ForegroundColor Cyan $guidImportCSV = Import-Csv $CSVFile $Obj = New-Object PSObject ForEach ($guidImport in $guidImportCSV) { Write-host $guidImport.Name -ForegroundColor Cyan $Obj | Add-Member -Name Name -MemberType NoteProperty -Value $guidImport.Name $Obj | Add-Member -Name GUID -MemberType NoteProperty -Value $guidImport.Guid } $NodeGuid = ($obj | Where-Object { $_.Name -match $Node }).guid DeployHostFile -NodeGUID $NodeGuid Set-Location .\DeployHostFile Write-Host "Creating checksums..." -ForegroundColor Cyan New-DSCCheckSum -ConfigurationPath . -OutPath . -Verbose -Force Write-Host "Copying configurations to pull server..." -ForegroundColor Cyan $SourceFiles = ".\*.mof*" $TargetFiles = "C:\Program Files\WindowsPowershell\DscService\Configuration" Move-Item $SourceFiles $TargetFiles -Force } #### PART 4 - List of available actions #### switch ($Action) { Create {CreateCSVFile -FileName $FileName -FilePath $FilePath} Add {AddContentToCSVFile -Node $Node -GUID ([guid]::NewGuid()) -CSVFile "$FilePath\$FileName"} Publish {PublishMOFFiles -Node $Node} default {Write-Host "The action could not be determined." -ForegroundColor Red} } |
|
1 2 3 4 5 6 7 8 9 10 11 12 13 14 15 16 17 18 19 20 21 22 23 24 25 26 |
PS C:\DSC> .\PublishMofFile.ps1 -Action Create Directory: C:\Temp Mode LastWriteTime Length Name ---- ------------- ------ ---- -a--- 5/25/2016 9:06 PM 0 DSC-Nodes.csv name,guid C:\Temp\DSC-Nodes.csv created! PS C:\DSC> .\PublishMofFile.ps1 -Action Add -Node ADM01 ADM01,e63f9237-51f0-4fcf-93bc-ee1d7a632bb5 PS C:\DSC> .\PublishMofFile.ps1 -Action Publish -Node ADM01 Checking node = GUID and creating MOF File in C:\ ADM01 Directory: C:\DSC\DeployHostFile Mode LastWriteTime Length Name ---- ------------- ------ ---- -a--- 5/25/2016 9:07 PM 1296 e63f9237-51f0-4fcf-93bc-ee1d7a632bb5.mof Creating checksums... VERBOSE: Create checksum file 'C:\DSC\DeployHostFile\e63f9237-51f0-4fcf-93bc-ee1d7a632bb5.mof.checksum' Copying configurations to pull server... |
In order not to use the CSV file, the script should be modified to search the GUID either in the Active Directory, Hyper-V or in the SQL Server database. This script is a very basic example. Of course this can be improved or optimized its content, but the goal was to give you a start in automating a deployment.
Monitor your nodes
It is important to monitor progress in order to anticipate potential problems. DSC PowerShell is no exception to the rule. It is important to follow the deployment of your configurations and especially the compliance of your nodes. How would you know if a node has recovered its configuration, or the time at which the node queried the Pull server? Well, that is the role of the compliance server to notify you with this sort of information.
To get started, you’ll need to know the address to access the compliance server. Here is the URL structure: http://<computername>:<portnumber>/PSDSCComplainceServer.svc. To adapt it to your network environment, you must read the section on DSC configuration of the previous article. Herewith is the extract:
|
1 2 3 4 5 6 |
xDscWebService PSDSCComplianceServer { Ensure = "Present" EndpointName = "PSDSCComplianceServer" Port = 9080 [...] |
So, in my environment, the URL is: http://DSC01:9090/PSDSCComplianceServer.svc and you will get the following result:
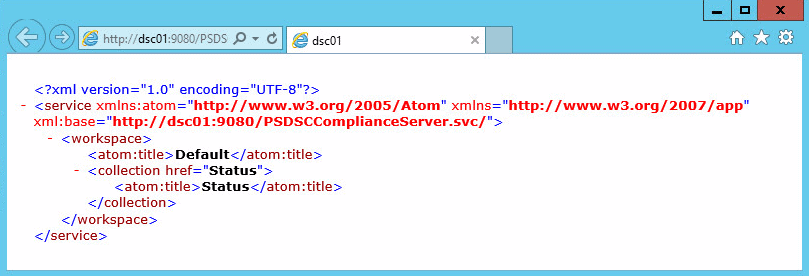
Figure 5: Compliance Server Web Access
Note: If you get “Access Denied” message, try this cmdlet followed by a reboot:
|
1 |
PS C:\> Add-WindowsFeature web-Windows-Auth |
If it’s still not working, then enable anonymous authentication in IIS:
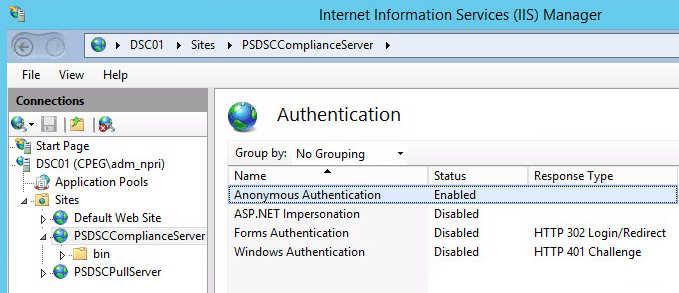
Figure 6: Enable Anonymous Authentication
The “Status” method provides the status of each node that downloads its configuration from the pull service. Thus, via the following URL, you will get all the nodes in the inventory Pull service: http://DSC01:9090/PSDSCComplianceServer.svc/Status
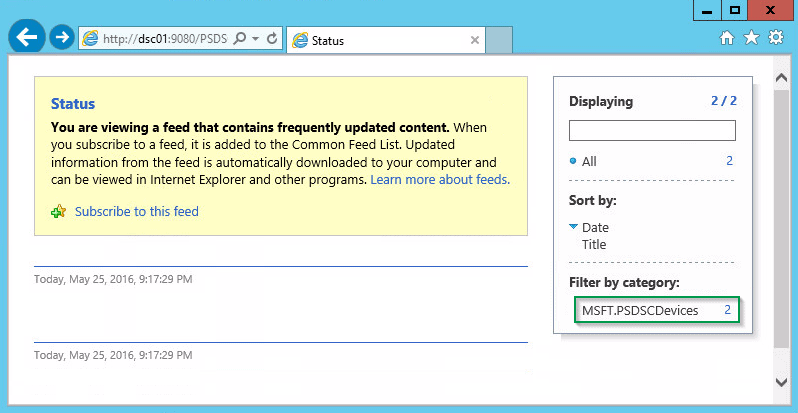
Figure 7: The status method
It is possible to obtain more information about each node with the following properties:
- TargetName: Node name.
- ConfigurationID: Configuration ID associated with the node.
- StatusCode: The status of very last pull operation on the node.
- NodeCompliant: Chck if the node configuration is in sync with the Pull server or not.
- ServerCheckSum: Checksum of the configuration mof file stored on the pull server.
- TargetCheckSum: Checksum of the configuration mof file that was applied on the code.
- LastComplianceTime: Last time the node ran the configuration successfully.
- LastHeartbeatTime: Last time the node connected to Pull server/
- Dirty: True if node status was recorded in the datatse, and false if not.
How to get these properties? Just use $metadata : http://DSC01:9090/PSDSCComplianceServer.svc/$metadata
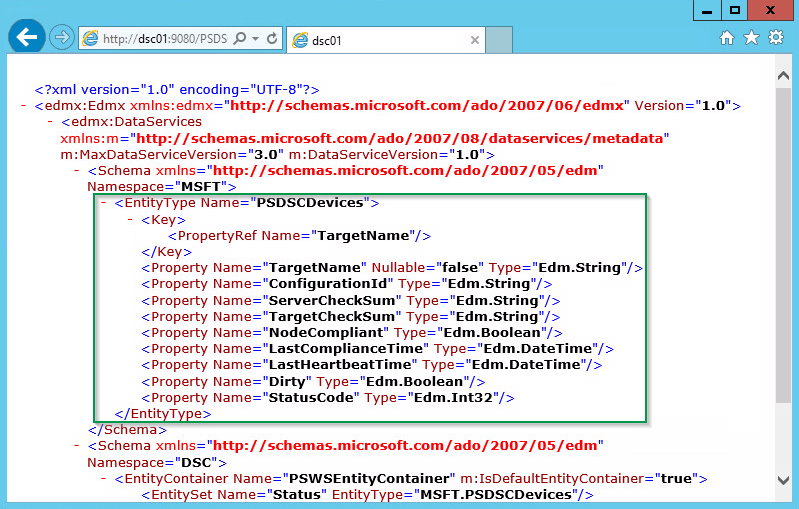
Figure 8: The status properties
Note: $metadata is case sensitive.
With these few commands lines published on the Windows PowerShell Blog, it is easy to get the information about nodes:
|
1 2 3 4 5 6 7 8 9 |
$response = Invoke-WebRequest -Uri $Uri -Method Get -ContentType $ContentType -UseDefaultCredentials -Headers @{Accept = $ContentType} If ($response.StatusCode -ne 200) { Write-Host "node information was not retrieved." -ForegroundColor Red } $jsonResponse = ConvertFrom-Json $response.Content $jsonResponse.value | fl * |
I can now obtain the status of my two nodes:
|
1 2 3 4 5 6 7 8 9 10 11 12 13 14 15 16 17 18 19 20 21 22 23 |
TargetName : 172.16.101.20 ConfigurationId : 18ca85b8-1500-4aca-8f05-fbf61c1f48b0 ServerCheckSum : 2D105D808143E887E9795BCC85FAD7039F32B5A7E9F6F0B49624BEE5F3AA5B6A TargetCheckSum : 2D105D808143E887E9795BCC85FAD7039F32B5A7E9F6F0B49624BEE5F3AA5B6A NodeCompliant : True LastComplianceTime : 2016-05-25T19:39:26.9560578Z LastHeartbeatTime : 2016-05-25T19:39:26.9560578Z Dirty : True StatusCode : 0 TargetName : 172.16.102.20 ConfigurationId : 4aa09541-82d7-491f-9408-a1fa10757734 ServerCheckSum : EC19F900F14E95766C6E9E796FE741CA4CDD6DFFBFD3F0667F41D716E2319D77 TargetCheckSum : EC19F900F14E95766C6E9E796FE741CA4CDD6DFFBFD3F0667F41D716E2319D77 NodeCompliant : False LastComplianceTime : 2016-05-25T18:39:01.7295103Z LastHeartbeatTime : 2016-05-25T18:39:01.7295103Z Dirty : True StatusCode : 0 |
Note: “StatusCode=0” means “Pull operation was successful”.
Now let your creative imagination run free, and you can easily format your results in HTML:
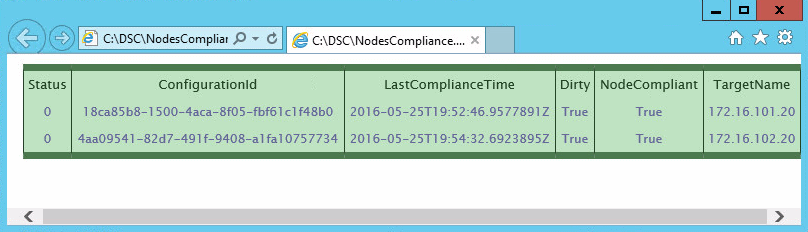
Figure 9: HTML output
|
1 2 3 4 5 6 7 8 9 10 11 12 13 14 15 16 17 18 19 20 21 22 23 24 25 26 27 28 29 30 31 32 33 34 35 36 37 |
$Uri = "http://DSC01:9080/PSDSCComplianceServer.svc/Status" $response = Invoke-WebRequest -Uri $Uri -Method Get -ContentType "application/json" -Headers @{Accept = "application/json"} if($response.StatusCode -ne 200) { Write-Host "Node information was not retrieved." -ForegroundColor Red } $jsonResponse = ConvertFrom-Json $response.Content $jsonResponse.value | fl * $HTMLReport = @() foreach ($response in $jsonResponse.value) { $obj = New-Object PSCustomObject -Property @{ TargetName = $response.targetname; NodeCompliant = $response.nodecompliant; LastComplianceTime = $response.LastComplianceTime; Dirty = $response.dirty; Status = $response.statuscode; ConfigurationId = $response.ConfigurationId; } $HTMLReport += $obj } ### $css= "<style>" $css= $css+ "BODY{ text-align: center; background-color:white;}" $css= $css+ "TABLE{ font-family: 'Lucida Sans Unicode', 'Lucida Grande', Sans-Serif;font-size: 12px;margin: 10px;width: 100%;text-align: center;border-collapse: collapse;border-top: 7px solid #4A794E;border-bottom: 7px solid #4A794E;}" $css= $css+ "TH{font-size: 13px;font-weight: normal;padding: 4px;background: #BDE3C1;border-right: 1px solid #234526;border-left: 1px solid #234526;color: #234526;}" $css= $css+ "TD{padding: 4px;background: #BDE3C1; border-right: 1px solid #234526;border-left: 1px solid #234526;color: #669;hover:black;}" $css= $css+ "TD:hover{ background-color:#234526;}" $css= $css+ "</style>" ### $HTMLReport | Convertto-HTML -Head $css | Out-File ".\NodesCompliance.html" |
Conclusion
This article was intended to highlight that the management of MOF files is the most difficult part of the pull mode. To deal with this, you can use a basic method (CSV file) or more advanced technique (Active Directory, SQL, Virtual Machine) based on your technical environment. The important thing is to use a method that works for you and with which you are comfortable.
On the other hand, it is important to follow the deployment of your DSC configurations and the compliance of your nodes. For this, the “Compliance server” component must be checked regularly to get the deployment status of your nodes.
Keep in mind that DSC is a recent technology, and that certain aspects are more complex than others to use. However, several scripts and tools are appearing that simplify its management.
Load comments