
When you have Exchange Server 2003 running in your office you might well be thinking about upgrading to a newer version for whatever business justification you have. But instead of moving to Exchange 2010 on-site (called “on-premises” by Microsoft), Office 365 might be an interesting solution as well. I am not going to discuss the pros and cons of Office 365, or talk about the business justification of Office 365. In this article I will explain the steps it takes to move to Office 365, after you have made the business decision to do so…
Introduction
This article is written around an imaginary corporation called Inframan. At Inframan they use Exchange Server 2003 in a front-end and back-end scenario and Exchange Server 2003 is published to the Internet using Microsoft Threat Management Gateway (TMG) 2010 which was recently upgraded from Microsoft ISA Server 2006. The Outlook clients were recently upgraded to Outlook 2010 and these Outlook clients are running on the internal network but employees do take their laptops home and use RPC over HTTPS (now called Outlook Anywhere) to access their Mailbox. Other services that are offered are webmail (OWA) and iPhone and Windows Phone 7 clients. The latter are using Exchange ActiveSync to access the user’s mailboxes.
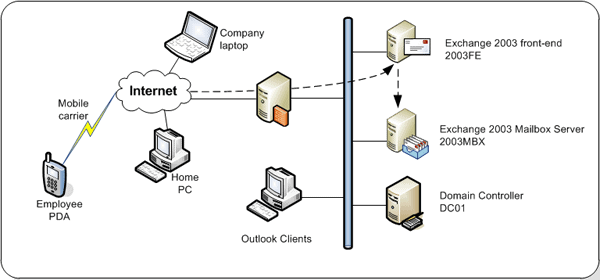
Figure 1. Global overview of the Inframan environment
Note. Public Folders are not offered in Office 365, therefore Outlook 2003 clients cannot be used with Office 365!
In this article I assume that all Mailboxes in the Inframan organization will be moved to Office 365 and that the Exchange Server 2003 servers will be decommissioned. However, in a future article I will explain what it takes to create a coexistence scenario with Exchange on-premises and Exchange Online, combined with a Single Sign-On (SSO) solution.
Exchange Online
Office 365 contains of three integrated Microsoft products offered in the cloud:
- Exchange Online;
- Lync Online; and
- Sharepoint Online.
I have written before about Exchange Online here on Simple-Talk. So, for a detailed description on how to create a new subscription and to configure Exchange Online I can refer you to these articles: Microsoft Office 365 Beta: First Look and Managing Office 365.
To move mailboxes from the on-premises Exchange 2003 environment to Exchange Online there are two possible ways:
- Manual Move – PST files are used to actually migrate to data manually from the on-premises Exchange 2003 environment to Exchange Online. It is relatively easy, but it is only doable when there aren’t too many mailboxes because it is very labor intensive. You also have to take into account that options like delegates and permissions are not migrated using the PST option ;;
- Automated Move – Using this method mailboxes are moved online from the on-premises Exchange Server 2003 environment to Exchange Online. It takes more work in advance to get everything in place, but moving the mailboxes is way easier. There are two ways to automate a move: use the move mailbox option from the Exchange Control Panel or using a directory synchronization tool.
Note. These options are available for Exchange 2003, 2007 and 2010. In this article I’m focusing on a migration from Exchange 2003 to Office 365. For other Exchange versions the steps are basically the same.
Move Mailboxes Manually
Move mailboxes manually is the most simple method you can think of. Of all mailboxes that are available on Exchange 2003, PST files will be created. The easiest way to achieve this is using the ExMerge tool which allows you export Mailbox content from the Exchange 2003 server directly into PST files. You have to plan this carefully though to prevent inbound mail entering the Exchange 2003 mailboxes after the PST files for the migration are created.
A proper order to do a manual move would be:
- Create an Office 365 subscription and register your primary SMTP domain;
- Register the Autodiscover DNS entry in your public DNS;
- Create the user Mailboxes in Office 365;
- Switch the MX records to Office 365 so inbound mail from the Internet is delivered into the Office 365 mailboxes;
- Configure the Outlook 2007/2010 mailboxes to use Office 365;
- Export the Exchange 2003 mailboxes to PST files;
- Import the PST files into the appropriate Office 365 mailboxes;
- Decommission Exchange 2003.
Again, for the first five steps in this list I refer you to the Simple-Talk articles I mentioned before. At this point your users should now be able to use Outlook 2007/2010 in combination with the Office 365 mailboxes.
Step 6 is to export the content from the user’s mailboxes in Exchange 2003. The easiest way is to use the ExMerge tool to accomplish this. Logon to the Exchange 2003 server and use the ExMerge tool to connect to the Exchange Server’s Information Store to extract all mailbox data as long as the mailboxes are less then 1.8GB in size of course!.
When all the PST files have been gathered you have to connect the appropriate PST files to the user’s Outlook and import it into their mailboxes. Once imported Outlook will synchronize in the background with Office 365 until the message “all folders are up to date” appears in Outlook 2007/2010. When done Exchange 2003 can be decommissioned and you’re all set.
This approach is very labor intensive and only doable for a few mailboxes in Exchange 2003. If there are more mailboxes you will need an automated way to move the mailboxes from Exchange 2003 on-premises to Exchange Online in Office 365.
Simple Exchange Migration
There’s an automated tool available in Office 365 ECP (Exchange Control Panel) you can use to migrate all Mailboxes from your existing Exchange environment (which can be Exchange 2003 or higher) to Office 365. This method is referred to as a Cutover Exchange Migration.
Note. This is not the same as a Directory Synchronization or hybrid configuration, this will be covered in a future article.
In a Cutover Exchange Migration, the migration tool will:
- Provision all mailboxes in Office 365 according to the information found in the on-premises Exchange 2003 environment;
- Migrate all messages, contacts and calendar items to Exchange online;
- Synchronize the on-premises Exchange 2003 mailboxes with the Exchange Online mailboxes every 24 hours until the switch is made from on-premises Exchange 2003 to Exchange Online.
In our Inframan environment an Office 365 E3 subscription and accompanying management account is created. Using this account the Inframan.nl SMTP domain is created and validated using the validation tool. After validation, Exchange Online is specified as domain services in the Office 365 Management tool.
During provisioning and configuring of the SMTP domain the DNS settings are also shown. It is a good thing to write this down, but not to configure this at this point since all messaging is still handled by the on-premises Exchange 2003 environment.
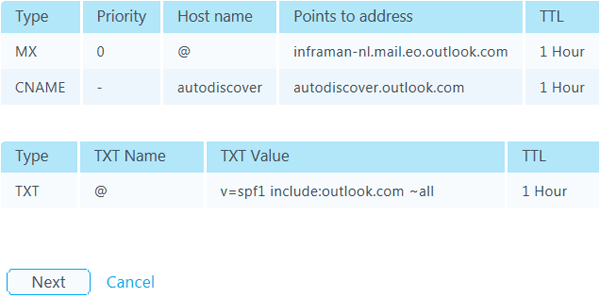
Figure 2. DNS Settings of Exchange Online, but these should not be configured at this point.
To provision all mailboxes, distribution groups and contacts the migration tool can be used. The migration tool uses Outlook Anywhere, formerly known as RPC over HTTP to connect to the Inframan Exchange 2003 environment. For accessing the individual mailboxes a service account (needs to be created in advance!) is used and this account needs the Full Access (including Receive As) permission on the Mailbox Database where the mailboxes reside. To grant this service account access to all mailboxes please consult Microsoft knowledge base article 821897: How to assign service account access to all mailboxes in Exchange Server 2003.
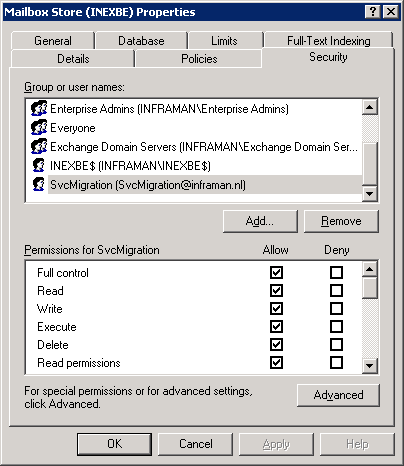
Figure 3. Grant the Receive As permission to the migration service account
To start the migration tool logon as the Exchange Online administrator and go to the options pages (Exchange Control Panel). In ECP select Manage my Organization and click on E-mail migration:
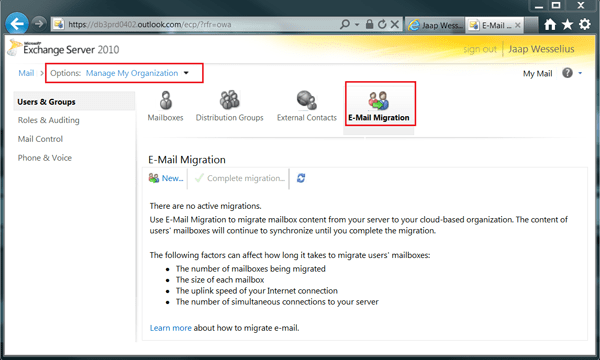
Figure 4. The E-mail migration tool is part of the Exchange Control Panel.
Since Inframan is using Exchange 2003, there’s no autodiscover functionality available in the on-premises Exchange organization so all connection settings have to be specified manually.
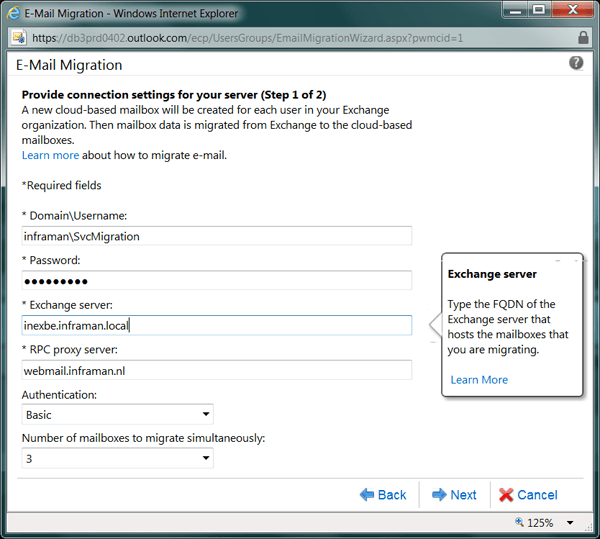
Figure 5. When migrating from Exchange 2003 all settings have to be specified manually.
The service account information needs to be entered and the Exchange Server (the back-end server that hosts the mailboxes) and the RPC proxy server (the front-end server that’s offering Outlook Anywhere to the Internet).
When you click Next the connection to the on-premises Exchange environment is tested. When successful the batch is shown, including the number of mailboxes found in the on-premises environment. You can also select an additional mailbox where a copy of the migration results is sent to:
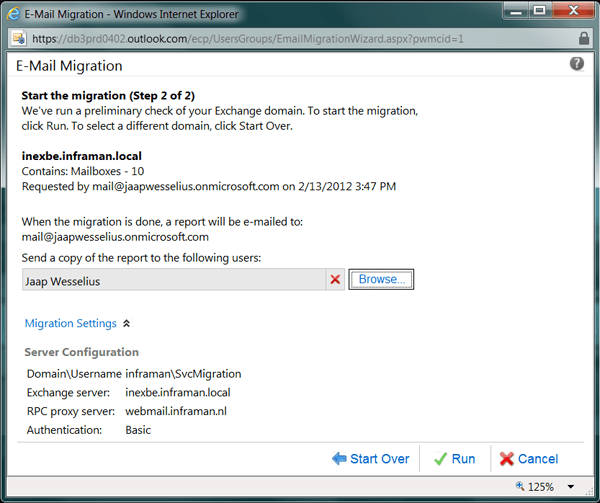
Figure 6. Before the initial migration is started an overview of all settings is shown.
When everything is ok, click Run to start the migration. The mailboxes, contacts and Distribution Groups will be read from the on-premises environment and will be created in Exchange Online. Once created, the tool will use Outlook Anywhere to log into the various mailboxes and copy all the data from the Exchange 2003 mailboxes into the Exchange Online mailboxes. Depending on the amount of data this can take a considerable period of time.
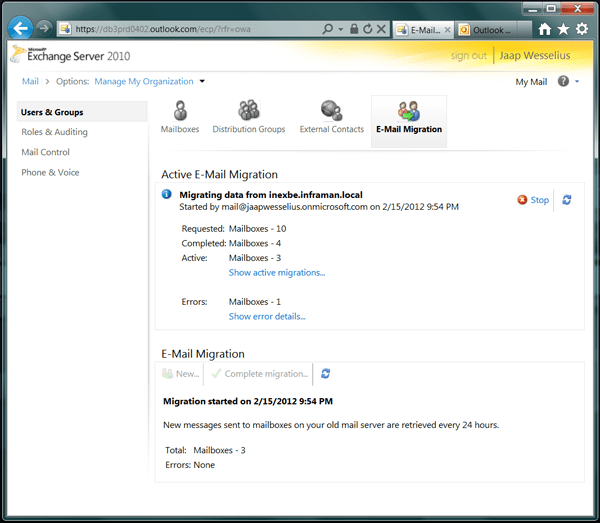
Figure 7. The status of the migration is shown in the Control Panel.
For more detailed information about the migration at a certain moment you can click on Show Active Migrations you can see the details of the migration. Once the migration run is finished an e-mail is sent from the migration tool with the results of the migration. Obviously one Inframan mailbox failed during migration:
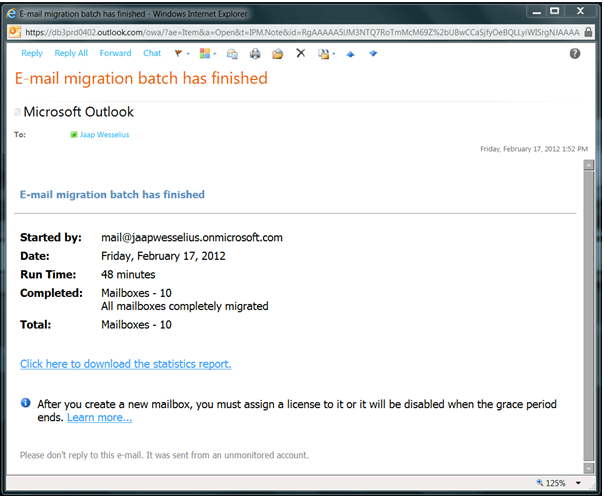
Figure 8. After the migration a status report is sent
Now all data is copied over from the Inframan on-premises Exchange 2003 environment to the new Exchange Online environment, but the on-premises environment is still the active environment. New mail is still delivered here and all users still connect to this environment. Once every 24 hours a new synchronization pass is performed by the migration tool to keep both environments up-to-date.
Before the migration is finalized some details regarding the newly created users has to be entered in the management console, for example the assigned roles, the sign-in status and the location of the users. Also very important to set are the licensing options:
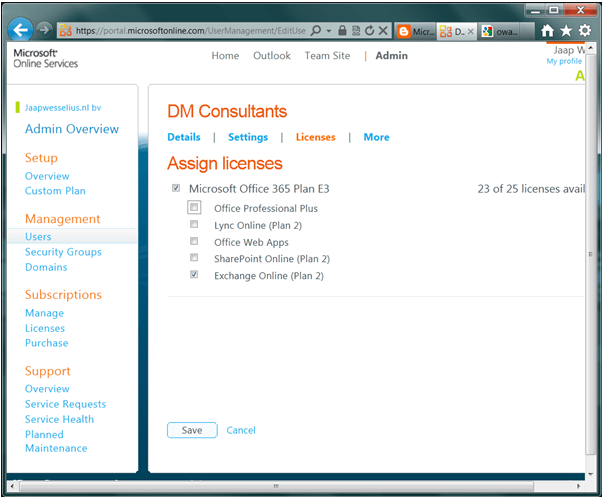
Figure 9. Don’t forget to set the appropriate licenses for the newly created users!
Finalize migration
At one point the migration has to be finished, this is the ‘cut-over moment’. To accomplish this, the following actions have to be completed:
- Set MX records, Autodiscover record and SPF record to point to Office 365. This way new SMTP message are no longer delivered to the on-premises environment but to the Office 365 environment. The information is on the Microsoft Online Portal (see Figure 2);
- Reconfigure the mail clients to use the Office 365 mailboxes;
- Finalize the Exchange migration.
To finalize the Exchange migration, logon to the Office 365 Administrator Mailbox, open the Exchange Control Panel and navigate to the E-mail migration, just like in Figure 4. Click on Complete Migration to finalize the migration.
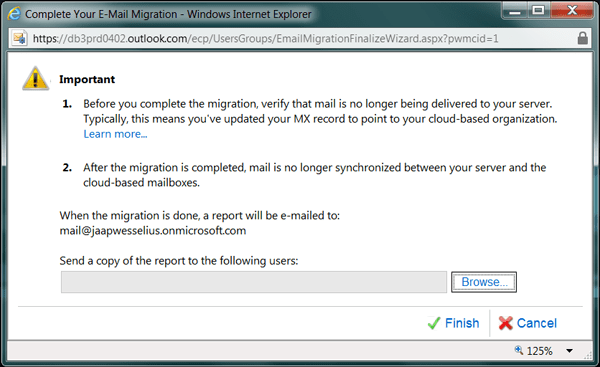
Figure 10. Finalize the Exchange migration
All remaining mailbox content (added since the last synchronization) is now copied over the corresponding Exchange Online mailboxes and the daily synchronization is stopped. At this point there’s no more activity going on in the on-premises Exchange 2003 environment. The Exchange 2003 environment can now be decommissioned.
Conclusion
In this article I showed you how to migrate a (small) organization from an on-premises Exchange 2003 environment to Office 365 using the built-in migration tool. This is called a ‘cut over migration’. All mailbox data is copied over the Office 365 and at a certain moment you ‘cut over’ the messaging service from the on-premises Exchange 2003 environment to Office 365.
In my next article I will discuss a more tight integration between an on-premises Exchange environment with Office 365 where both directories are connected, one GAL is used with mailboxes both in Office 365 and on-premises and with a Single Sign-On (SSO) solution.
Load comments