
Disk quotas have been available in Windows since Windows 2000 was released, and could be used by administrators to limit the amount of space users could use on an NTFS volume. Disk quotas are based on file ownership rather than folder structure and because of this they are not particularly useful in all situations. For example, if your server had a single storage volume and you need to apply quotas to different folders on the volume then disk quotas will not help.
File system quotas, which were first introduced in Windows Server 2003 R2, and are a part of the File Server role in Windows Server 2008 (and Windows Server 2008 R2), offer many benefits over disk quotas. With file system quotas we can set quotas for specific folders on the volume, we can use templates to ensure consistent application of quotas, and we can set quotas which are automatically applied to all sub-folders of a folder.
Additionally, file system quotas are useful not just for limiting the amount of space users can consume, but also for reporting on space used – quotas can be set with so-called “soft” limits which are used for monitoring rather than enforcing limits. This functionality can be extremely useful for quickly determining which users or folders are consuming large amounts of disk space on a file server.
Quota thresholds can be configured so that users or administrators receive notifications when quotas have been reached or are about to be reached. Multiple thresholds can be configured for individual quotas, and actions can include sending e-mail messages, logging to the Windows event log, running commands or scripts, or generating storage reports.
In Windows Server 2008 file system quotas are managed with the File Server Resource Manager (FSRM) console (which is installed as a role service in the File Services role), the command line utility dirquota, or with Windows PowerShell using a COM API.
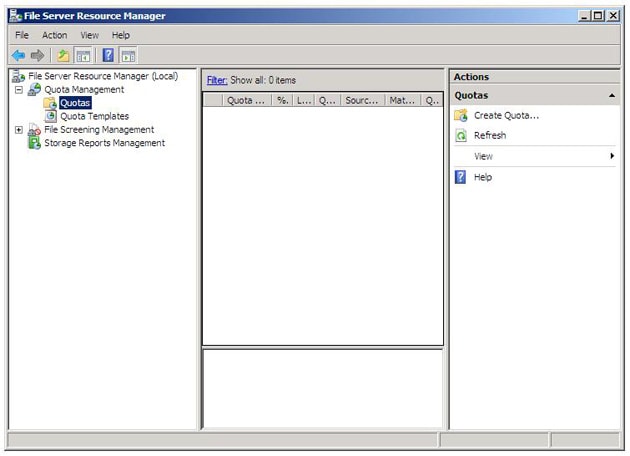
Figure 1: Windows Server 2008 File Server Resource Manager
There are two kinds of quota available – hard quotas which set a limit and enforce it, and soft quotas which set a limit but only report on it. Soft quotas are useful for monitoring disk space use. Quotas are commonly applied using quota templates, which are a mechanism for easily applying the same quota settings to one or more folders. Quota Templates are the recommended way to configure quotas and FSRM includes some example templates which cover a range of scenarios, including using both hard and soft quota types.
Before we start to configure quotas which will generate e-mail messages, the quota File Server Resource Manager needs to be configured with an SMTP server, and optionally, the default administrator recipients, and the default “from” address.
Like all aspects of quota management, the FSRM settings can be applied using three different tools and you can choose the method appropriate to your needs.
To configure FSRM using the FSRM console:
- Launch the File Server Resource Manager
- Select the root node, labelled “File Server Resource Manager”
- In the Action Pane click “Configure Options…”
- Enter an SMTP server and if desired configure the other settings
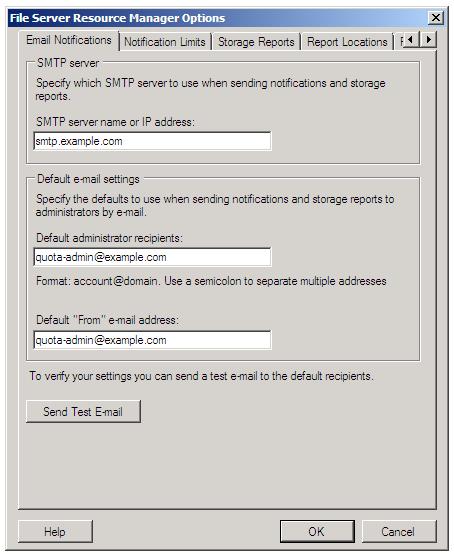
- Click the “OK” button
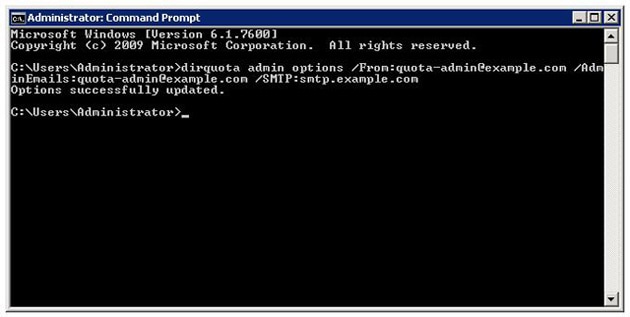
To configure FSRM using the command line:
- Open an elevated command prompt window
- Enter the command “dirquota admin options /From:quota-admin@example.com /AdminEmails:quota-admin@example.com /SMTP:smtp.example.com”
To configure FSRM using Windows PowerShell:
- Open Windows PowerShell
- Enter these commands (or save them as a script and run it):
|
1 2 3 4 5 6 7 8 9 10 11 |
# Create a new COM object to access the FSRM settings $fsrm = New-Object -com Fsrm.FsrmSetting # Set the default administrators e-mail address $fsrm.AdminEmail = "quota-admin@example.com" # Set the from address $fsrm.MailFrom = "quota-admin@example.com" # Set the SMTP server $fsrm.SmtpServer = "smtp.example.com" |
Quota Example – Home directories with a 5GB limit
A common use of file system quotas is to put limits on the size of user’s personal storage space (folders which are often referred to as home directories) on a file server. The requirements of this scenario are to limit the space each user can use to 5GB, alert administrators when 90% of the quota has been reached, and automatically apply quotas to new home directories. The solution requires the implementation of new quota template and an auto apply quota.
Step 1: Create the new quota template
The first step is to create a new template, which we will use later to apply the quota to the file system. Using a template means we can easily make changes to all folders where we have applied the template quota settings. The template can be created using the FSRM, the dirquota command line tool, or PowerShell, meaning you can choose the tool with which you feel comfortable with and that fits most of your scenarios.
To create the new quota template using the FSRM:
- Launch the File Server Resource Manager
- Expand “Quota Management” -> “Quota Templates”
- In the Action Pane click “Create Quota Template”
- Enter the template name and set the space limit
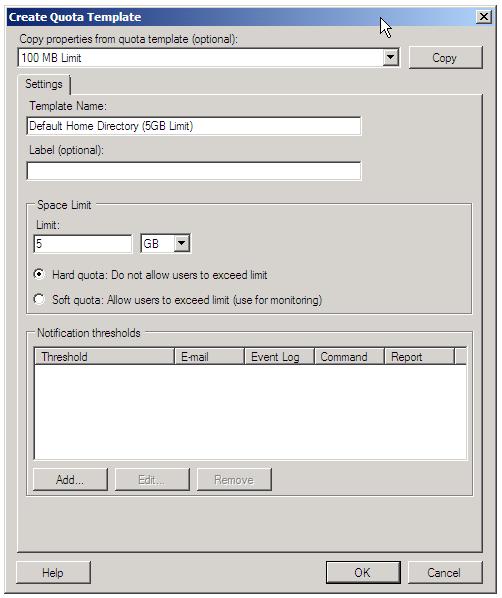
Note: To set a soft quota (for monitoring only) check the “Soft Quota” radio button
- Click the “Add” button to add a notification threshold
- Set the notification percentage to 90, check the “Send e-mail to the following administrators”, and enter an appropriate destination e-mail address. You can also customise the message text.
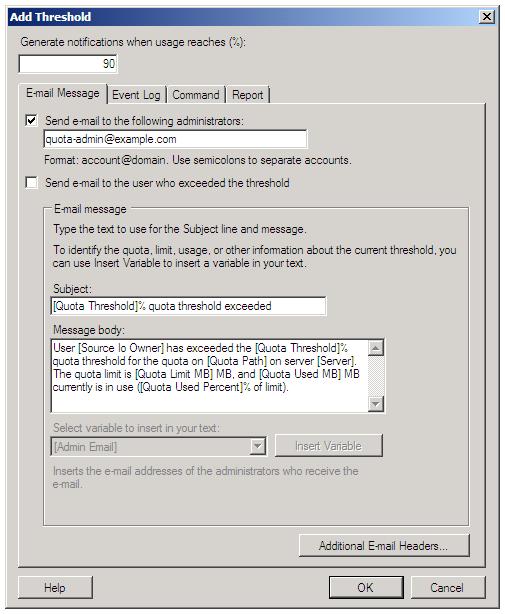
- Click the “OK” button twice
To create the new quota template using the dirquota command line utility:
- Open an elevated command prompt (or Windows PowerShell) window
- Create a text file called notification.txt containing the text of the notification message (an example of this text message can be downloaded from this article)
- Enter this command:
|
1 |
dirquota Template Add /Template:"Default Home Directory (5GB Limit)" /Limit:5GB /Type:Hard /Add-Threshold:90 /Add-Notification:90,M,notification.txt |
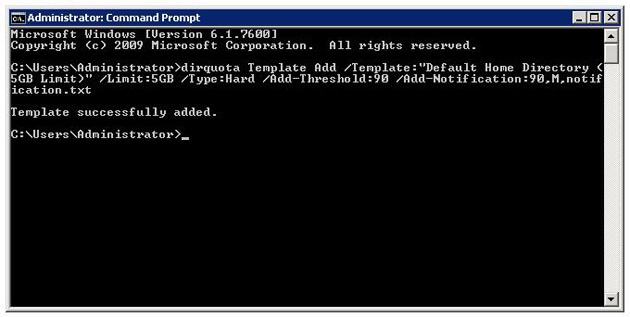
Note: To set a soft quota (for monitoring only) change “/Type:Hard” to “/Type:Hard”
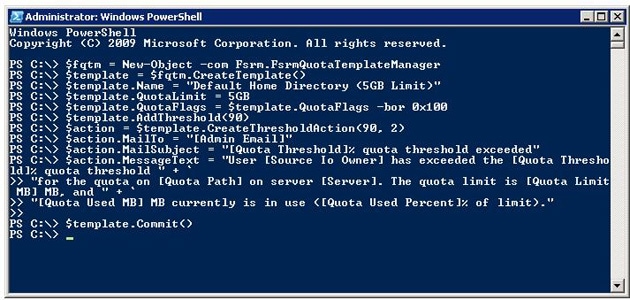
To create the new quota using Windows PowerShell:
- Open Windows PowerShell
- Enter these commands (or save them as a script and run it):
|
1 2 3 4 5 6 7 8 9 10 11 12 13 14 15 16 17 18 19 20 21 22 23 24 25 26 27 28 29 30 31 32 |
# Create a new COM object to access quota templates $fqtm = New-Object -com Fsrm.FsrmQuotaTemplateManager # Create a new template object $template = $fqtm.CreateTemplate() # Set the template's name $template.Name = "Default Home Directory (5GB Limit)" # Set the quota limit $template.QuotaLimit = 5GB # Set the quota type to hard limit (the flag for a hard limit is 0x100) $template.QuotaFlags = $template.QuotaFlags -bor 0x100 # Add a quota threshold $template.AddThreshold(90) # Add a threshold e-mail action $action = $template.CreateThresholdAction(90, 2) # Set the e-mail message recipient $action.MailTo = "[Admin Email]" # Set the e-mail message subject $action.MailSubject = "[Quota Threshold]% quota threshold exceeded" # Set the e-mail message text $action.MessageText = "User [Source Io Owner] has exceeded the [Quota Threshold]% " + ` "quota threshold for the quota on [Quota Path] on server [Server]. The quota limit " + ` "is [Quota Limit MB] MB, and " + ` "[Quota Used MB] MB currently is in use ([Quota " + ` "Used Percent]% of limit)." |
Note: To set a soft quota (for monitoring only) change “$template.QuotaFlags = $template.QuotaFlags -bor 0x100” to “$template.QuotaFlags = $template.QuotaFlags -bxor 0x100” to disable the hard limit flag.
Step 2: Create the Quota
The next step is to use the new quota template to apply the quota to the file system.
In this example we’ll say that the home directories are all subfolders of C:\Home. Because we want any new home folders to automatically have the quota applied we need to create an Auto apply Quota. Auto apply quotas are applied to all existing subfolders and any future folders.
To create the quota using the FSRM:
- Launch the File Server Resource Manager
- Expand “Quota Management” -> “Quotas”
- In the Action Pane click “Create Quota”
- Enter the quota path and choose the appropriate template
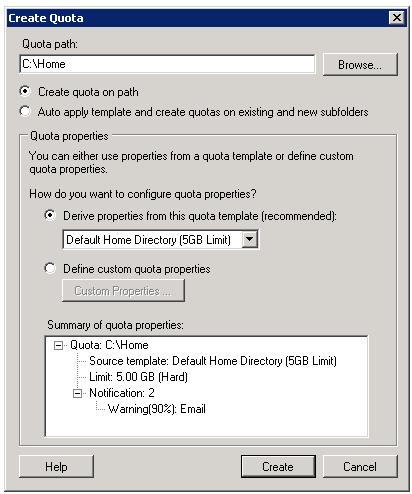
- Click the “Create” button
To create the quota using the dirquota command line tool:
- Open an elevated command prompt window
- Create a text file called notification.txt containing the text of the notification message (an example of this text message can be downloaded from this article)
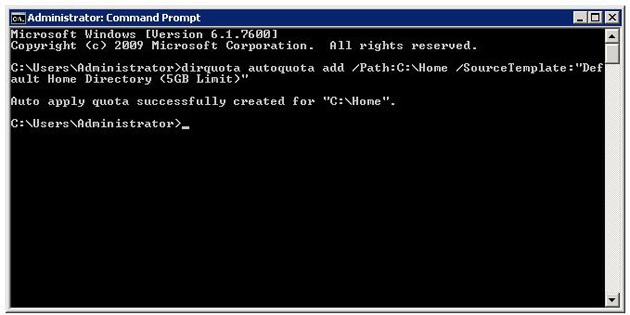
- Enter the command “dirquota autoquota add /Path:C:\Home /SourceTemplate:”Default Home Directory (5GB Limit)””
To create the quota using Windows PowerShell:
- Open Windows PowerShell
- Enter these commands (or save them as a script and run it):
|
1 2 3 4 5 6 7 8 9 |
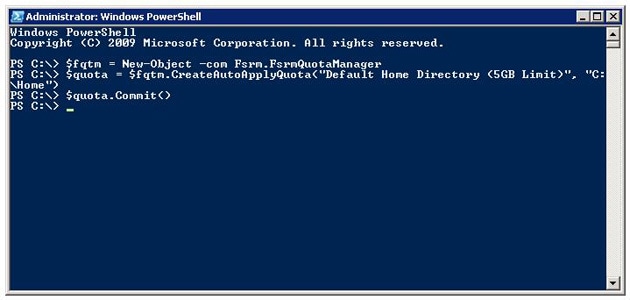
# Create a new COM object to access quotas $fqtm = New-Object -com Fsrm.FsrmQuotaManager # Create the new quota $quota = $fqtm.CreateAutoApplyQuota("Default Home Directory (5GB Limit)", "C:\Home") # Save the new quota $quota.Commit() |
Quota Exceptions / Folder-Specific Quotas
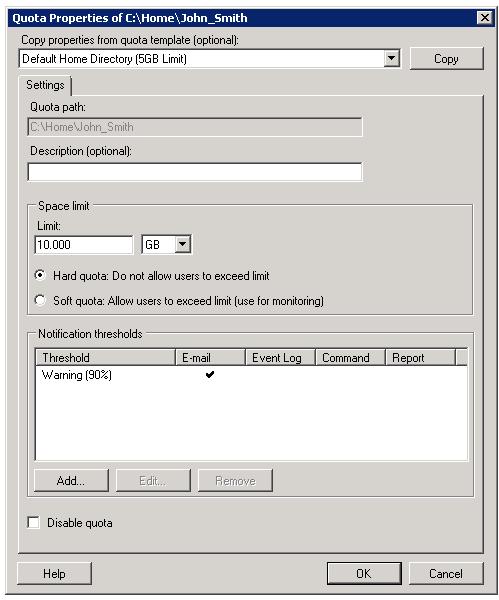
Naturally there will be occasions when a folder needs to be excluded from a template or auto apply quota. In these situations you can easily add a specific quota for that folder to either increase the limit or to disable the quota entirely.
To create the quota exception using the FSRM:
- Launch the File Server Resource Manager
- Expand “Quota Management” -> “Quotas”
- Select the folder you wish to make the exception for
- In the Action Pane click “Edit Quota Properties…”
- Enter new limit for the quota
- Click “OK”
Note: Check the “Disable quota” box to disable the quota
To create the quota exception using the dirquota command line tool:
- Open an elevated command prompt window
- Enter the command …
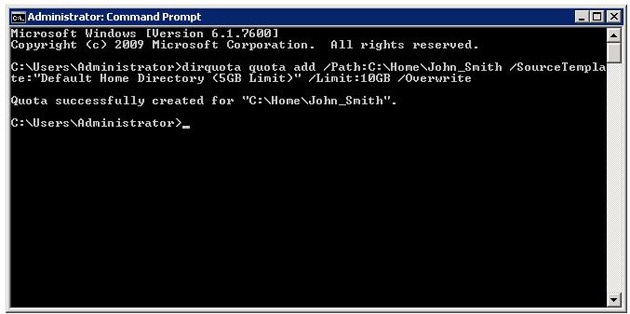
“dirquota quota add /Path:C:\Home\John_Smith /SourceTemplate:”Default Home Directory (5GB Limit)” /Limit:10GB /Overwrite”
Note: To disable the quota append the command with “/status:disabled”.
To create the quota exception using Windows PowerShell:
- Open Windows PowerShell
- Enter these commands (or save them as a script and run it):
|
1 2 3 4 5 6 7 8 9 10 11 12 |
# Create a new COM object to access quotas $fqtm = New-Object -com Fsrm.FsrmQuotaManager # Get the existing quota $quota = $fqtm.GetQuota("C:\Home\John_Smith") # Set the new quota limit $quota.QuotaLimit = 10GB # Save the quota $quota.Commit() |
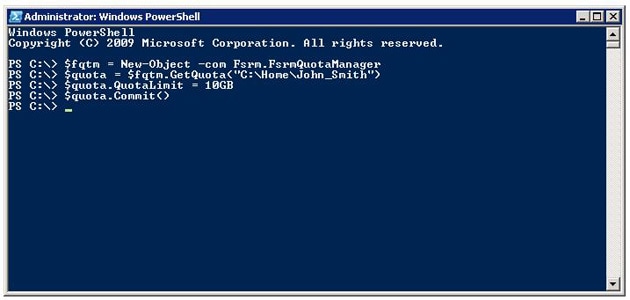
Note: To disable the quota, insert the line “$quota.QuotaFlags = $quota.QuotaFlags -bor 0x200” before saving the quota
How Quotas Affect Clients
When a client maps a network drive to a folder which has a hard quota applied the size of the volume and the amount of available disk space shown is equal to the quota settings.

Figure: Mapped drive showing hard quota limit as volume size
When a hard quota is met or exceeded clients will receive a message telling them that the volume is out of disk space.

Figure: Insufficient disk space message
Viewing Quotas
Administrators can view hard and soft quotas using FSRM, and viewing quotas this way can be a quick method for finding large folders or large consumers of space.
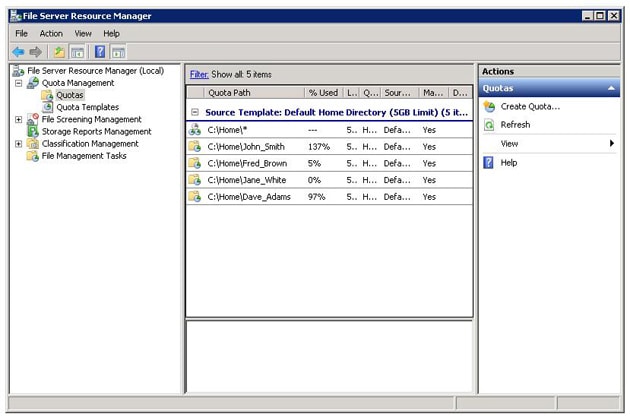
Figure: Quotas in File Server Resource Manager
File system quotas are quick and easy to set up, with three different and flexible methods available for configuring them. Properly applied they can be a good tool to help ensure efficient use of storage resources, a convenient countermeasure against storage waste, and a useful tool for reporting on storage utilisation. There is an IO performance penalty for using quotas, but the benefits will probably outweigh the small performance cost.
- More information about File Server Resource Manager is available in Microsoft TechNet:
http://technet.microsoft.com/en-us/library/cc771092%28WS.10%29.aspx - More information about the dirquota command line tool is also available in TechNet:
http://technet.microsoft.com/en-us/library/cc754836%28WS.10%29.aspx - More information about the COM API for working with FSRM is available in MSDN:
http://msdn.microsoft.com/en-us/library/bb972746%28VS.85%29.aspx
Load comments