
In the first part of this article series, I showed you how to configure Windows to form a Majority Node Set Cluster. Although the procedure that I gave you works well, it is intended for use with Windows Server 2003. You can also host a clustered mailbox server on Windows Server 2008, but the procedure for creating the cluster is quite a bit different from what you saw in the first article. In this article, I want to show you how to create the required cluster on Windows Server 2008.
In the previous article, I spent a long time talking about the hardware requirements for building a cluster, and about the cluster planning process. This same information roughly applies to planning for a Windows Server 2008 cluster. You are still going to need two similar servers with two NICs installed. The requirements for the number of names and IP addresses that I covered in Part 1 also remain the same. Once again, I will be referring to the cluster node that is initially active as Node1, and the node that initially acts as the passive node as Node 2.
Deploying the Failover Cluster Feature
Before you can configure Windows 2008 Servers to act as clusters, you must install the Failover Cluster feature. To do so, begin by opening the Server Manager, and selecting the Features container. Click the Add Features link, and Windows will display a list of the various features that you can install. Select the Failover Clustering check box, as shown in Figure A, and click Next. At this point, you will see a warning message telling you that a server restart will be required. You don’t have to do anything to acknowledge the message though. Just click the Install button to install the feature. When the installation process completes, click Close and reboot your server if necessary. Now, perform this procedure on your second cluster node.

Figure A
Select the Failover Cluster option, and click Next.
The Failover Cluster Management Console
When we set up clustering in Windows Server 2003, we used a wizard for the configuration process, but we had to call the wizard from the command line via the Cluster command. Although the Cluster command still exists in Windows Server 2008, the individual commands that I showed you in Part 1 for invoking the cluster wizard no longer work. The good news is that you no longer have to launch the wizard from the command line. In Windows Server 2008, Microsoft gives us an administrative tool that you can use to perform various clustering functions. You can access this tool by selecting the Failover Cluster Management command from the server’s Administrative Tools menu.
Creating the Cluster
You are now ready to create our cluster. As before, we are going to be creating an active and a passive node, which I will be referring to as Node 1 and Node 2. We can get started by opening the Failover Cluster Management Console on Node 1. When the console opens, click the Create Cluster link, found in the console’s Management section. When you do, Windows will launch the Create Cluster Wizard.
Click Next to clear the wizard’s Welcome dialog, and the wizard will prompt you to enter the names of the cluster nodes. Enter the name of Node 1, and click the Add button. Once Windows validates the server’s name and adds it to the list, repeat the process by entering the name of Node 2 and clicking the Add button. When both cluster nodes have been added to the list, click Next.
You should now see a dialog warning you that Microsoft does not support the use of clusters unless the cluster configuration can be validated. You are now presented with the option of running a validation wizard. Choose the option labeled Yes, When I Click Next, Run Configuration Validation Tests, and Then Return to the Process of Creating the Cluster
Click Next, and the wizard will take you to an introductory dialog, as shown in Figure B,that describes the validation process. Go ahead and click Next to move on. You are now asked if you want to run all of the validation tests, or if you want to select specific tests to run. Choose the option to run all of the tests and click Next. You should now see a screen that confirms the tests that you are about to perform. Click Next to begin the validation tests. When the validation tests complete, you may receive some warnings (particularly in regard to storage), but you should not receive any errors. Click Finish.
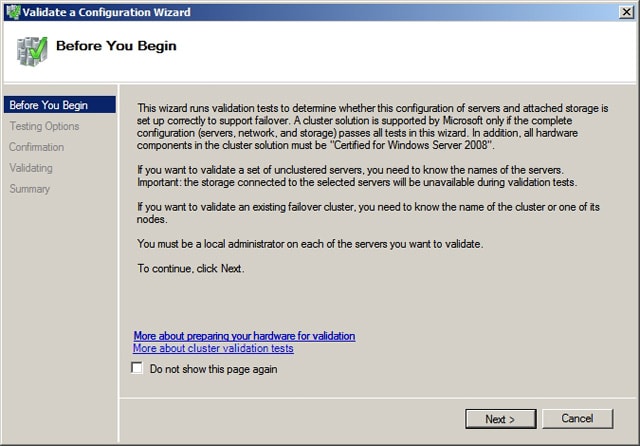
Figure B
This dialog introduces you to the validation tests.
Now that the validation is complete, Windows returns us to the Create Cluster Wizard. At this point, you must enter the name and IP address that you wish to assign to the cluster, as shown in Figure C. Be sure to make note of which names and addresses you use, because you will need to reference them again later on.
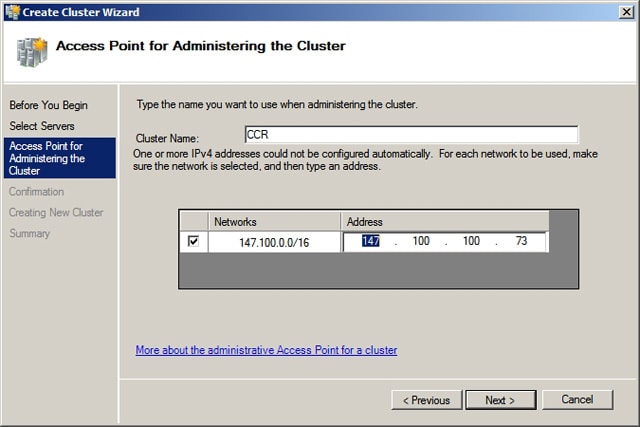
Figure C
Enter the name and IP address that you want to assign to the cluster.
After entering the cluster’s name and IP address, click Next, and you should see a summary screen outlining the details of the cluster that you are creating. Take a moment to read the summary and make sure that everything is correct. Assuming that all is well, click Next, and Windows will create your cluster. When the process completes, click Finish.
Configuring Networking for the Cluster
Now that you have finished creating the cluster, you must make sure that the network adapters are configured properly for the cluster. Windows Server 2008 normally does a pretty good job of automatically configuring the network interfaces for you, but it is still important to double check the configuration.
Navigate through the Failover Cluster Management Console to Failover Cluster Management | <your cluster name> | Networks. You should now see listings for both of your network segments, as shown in Figure D. They should be listed as Cluster Network 1 and Cluster Network 2 respectively.
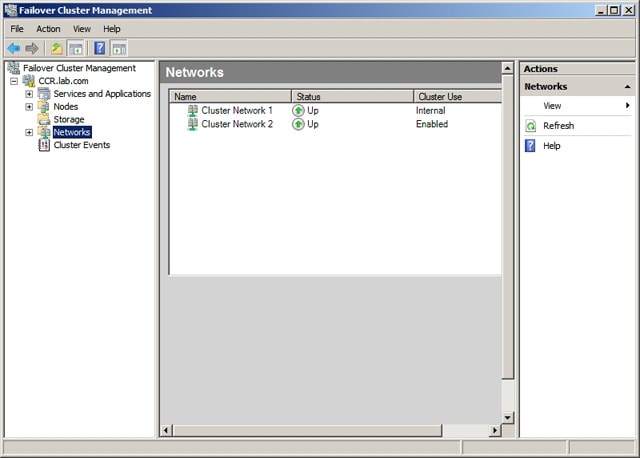
Figure D
Both networks should be displayed in the Failover Cluster Management Console.
Right click on Cluster Network 1, and choose the Properties command from the shortcut menu. When you do, you will see a properties sheet for the connection. Make sure that this is the connection isn’t the private segment that you are reserving for communication between cluster nodes. Now, verify that the Allow Cluster to Use this Connection option is selected You should also make sure that the Allow Clients to Connect Through This Network check box is selected. Click OK to close the properties sheet.
Now, right click on Cluster Network 2, and select the Properties command from the resulting shortcut menu. This network connection should be the private segment that services the cluster nodes. Once again, you want to make sure that the Allow Cluster to Use This Network Connection option is selected. However, the Allow Clients to Connect Through This Network option should not be selected. Click OK to close the properties sheet and return to the Failover Cluster Management Console.
Configure the Node and File Share Majority Quorum
In the previous article, I explained that a majority node set cluster has to have more than two nodes, because otherwise there is no node majority in a failover situation. Since CCR only works on two node clusters though, we need to create a file share witness on our hub transport server. This allows the file share that we create to take the place of the third cluster node.
The first thing that we need to do is to create a share on a hub transport server that can be used as the file share witness. To do so, go to your hub transport server, and open a Command Prompt window. You must now enter the following commands:
|
1 2 3 4 5 6 |
C: CD \ MD FSM_DIR_CCR Net Share FSM_DIR_CCR=C:\FSM_DIR_CCR /Grant:<cluster name>$, FULL CACLS C:\FSM_DIR_CCR /G BUILTIN\Administrators:F <cluster name>$:F |
In the code above, we are granting the cluster access to the FSM_DIR_CCR folder on our hub transport server. You will notice that every time I reference the cluster name, I am putting a dollar sign after the cluster name. The dollar sign tells Windows that we are granting access to a computer account rather than to a user account.
Now that we have prepared our hub transport server, we need to configure the cluster quorum settings. To do so, go back to one of your cluster nodes and open the Failover Cluster Management Console. Once the console opens, right click on the listing for your cluster, and select the More Actions | Configure Cluster Quorum Settings commands from the resulting shortcut menus.
At this point, Windows will launch the Configure Cluster Quorum Wizard. Click Next to clear the wizard’s Welcome screen, and you will be taken to a screen that asks you to select the quorum configuration that you want to use. Choose the Node and File Share Majority (For Clusters With Special Configurations) option, as shown in Figure E, and click Next.

Figure E
Choose the Node and File Share Majority option.
The next screen that you will encounter asks you for the path to the file share that you want the cluster to use. Enter the path to the share that you created earlier in UNC format (\\<your hub transport server’s name)\FSM_DIR_CCR). You can see an example of this in Figure F. Click Next, and the wizard will take you to a confirmation screen. Take a moment to make sure that the information that is presented on this screen appears correct, and then click Next. Windows will now configure the quorum settings. When the process completes, click Finish.
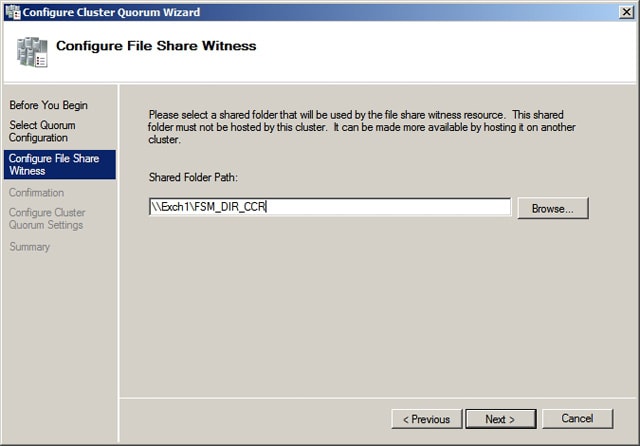
Figure F
Enter the path to the file share that you created.
Installing Exchange Server
Now that we have created our cluster, it is time to install Exchange Server 2007. There are a few things that you need to take into account prior to beginning the installation process.
For starters, I am assuming that both of your cluster nodes have the Exchange Server prerequisites installedYou should also keep in mind is that the Clustered Mailbox Server role cannot coexist on a server with any other Exchange Server roles. This means that at a minimum you will already need to have an Exchange 2007 hub transport server and client access server in place prior to deploying your clustered mailbox server.
One last thing that you need to keep in mind is that if you are going to be installing Exchange onto a Windows Server 2008 based cluster, then you must install Exchange 2007 SP1 or higher. You can’t install the RTM release and then upgrade to SP1 later on. You must start with SP1 or higher. If you are going to be installing Exchange onto Windows Server 2003, then you can install Exchange 2007 with or without the service pack, although it is always preferable to use the latest service pack.
Configuring the Active Node
The process for setting up the active node isn’t all that different from configuring a typical mailbox server. Since we must begin by setting up the active node, you should perform these steps on Node 1.
Begin the installation process by double clicking on Setup.exe. When the Exchange Server 2007 splash screen appears, click on Step 4: Install Microsoft Exchange Server 2007 SP1. This will cause Setup to launch the installation wizard.
The first screen that you will see is really nothing more than a welcome screen. You can just click Nextto skip it. You will now be prompted to accept the server’s license agreement. After doing so, click Next.
The next screen that you will encounter asks you whether or not you want to enable error reporting. Whether or not you want to use error reporting is really up to you. After you make your decision, click Next.
The following screen will ask you if you want to perform a typical Exchange Server installation or a custom installation. You can only configure a clustered mailbox server by performing a custom installation. Therefore, choose the Custom Exchange Server Installation option, and click Next.
You will now be prompted to select the Exchange Server roles that you want to install. Select the Active Clustered Mailbox Server Role check box, as shown in Figure G. When you do, all of the other options will be grayed out, because the clustered mailbox server role cannot coexist with any other Exchange Server role.
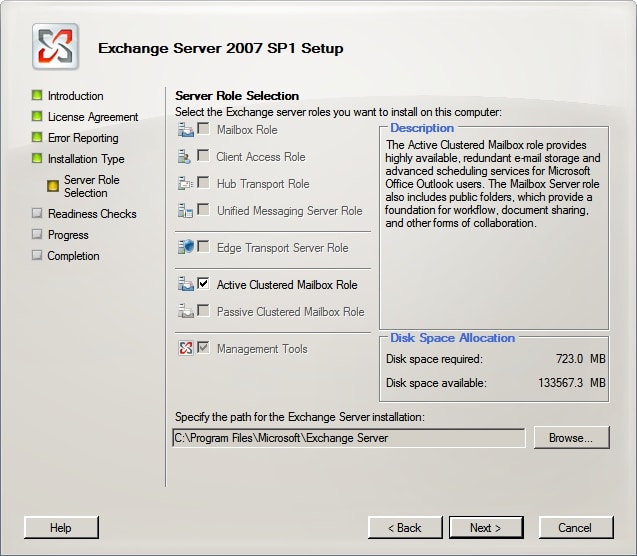
Figure G
Select the Active Clustered Mailbox Role check box.
Click Next, and Setup will ask you what type of clustered mailbox server you want to create. Choose the Cluster Continuous Replication option. Before continuing, you must enter the name that you want to assign to your clustered mailbox server, as shown in Figure H. This is the name that will be unique to Exchange Server.
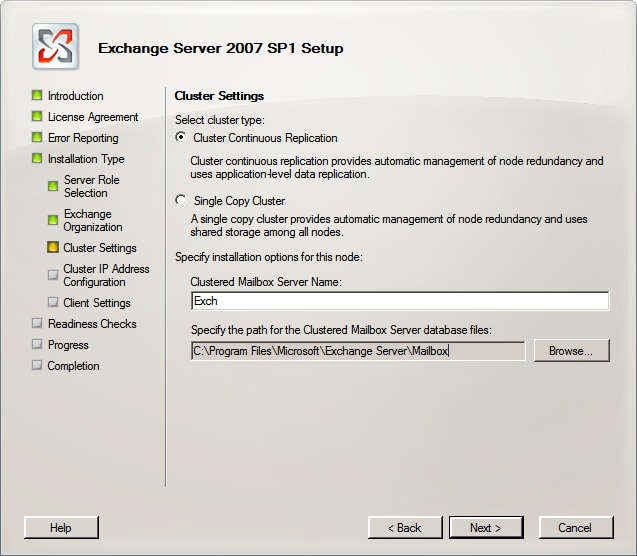
Figure H
Choose the Cluster Continuous Replication option and then enter the name that you want to use for your clustered mailbox server.
Click Next, and you will be prompted to enter the server’s IP address. You should enter the IP address that will be unique to Exchange Server.
Click Next, and Setup will perform a prerequisite check to make sure that all of the necessary components are in place. Assuming that the check succeeds, click the Install button to begin the installation process.
When the installation process completes, click Finish. You may see a message telling you that a restart is required before placing the server into production. If you receive such a message, just click OK to acknowledge it. Rather than restarting the server immediately, we need to stop the clustered mailbox server service, and move it to our passive node. As you will recall though, we haven’t actually installed Exchange onto the passive node yet. This makes things a little bit messy, but it isn’t going to cause us any problems. My personal preference is to perform this operation from the command line, but you can use the Failover Clustering Console.
To stop the Clustered Mailbox Service, open the Exchange Management Shell, and enter the following command:
Stop-ClusteredMailboxServer <your clustered mailbox server name> -StopReason Setup -Confirm:$False
Stopping the Clustered Mailbox Service allows our passive node to take ownership of the service. You can now safely restart Node 1. When the node restarts though, Node 2 still has ownership of the clustered mailbox server. To fix this, open a command prompt window (not EMS) and enter the following command:
Cluster Group <your clustered mailbox server name> /Move:<the name of node 1>
Once the move has completed, we just need to start the Clustered Mailbox Service. To do so, open the Exchange Management Shell and enter the following command:
Start-ClusteredMailboxServer <your clustered mailbox server name>
Installing the Passive Node
Now that our active node is operational, we can install our passive node. Begin the installation process by double clicking on Setup.exe. When the Exchange Server 2007 splash screen appears, click on Step 4: Install Microsoft Exchange Server 2007 SP1. This will cause Setup to launch the installation wizard.
The first screen that you will see is really nothing more than a welcome screen. You can just click Next to skip it. You will now be prompted to accept the server’s license agreement. After doing so, click Next.
The next screen that you will encounter asks you whether or not you want to enable error reporting. Whether or not you want to use error reporting is really up to you. After you make your decision, click Next.
The following screen will ask you if you want to perform a typical Exchange Server installation or a custom installation. You can only configure a clustered mailbox server by performing a custom installation. Therefore, choose the Custom Exchange Server Installation option, and click Next.
You will now be prompted to select the Exchange Server roles that you want to install. Select the Passive Clustered Mailbox Role. Once again, the other roles will be grayed out to prevent you from selecting them, but the management tools will be installed automatically. You also have the option on this screen of specifying a database path. If you do enter a non default path, it must match the path used by the active node.
Click Next, and Setup will perform a readiness check to make sure that the server has been properly prepared. When the readiness check completes, click the Install button. When the installation completes, click Finish.
Once again, you will receive a message telling you that your server needs to be restarted. This time though, you can restart the server without having to do anything special because this is a passive node.
Conclusion
In this article I have explained how to deploy Cluster Continuous Replication in a Windows Server 2008 environment. In Part 3, I will conclude the series by showing you various techniques for managing your cluster.
Load comments