
If you are writing an application, such as a service, that you want to be able to monitor and configure remotely then you’ll want to ensure that your application integrates smoothly with Windows Management Instrumentation (WMI). WMI is the Microsoft implementation of an industry standard interface called Web Based Enterprise Management. It allows a user to access, and change, management information from a wide variety of devices across the enterprise. The classes that support WMI in the .NET Framework reside in the system.management namespace, within the framework’s class library.
In this article, we will first create a Windows Service that accepts a TCP connection and echoes back any text typed into a telnet connection. We will then add some WMI code to our service in order to enable it to publish information about the number of characters that have been echoed back. In other words, we will turn our Windows Service into a WMI Provider.
Although this is a fairly simple project, it does highlight the key steps that are required to WMI-enable your application.
Creating and installing the service
Create a new Windows Service project in Visual Studio and call it TestService. In Solution Explorer, open up the file called Service1.cs in the code editor.
Add a new member variable called m_engineThread of type Thread:
|
1 |
Thread m_engineThread; |
We then want to kick it off this new listening thread during service startup:
|
1 |
protected override void OnStart(string[] args)
{
m_engineThread = new Thread(new ThreadStart(ThreadMain));
m_engineThread.Start();
}
And make sure we terminate it when the service is stopped:
|
1 |
protected override void OnStop()
{
try
{
m_engineThread.Abort();
}
catch (Exception) { ;}
}
The code for ThreadMain is fairly simple; it just sets up a TCPListner and accepts connections. It then prints out any line entered via the TCP connection, until a single “.” is received on a line by itself:
|
1 |
public void ThreadMain()
{
// Setup the TCP Listener to bind to 127.0.0.1:50009
IPAddress localAddr = IPAddress.Parse(“127.0.0.1”);
TcpListener tlistener = new TcpListener(localAddr, 50009);
try
{
// Start listening
tlistener.Start();
String data = null;
// Enter processing loop
while (true)
{
// Block until we get a connection
TcpClient client = tlistener.AcceptTcpClient();
data = null;
// Get a stream object and
// then create a StreamReader for convience
NetworkStream stream = client.GetStream();
StreamReader sr = new StreamReader(stream);
// Read a line from the client at a time.
while ((data = sr.ReadLine()) != null)
{
if (data == “.”)
{
break;
}
byte[] msg = System.Text.Encoding.ASCII.GetBytes(data);
stream.Write(msg, 0, msg.Length);
stream.WriteByte((byte)’\r’);
stream.WriteByte((byte)’\n’);
}
// Shutdown and end connection
client.Close();
}
}
catch (SocketException e)
{
;
}
finally
{
// Stop listening for new clients.
tlistener.Stop();
}
}
Finally, we need to get the service to install itself. To do this, add a project reference to System.Configuration.Install.dll and then add a new class to your project, called MyInstaller. This class should derive from Installer and be attributed with the RunInstallerAttribute:
|
1 |
[System.ComponentModel.RunInstaller(true)]
public class MyInstaller : Installer
{
…..
In the constructor of the MyInstaller class, we need the following code to install the service:
|
1 |
public MyInstaller()
{
ServiceProcessInstaller procInstaller = new
ServiceProcessInstaller();
ServiceInstaller sInstaller = new ServiceInstaller();
procInstaller.Account = ServiceAccount.LocalSystem;
sInstaller.StartType = ServiceStartMode.Automatic;
sInstaller.ServiceName = “Simple-Talk Test Service”;
Installers.Add(sInstaller);
Installers.Add(procInstaller);
}
All this does is to ensure that the service installs correctly and appears in the services.msc control panel.
Starting and Stopping the Service
Let’s give it a go. Hit F6 to build the project and then run InstallUtil.exe on the resulting binary. In my case, this is:
C:\Simple-Talk>InstallUtil.exe TestService.exe
You will see a large amount of text output. Once this has completed, hit start->Run and type services.msc. This will bring up the services control panel; scroll down until you find Simple-Talk Test Service and start it.
Having started the service, we can now try it out. Hit start->run again and type: telnet 127.0.0.1 50009. This will open up a telnet window; anything you type will be echo’d back to you when you hit enter.
To close the connection enter “a .” on a line, on its own.
We now need to stop the service, which you can do using the services control panel.
Adding WMI Support
We now want to add the WMI support to the service. As an example, we will publish the number of characters which have been echo’d back since the service started.
To WMI-enable our service, include a reference to System.Management.Dll and then add a new class to the project called EchoInfoClass. Attribute this class with the InstrumentationClass attribute, with its parameter as InstrumentationType.Instance. Then, add a public field called CharsEchoed of type int:
|
1 |
[InstrumentationClass(InstrumentationType.Instance)]
public class EchoInfoClass
{
public int CharsEchoed;
}
The InstrumentationClass attribute specifies that the class provides WMI data; this WMI Data can either be an instance of a class, or a class used during a WMI event notification. In this case, we want to provide an instance of a class. Next, in order to WMI-enable our project, we need to modify the installer class we wrote earlier so that it registers our WMI object with the underlying WMI framework.
For safety, first run InstallUtil.exe /u against the binary we built before to uninstall the service.
Now, we can change the installer class so that it registers our WMI object correctly with the underlying WMI subsystem. Luckily, the .NET Framework architects made this easy for us. There is a class called DefaultManagementProjectInstaller in the framework that provides the default installation code to register classes attributed with InstrumentationClass. To take advantage of this we simply change the class MyInstaller to derive from DefaultManagementProjectInstaller rather than Installer.
|
1 |
[System.ComponentModel.RunInstaller(true)]
public class MyInstaller :
DefaultManagementProjectInstaller
{
…
We need to create and register an instance of this service class on service startup. To do this, first add a member variable to the service class:
|
1 |
EchoInfoClass m_informationClass;
Then, add the following code to your OnStart override:
|
1 |
protected override void OnStart(string[] args)
{
m_informationClass = new EchoInfoClass();
m_informationClass.CharsEchoed = 0;
Instrumentation.Publish(m_informationClass);
m_engineThread = new Thread(new ThreadStart(ThreadMain));
m_engineThread.Start();
}
This creates the class instance and registers it with the WMI framework so that it is accessible via WMI. Once that is done we just use the class as normal.
We have now told the WMI Framework about our class (via the installer) and published an instance of it (in our OnStart method). Now, we just need to update the information we are publishing via WMI. To do this we increment the m_informationClass.CharsEchoed field whenever we echo a character back to the client. To do this add the following line to ThreadMain:
|
1 |
while ((data = sr.ReadLine()) != null)
{
if (data == “.”)
{
break;
}
byte[] msg =
System.Text.Encoding.ASCII.GetBytes(data);
stream.Write(msg, 0, msg.Length);
stream.WriteByte((byte)’\r’);
stream.WriteByte((byte)’\n’);
m_informationClass.CharsEchoed += msg.Length;
}
Testing the WMI Provider
We are now ready to give it a go and see if it all works! Build your application by hitting F6 and then run InstallUtil again:
|
1 |
C:\Simple-Talk>InstallUtil.exe TestService.exe |
Then just start the service and try it out:
|
1 |
C:\Simple-Talk>net start "Simple-talk test service"C:\Simple-Talk>telnet 127.0.0.1 50009 |
The telnet command opens up a blank screen, waiting for you to type something in. I typed in “simple-talk” and hit enter and the service duly echo’d back “simple-talk” to the screen.
So, the service returned 11 characters and, hopefully, our WMI provider worked correctly and recorded that. Microsoft provides a WMI information browser called wbemtest – it’s fairly ropey, but it will do for now so open that up:
|
1 |
C:\Simple-Talk>wbemtest |
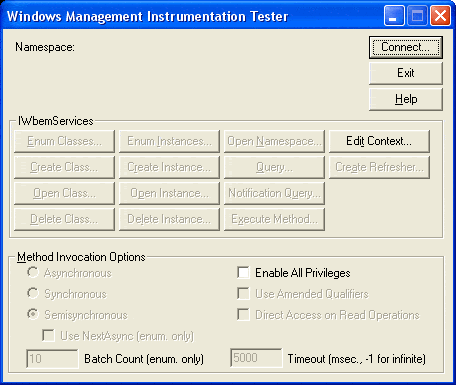
Click connect, leave all the settings at their default value, and click OK:
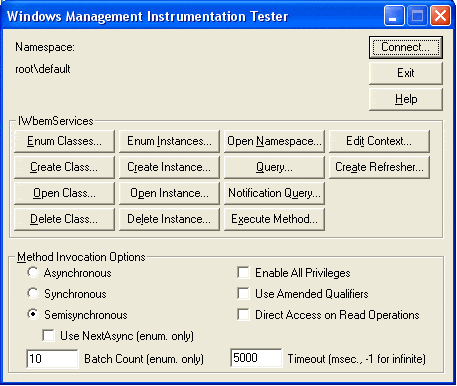
Next click the Query… button and enter the following:

WQL returns instances of the classes we requested, rather than rows, and presents us with the following screen:
NOTE: WQL is very similar to SQL – in fact it is a subset of SQL and allows you to query management information in a very similar way to an RDBMS. WQL generally returns “instances” rather than rows. However, these can be thought of as analogous.
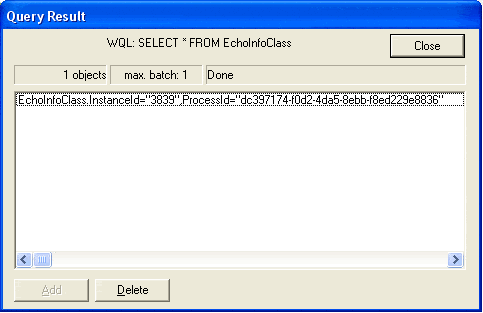
Double click on the instance of the class:
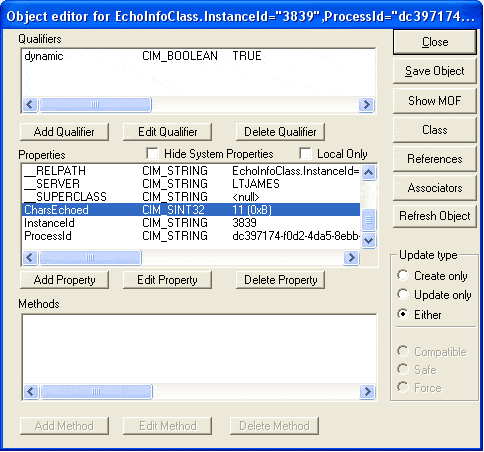
The CharsEchoed property shows us that 11 characters have been sent back from the service.
Summary
WMI is a wide ranging infrastructure on Windows (and other platforms) for managing machines and programs across an enterprise. Although our example is fairly simple it should give you enough information to be able to include WMI integration next time you are writing a service or website that requires remote monitoring and management.
It is equally as easy to consume WMI information from .NET however that topic can wait for another article.
Load comments