
- Part 1: How to Document your PowerShell Library
- Part 2: Using C# to Create PowerShell Cmdlets: The Basics
- Part 3: Documenting Your PowerShell Binary Cmdlets
- Part 4: Unified Approach to Generating Documentation for PowerShell Cmdlets
- Part 5: Using C# to Create PowerShell Cmdlets: Beyond the Basics
Contents
- Recap
- Step 16: Document your cmdlet
- Step 17: Use a module manifest
- Step 18: Enforcing required vs optional inputs
- Step 19: Untainting user input
- ValidateCount(I1,I2) – enforces the number of values allowed for an array parameter
- ValidateLength(I1,I2) – enforces a minimum/maximum length of a for a parameter
- ValidateRange(N1,N2) – enforces a minimum/maximum value for a parameter
- ValidateSet(V1,V2,… Vn) – limits values of a parameter to a specific set of values
- Notes on the Validate attributes
- ValidatePattern – enforces that an input matches a given regular expression
- Summary of Validate attributes
- Step 20: Honoring common parameters
In the first installment (Using C# to Create PowerShell Cmdlets: The Basics), you learned how to put together a complete, working PowerShell cmdlet. But that was really just the fundamentals. There are more things you should be aware of in constructing new, professional-quality cmdlets; this article covers the next 5 steps in this endeavor.
Recap
Let’s first summarize the steps from the last article:
- Create a Visual Studio class library project to house your cmdlets.
- Add a reference to .NET PowerShell resources using the NuGet Package Manager.
- Rename the default class in your new project to <verb><noun>
Cmdlet.cs. - Update that class to inherit from
System.Management.Automation.Cmdlet(or PSCmdlet if needed). - Decorate your class with
CmdletAttributeto specify the exposed verb and noun for the API. - Create another class that is a container for your cmdlet’s output.
- Decorate your cmdlet class with
OutputTypeAttributeto expose the output container for the API (supporting, e.g. tab completion of your cmdlet’s parameters). - Create public properties to be used for your cmdlet’s inputs.
- Decorate each input with
ParameterAttributeto expose it to the API. - Specify
ValueFromPipelineif you want a single parameter to accept an entire object fed through the pipeline. - Specify
ValueFromPipelineByPropertyNamefor each parameter that you want to accept a property of the object fed through the pipeline. - Add symmetry to the input accepting an entire object-so that it can accept multiple items not just through the pipeline but also as a direct command-line parameter-by making that parameter an array.
- Allow your parameters to be used positionally (i.e. without explicit parameter names) by specifying Position to the parameter.
- Provide aliases to your parameter names with the
AliasAttribute. - Write some production code.
In this article I will add several additional, important steps. Let’s start with the first new step, number 16, next.
Step 16: Document your cmdlet
I mentioned documentation in passing in step 11 in the first installment, but I am making it explicit-and putting it as the first additional step here-because it is so important. In the Agile world, we are taught to eschew documentation. Well, perhaps not entirely, but to consider it less valuable than the visible parts of the working system you are delivering. But advocating documentation here so prominently is not at all going against that grain, because the documentation of a PowerShell cmdlet is an integral part of its deliverable. There is no GUI per se when you’re typing in a PowerShell window. There’s no arrow to click to expand a list, no button to press and no slider to slide. Unlike a well-designed GUI, you cannot as a rule work how to use a PowerShell cmdlet merely by intuition; it must be properly documented so that you can quickly look up what the cmdlet does, what any particular parameter does, what kind of output it generates, what side effects it produces, and so forth.
When you write C# code, there is a standard that prescribes exactly how to instrument your code with documentation comments so that when you build in Visual Studio it will generate a proper MAML file that can then be used to generate user documentation, typically done with Sandcastle and
SandcastleHelpFileBuilder. (See, for example, Taming Sandcastle: A .NET Programmer’s Guide to Documenting Your Code.) When it comes to PowerShell code, on the other hand, there is no single set-in-stone standard, so the way that you document your cmdlets will vary depending on what tools you plan to use to post-process. However, I suggest that there should be a standard because, at the time of writing, there is a single utility that makes documenting your PowerShell cmdlets written in C# as easy and as simple as documenting your other C# code. This utility is XmlDoc2CmdletDoc, and I wrote an extensive guide on how to use it effectively-see Documenting Your PowerShell Binary Cmdlets. WithXmlDoc2CmdletDocyou instrument your cmdlet classes using inline documentation comments. (Most other current tools do not support that.) Furthermore, you use a doc-comment grammar quite similar to the standard grammar you use for other C# classes.Step 17: Use a module manifest
Probably the next most critical piece you need for production-ready PowerShell is a manifest file. As the Wikipedia article explains, a manifest typically enumerates metadata for an accompanying set of files. Mapping this to a PowerShell context, the manifest specifies the contents and attributes of your PowerShell module, its prerequisites, its dependencies, and how its components are processed. The manifest file in PowerShell is an XML file with a .psd1 extension. The file contains a single hash table containing quite a number of parameters. However, you can easily generate a default manifest by specifying just a single parameter to
New-ModuleManifest:1PS> New-ModuleManifest c:\path\to\your\module\your-module-name.psd1You then need to open that file in a text editor and make a couple of updates.
- Change the
RootModuleto the name of your compiled library file, e.g. your-module-name.dll. - Update the author, company name, and copyright info as your company guidelines dictate.
- Update the description to give a synopsis of what your module does.
- Update th
e RequiredAssemblieslist to include any DLLs that your module depends on. - Update the FileList list to include all the files that you wish to ship with the module (this would include at a minimum your compiled library file and its accompanying help file (your-module-name.dll and your-module-name.dll-Help.xml)
For more details about the values that go into that hash, see the documentation for the cmdlet itself,
New-ModuleManifest, in combination with the MSDN article, How to Write a Module Manifest.Though in the previous article I showed how to import the module using the DLL directly, the sample project already included the corresponding manifest. So whenever you have a manifest, which should be always, you should import the module using the manifest rather than the DLL, to wit:
1PS> Import-Module .\bin\Debug\PowerShellModuleInCSharp.psd1 -ForceFor this simple project it does not make any visible difference in executing the cmdlet. However, you can see the difference internally if you run this command after importing the module first with the DLL, then with the manifest:
1PS> Get-Module PowerShellModuleInCSharp | Format-List -force *Step 18: Enforcing required vs optional inputs
Step 9 introduced the ParameterAttribute to those public properties that are part of your cmdlet’s API. Steps 10, 11, and 13 added several properties for particular behaviors. (You can see the list of all available properties on MSDN.) Here you will learn one more property to require a parameter to be entered by the user, the
Mandatoryproperty. If the user does not specify a value for a parameter adorned with this property, PowerShell will prompt the user to enter a value. And if he or she still refuses-by just hitting enter-the cmdlet throws a terminating error. As an example, if you make theNameparameter mandatory…12[Parameter(Position=1, ValueFromPipelineByPropertyName=true, Mandatory=true)]public string Name { get; set; }… and then fail to provide -Name on the command line, this is the error:
1Get-NetworkAdapter :Cannot bind argument to parameter 'Name' because it is an empty string.While accurate, that message is less than ideal; something like “Required ‘Name’ parameter was not supplied” would be a bit more clear. However, that does bring to light what
Mandatoryreally means-which is not even spelled out fully in the official documentation!-and that is that the parameter must be present, non-null, and non-empty. Thus, these will all generate the same error:123PS> Get-NetworkAdapter -name $nullPS> Get-NetworkAdapter -name ""PS> Get-NetworkAdapterBe warned, though, that you could circumvent that security blanket rather easily by providing just a single space:
1PS> Get-NetworkAdapter -name ' 'So you need to be aware that the
Mandatoryproperty, while useful, is not quite as comprehensive as one always needs.Step 19: Untainting user input
Similar to making arguments ‘required’, you should typically make sure that any parameters that are supplied are valid and/or safe. The latter is referred to as untainting a value (see Taint checking for more) but I am lumping both together under the “untainting” heading because they are treated the same in PowerShell.
PowerShell provides several attributes for validating inputs (Cmdlet Attributes). First, a few examples taken from the sample project, showing how you might use them.
1234567891011121314[Parameter(Position=1,ValueFromPipelineByPropertyName = true)][ValidateLength(1, 50)][ValidateSet("Intel","WAN","Cisco","Bluetooth")]public string Name { get; set; }[Parameter(Position=0,ValueFromPipelineByPropertyName = true,ValueFromPipeline = true)][Alias("mfg", "vendor")][ValidateCount(1,3)]public string[] Manufacturer { get; set; }[Parameter(Position=3)][ValidateRange(5, 150)]public int MaxEntries { get; set; } = 100;All the validation attributes are listed below along with the resulting error messages presented to the user if invalid inputs are given. To use any one of these, just decorate the parameter of interest with the attribute, as shown above. In each of the error messages, I have just generically used X to represent your parameter name and J to represent the user’s input.
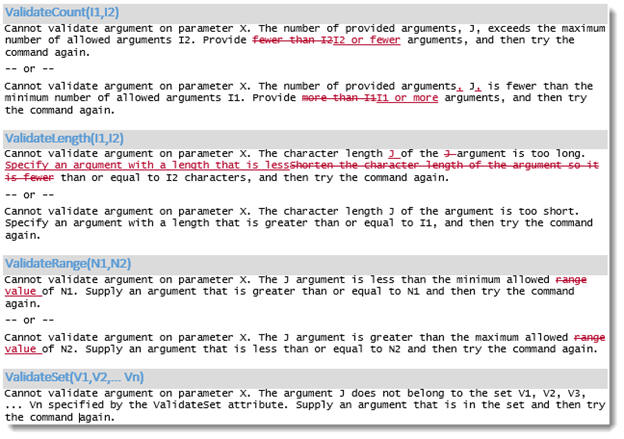
ValidateCount(I1,I2) – enforces the number of values allowed for an array parameter
Use this when you want to restrict the number of items to be supplied to a single array parameter. If the user exceeds those values when using your cmdlet, the result is either of these messages, as appropriate.
1Cannot validate argument on parameter X. The number of provided arguments, J, exceeds the maximum number of allowed arguments I2. Provide fewer than I2 arguments, and then try the command again.— or —
1Cannot validate argument on parameter X. The number of provided arguments J is fewer than the minimum number of allowed arguments I1. Provide more than I1 arguments, and then try the command again.ValidateLength(I1,I2) – enforces a minimum/maximum length of a for a parameter
Use this to restrict the length of a single parameter. Possible failure messages:
1Cannot validate argument on parameter X. The character length of the J argument is too long. Shorten the character length of the argument so it is fewer than or equal to I2 characters, and then try the command again.— or —
1Cannot validate argument on parameter X. The character length J of the argument is too short. Specify an argument with a length that is greater than or equal to I1, and then try the command again.ValidateRange(N1,N2) – enforces a minimum/maximum value for a parameter
Use this to restrict the value of a single numerical parameter. Possible failure messages:
1Cannot validate argument on parameter X. The J argument is less than the minimum allowed range of N1. Supply an argument that is greater than or equal to N1 and then try the command again.— or —
1Cannot validate argument on parameter X. The J argument is greater than the maximum allowed range of N2. Supply an argument that is less than or equal to N2 and then try the command again.ValidateSet(V1,V2,… Vn) – limits values of a parameter to a specific set of values
Use this to restrict the value of a single string parameter, where it has a small set of possible values. If the supplied argument does not match one of the supplied value, it results in this error message:
Cannot validate argument on parameter X. The argument J does not belong to the set V1, V2, V3, … Vn specified by the
ValidateSetattribute. Supply an argument that is in the set and then try the command again.Notes on the Validate attributes
At first glance, those error messages above look reasonable, conveying what is wrong so the user can address it. If you look closer, though, there are several issues with the text of those messages. Here they are again, with my corrections for accuracy, grammar, and consistency in place:
And then there’s ValidatePattern, discussed next.
ValidatePattern – enforces that an input matches a given regular expression
If the user provides an input that does not match the pattern supplied to
ValidatePattern, then the error message is, well, intractable for most users. For this example I specified a regular expression that recognizes one format of a US phone number.123[Parameter][ValidatePattern(Pattern=@"^\(?\d{3}\)?[-\s.]?\d{3}[-\s.]\d{4}$")]public string USPhoneNumber { get; set; }Woe betide the user who enters it wrong and is presented with this:
1Cannot validate argument on parameter 'USPhoneNumber'. The argument "foo" does not match the "^\(?\d{3}\)?[-\s.]?\d{3}[-\s.]\d{4}$" pattern. Supply an argument that matches "^\(?\d{3}\)?[-\s.]?\d{3}[-\s.]\d{4}$" and try the command again.But PowerShell is nothing if not flexible. Joel Bennett wrote a blog post some time back on this very topic-that’s where I got the phone number example from, in fact. So instead of using
ValidatePatternuse a custom validator-ValidatePatternFriendlyis my streamlined and updated version of hisValidatePatternEx:12345[Parameter][ValidatePatternFriendly(Pattern = @"^\(?\d{3}\)?[-\s.]?\d{3}[-\s.]\d{4}$",Message = "Please enter a 10-digit phone number like: (123) 555-1212")]public string USPhoneNumber { get; set; }Upon transgressing, that will produce a much more palatable error for the typical user, along with the technical info for the support folks:
1Cannot validate argument on parameter 'USPhoneNumber'. Please enter a 10-digit phone number like: (123) 555-1212ValidatePatternEx failure, the value didn't match the pattern: ^\(?\d{3}\)?[-\s.]?\d{3}[-\s.]\d{4}$I have included th
e ValidatePatternFriendlycustom validator in the sample solution attached to this article; you are free to use that in production code. (Bennett’s original post, Better error messages for PowerShell ValidatePattern, regrettably, is no longer available, but last I checked you could retrieve it from the magical WayBack Machine; search for “http://huddledmasses.org/better-error-messages-for-powershell-validatepattern/”.)For convenience here is the code for the custom validator:
1234567891011121314151617181920212223[AttributeUsage(AttributeTargets.Field | AttributeTargets.Property)]public class ValidatePatternFriendlyAttribute : ValidateEnumeratedArgumentsAttribute{private string Name { get; } =nameof(ValidatePatternFriendlyAttribute).Replace("Attribute","");public RegexOptions Options { get; set; } = RegexOptions.IgnoreCase;public string Message { get; set; }public string Pattern { get; set; }protected override void ValidateElement(object element){if (element == null){throw new ValidationMetadataException($"{Message}\n{Name} failure: argument is null");}if (!new Regex(Pattern, Options).Match(element.ToString()).Success){throw new ValidationMetadataException($"{Message}\n{Name} failure, the value '{element}' does not match the pattern /{Pattern}/");}}}Side note: If writing in PowerShell rather than C#, this type of custom validation can be done more simply and on-the-fly; there’s no need to write a custom validator, just use the
ValidateScriptAttributewith whatever custom logic you need. Here’s the equivalent in PowerShell for the phone number validation:12345[ValidateScript({ if($_ -notmatch '^\(?\d{3}\)?[-\s.]?\d{3}[-\s.]\d{4}$') {throw 'Please enter a 10-digit phone number like: (123) 555-1212'} else { $true }})]Also see How to Validate Parameter Input for more details.
Summary of Validate attributes
The following table (based on the information provided in System.Management.Automation Namespace but reformatted and condensed) summarizes the attributes mentioned above, plus includes a few remaining ones not previously discussed.
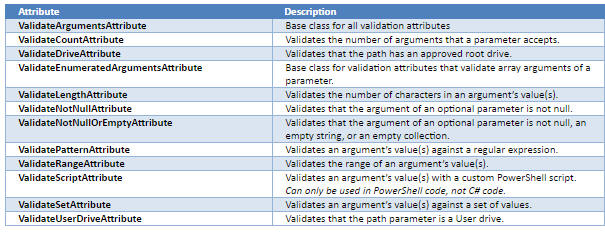
And here is the inheritance tree for the above list:
- ValidateArgumentsAttribute
- ValidateCountAttribute
- ValidateDriveAttribute
- ValidateUserDriveAttribute
- ValidateEnumeratedArgumentsAttribute
- ValidateLengthAttribute
- ValidatePatternAttribute
- ValidateRangeAttribute
- ValidateScriptAttribute
- ValidateSetAttribute
- ValidateNotNullAttribute
- ValidateNotNullOrEmptyAttribute
Note that several of those you have seen inherit from
ValidateEnumeratedArgumentsAttribute, which automatically provides support for the user entering either a single value or an array of values for a given parameter. Similarly, the customValidatePatternFriendlyAttributedoes aw well. Thus, while this would clearly evaluate the single phone number against the regular expression specified for the parameter…1PS> Get-NetworkAdapter -USPhoneNumber '(123) 555-1212'…you can supply multiple values-because USPhoneNumber is an array parameter-and each of them will individually be validated by the regular expression.
123PS> Get-NetworkAdapter -USPhoneNumber '(123) 555-1212','(123) 555-abcd'Get-NetworkAdapter : Cannot validate argument on parameter 'USPhoneNumber'. Please enter a 10-digit phone number like: (123) 555-1212ValidatePatternFriendly failure, the value '(123) 555-abcd' does not match the pattern /^\(?\d{3}\)?[-\s.]?\d{3}[-\s.]\d{4}$/(Note that if there are multiple invalid values in the passed array, the reported exception only describes the first one, since it aborts at that point in any case.)
Step 20: Honoring common parameters
There are several command-line switches that you can specify with any standard PowerShell cmdlet. As an author of custom PowerShell cmdlets, you should provide support for at least some of these in your cmdlets as well. You can see the full list at about_CommonParameters. This section explains how to deal with a subset of these-those that are more commonly used-and that affect output and workflow:
-Verbose,-Debug, –WhatIf, and-Confirm.-VerboseIn PowerShell you can output extra information on demand to PowerShell’s verbose data stream. Typically this just comes out on the console in a different color.
To support
-Verboseyou need to:- enable v erbose output functionality, and
- emit messages to the verbose stream.
When writing cmdlets in PowerShell (as opposed to C#), you need to make sure that a function has the
CmdletBindingAttribute. The presence of that attribute is what enables verbose output. When writing in C#, on the other hand, any cmdlet you write must have theCmdletAttribute-you don’t have a choice, so in essence all your cmdlets automatically have verbose output enabled. (That’s not a typo; you useCmdletBindingin PowerShell, but just Cmdlet in C#.)To emit messages on the verbose stream once enabled, you simply use the Write
-Verbosecmdlet (PowerShell) or WriteVerbose method (C#) to send output to the verbose stream instead of the standard output stream (Write-OutputorWriteObject,respectively).-DebugDebug output-extra output on PowerShell’s debug data stream-is almost identical to verbose output. To support
-Debugyou need to:- enable debug output functionality, and
- emit messages to the debug stream.
You enable this, just like
-Verbose, withCmdletBindingAttribute(PowerShell) orCmdletAttribute(C#), then you emit messages with theWrite-Debugcmdlet (PowerShell) orWriteDebugmethod (C#).A distinction of debug output, however, makes it serve quite a different purpose than
-Verbose. The thing about the debug output statement(Write-DebugorWriteDebug)is that it besides producing additional output it also acts as a breakpoint after emitting your debug message! That is, it pauses your cmdlet-whether written in PowerShell or in C#-with a prompt similar to what-Confirmdoes (which you will see below). Consider this simple PowerShell cmdlet:12345678function Get-Foo{[CmdletBinding ()]param()Write-Debug "debug output"Write-Verbose "verbose output"Write-Output "standard output"}Here is the default output:
12PS> Get-Foostandard outputAnd here is what happens when you add debugging:
12345PS> Get-Foo -DebugDEBUG: debug outputConfirmContinue with this operation?[Y] Yes [A] Yes to All [H] Halt Command [S] Suspend [?] Help (default is "Y"):Here, while your cmdlet is paused, you can examine the state of any external resources that may have been modified, or you can suspend and get back to a PowerShell prompt to dig further right here.
(I noticed as I was putting this together that, at least in PowerShell 5,
-Debughad one slight quirk, and this only applies to cmdlets written in C# (not in PowerShell). Adding-Debugalso seemed to enable-Verboseautomatically.)–
WhatIfThe –
WhatIfparameter is a safety net for cmdlets that may make substantial changes to your system (read: do damage). It let’s you do a dry run, to see an overview of what would happen, before you run the real thing.To support –
WhatIfyou need to:- enable
WhatIffunctionality, and - gate appropriate code blocks .
Enable –
WhatIfwithCmdletBindingAttribute(PowerShell) orCmdletAttribute(C#) and include the SupportsShouldProcess argument. Here’s an example from the sample project:1[Cmdlet(VerbsCommon.Get, "NetworkAdapter", SupportsShouldProcess = true)]You then need to identify one or more blocks in your code that you wish to protect. Surround each block with a condition that is gated with the result of the Cmdlet.
ShouldProcessmethod. Thus, if you have a block like this…1/* code to erase the root disk */… change it to this:
1234if (ShouldProcess("root disk")){/* code to erase the root disk */}Each occurrence of the
ShouldProcessmethod will emit an informational message to the user.ShouldProcessactually comes with several different signatures, giving you quite a bit of flexibility as to how the message will appear. Here are the variations, applied to the sample project:1if (ShouldProcess("network data store"))12PS> Get-NetworkAdapter -WhatIfWhat if: Performing the operation "Get-NetworkAdapter" on target "network data store".1if (ShouldProcess("network data store", "read"))12PS> Get-NetworkAdapter -WhatIfWhat if: Performing the operation "read" on target "network data store".1if (ShouldProcess("reading network data store", "don't care", "don't care"))12PS> Get-NetworkAdapter -WhatIfWhat if: reading network data storeI used “don’t care” for the second and third arguments because they are not used by –
WhatIf. However, they are used with-Confirm, as you will see next, so you should be sure to use real phrases, not “don’t care”!There is actually a fourth signature for
ShouldProcessas well, which you could read about on the MSDN documentation page here, but it has little utility.-ConfirmThe
-Confirmparameter is also a safety net for cmdlets that may make substantial changes to your system. For each significant change your code will perform it lets the user choose to proceed or skip it.To support – Confirm you need to:
- enable Confirm functionality, and
- gate appropriate code blocks .
Enable
–WhatifwithCmdletBindingAttribute(PowerShell) orCmdletAttribute(C#) and include theSupportsShouldProcessargument. Here’s an example from the sample project:1[Cmdlet(VerbsCommon.Get, "NetworkAdapter", SupportsShouldProcess = true)]You then need to identify one or more blocks in your code that you wish to protect. These need to be exactly the same code blocks that you want to protect with –
WhatIfbecauseShouldProcesshandles support for both of those simultaneously.Each occurrence of the
ShouldProcessmethod will prompt the user for an action.ShouldProcessactually comes with several different signatures, giving you quite a bit of flexibility as to how the prompt will appear. Here are the variations, applied to the sample project:1if (ShouldProcess("network data store"))12345PS> Get-NetworkAdapter -ConfirmConfirmAre you sure you want to perform this action?Performing the operation "Get-NetworkAdapter" on target "network data store".[Y] Yes [A] Yes to All [N] No [L] No to All [S] Suspend [?] Help (default is "Y"):1if (ShouldProcess("network data store", "read"))12345PS> Get-NetworkAdapter -ConfirmConfirmAre you sure you want to perform this action?Performing the operation "read" on target "network data store".[Y] Yes [A] Yes to All [N] No [L] No to All [S] Suspend [?] Help (default is "Y"):1if (ShouldProcess("don't care", " This may take several seconds", " Fetching network data"))1234PS> Get-NetworkAdapter -ConfirmFetching network dataThis may take several seconds[Y] Yes [A] Yes to All [N] No [L] No to All [S] Suspend [?] Help (default is "Y"):Notes on
WhatIfandConfirmMany things are often a bit simpler when writing cmdlets in PowerShell as compared to C#. However,
ShouldProcessis quite the reverse; here’s why. In PowerShell, yourShouldProcesscalls can be gating other cmdlets which may in turn supportWhatIfand Confirm. So you need to think about whether you want those wrapped cmdlets to also prompt or whether assenting to your cmdlet should automatically assent to its wrapped calls, then pass on appropriate values ofWhatIfand Confirm switches. In C#, however, you’re just calling other C# methods, no cmdlets, so you don’t have that issue at all.Microsoft advocates always combining
ShouldProcesswith a call toShouldContinueand the introduction of an additional Force parameter to override it. Their recommendation seems rather unwieldy, though. Why should you have to add a -Force to avoid getting a second prompt if you’ve already added a-Confirm? I have not found a good reason to use the pattern they suggest, but you should decide for yourself-see How to Request Confirmations.Conclusion
PowerShell gives you unprecedented command-line power to carry out systems operations. With this article and its predecessor, I hope to convey that it is reasonably straightforward, with some diligence to create your own custom cmdlets to augment that power even further. There are a lot of articles out there that reveal bits and pieces of the process. My goal here is to collect it all in one place so you have a single recipe/checklist to help you generate your cmdlets quickly and efficiently.
Load comments