
Find out more
Visual Studio, which is possibly the best IDE out there, just keeps getting better and better at both (a) getting out of your way to avoid slowing you down when you are “in the zone”, and (b) providing more streamlined techniques and power assists to boost your productivity. Add to that the incredible assortment and diversity of the third party extensions (and then extensions to extensions like those available for ReSharper), the odds are that there are extensions that you need that you have never even heard of! So it is always fun, when you meet or chat with other developers, to find out what they favor. I can’t chat with you all, but lend an ear for some of the ways I have found to make Visual Studio sing. You should already be familiar with ReSharper, CodeRush, OzCode, and NCrunch, to name a few of the more powerful and comprehensive packages available; I won’t be addressing those here. What I will discuss are mostly finer grained items, doing a single specific task very well. Herewith is my list, in no particular order.
Add Guidelines
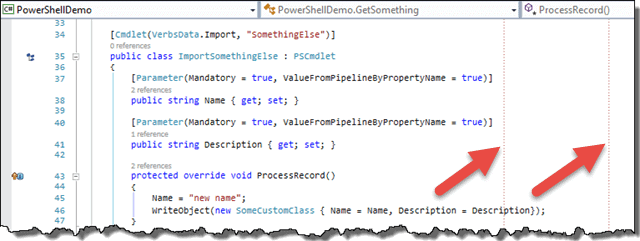
Perhaps your team has agreed to always keep lines under 120 characters to maximize screen real estate. Or perhaps you want to compare the indentation of a deeply nested block of code to another block farther down the page. Maybe you like to keep your variable assignments all aligned. With Productivity Power Tools you can easily place one or more vertical column guides in your code editor for any of those purposes. For example, I prefer to keep lines at 80 characters long (the guideline pointed to by the left arrow below) but I allow for an occasional bit of excess going up to 100 characters (the second guideline).
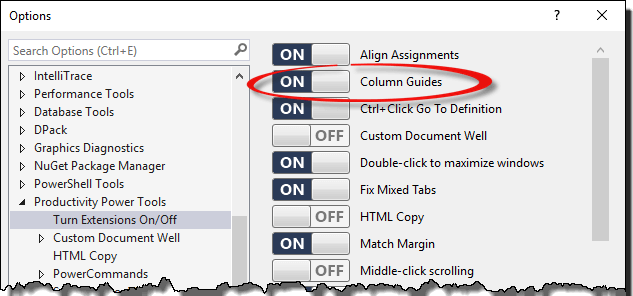
To apply such guidelines you need to (a) make sure the feature is activated (Options >> Productivity Power Tools >> Turn Extensions On/Off >> Column Guides)…
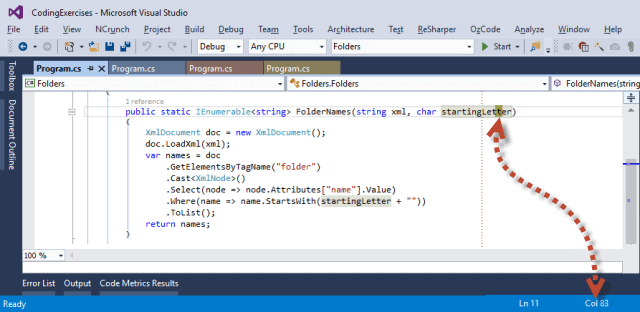
…then (b) right-click in the VS text editor at the location you want the guideline. Select Guidelines >> Add Guideline from the context menu. Note that you need to click in the text editor on a line that is at least as long as the position in which you want the guideline. Note that the cursor in the figure is in column 83 on a line containing 86 characters. To set your guide at column 80, just move the cursor over 3 characters and then you know precisely where to open the context menu.
Add Scope Lines
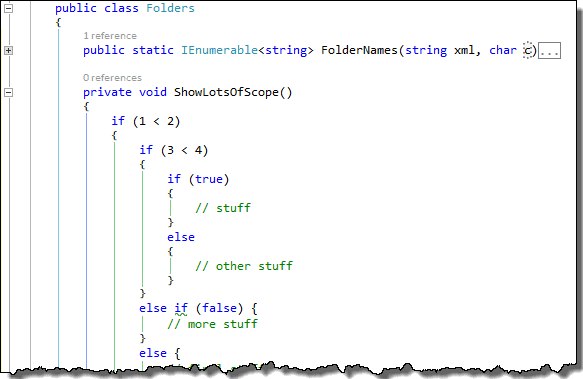
It is not unusual to have code blocks nested 5 or more levels, once you include the namespace, the class, the method, a loop, and a conditional or two. So particularly for complex code, it is a tremendous help to be able to visualize these multiply nested “scopes” to help you keep your place. As opposed to guidelines, which run uniformly from top-to-bottom in your editor window, scope lines cover just the extent of each scope. In this figure, the leftmost line is Visual Studio’s own, showing the icons that let you expand or contract your code vertically. All the remaining vertical lines are scope lines, spanning all the way from the namespace down to each function and further down to each block inside each function.
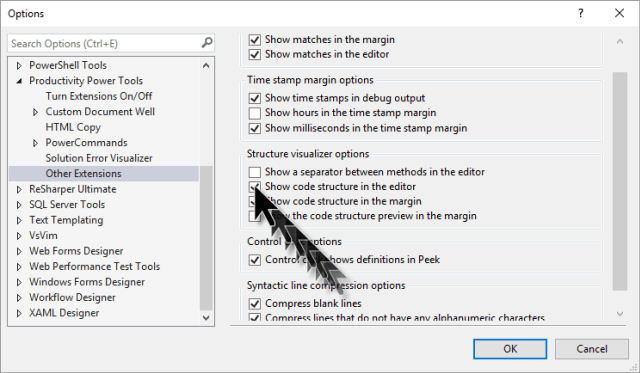
Scope lines, like guidelines, come from Productivity Power Tools. To apply scope lines you need to (a) make sure the feature is activated, just as with guidelines above (Options >> Productivity Power Tools >> Turn Extensions On/Off >> Structure Visualizer) then, still in the Options dialog, (b) Productivity Power Tools >> Other Extensions >> Structure Visualizer options >> Show code structure in the editor as shown below.
Keyboard Switching Between Tab Groups
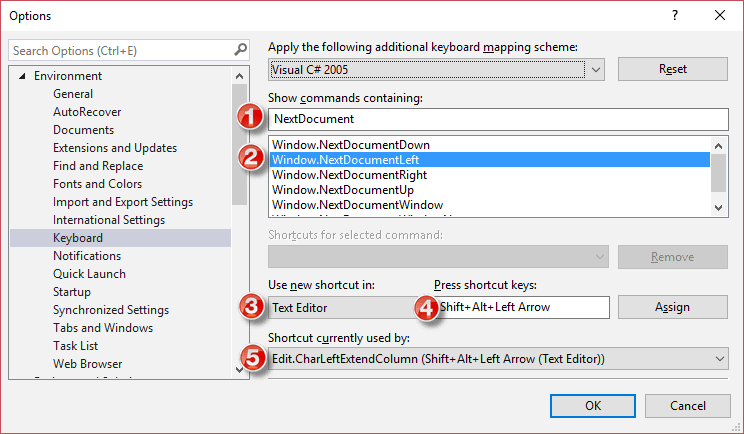
Visual Studio lets you open up multiple adjacent vertical or adjacent horizontal editor panes, each containing one or more file tabs. For those of you who have an affinity for the keyboard—and an aversion for leaving it—have likely always been annoyed that to switch between those panes of tab groups you have to use the mouse, right? No longer! I had long sought a way to hop between two open editor panes (officially called “tab groups” in Visual Studio) without using the mouse. I found it in a simple VS extension VSStreamliner. The catch, though, is that VSStreamliner works only for VS2010… but someone else hacked it (really just changed the version for it) into VSStreamliner 2015. Once you download and install the extension (you have to get it from the above link; it is not available from the VS gallery), it provides four new commands within VS. You then have to create key bindings for any or all that you wish to use. Go to Tools >> Options >> Environment >> Keyboard and type in “NextDocument” in Show commands containing (point [1] in the figure). That will display the 4 new commands plus a couple pre-existing ones [2]. Select one of those in the results list in preparation for assigning a key binding to it. Make sure that you’ve selected the Text Editor context [3] rather than the default Global, then type the key combination you wish to use [4]. If your chosen key combination is already in use, it will appear in a dropdown list [5]. It is important to note that the same key combination may be assigned to different commands in different contexts; the dropdown list includes all of those. If one in the list shows the Text Editor context, then when you press the Assign button, it will detach from that existing one and attach to your selected command.
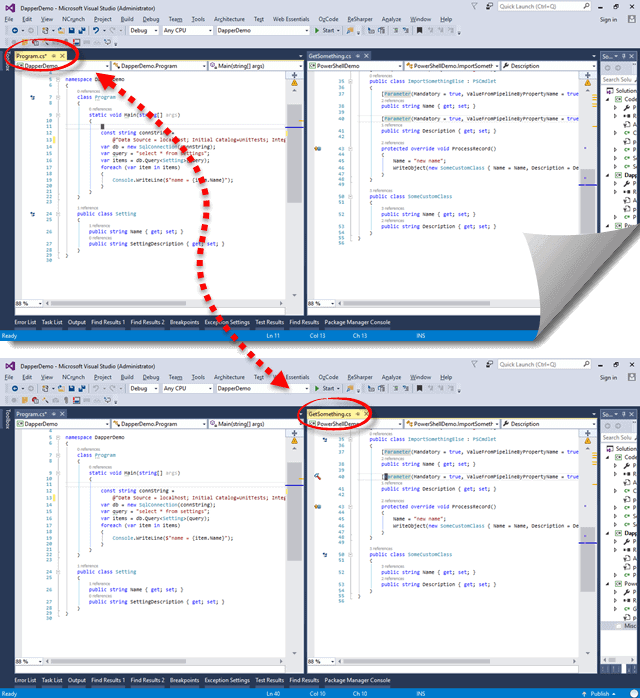
I tend to use vertical tab groups most of the time so I only wired up Window.NextDocumentLeft and Window.NextDocumentRight to Shift+Alt+LeftArrow and Shift+Alt+RightArrow, respectively. With those in place, I no longer have to leave the keyboard to switch between the two tab groups shown below. And, it works for more than two tab groups, too!
View Available Key Chords
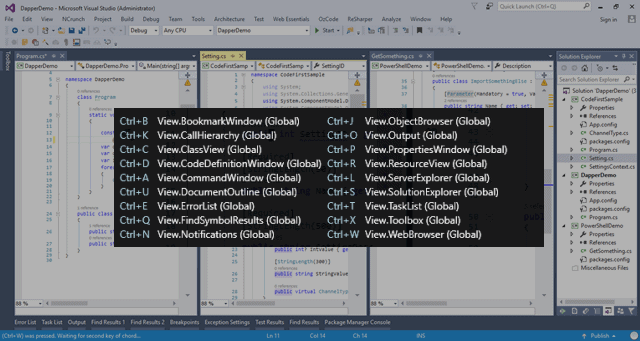
As you know, Visual Studio has a large number of key bindings. If you can remember them all, your hands can dance on the keyboard, dazzling your colleagues. But sometimes you get stuck—what was that key chord again? A key chord is simply a multi-keystroke command, e.g. Ctrl+W followed by Ctrl+S is a key chord that opens Solution Explorer. By design, Ctrl+W followed by some other key stroke typically perform some windowing command. But if you have not memorized all of them, don’t fret. IntelliCommand is a very useful utility to help you keep track of all those chords. Just press the first “note” in the chord, e.g. Ctrl+W, for a brief interval and IntelliCommand pops-up a list of possible keystrokes to complete the chord. This is particularly handy for ReSharper commands as well, which mostly begin with Ctrl+R.
Create Documentation Skeletons
Whenever you are creating an API for consumption by other developers, you need to decorate your classes and methods appropriately so that a documentation generator can then build your API documentation for you. GhostDoc gives you a big helping hand in this, best shown by example. Take, as an example, this simple function.
|
1 2 3 4 5 |
public static bool IsPalindrome(string word) { var backwardWord = string.Join("", word.ToCharArray().Reverse()); return word.ToLower() == backwardWord.ToLower(); } |
Once you download GhostDoc, run its installer, and restart Visual Studio, simply place the cursor in the signature line of the function. Then invoke ‘Document This' from the menu (or use its default keystroke Ctrl+Shift+D) and your function is instantly decorated like so:
|
1 2 3 4 5 6 7 8 9 10 11 12 |
/// <summary> /// Determines whether the specified word is palindrome. /// </summary> /// <param name="word">The word.</param> /// <returns> /// <c>true</c> if the specified word is palindrome; otherwise, <c>false</c>. /// </returns> public static bool IsPalindrome(string word) { var backwardWord = string.Join("", word.ToCharArray().Reverse()); return word.ToLower() == backwardWord.ToLower(); } |
As you can observe, GhostDoc applies some intelligence to the wording and grammar of what it generates. It won’t always be perfect, but it gets you darn close. In this example, we need to introduce an article in front of “palindrome” in two places to make it grammatically correct (so it reads “word is a palindrome” rather than just “word is palindrome”). GhostDoc understands existence functions so it gets very close on this; it does not, however, distinguish nouns (which require an article) from adjectives (which do not). So if this method was, e.g., IsGreen, and its parameter was named item, then the generated text “specified item is green” would be just right.
The second tweak needed, for semantic completeness, would be to expand the description of the parameter from “The word.” to something like “The word that might be a palindrome.” This usually needs the deep understanding that a human developer must provide to elaborate on.
Here is a second example, this time showing an action method, along with the documentation that GhostDoc generated. Subject to the particular needs of your project, this generated documentation might be usable exactly as is, with no modifications.
|
1 2 3 4 5 6 7 8 |
/// <summary> /// Attaches the wagon from left. /// </summary> /// <param name="wagonId">The wagon identifier.</param> public void AttachWagonFromLeft(int wagonId) { train.AddFirst(wagonId); } |
GhostDoc does not actually try to understand your code. Rather, it looks for conventions defined in Microsoft’s Naming Guidelines and from there it can derive useful text.
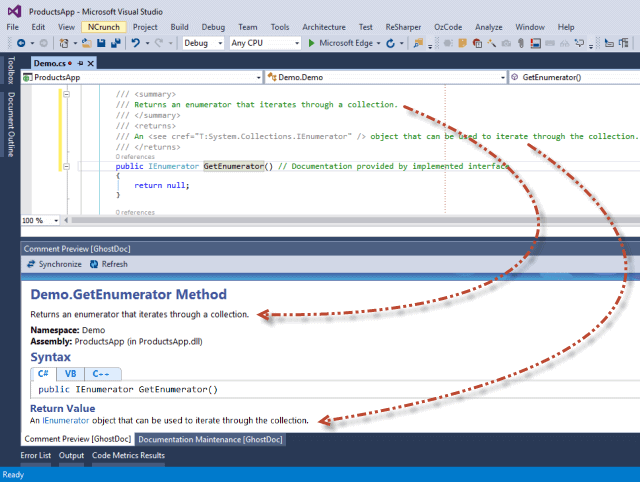
Another time saver is that if your class implements an interface and you override a base class member, then when you document that member GhostDoc will pull in the documentation from the base class. (As an example, the Demo.cs file from GhostDoc’s demo project implements IEnumerable and overrides GetEnumerator. When you document that method with GhostDoc, you’ll see it pull in the documentation from IEnumerable.GetEnumerator.
Finally, GhostDoc will actually show you the final documentation right in Visual Studio. Just put your cursor on the class or member of interest, then press ‘Synchronize' (or Refresh) in the Comment Preview pane, and you see how it renders:
Find Things in Visual Studio
Visual Studio—particularly when you add a few extensions here, a few plugins there—has a tremendous number of features to keep track of. There are menus layered upon menus, dozens of panels, contextual menus, not to mention the huge collection of settings in the Options panel itself. It is a Herculean task to try to remember all those… but in fact, with Visual Studio’s Quick Launch it is not at all necessary to remember them. Tucked away in plain sight, as it were, in the upper right corner of Visual Studio is the Quick Launch bar. You can click there with the mouse or just press Ctrl+Q; either way will activate the input field. Then just type something you might want to do. Say for example you want to turn on line numbers in your editor. Type “number” in the box and Visual Studio gives you several choices:
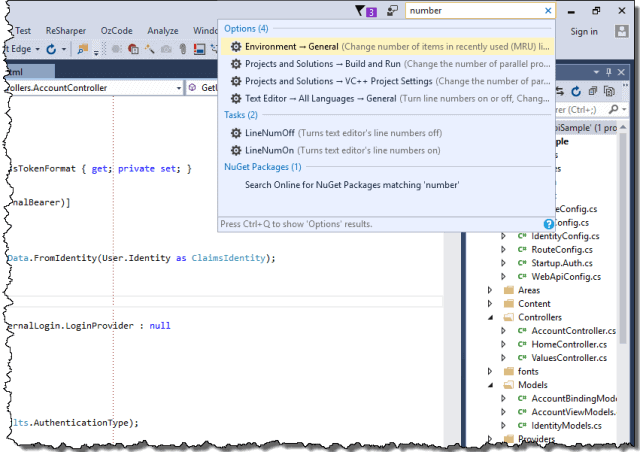
From here, you could select the last item in the Options section, where it indicates to “Turn line numbers on or off”. Selecting that will open the Options panel, with the correct subpage selected so you can toggle the option. Neat! So this is a great shortcut to navigate to particular sections of the vast and voluminous options panel. But that’s not all! Type something like “performance” in the Quick Launch box and you will see some entries for options, but also some entries for menu choices. So this is also a way to get to a menu entry quickly. And there are more categories; here is a complete list:
|
Category |
Shortcut |
Source |
Description |
|
Most recently used |
@mru |
built-in |
Shows the last 5 most recent entries that you have used from quick launch matching your current search criteria |
|
Menus |
@menu |
built-in |
Reveals menu items matching your current search criteria |
|
Options |
@opt |
built-in |
Reveals items from the Options panel matching your current search criteria |
|
Open documents |
@doc |
built-in |
Reveals any open documents whose file names or paths match your current search criteria |
|
Nuget packages |
@nuget |
built-in |
Shows installed nuget packages matching your current search criteria |
|
Actionable tasks |
@tasks |
Productivity Power Tools |
Besides just providing a shortcut to navigate somewhere in Visual Studio, the tasks category actually performs an action for you. |
Curiously the official MSDN documentation (Quick Launch, Environment, Options Dialog Box) is missing the nuget category, though that was introduced back in Visual Studio 2013.
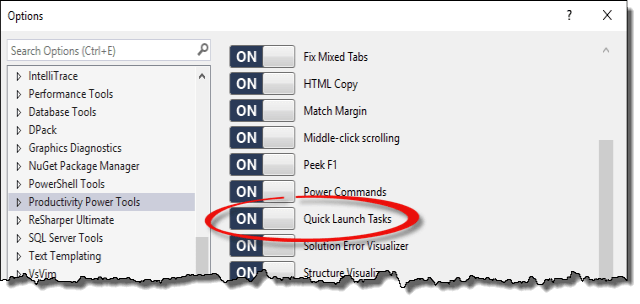
Let’s return now to the first example above, searching for “number”. I described how you could select the item in the Options category to open the right options page and then you could manually change the setting. But you don’t have to go to all that trouble. The ‘Tasks' section of the search results gives you actionable items without having to go anywhere or open other panels! if you just want to turn on line numbers now, just click on the LineNumOn item under ‘Tasks' and it is done. The tasks provider, however, is not built-in to Visual Studio. It is yet another cool feature provided by Productivity Power Tools, activated with (‘Options' >> 'Productivity Power Tools' >> 'Turn Extensions On/Off' >> 'Quick Launch Tasks'):
Finally, ‘Quick Launch' gives you the capability to filter to a particular category using the shortcuts shown in the table above. Specify a category by starting with an @ sign followed by a keyword. To be even more user friendly you can just type the @ sign and it will prompt you with keywords for each of the installed providers. So a more efficient way to get to the line numbers task is to just enter “@tasks number”.
Another useful reference on Quick Launch is Visual Studio 2013: Quick Launch.
Spell Checking
There are a number of spell checker plugins for Visual Studio, but there is one that really stands out and has been around for a while as well. This is a free plugin from Eric Woodruff (of Sandcastle Help File Builder fame) called simply Visual Studio Spell Checker (VS gallery page, usage notes). Once downloaded and installed with the Extensions Manager in Visual Studio, you will find a new ‘Spell Checker' submenu on your Tools menu:
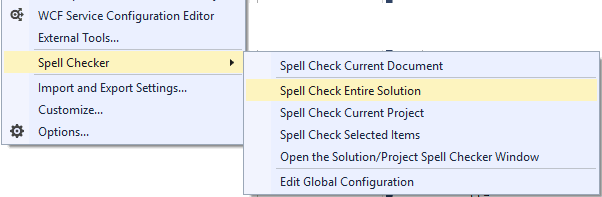
As the menu choices show, you have great flexibility in what you can check. Until quite recently, Visual Studio Spell Checker only did the basic “spell check as you type”. But now with this bounty of choices I no longer have to seek partial solutions elsewhere! In particular, being able to spell check an entire solution is vital to me. It allows you to see globally wherever you’ve made the same mistake and can make your entire solution consistent easily.
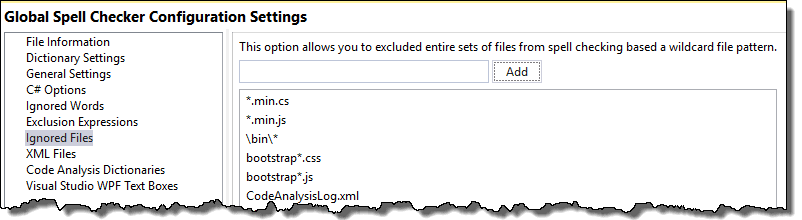
So my suggestion on using this is to first run the solution spell check—it runs very fast—and identify any third party files you want to exclude. That is, any spelling errors that show up in third party files are just noise from your project’s perspective. Select the Edit Global Configuration menu choice to add these files to the default list. In an ASP.NET project, for example, I quickly identified that I wanted to add angular*.js and jasmine*.js to the pre-existing list.
Woodruff has done a thorough job of providing ultimate flexibility. These global settings (stored in AppData) are truly global—they apply to any solution you subsequently open in Visual Studio. But you can override or add to these settings at the solution, project, folder, or even file level (and those settings are stored in the solution or project to which they apply, so can be shared via source control with your colleagues for consistency).
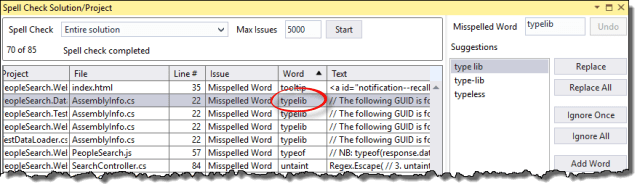
Adding in such files to exclude should reduce the noise in your output considerably. Next, you will likely have false positives that you can eliminate to reduce the noise even further. Again in the list of entire solution spelling errors list, sort by the Word column then manually scan for any false positives. In the example, I’ve identified “typelib”. Over at the far right the spell checker provides suggestions, but I don’t want to change this word, I want to ignore it. So even further right, at the bottom, I select Add Word to add it to the user dictionary, and all occurrences of typelib in the list immediately go away.
CSS Essentials
The aptly named Web Essentials from Mads Kristensen truly is. Essential, that is. It provides a broad spectrum of tweaks in Visual Studio but in keeping with the spirit of this article I focus here on just one specific aspect: working with CSS files.
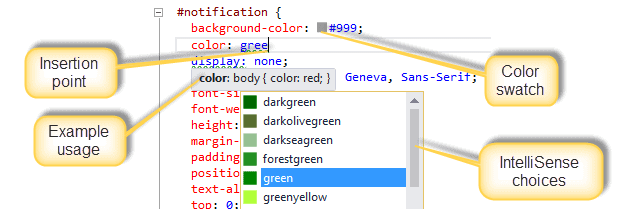
Specifying a color in a CSS file provides not just IntelliSense for the color names, but also provides actual color swatches for the names (as shown in the drop-down for the color attribute), and the selected colors are decorated with swatches as well (as shown for the background-color attribute). Whoohoo!
Next, hovering over any CSS selector provides a selector specificity tooltip. Specificity is one of those high-falutin’ sounding concepts that is fairly simple once you get the hang of it. In a nutshell, it determines which of multiple CSS rules ultimately gets applied to a given element on the page. Web Essentials reveals these specificity triplets for any value in your CSS file, so it can help you determine why the style you thought should be applied is not the one actually applied. The figure below shows an example of what it looks like.

I cannot do justice to explaining what these numbers mean here without going on far too long, so instead I’ll point you to some excellent articles: take a look at the Mozilla Developer Network (MDN) reference for Specificity, Joshua Johnson’s excellent article What the Heck Is CSS Specificity?, and Keegan Street’s handy Specificity Calculator.
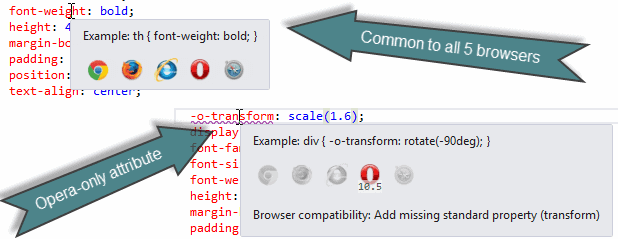
Finally, hovering over any CSS attribute provides a browser matrix tooltip. This reveals at a glance when you might unintentionally be using something browser-specific. The example shows first that font-weight is universally supported in all versions of all listed browsers. On the other hand -o-transform is supported only in Opera and only since version 10.5.
VsVim
Is Visual Studio’s default editor really your favorite way to type in your code? One source puts it as seventh in popularity, behind Notepad++, SublimeText, Vim, and a few others. I cannot speak for others in that list, but for vim there is a VsVim extension, allowing you to replace Visual Studio’s default editor with vim. Great news, if you are a long-time vim user, as I am. For those who have not heard of it, vim is an odd bird. Besides likely being older than you—vim dates back to the 1976 vi editor—it has managed to survive all these years from its humble Unix beginnings and spread to many other platforms, including Windows, Mac, Android, and iOS.
Vim has a substantial learning curve due to its large feature set—so much so that I don’t think any one person uses a majority of the available features. But if you are new to vim you don’t have to learn everything all at once; its built-in documentation allows you to learn as you go. Vim is designed to be purely keyboard driven (though you could use the mouse if you really want to). Vim is highly extensible, both from the availability of 3rd party plugins, and from its own macro language allowing you to define your own custom commands.
Once you get up to speed on vim, it definitely makes you more productive. Now with VsVim, the full vim experience is available inside Visual Studio so that you can edit and navigate around your code sans mouse. It really makes a difference.
Conclusion
“What, no more?” you exclaim. “How could I not include (fill in your favorite VS extension here)?”. Well, perhaps I use that but it did not make my top ten list. Or perhaps, given the voluminous list of extensions in Visual Studio’s gallery, odds are I’ve never heard of it. If you were paying close attention, you’ll note that I have only included nine in this “top ten” article. So, go ahead, share your favorite and little-known extension in the comments below to round out this top ten list.
This document contains proprietary information and is protected by copyright law.
Copyright © 2026 Red Gate Software Limited. All rights reserved
Load comments