
Windows Server 2008 Hyper-V offers a high availability solution by using Windows Server 2008 Failover clustering. The Virtual Machine is implemented as a cluster resource and when a host node fails, the Virtual Machine resource fails over to the other node. Like all other Windows Server 2008 Failover solutions, the resource is brought offline before it actually fails over. This results in a relatively small period of downtime which is unacceptable in certain environments.
Windows Server 2008 R2 Hyper-V offers a Failover clustering solution without any downtime for the Virtual Machine. This solution uses a new feature called “Cluster Shared Volume” or CSV and is called “Live Migration”. In this article I’ll explain what the CSV solution is and how it works.
Windows Failover Clustering
When creating a Highly Available Hyper-V environment, a Failover cluster needs to be created. A Failover cluster is a logical server consisting of two or more Windows Server 2008 servers. Windows Server 2008 supports a maximum of 16 servers in a Failover cluster.
These servers are called Cluster Nodes. All Cluster Nodes in the Failover cluster are connected to a shared storage solution where the data is stored. The Virtual Machines running under Hyper-V that need to be highly available are configured as a resource in the cluster.
Note. All servers in the cluster must run the same Operating System, all nodes must either be Enterprise or Datacenter Edition and for Live Migration all servers must run the same processor family (even the same processor stepping).
In a Windows Server 2008 Failover cluster, only one Cluster Node can be “owner” of the disk resource and only the owner of the disk resource can access the files (including the Hyper-V VHD files). Therefore, if a Virtual Machine needs to be failed-over to another Cluster Node, the complete disk resource needs to be brought down, moved to the other Cluster Node and be brought online again. The Virtual Machine is in a “saved state” during a cluster Failover. To bring the Virtual Machine in a saved state a certain amount of time is needed. For a Virtual Machine with only 256MB of memory this is only a short time, but a Virtual Machine with 8GB or 16GB can need up to minutes to be brought into a saved state. Starting the Virtual Machine on the new node will take the same amount of time. Needless to say, failing over a Virtual Machine can cause a significant downtime.
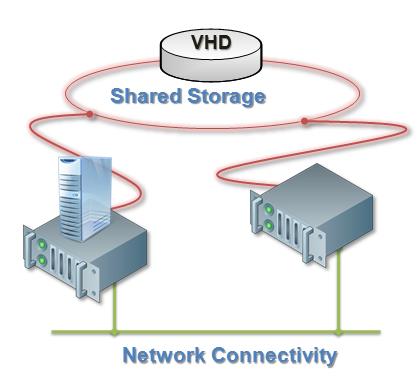
Figure 1. Two Hyper-V Servers in a Failover cluster, the Virtual Machine is stored on the Shared Storage
ESX Server has the functionality of migrating Virtual Machines from one Cluster Node to another without any downtime, and this always has been an issue with Hyper-V on Windows Server 2008. One of the highest priorities for Microsoft in Windows Server 2008 R2 was to add this capability.
In Windows Server 2008 R2 a new concept has been introduced: Cluster Shared Volumes or CSV. CSV offers the possibility for Windows Server 2008 R2 Cluster Nodes to access the shared volumes at the same time. As with Windows Server 2008, only one server can be the owner of the disk resource, but for Hyper-V, and only for Hyper-V, both servers can access the disk.
I say deliberately “only for Hyper-V” because other services cannot use the CSV option. If you use Windows Explorer to access the CSV disk you get an “access denied” error on the Cluster Node that is not the owner of the resource. So, when using CSV disk in the Hyper-V cluster, the need to Failover a disk resource when failing over a Virtual Machine has been removed.
What happens when failing over a Virtual Machine from one Cluster Node to another in the Hyper-V R2 cluster? When manually failing over the Virtual Machine, the configuration of the Virtual Machine is copied from one Cluster Node to the other Cluster Node. Then the Virtual Machine’s memory is copied from one Cluster Node to the other Cluster Node, this happens online. But since the Virtual Machine is still running, memory pages keep changing. During a Failover, Hyper-V keeps track of the changed memory pages, so when all pages of the initial copy are on the other Cluster Node the changed pages are copied as well. This is an iterative process and is repeated until only a few changed pages are left on the first Cluster Node.
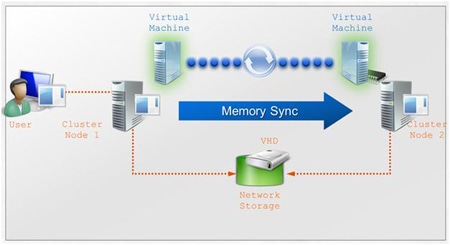
Figure 2. Copying memory pages from one Cluster Node to another and keeping them in sync
Then the Virtual Machine on Cluster Node 1 is shut down, the remaining memory pages are copied to Cluster Node 2 and the Virtual Machine on Cluster Node 2 is brought online. This happens in a fraction of a second and this process is fast enough that no clients will notice any downtime and is called a “live migration”.
Note. This process happens during a manually initiated Live Migration. When Cluster Node 1 unexpectedly crashes, the Virtual Machine crashes as well. Cluster Node 2 will notice this and start (reboot!) the Virtual Machine. This does mean a certain downtime, but this situation is more or less the same for every vendor.
Building a Hyper-V R2 Cluster with CSV
To build a Hyper-V R2 Cluster with a Cluster Shared Volume and two Cluster Nodes the following prerequisites need to be met:
- Two servers running Windows Server 2008 R2 Enterprise (or Datacenter) with Hyper-V and Failover clustering;
- Each Server should have at least four Network Interfaces:
- A Public Network for clients to access the Virtual Machine
- A dedicated iSCSI network;
- A heartbeat network;
- A Management Network;
- A Shared Storage solution with at least 2 LUN’s. A small one (for example 1 GB) that’ll be used as the Cluster’s Quorum and a large one (for example 500 GB) that’ll be used as the Cluster Shared Volume;
- Sufficient IP addresses on the Public Network as well as on the iSCSI Network.
Install Windows Server 2008 R2 on both Cluster Nodes and bring them up-to-date with the latest hotfixes using Windows Update (or any other patch management solution of course). After Windows Server 2008 R2 is installed, open the Server Manager and install the Hyper-V Server Role. Reboot the server when requested.
When the Hyper-V Server Role is installed, an External Network needs to be created on both Hyper-V Servers. This External Network will be used by Virtual Machines to access the ‘outside world’. On both Hyper-V Servers open the Hyper-V Management Console and click “Virtual Network Manager” in the Actions Pane. Select “New Virtual Network”, select the Connection Type of External, and click Add to continue. On both Hyper-V Servers use the same name for the External Virtual Network, for example “Public Virtual Network”. Connect this External Virtual Network to the Network Interface that is connected to the Public Network.

Figure 3. Creating the External Virtual Network
The next step is to configure two LUNs on the shared storage solution. In this example, the LUNs are 1GB and 500GB in size. Both LUNs need to be accessible for both Hyper-V Servers.
On the first Hyper-V Server, open the iSCSI initiator and connect the Server to both LUNs. Open the Server Manager and navigate to the Disk Management section. Bring both disks online (when needed), create two partitions and format them. Assign drive letters F:\ and G:\ to the partitions.
On the second Hyper-V Server, open the iSCSI initiator and connect the Server to both LUNs. Do not access the LUNs using the Server Manager, just connect the Server to the LUNs and that’s it.
Using the Server Manager, install the Failover Clustering components (Failover Clustering is a Server Feature and not a Server Role).
When installed, on the first Hyper-V Server open the Failover Cluster Manager (which is located in the Administrative Tools menu). To check if your configuration is capable of creating a Failover cluster select the “Validate a Configuration” option in the Actions Pane. Run the wizard, enter both Cluster Node names and run all tests.
When finished an HTML report is generated showing the results of the validation:
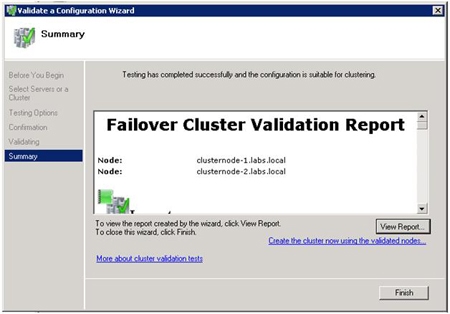
Figure 4. The Failover Cluster Validation Report
When you’ve reviewed the Validation Report and fixed any issues when needed, it’s time to create the actual cluster. In the Actions Pane of the Failover Cluster Manager select the “Create a Cluster…” option. When the wizard starts, add both Cluster Nodes, add the Cluster Name, and add the Cluster IP Address. When all variables are entered, the cluster is created by the Wizard. When finished, you have created your cluster, without any applications of course.
This is just an ordinary Windows 2008 Failover Cluster; we now have to add the CSV storage. In our test environment we have two disks:
- One 1GB disk acting as the Cluster Quorum;
- One 500GB disk that will act as the CSV storage.
After creating the cluster, the 500GB disk is just some storage in the cluster. When the Cluster is selected in the Navigation Pane, select “Enable Cluster Shared Volumes…” in the Actions Pane.
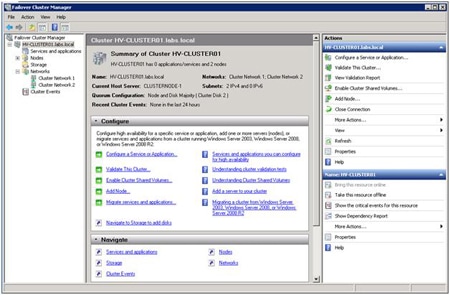
Figure 5. The Failover Cluster Manager. When the new cluster is selected you have the option to enable CSV in the Actions Pane
This will enable the Cluster Shared Volumes within your cluster. But since CSV is only available for Hyper-V a warning message is displayed. Check the “I have read the above notice” check box and click OK to continue.
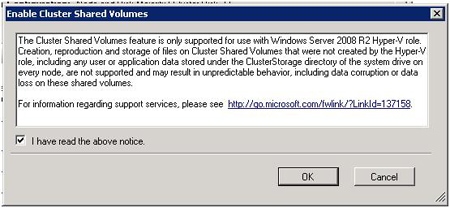
Figure 6. Warning message since CSV is only available for Hyper-V
When finished, a new option appears in the Navigation Pane, the Cluster Shared Volumes. When you select this you can add the CSV storage. This should be an empty disk that’s already in the cluster. Select the “Add Storage” option in the Actions Pane. Select the 500GB disk and click OK to continue. The disk will now be added as a CSV disk in the cluster.

Figure 7. The CSV Storage in the Failover Cluster Manager.
The CSV will not appear as a separate disk with a separate drive letter, but it will appear as a directory on the local C:\ drive, in this case C:\ClusterStorage\Volume1.
As stated before, the CSV storage will only be available for Hyper-V, although the CSV storage will appear on both Cluster Nodes at the same time. In Figure 7 you can see that CLUSTERNODE-1 is the owner of the actual disk resource. When you try to open Windows Explorer on CLUSTERNODE-2 it will fail, although you can see it in Windows Explorer. Using the CSV storage with Hyper-V Manager is not a problem though.
Using Hyper-V with CSV storage
To use Hyper-V with the CSV storage, the Hyper-V settings need to be changed. Both the Virtual Hard Disks as well as the Virtual Machines need to be configured to use the CSV storage.
Open the Hyper-V Manager on both Cluster Nodes and select “Hyper-V Settings…” in the Actions Pane. Enter the proper directory locations, for example:
- C:\ClusterStorage\Volume1\Hyper-V\Virtual Hard Disk
- C:\ClusterStorage\Volume1\Hyper-V
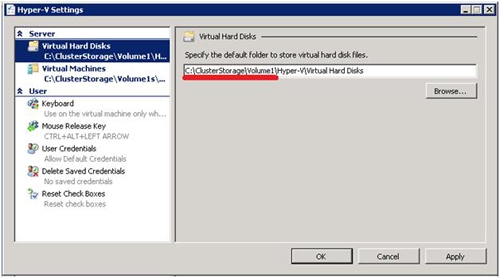
Figure 8. Change the Hyper-V settings to use the CSV Storage
Hyper-V is now ready to use the CSV storage and is able to Live Migrate VM’s from one Cluster Node to another Cluster Node.
In the Hyper-V Manager, create a new Virtual Machine and make sure that it uses the directory as configured in the previous step. Configure the Virtual Machine as needed and continue the installation of the Virtual Machine.
After installation of the Virtual Machine, shut it down and open the Windows Server 2008 Failover Cluster Manager. Under the Cluster Name, select the “Services and applications” node and in the Actions Pane select “Configure a Service or Application”. In the “Select Service or Application” pop-up dialog select “Virtual Machine” and click Next. Select the Virtual Machine that was just created and click Next two times. Click Finish to end the High Availability Wizard.
The Failover Cluster Manager now takes over the control of the Virtual Machine. To start the Virtual Machine right click it in the Failover Cluster Manager and select “Start”. The Virtual Machine will now be started and after some time you’ll be able to connect to the Virtual Machine.
To Live Migrate the Virtual Machine from one Cluster Node to another Cluster Node, open the Failover Cluster Manager and select the Virtual Machine. In the Actions Pane select “Live migrate virtual machine to another node” and select an available Cluster Node (CLUSTERNODE-2 in Figure 9).
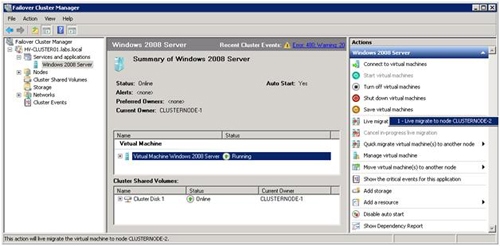
Figure 9. Live Migrate a Virtual Machine to another Cluster Node.
Connected Clients will not notice that the Virtual Machine failed over to another Cluster Node!
Note. If you use a Private Network for Internal Cluster Communications, make sure that you’ve enabled the “Client for Microsoft Networks” and the “File and Printer Sharing for Microsoft Networks”. If you do not enable this option, Live Migration of Virtual Machines will fail.
Conclusion
When using the Live Migration feature in Hyper-V R2, it is now possible to failover a Virtual Machine without any downtime, which was not possible in the first release of Hyper-V. The issues you have to be aware of are the Network Settings and the fact that Cluster Shared Volumes are only available to Hyper-V and not to any other service running on the Hyper-V server.
Management of the Hyper-V cluster will even be easier when using System Center Virtual Machine Manager 2008 R2, but that’s beyond the scope of this article.
This document contains proprietary information and is protected by copyright law.
Copyright © 2026 Red Gate Software Limited. All rights reserved
Load comments