
In an earlier article, based on the full version of Windows Server 2008 R2, I explained the new Live Migration option in Hyper-V R2. For security reasons it is recommended to use Windows Server 2008 R2 Server Core (or Hyper-V Server) for your Hyper-V needs but, from a management perspective, using Server Core can be painful, as I recently experienced at a customer. Not only is the setup of the server itself a different process, but setting up the iSCSI Shared Storage and Remote Management are also subtly different. Time for some guidance…
Server Core
In an even earlier article on Simple-Talk, I explained the architecture of Windows Server 2008 and Hyper-V. It is clear that the parent partition, sometimes referred to as the root partition, is basically a normal instance of Windows Server 2008 R2, with all its habits. So, that means you have to patch (and therefore reboot) the parent partition on a regular basis, which can be difficult, especially when a large number of virtual machines are running on this Hyper-V host. Also, the ‘attack surface’ can be significant, especially when (unwanted) applications are installed in the parent partition or when the parent partition is used for browsing the Internet, for example. Given that the parent partition controls the entire Hyper-V host, it’s therefore necessary to take significant steps to keep the root partition as safe as possible.
One option is to use Windows Server 2008 R2 Server Core as the operating system in the root partition. Server Core is a ‘stripped down’ version of Windows Server 2008 R2, and doesn’t contain a lot of the software and services that a normal version of Windows Server 2008 R2 would, which is reflected in the comparatively small number of hotfixes that should be applied to Server Core Servers. To be specific, Server Core only has a command prompt and a small number of graphical programs, like the date/time applet, the iSCSI applet or notepad, so most management has to be performed from the command line.
Just so we’re all on the same page, throughout this article, I’ll be assuming you want to set up a 2-server failover cluster (just because it’s a simple configuration), but you can, of course, extend the steps we’ll cover to setup as many servers as you need. Also, bear in mind that I’ll only be looking at the Windows Server side of the setup at this stage, and I’ll be covering the Hyper-V side of things in my next article. With that in mind, let’s get stuck in.
Installation of Windows Server 2008 R2 Server Core is easy; simply boot the server from the Windows Server 2008 R2 DVD and select “Windows Server 2008 R2 Enterprise (Server Core installation)” as the operating system. The Enterprise Edition is needed because we want to create a failover cluster to facilitate the Live Migration option.
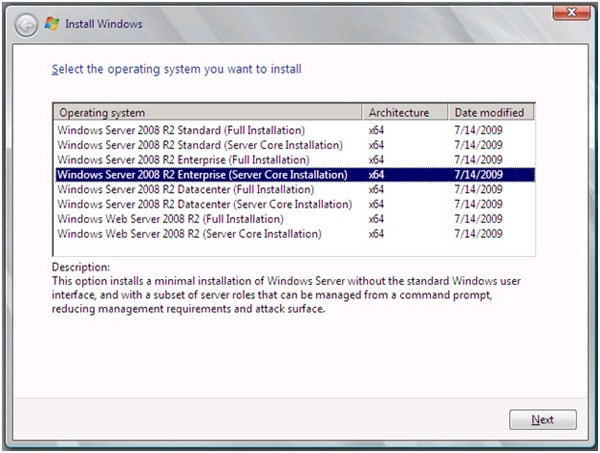
Figure 1. Select the Server Core option
Follow the installation wizard as you would for a regular Windows Server 2008 R2 Server. Since the process doesn’t have to install as many features as a Full Installation, it will finish rather quickly. After entering an Administrator password, rebooting the server and logging in, you’ll get the following screen:
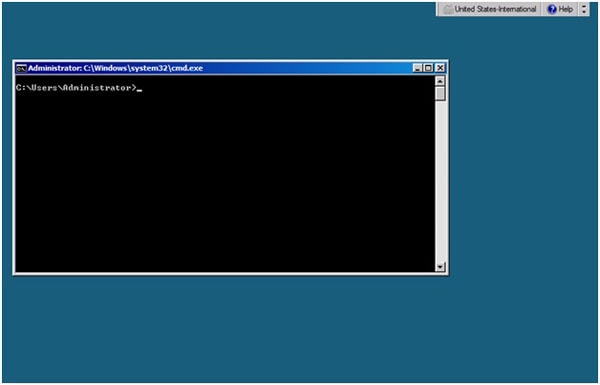
Figure 2. Windows Server 2008 R2 Server Core screen
Configuring a Windows Server 2008 Server Core (not R2, but the previous version) was always challenging, as we had to configure everything using command line tools like NETSH, WMIC, NETDOM and ISCSICLI. Not only was this difficult, but most Windows Administrators had absolutely no idea what they were doing, so they never knew if, for example, they had made the proper changes to the Windows Firewall, or maybe completely disabled the Firewall!
In Windows Server 2008 R2, Microsoft is using a utility called SCONFIG (which, in turn, is taken from Microsoft’s Hyper-V Server), which is a small, character-based utility that can be used to configure an R2 Server Core. This makes the Windows Administrator’s life much easier, and the Server Core Servers more safe. Now we’re going to look at configuring the newly-installed server, and while some of the steps will employ the SCONFIG utility, not all of them will. In any case, there are only a handful of options in SCONFIG you need to worry about at this stage, and we’ll go through them in order.
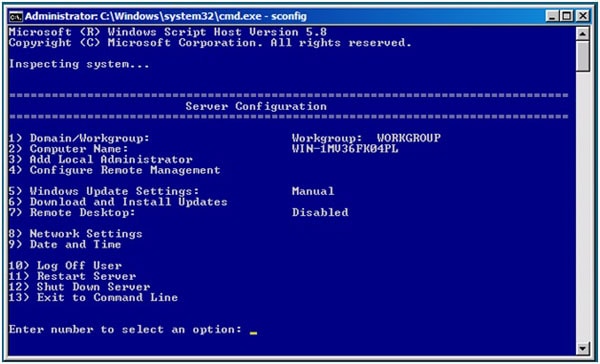
Figure 3. The SCONFIG utility to configure an R2 Server Core.
The Servers in this example are connected to three different networks:
- Public – this network is used by the clients to connect to the Virtual Machines running on the Hyper-V Servers;
- iSCSI – this network is used by both Hyper-V Servers to connect to the iSCSI Storage solution;
- Private – this network is used by both Hyper-V Servers for internal cluster communication.
To begin setting things up for the live migration, select option 8 In the SCONFIG menu (see figure 3, above) and enter the various network settings for the new server, like IP Address, Subnet Mask, Default Gateway and DNS Servers. Unfortunately, not all settings can be changed through the SCONFIG application; if you want to change the name of the network connection, for example if you want to change “Local Area Connection ” to a name like “Public“, you have to use the NETSH command. This cannot be done using the SCONFIG utility, so to change the network name from “Local Area Connection” to “Public”, you’ll need to enter the following command:
|
1 2 |
netsh interface set interface id="local" area connection" newname="Public" |
Repeat this step for the other 2 network interfaces as appropriate, and when you’re finished you can check the network configuration using the IPCONFIG command:
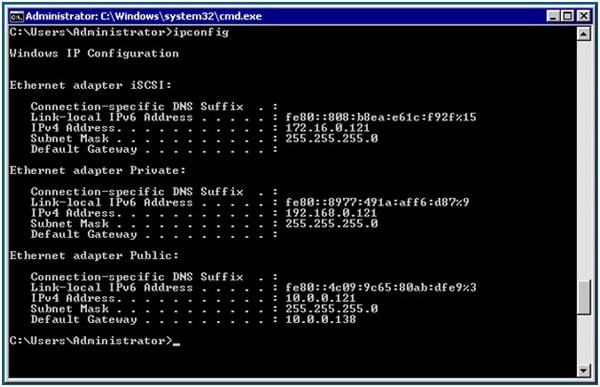
Figure 4. Checking your new network configuration.
When you’re finished with that, the newly installed server can be given a real name (using option 2 from the SCONFIG utility menu) and be joined to the network. Joining a domain is mandatory at this point, since this is a prerequisite for Windows Server 2008 R2 Failover clustering.
You should also consider option 7 in SCONFIG (remote desktop), as enabling the RDP functionality is very useful for administration purposes. Windows Server 2008, which required you to use the <netsh advfirewall firewall set rule group=”Remote Administration” new enable=yes> and the <cscript %windir%\system32\SCRegEdit.wsf /ar 0> commands, made the administrator’s life both difficult and dangerous, since this approach was prone to error. More to the point, most GUI-based administrators had no idea what the effect of all the commands were.
Lastly, Option 4 in the SCONFIG utility allows us to enable remote management on the server, which is useful for managing the server using a remote MMC snap-in, as you’ll see when configuring the iSCSI storage.
Once both servers are fully configured, it’s time to install the Hyper-V Server role on them; To do this, after logging on, enter the following command:
|
1 |
start /w ocsetup Microsoft-Hyper-V |
…and reboot the server when requested.
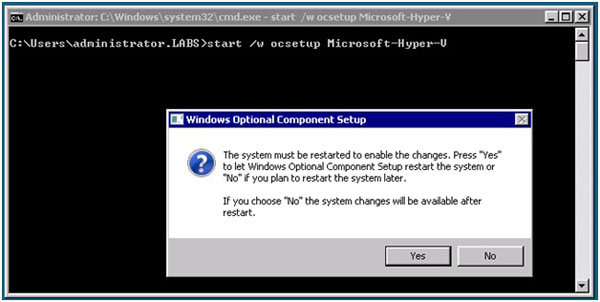
Figure 5. Sometimes you will see some graphical popup windows appear
The last step in preparing the servers is to install the Windows Server 2008 R2 Failover clustering software. After logging in to the server, you have to install the failover clustering role by entering the following command:
|
1 |
start /w ocsetup FailoverCluster-Core |
…and of course you have to repeat all the steps outlined above on all servers that will be members of the Failover Cluster, and make sure that all servers are configured identically.
iSCSI Shared Storage
When creating a Failover Cluster, you need some sort of shared storage; I’ll use an iSCSI solution, but this can just as easily be a Fiber Channel solution . Before configuring the iSCSI service on the servers, I’ve created two LUNs on the iSCSI storage, one of which is a mere 1GB in size (yes, one Gigabyte) and will be used as a quorum disk in the cluster. All cluster-specific information will be stored on this disk by the Failover Cluster. A second LUN of 1TB is created and will be used as the “Cluster Shared Volume” or CSV in the Failover Cluster, and the Virtual Machines will be stored on this CSV.
To configure access to the iSCSI shared storage solution, you have to start the iSCSI applet. This iSCSI applet is new in Windows Server 2008 R2 Server Core, and in the previous version (Windows Server 2008) all iSCSI functionality had to be configured from the command line, which was a horrible experience.
To start the iSCSI applet, just enter “iscsicpl” from the command line. The first time you start the applet, a pop-up window will appear to alert you to the fact that the iSCSI service not running on this server; click “Yes” to automatically start the iSCSI service.
Configuring iSCSI is extremely easy with this applet; just enter the IP address of the iSCSI Target and click on “Quick Connect“. The iSCSI applet will automatically detect the first iSCSI target, and also automatically connect. In our example there are two targets (the Quorum and he CSV), so select the 2nd target and click “Connect“. That’s it!
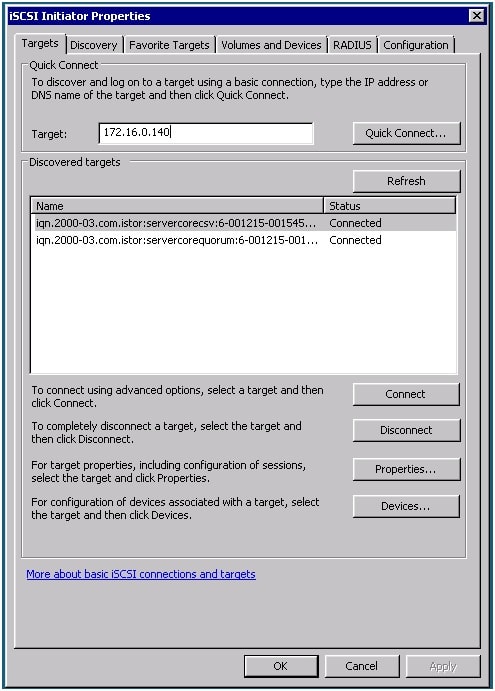
Figure 6. Configure the iSCSI storage using the iSCSI applet in Windows Server 2008 R2 Server Core.
Remote Management
From now on in this article, most of the Server Core Management will be performed from a Management Workstation which is running on Windows 7. To configure the disks on the Server Core servers, open the Computer Management MMC snap-in on the Management Workstation. Right-click on the server and select “Connect to Server” from the menu. Enter the Server Name (or use the Browse Button to search in Active Directory for the Computer Object) and, if you’ve enabled remote management on the Server Core servers, the Management Workstation will automatically connect. Select “Disk Management” and create a volume and format this volume appropriately: I’ve assigned the drive letter “Q” to the Quorum disk and the drive letter “F” to the CSV disk. Do this only on the first node of the cluster, as the other nodes will be configured automatically when creating the Failover cluster.
To manage the Hyper-V Servers and the Failover cluster, you’ll need the administration tools on the Management Workstation. You can easily download these from the Microsoft website. After installing these tools, you have to configure which ones you want to use using the “Turn Windows Features on or off” option in the “Programs” section of the Management Workstation’s “Control Panel“:
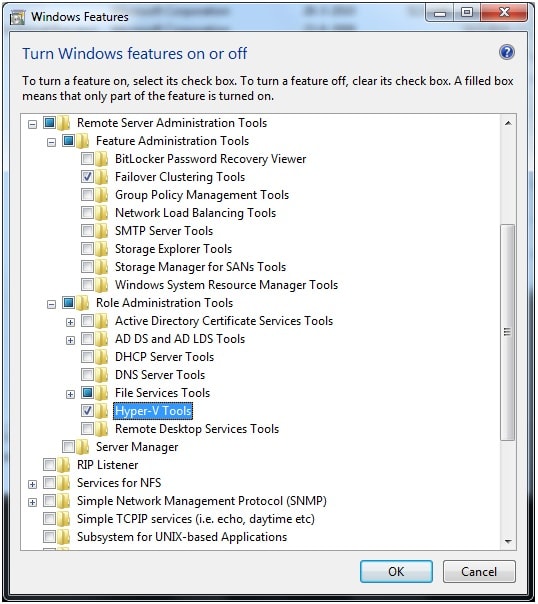
Figure 7. Enable the Failover Clustering and the Hyper-V Management Tools
From now on, configuring and managing the R2 Server Core Hyper-V Failover Cluster is no different from managing a “normal” Failover Cluster, except that it is managed from another server. Of course, you might be interested to note is that it is still possible to manage the cluster using cluster.exe.
To create the Failover Cluster, start the Failover Cluster Management snap-in on your Management Workstation, and select “Validate a configuration” in the Actions Pane. In the resulting wizard, enter both (or all) server nodes and select “Run all tests“. The Cluster service will now test the complete configuration and, when done, will create a Validation Report (stored as an HTML page) which you can use to see if any errors show up in the Cluster configuration. If there are any errors, correct them and run the Validation Wizard again. Alternatively, if no errors show up, you can then select “Create a Cluster” in the actions pane.
In the wizard that pops up, enter both (or all) server nodes again, enter the name and the IP address of the cluster you want to create, and then finish the wizard; the Failover Cluster is now ready to use. The Failover cluster manager will open automatically, and you can browse through your fresh cluster to see the 1GB Quorum disk and the 1TB disk of additional storage. You’ll also see the three network we created earlier.
But wait, you’re not done yet; you still have to configure the Cluster Shared Volume. In the Failover cluster manager, select the newly created cluster and, in the actions pane, select “Enable Cluster Shared Volumes“. Be aware that the CSV option is only available (and accessible) for Hyper-V. So, Hyper-V can access this shared storage from all cluster nodes at the same time, but all other services and application cannot, as explained by the pop-up window which will appear with this warning:
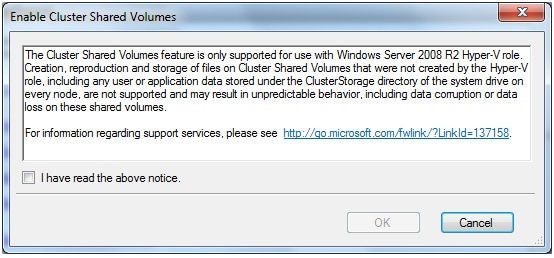
Figure 8. Cluster Shared Volumes are only available for Hyper-V!
When you’ve enabled Cluster Shared Volumes, it’s time to add the 2nd, larger disk as a CSV disk. In the navigation pane of the Failover cluster manager, select “Cluster Shared Volumes” and then, in the actions pane, select “Add Storage“. Select the 2nd disk and click OK, and this disk will now be added as a Cluster Shared Volume to the Hyper-V Failover Cluster.
Conclusion
Using Windows Server 2008 R2 Server Core, you can create Hyper-V Servers which are more secure than using full server Windows Server 2008 R2. However, managing Server Core servers is more difficult than managing it’s more full-featured relative, and you’ll need to take more steps to achieve the same goal. That being said, Microsoft made some considerable changes to R2 when compared to the previous version of Windows Server 2008, and these changes makes life for a SysAdmin much easier.
Just to recap, In this article I explained the steps needed to install and fully configure Server Core, as well as install Hyper-V and Failover clustering, and configure a CSV cluster. In my next article I’ll describe the Hyper-V part of such a cluster.
This article was commissioned by Red Gate Software, engineers of ingeniously simple tools for optimizing your Exchange email environment.
Learn more about Exchange Server Archiver and PST Importer.
This document contains proprietary information and is protected by copyright law.
Copyright © 2026 Red Gate Software Limited. All rights reserved
Load comments