
If you are involved in supporting test, training or development servers, then you will find that server- or host- based virtualization will solve many of your problems. Instead of having to stock up several physical machines, each dedicated to certain roles and functionality, you will be able to consolidate them onto a number of powerful boxes with speedy multi-core processors, massive RAM memory and fast disk drives with huge capacity. This will simplify administration, lessen the use of floor space, and reduce both costs and energy consumption.
In this article, I’ll use Microsoft’s host virtualization solution, Hyper-V, to build a representative test installation. Hyper-V is available as part of some editions of Windows Server 2008, or more recently as a free standalone product similar to VMware ESXi.
The Big Picture
Typically, a corporate infrastructure contains many servers providing core enterprise services such as network, directory, security, messaging and file and print. Of late, the concept of Unified Communications (UC) has gathered a lot of attention within the industry. Unified Communications is a term for the technologies that aim to integrate and coordinate the systems that provide telephony, email, instant messaging, video, voicemail, and group chat, and ensure that the communications reach the recipients in the most effective and timely way.
One beauty of using virtual machines (VM) is the ease with which you can add, remove and edit virtualized hardware components such as network adapters, RAM memory and hard drives at will. You can also roll-back an installation should something go wrong, as long as you have taken point-in-time snapshots. The test lab is designed to run satisfactorily on up-to-date machines equipped with 2GB or more RAM memory and plenty of disk storage on the host machine. You can then scale up the hardware to accommodate additional system demands and workload. Depending on the test scenarios being played out, the number of active running VMs can vary. Technically, there is no restriction imposed but the licensing model may limit the number of VMs that can be deployed, depending on the Windows Server 2008 edition chosen. As a starting point, all VMs are created with the standard configuration of default virtual devices, with the addition of the legacy network adapter setup to connect to one common internal, local-only (private) virtual network switch.
Although migrating virtual machine configuration (.vmc) and virtual hard disks (.vhd) created in Virtual PC or Virtual Server to Hyper-V is relatively painless, I shall instead cover the fundamentals of building the entire test lab from scratch with Hyper-V on a supported x64 machine. We’ll have to assume that you know how to run setup and accomplish basic tasks on your own without much hand-holding. I’ll try to highlight key points, and suggest tips and tricks to help to make the journey a lot smoother.
All guest server VMs will be built using the SP1 version of Windows Server 2003, as it is so widely deployed. Hyper-V will support both x86 and x64 guest VMs (or child partitions) running side-by-side, but we’ll choose the x86 edition so as to keep the overall memory requirement to a manageable level with minimum overhead. All this is done without the risk of losing functionality in the sort of application that most organizations will be working with.
You can find a checklist summarizing the test lab machines in Table 1.
|
name |
ram (mb) |
ip/24 |
roles / services |
configuration |
|
LABDC01 |
384 |
10.0.0.11 |
|
|
|
LABEX01 |
768 |
10.0.0.12 |
|
|
|
LABOC01 |
512 |
10.0.0.13 |
|
|
|
LABXP01 |
384 |
10.0.0.51 |
|
|
|
LABVT01 |
448 |
10.0.0.52 |
|
The Journey Begins
Active Directory (AD) provides resource authentication and authorization for third party solutions as well as all the Microsoft product family. You will need a solid Domain Naming Services network service to ensure problem-free operations across the entire AD forest. Therefore, the very first server (VM) should be set up as a Domain Controller (DC) and named as LABDC01 in our single forest, single domain infrastructure. For many good reasons, we must install the Microsoft DNS service and integrate it with Active Directory.

Figure 1: Configure and associate IP subnet with AD site.
We use the fully qualified domain name (FQDN) of testlab.local to scope the authoritative DNS and AD name space to the private intranet. Being the first DC in the domain implies that the Global Catalog role will also be automatically enabled. As a best practice, create an IP subnet object (10.0.0.0/8) and associate it with the Default-First-Site-Name AD object from which all applications that use AD directory services will gain optimal traffic routing (see Figure 1).
The default AD domain and forest functional levels are set at that of ‘Windows 2000 mixed’ and ‘Windows 2000’ respectively. In order to introduce Exchange 2007 as the messaging service, the target domain that holds one or more Mailbox server role must be at the ‘Windows 2000 native’ mode domain functional level or higher. Similarly, any AD domain with mailbox-enabled accounts (user, contact, etc.) – even with no Exchange 2007 Mailbox server role present – must be raised to this minimal domain functional level. To support Office Communications Server 2007, you will need to raise the domain functional level all the way to ‘Windows Server 2003’.
Messaging Service
The process of setting up Exchange Server 2007 with SP1 is a bit more tedious and time consuming. As a first step, you will need to install the WWW service from the Windows Server 2003 SP1 media. Unlike its predecessor, the SMTP service is not a requirement to setup Exchange 2007.You will save time and avoid frustration if you next download items 3 to 9 listed in Table 1 from your administrative workstation.
When you are ready, install the files in the order listed onto the VM named LABEX01 that is joined to the domain. You will require SP2 for Windows Server 2003 in order to run Exchange Server 2007 SP1 on this version of Windows. Because the Microsoft Management Console 3.0 is shipped as an integral part of Windows Server 2003 SP1 and above, you won’t need to install it separately. Likewise, all the pre-requisites would have been met and you can straightaway launch step 4 as soon as you run the Exchange 2007 with integrated SP1 executable.
The typical Exchange Server installation option offers the minimal server roles that are compatible for setup and running Exchange on the same machine, namely Client Access, Hub Transport and Mailbox server roles. Throughout the installation process, accept all the proposed installation options except one and name the Exchange organization TestLabExchange.
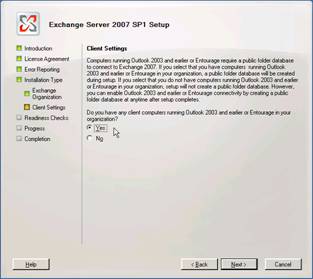
Figure 2: Configure download client compatibility
To maintain compatibility with Outlook 2003 and earlier or Entourage clients, confirm that the Yes radio button is selected at the ‘Client Settings’ page (see Figure 2); then you won’t have to worry about any extra configuration steps later on. Updates to the Active Directory schema and configuration is part of the Exchange installation process so there is another one less thing to be concerned with.
When you’ve completed setup and reboot the machine as prompted, your messaging platform is almost ready for service. Start Exchange Management Console on LABEX01 and create 2 new mailbox-enabled user accounts, say Alice and Bob. We have not yet mentioned the application clients which we shall do so next.
The Client Side
To model real world usage as far as possible, I suggest that you build two different client machines that run Windows XP SP2 and Vista SP1. Assign the names LABXP01 and LABVT01 and join them to the domain. On the respective systems, install the Outlook 2003 and 2007 clients. You may choose to set up other additional applications in the Office 2003/2007 suite. This will allow the Office 2007 applications to provide ‘click-to-dial’ and to supply information about the users’ presence to the Unified Communications system.
Next, log in to the XP desktop as Alice and Bob on Vista. Outlook 2007 on Bob’s desktop will attempt to automatically locate, connect and configure appropriate settings with the correct Exchange home server (LABEX01). In contrast, you will have to manually specify Alice’s SAM account or display name, and the name of the home Exchange server, to achieve the same results. With this out of the way, you can then proceed to run functional tests for mail, calendaring and scheduling: Then you can convince yourself that the core messaging services work as expected.
Extend Your Reach
Up to this point, the setup procedures for the basic test lab have been fairly straightforward. In order to provide Unified Communications functionality, you will have to face a lengthy setup process with Office Communications Server 2007.
Before we even begin, an internal Public Key Infrastructure (PKI) must already be present unless you are going to use digital certificates from public root Certificate Authority (CA) such as Verisign and Thawte. This strict requirement guarantees that all OCS server-to-server and server-to-client communication channels are properly secured. You will usually save cost with this approach if you have a large number of servers or clients that will not be directly accessible by or communicate with the general public from the Internet.
For the test lab, it is sufficient to install the Certificate Services configured as an Enterprise root CA. Use the name TestLabRootCA with the default settings on the DC itself (see Figure 3 and 4). End-user or machine certificate application and enrollment can be greatly simplified through the use of the web front-end. For this reason, the WWW feature must be installed on the DC. In real practice, a separate member server will fulfill this special role.
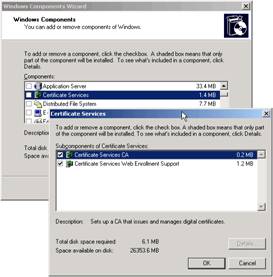
Figure 3: Setup Certificate Services
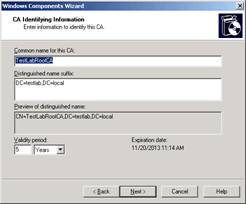
Figure 4: Configuring CA identifying information
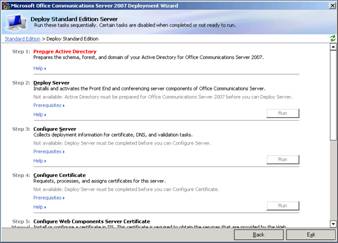
Figure 5: Deploy OCS Standard Edition (steps 1 to 8)
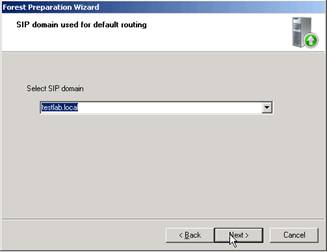
Figure 6: Configure SIP domain
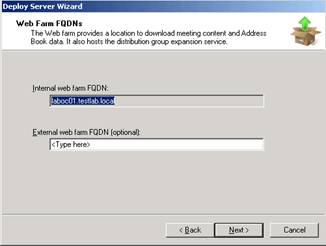
Figure 7: Specify Web Farm FQDN
For a simple OCS standard edition deployment scenario for internal user access, the core set of features such as Instant Messaging, Audio/Video and Web Conferencing all reside on the same machine. Again, the WWW service is featured prominently and must be installed ahead of time. Unlike Exchange Server 2007, OCS ships with all the pre-requisite applications. Once you start setup, you will have the opportunity to install the Visual C++ 2005 Redistribution Kit as well as the .NET Framework runtime. Similar to the other installations, you should login to LABOC01 with the built-in Administrator account in the domain. By default, this account has membership in the Domain Admins and Schema Admins groups. This permits you to execute steps 1 through 8 in sequence without having to switch to and fro to the DC that holds the critical Schema Masters and other FSMO roles (LABDC01); see Figure 5. I recommend that you use testlab.local as the SIP domain and laboc01.testlab.local as the internal web farm FQDN to keep things simple (see Figure 6 and 7). Otherwise, it is enough to accept all the default settings during the OCS setup. Note that AD Domain and Forest preparation steps are an integral part of the OCS installation process.
At the termination of validation step number 8, you can expect errors to surface because certain roles and features are not installed for a standard OCS setup. This can be safely ignored . Following that, pop in the Windows Server 2003 media and execute \i386\adminpak.msi. This is essential to enable user management and administration of OCS profile settings on LABOC01.
At the time of writing, Microsoft announced that OCS 2007 R2 will be released to manufacturing shortly. Like Exchange 2007, OCS R2 is supported only on the x64 platform in a production environment. What remains unclear is whether an x86 version will be made available for testing, evaluation and administration , as was the case with Exchange. Nevertheless, it should be easy to introduce OCS R2 into the OCS 2007 environment we are building here.
The Final Pieces
So that the Microsoft Office Communicator (MOC) client can automatically locate available OCS server pools without manual configuration, it is essential to setup the necessary SRV resource records in DNS. At a minimum, configure the _sipinternaltls._tcp.testlab.local to listen on TCP port 5061 on LABDC01 (see Figure 8). Once this is in place, go ahead and install items 3 to 5 in Table 1 on both the LABXP01 and LABVT01 clients. The Live Meeting and Outlook Conferencing Add-in clients are extra components responsible for the web conferencing feature. In OCS R2, basic service or help desk in the form of a full remote desktop client control feature is built right into the updated MOC client. The standalone Live Meeting client is still required for the full, rich conferencing experience.

Figure 8: Configure SRV resource record
You may want to restart the Windows client after installation completes. Although this is generally not required, you will then have the chance to identify any issues that typically surface only after a clean system shutdown and restart cycle is followed through. With a successful login to the domain, MOC queries DNS and your credentials will transparently be used to connect and sign-in to OCS.
To conduct the functional tests, observe that rich presence information (Available, Busy, etc.) is shown in MOC, Outlook as well as locally installed Office applications (See Figure 9 and 10). You can start an Instant Messaging conversation between Alice and Bob and escalate this to a collaborative web conferencing session. Using Outlook, it is possible to have appointments set up as ad-hoc or scheduled web conferencing sessions. For this to work, you must make the configuration changes on LAB0C01 as described in Table 1.
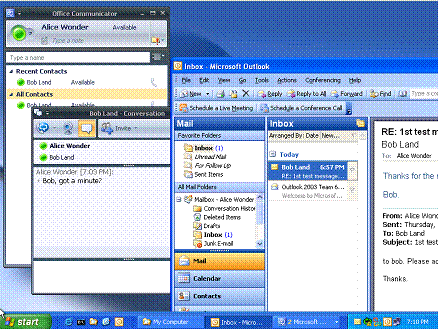
Figure 9: MOC and Outlook 2003 on XP client
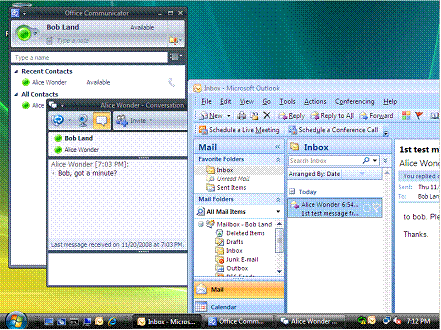
Figure 10: MOC and Outlook 2007 on Vista client
Wrapping Up
Generally, you should install the Hyper-V Integration Components into each guest VM. This is carried out to boost performance and enhance host-guest integration. Other than the machines with Vista SP1 and Windows Server 2003 SP2 in our test lab, all the other Windows operating systems do not fulfill the pre-requisites to support the integration components. Therefore, the integration components are not installed in our test lab at the expense of VM performance improvements. This is a deliberate decision and does not affect the lab infrastructure.
Not surprisingly, there are already a number of patches and hotfixes since the official RTM of the various products. After you determine that functional tests of the enterprise services (directory, messaging, unified communications, etc.) perform as expected, consider applying the updates to bring the applications current. Before you do that, it is a good idea to save a working set of all the VMs by using Hyper-V’s export feature. Subsequently, you can take a snapshot for each VM to enable quick rollback to a known state.
Using Hyper-V as the host virtualization solution is not without its shortcomings though. Because there is no native support for built-in sound card and USB devices, you cannot extend the test lab to include scenarios that involve enterprise voice communications (VoIP), Exchange 2007 Unified Messaging, fax integration or any hardware dependent services. Moreover, Novell SUSE Linux Enterprise 10 is the only non-Windows operating system supported in Hyper-V. You will have to look elsewhere if you are considering building integration solutions based on other Linux distributions or operating systems. One good example is the recently released Cisco Unified Communications Server 7.0 family of products.
To overcome such constraints, you can set up another physical machine to run VMware Server 2.0 or VMware Workstation 6.5 hosted on Windows 2003/2008 x64 editions. Unfortunately, these products will not even install when Hyper-V is detected on the host machine, therefore this extra hardware investment is essential.
Parting Words
By now, you should have a fully functional test lab to simulate a majority of real world scenarios. All traffic is confined to the internal network (local-only, private virtual network) and it does not take much to extend the test lab to cover external network segments. Subsequently, more VMs can be added to provide important services such as security, system configuration, monitoring and patch management. We’ll look at these in a subsequent article.
This document contains proprietary information and is protected by copyright law.
Copyright © 2026 Red Gate Software Limited. All rights reserved
Load comments