
Step functions allow complex solutions to process data in the background. This frees users from having to wait on the results while it is running. Imagine a use case where someone uploads a resume because sifting through resumes takes time, a background process can curate the data and have it ready for a recruiter. In this take, I will explore AWS step functions and show how they enable asynchronous processes without blocking. Apps, for example, are expected to show results within milliseconds. If a job takes longer than a few seconds, a nice approach is to run this asynchronously so it doesn’t block and force people to wait.
The sample code has a resume uploader built with step functions. Each lambda function represents a step in the workflow. Then, results are placed in a SQS queue for asynchronous consumption. To keep the sample code simple, the emphasis will be entirely on the asynchronous process because it is the core of a much larger solution.
Getting Started with Step Functions
To get started, you are going to need two things: .NET 6 SDK, and the AWS CLI tool. Instructions on how to set these up is beyond the scope of this article but you will find a lot of resources available. The sample code is also available on GitHub, so feel free to clone this, or simply follow along.
Next, set up the global AWS dotnet tool from AWS. This has the templates and commands necessary so you can use the dev tools available in .NET.
|
1 2 |
> dotnet tool install -g Amazon.Lambda.Tools > dotnet new -i Amazon.Lambda.Templates |
Then, spin up a new solution folder and solution projects.
|
1 2 3 |
> mkdir net-aws-step-functions > cd net-aws-step-functions > dotnet new serverless.StepFunctionsHelloWorld --region us-east-1 --name Aws.StepFunctions.ResumeUploader |
The template names read like run-on sentences so double check that it is in the serverless template. The one with StepFunctions in the name is the one you should choose. Pick the correct region, my region happens to be us-east-1, but yours might differ. Because the template scaffold is a little bit silly, I recommend flattening the folders a bit. This is what the folder structure looks like:
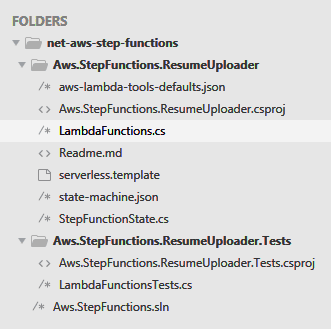
Figure 1. Folder structure
Be sure to rename the main files to LambdaFunctions and LambdaFunctionsTests. The State class has been renamed to StepFunctionState for readability. Also, double check the test project references the correct path for the main project and uses LambdaFunctions, which is the system under test. With both the test and main project in place, create a new solution file.
|
1 2 3 |
> dotnet new sln --name Aws.StepFunctions > dotnet sln add Aws.StepFunctions.ResumeUploader\Aws.StepFunctions.ResumeUploader.csproj > dotnet sln add Aws.StepFunctions.ResumeUploader.Tests\Aws.StepFunctions.ResumeUploader.Tests.csproj |
The solution file is mainly so the entire project is accessible via Rider, Visual Studio, or the dotnet CLI tool. Feel free to poke around the project files. Note the project type is set to Lambda, which is not your typical dotnet project.
The files generated by the scaffold might seem overwhelming, but here is a quick breakdown of what each one is meant for:
- aws-lambda-tools.defauls.json: provides default values for the deployment wizard
- LambdaFunctions.cs: main code file
- StepFunctionState.cs: state object
- serverless.template: AWS CloudFormation template file (optional, not in use)
- state-machine.json: workflow definition for the state machine
- LambdaFunctionsTests.cs: unit tests for TDD
Build the Step Functions
Step functions execute a workflow that gets captured in the state object. Crack open StepFunctionState.cs and define what properties the state must capture. As each step completes its own asynchronous task, the state is the one that gets the results.
|
1 2 3 4 5 6 |
public class StepFunctionState { public string FileName { get; set; } = string.Empty; public string StoredFileUrl { get; set; } = string.Empty; public string? GithubProfileUrl { get; set; } } |
In the LambdaFuntions.cs file, gut everything inside the class itself and put in place this code.
|
1 2 3 4 5 6 7 8 9 10 11 12 13 14 15 16 17 18 19 20 21 22 23 24 25 26 27 28 29 30 31 32 33 34 35 36 37 38 39 40 41 42 |
public class LambdaFunctions { private readonly IAmazonS3 _s3Client; private readonly IAmazonTextract _textractClient; private const string S3BucketName = "resume-uploader-upload"; public LambdaFunctions() { // double check regions _s3Client = new AmazonS3Client(RegionEndpoint.USEast1); _textractClient = new AmazonTextractClient(RegionEndpoint.USEast1); } // secondary constructor public LambdaFunctions(IAmazonS3 s3Client, IAmazonTextract textractClient) { _s3Client = s3Client; _textractClient = textractClient; } public Task<StepFunctionState> UploadResume( StepFunctionState state, ILambdaContext context) { throw new NotImplementedException(); } public Task<StepFunctionState> LookForGithubProfile( StepFunctionState state, ILambdaContext context) { throw new NotImplementedException(); } public Task<StepFunctionState> OnFailedToUpload( StepFunctionState state, ILambdaContext context) { throw new NotImplementedException(); } } |
The compiler should start complaining because IAmazonS3 and IAmazonTextract are missing. Go to the NuGet package manager and install AWSSDK.S3 and AWSSDK.Textract. For now, ignore compiler errors in the unit tests because this gets tackled next. Again, make sure the regions are set correctly so you can connect to the AWS services.
Step functions do not have the IoC container typically found in .NET Core projects. This is why the constructor has poor man’s dependency injection. The default constructor is for AWS, so it can initiate the workflow. The secondary constructor is for you and me, so we can write unit tests.
To practice Test-Driven-Development (TDD), simply write the unit test first, then the implementation. This helps you think about the design, and best practices before you flesh out the code itself.
In the LambdaFunctionsTests.cs file, gut everything in the class and write the unit test for UploadResume.
|
1 2 3 4 5 6 7 8 9 10 11 12 13 14 15 16 17 18 19 20 21 22 23 24 25 26 27 28 29 30 31 32 33 34 35 36 37 38 39 |
public class LambdaFunctionsTests { private readonly Mock<IAmazonS3> _s3Client; private readonly Mock<IAmazonTextract> _textractClient; private readonly TestLambdaContext _context; private readonly LambdaFunctions _functions; private StepFunctionState _state; public LambdaFunctionsTests() { _s3Client = new Mock<IAmazonS3>(); _textractClient = new Mock<IAmazonTextract>(); _context = new TestLambdaContext(); _state = new StepFunctionState { FileName = "-- uploaded resume --" }; _functions = new LambdaFunctions(_s3Client.Object, _textractClient.Object); } [Fact] public async Task UploadResume() { // arrange _s3Client .Setup(m => m.GetPreSignedURL(It.IsAny<GetPreSignedUrlRequest>())) .Returns("-- upload url --"); // act _state = await _functions.UploadResume(_state, _context); // assert Assert.Equal("-- upload url --", _state.StoredFileUrl); } } |
If the compiler complains about Mock missing, add Moq as a test project dependency in the NuGet package manager. Following the TDD red-green-refactor technique, write the UploadResume implementation to pass the test.
|
1 2 3 4 5 6 7 8 9 10 11 12 13 |
public Task<StepFunctionState> UploadResume( StepFunctionState state, ILambdaContext context) { state.StoredFileUrl = _s3Client.GetPreSignedURL(new GetPreSignedUrlRequest { BucketName = S3BucketName, Key = state.FileName, Expires = DateTime.UtcNow.AddDays(1) }); return Task.FromResult(state); } |
Note how every step in the workflow mutates the state object. Then, it returns the state, which can be asserted in the unit test. This is how step functions keep track of state as it makes its way through the workflow. Think of step functions as a state machine because the entire workflow is built around a state object like StepFunctionsState and each step fires independently via an event.
Next, flesh out LookForGithubProfile, I will spare you the details from the unit tests since they are already available in the GitHub repo. However, I do encourage you to write those yourself as an exercise to practice clean code.
|
1 2 3 4 5 6 7 8 9 10 11 12 13 14 15 16 17 18 19 20 21 22 23 24 25 |
public async Task<StepFunctionState> LookForGithubProfile( StepFunctionState state, ILambdaContext context) { var detectResponse = await _textractClient.DetectDocumentTextAsync( new DetectDocumentTextRequest { Document = new Document { S3Object = new S3Object { Bucket = S3BucketName, Name = state.FileName } } }); state.GithubProfileUrl = detectResponse .Blocks .FirstOrDefault(x => x.BlockType == BlockType.WORD && x.Text.Contains("github.com")) ?.Text; return state; } |
The S3Object belongs in the Amazon.Textract.Model namespace. This step function uses Textract which is one of the many machine learning services offered by AWS. It is capable of processing text inside a PDF file with a few lines of code. Here, the service looks for the candidate’s GitHub profile in the resume and sets it in the state.
Lastly, put in place an error handler in case something goes wrong during the upload process.
|
1 2 3 4 5 6 7 8 |
public Task<StepFunctionState> OnFailedToUpload( StepFunctionState state, ILambdaContext context) { LambdaLogger.Log("A PDF resume upload to S3 Failed!"); return Task.FromResult(state); } |
With the step functions taking shape, time to deploy this to AWS.
Deploy the Step Functions
Use the dotnet CLI tool to deploy the three step functions:
|
1 2 3 |
> dotnet lambda deploy-function --function-name upload-resume-step --function-handler Aws.StepFunctions.ResumeUploader::Aws.StepFunctions.ResumeUploader.LambdaFunctions::UploadResume > dotnet lambda deploy-function --function-name look-for-github-profile-step --function-handler Aws.StepFunctions.ResumeUploader::Aws.StepFunctions.ResumeUploader.LambdaFunctions::LookForGithubProfile > dotnet lambda deploy-function --function-name on-failed-to-upload-step --function-handler Aws.StepFunctions.ResumeUploader::Aws.StepFunctions.ResumeUploader.LambdaFunctions::OnFailedToUpload |
If you get lost, use the serverless.template file found on the GitHub repo as a reference. The tool will ask for a runtime, be sure to specify dotnet6. Allocate 2048 MB of memory and set the timeout to 5 seconds.
When prompted for a role, simply ask to create a new role, name it resume-uploader-executor, and do not grant any permissions yet.
Double check the step functions have been deployed successfully by login into AWS and checking the lambda functions. It should look something like Figure 2.
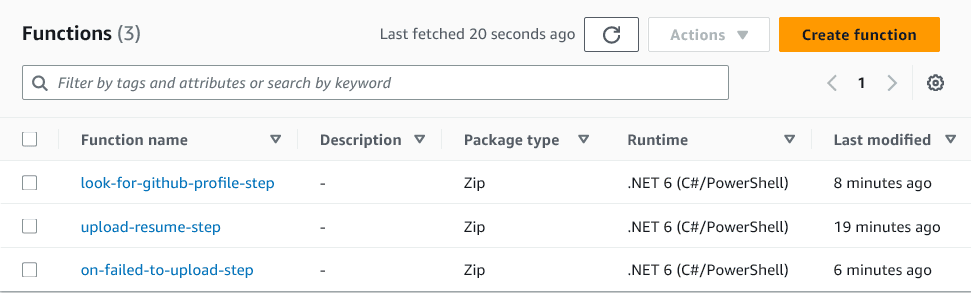
Figure 2. Step functions
Also, if you poke around each function, double check memory allocation, role assigned, and timeout.
Next, create the state machine. This is where the state-machine.json file with the workflow definition comes in handy. The Step Functions service in AWS has a tool to create the workflow visually. I recommend downloading the workflow definition from my GitHub repo then creating the workflow using the JSON file. The one gotcha is to verify you have the correct ARNs for the lambda functions because the workflow needs to know what to execute.
To create a state machine in AWS, follow these steps:
- click on Step Functions
- on the hamburger on the left, click on State machines
- click on Create state machine
- choose Design your workflow visually
- pick the Express type
- click on Import/Export, then Import definition
- choose the state-machine.json file, then click Import
Note the ARN values are missing in the state machine JSON file. Grab those from your lambda functions and place them in the workflow definition. Be sure to specify the SQS queue URL as well at the end of the workflow.
Specify a name for the state machine, like ResumeUploaderStateMachine. Create a new role for this workflow and create a new log group with a name like ResumeUploaderStateMachine-Logs.
If everything went well, you should see a nice visual of the workflow like the one in Figure 3.
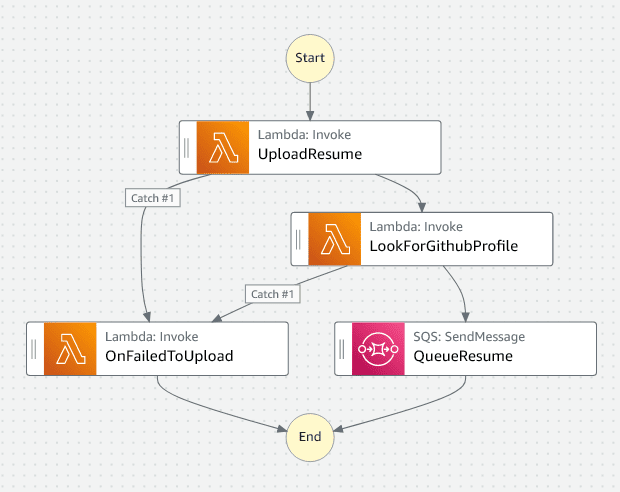
Figure 3. State machine workflow
Lastly, you need an SQS queue URL. Go to Simple Queue Service, click on Create queue then use all the default values. Be sure to give it a name, once the queue gets created it should have a URL available to put in the workflow definition.
This entire state machine is meant to be asynchronous. Meaning it is event driven by a user’s interaction within the system. AWS has S3 which is a Simple Storage Service where one can upload resumes, and this is what I will look at next.
Executing Step Functions
Unfortunately, AWS does not allow firing an S3 event that executes step functions automatically. There is a workaround via a lambda function that starts the execution, but this feels hacky. The hope is that in future releases step functions are treated like first-class events in AWS.
In the meantime, create an S3 bucket that will have all the uploaded resumes. In AWS, go to S3, click on Create bucket, and give it a unique name. The step functions code shown earlier expects the bucket name to be resume-uploader-upload, but yours can be different, just double check the code knows where to find the bucket. There is a sample resume in the GitHub repo you can upload, or you can create your own, simply pick a name like ExampleResume.pdf.
Now, to simulate an event that starts the workflow, use the AWS CLI tool to run the step functions:
|
1 |
> aws stepfunctions start-execution --state-machine-arn <arn> --input "{\"FileName\":\"ExampleResume.pdf\"}" |
Be sure to put the correct state machine ARN found in AWS. Step functions are asynchronous and event-driven so remember the output does not wait on execution to finish. This command simply says the workflow has begun and returns a timestamp without any further insight.
Note the input parameter in the AWS CLI tool. This specifies the initial state of the state machine that gets fed into the first step that runs in the workflow.
Go to Step Functions in AWS, right next to the Name column there is a Logs column you can click on. This opens CloudWatch with log streams so you can keep track of progress.
In the logs, you can see there is a LambdaFunctionFailed entry with a helpful error message: AccessDeniedException. This is happening because the individual lambda functions in the workflow do not have proper access.
To address this issue, go to IAM and click on the resume-uploader-executor role. Add the following two permissions:
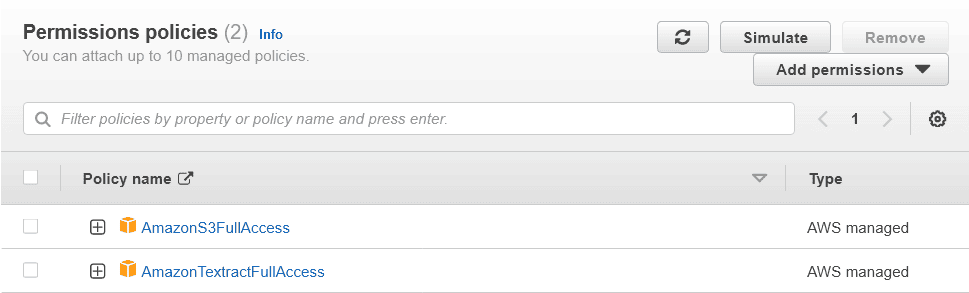
Figure 4. Role permissions
When troubleshooting step functions, a common cause for the workflow not working properly is due to lack of access. Once the permissions get applied, run the step functions again, and check the logs. This is the dev flow in step functions, everything is an event, so you must keep track of the logs to see what is happening.
Note each log entry has a type like LambdaFunctionScheduled, LambdaFunctionStarted, and LambdaFunctionSucceeded. This communicates that each step is treated like an asynchronous event in AWS. The only interdependency between events is the state which gets passed around in the workflow.
Lastly, check the SQS queue for the final output of the step functions. Be sure to nab the queue URL from the state machine definition and fire up the AWS CLI tool.
|
1 |
> aws sqs receive-message --queue-url <queue-url> |
Because the result is in AWS, you can also inspect the queue visually. Click on the queue name, Send and receive messages, then Poll for messages.
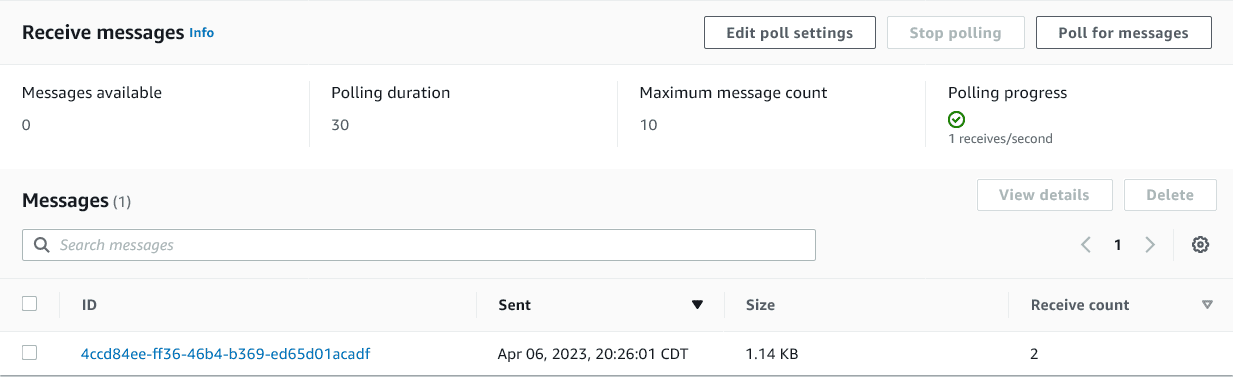
Figure 5. SQS polled messages
This message queue now has the processed resume data, which can be shown immediately to an actual user.
Conclusion
Step functions offer an exciting new way of working with asynchronous workflows. Everything in the workflow is an event and models the real world more closely. This way, the customer doesn’t have to wait on results and can simply get them when they are ready. Next, I can tackle starting the workflow via an AWS S3 event and wrapping all this complexity around a nice API interface.
This document contains proprietary information and is protected by copyright law.
Copyright © 2026 Red Gate Software Limited. All rights reserved


Load comments