
This article demonstrates how to export data from SQL Server to CSV files using PowerShell (without xp_cmdshell) and import data into SQL Server using OPENROWSET for fast, minimally-logged bulk inserts. The approach avoids third-party tools and uses only PowerShell for exports and T-SQL for imports.
The method works for CSV, text, and other delimited formats, and can be automated via SQL Server Agent jobs. The article also covers when to use this file-based approach versus alternatives like SSIS, Azure Data Factory, linked servers, and third-party tools.
Introduction
There are plenty of applications and tools available that allow for the movement of data in and out of SQL Server. Some tools are built by Microsoft, such as SSIS or Azure Data Factory. Others are created by third parties, such as Databricks or Snowflake. Still other available options make use of SQL Server features and rely on our own ability to write efficient code to get data from point A to point B.
Before diving into the specific solution presented in this article, there is value in recognizing that different data movement methods are better for different situations and data profiles. The following is a (brief) overview of when different types of tools might be most useful:
- Azure Data Factory, Azure Synapse Link: Ideal for data sources already in Azure, where these tools are conveniently available and file system/3rd party app access may be limited or inconvenient.
- SSIS: Convenient for on-premises SQL Server workloads or scenarios where SSIS is already used and an organization has existing expertise using it.
- Third Party Tools: There are many out there and their use is ideal when an organization is already invested in their applications or architecture. Mixing and matching ecosystems can be challenging, expensive, and require more overhead to spec-out security and data flows.
- Linked Servers: This is insanely convenient when moving data between two SQL Servers, but does require a secure connection between those servers. Linked servers are not ideal for large data sets and trying to efficiently run complex queries cross-server can yield unexpected results.
For the purposes of this article, we will focus solely on the task of moving a data set from one server to another. Topics such as ETL, ELT, data warehousing, data lakes, etc…are important and relevant to data movement, but out of scope for a focused discussion such as this.
Why (and Why Not to) Use Files?
The primary benefits of exporting data to files are:
- File portability. Once written, a file may be compressed, moved, copied, backed up, or otherwise manipulated freely without any impact on SQL Server.
- Bulk Loading. When reading a file into SQL Server, it can be bulk-loaded, which uses a minimally-logged process to import data faster while reducing the impact on the transaction log.
- Security. The only security need is a storage location to write the file to from the source server and a storage location to read the file from on the target server. There is no need for connections to other servers, services, or apps.
- Economy. In general, file storage and movement is inexpensive, whereas IO within SQL Server or other cloud services can be more costly. This varies from service-to-service, but for large data sets, data movement can quickly become a non-trivial cost.
The benefits above are also reasons to not use files. If you have no easy way to move the source file to the target destination, then portability provides no value. Similarly, if data loads need to be fully-logged for posterity or detailed, recovery (such as restoring to a point-in-time), then bulk-loading cannot be used. Lastly, if the resources needed to write/read a file from storage are not available for either the source or target server, then those would also be nonstarters.
If unsure of what method is best, consider testing the most feasible ones available to determine which are the fastest and most cost-effective. Scalability is also important. If you believe that the five servers you move files from may one day become one hundred servers, then consider if processes built now will scale up over time.
A Note on the Methods I will Use
Because there are many ways to import and export data, you may be quick to ask why I chose these specific methods. The choice of methods and code was based on two important factors:
- Security
- Speed
In terms of security, it was important to avoid xp_cmdshell or any other extended stored procedure that could provide security weak points by unnecessarily linking SQL Server to the file system. Enabling a feature like that creates a permanent security hole that is best left avoided. In this article I will use PowerShell to export data, which can read data from a table into a file and do so without needing any changes to SQL Server security. Similarly, to import data into SQL Server, I will useOPENROWSET to read a file, and then insert that data into a table without any other special security considerations.
Speed is also quite important here. Presumably, loading files like this will often be associated with analytics, logging, or other processes that tend to move large volumes of data. Ideally, these processes should be minimally logged and not consume excessive system resources. Writing data out to a file requires only reading the source table. There is no need for any SQL Server logging or writes, and once the data has been written to the CSV, our work on the source database server is complete without any cleanup or additional actions needed. Reading the file via OPENROWSET can take advantage of a minimally-logged bulk insert, which is key to performance here. Not needing to log the details of every row inserted into the target table will greatly improve the speed of this process. As a bonus, there will be no transaction log bloat, which will also avoid log file growth and potentially large transaction log backups.
Generating CSV Files from SQL Server Queries
Consider a query that needs to capture sales details for a given month. The results need to be imported automatically into another server. Here, we will walk through one way to automate this using the query, some PowerShell, and a SQL Server Agent job to execute the code.
The following is a query that pulls nine columns from a handful of tables in WideWorldImportersDW (which can be downloaded here from learn.microsof.com):
|
1 2 3 4 5 6 7 8 9 10 11 12 13 14 15 16 17 |
SELECT Sale.[Sale Key], [Stock Item].[Stock Item], Customer.Customer, Sale.[Invoice Date Key], Sale.[Delivery Date Key], Sale.Quantity, Sale.[Unit Price], Sale.[Total Excluding Tax], Sale.Profit FROM Fact.Sale INNER JOIN Dimension.[Stock Item] ON [Stock Item].[Stock Item Key] = Sale.[Stock Item Key] INNER JOIN Dimension.Customer ON Customer.[Customer Key] = Sale.[Customer Key] WHERE Sale.[Invoice Date Key] >= '2/1/2016' AND Sale.[Invoice Date Key] < '3/1/2016'; |
The month bounded by the WHERE clause may vary over time, but the general shape of the data will remain static. The results show us what this data looks like:
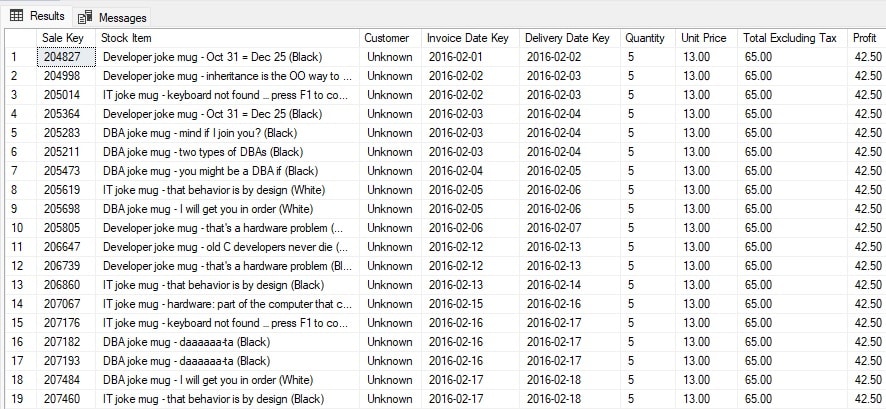
This is relatively straightforward data: Some dates, integers, decimals, and strings. Nothing unusual that might require special consideration. Note that file encoding may become relevant if the data source contains Unicode characters.
Create a New SQL Server Agent Job
To start, let’s create a new SQL Server Agent Job:
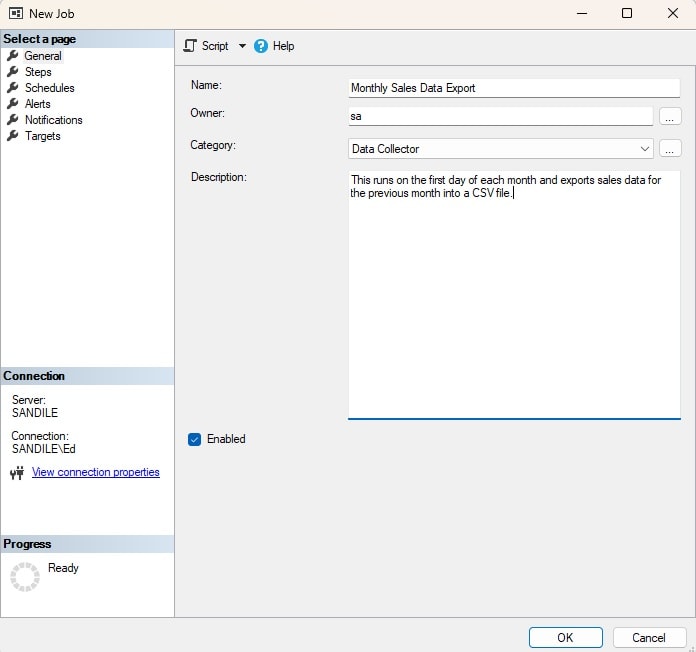
The details are entirely up to you and the conventions your database environment follows for names, categories, etc…For the moment, no schedule will be created as we can test this manually. Note that sa is used for the job Owner. Feel free to substitute it with any other job owner. (For more information, check out this blog post from Brent Ozar.)
The SQL Server Agent login will still be the one that is used to execute the job, regardless of its owner.
Next, go to the General pane, and click on the “New” button. Then choose PowerShell as the job type:
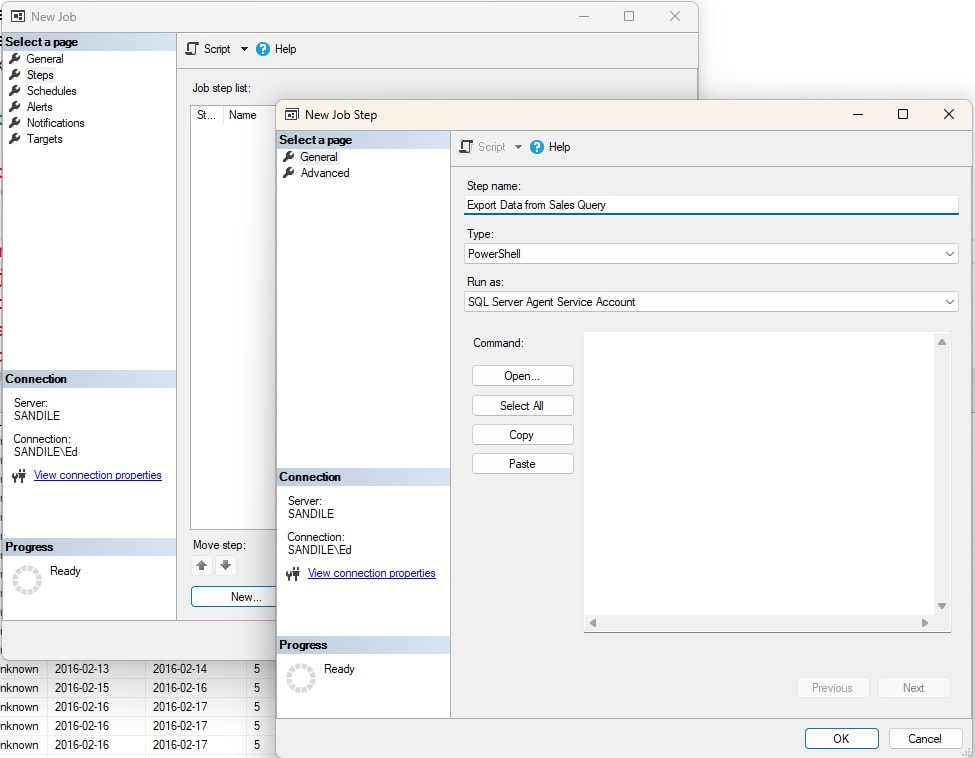
This is where the job creation pauses so that a PowerShell script can be written and tested. The steps that need to be accomplished are:
- Define the SQL Server connection and file destination.
- Define the query.
- Define the file name and format.
- Execute code to export the contents of the query to the file based on the specifications defined above.
Note that it is possible to export data using xp_cmdshell or some other SQL Server extended stored procedure, but those options are avoided due to the security concerns they raise. PowerShell can be executed from a SQL Server Agent job, a Windows task, or via a similar process.
To begin, the following code will outline the query source and destination:
|
1 2 3 4 5 6 7 8 9 10 11 |
$SQLServer = get-content env:computername $SQLDBName = "WideWorldImportersDW" $delimiter = "," $Today = Get-Date -uformat "%m_%d_%Y" $SqlConnection = New-Object System.Data.SqlClient.SqlConnection $SqlConnection.ConnectionString = "Server = $SQLServer; Database = $SQLDBName; Integrated Security = True;" $SqlCmd = New-Object System.Data.SqlClient.SqlCommand $SqlCmd.Connection = $SqlConnection $SqlAdapter = New-Object System.Data.SqlClient.SqlDataAdapter $FilePath = "C:\SQLData\DataExport\" |
The value for $SQLServer may need to be adjusted if a named instance is being accessed or if the SQL Server is not local to this machine. While the comma is used as the delimiter, other characters may be chosen. The date format is arbitrary and is used later when naming the file. Feel free to adjust it as needed or remove it if a timestamp is unneeded. Lastly, $FilePath is a local folder on my machine that the file can be exported to. This can also be adjusted to whatever location makes the most sense to export the CSV file to.
With the parameters for this process defined, the query to be executed can be added:
|
1 2 3 4 5 6 7 8 9 10 11 12 13 14 15 16 17 18 19 |
$SqlQuery = " SELECT Sale.[Sale Key], [Stock Item].[Stock Item], Customer.Customer, Sale.[Invoice Date Key], Sale.[Delivery Date Key], Sale.Quantity, Sale.[Unit Price], Sale.[Total Excluding Tax], Sale.Profit FROM Fact.Sale INNER JOIN Dimension.[Stock Item] ON [Stock Item].[Stock Item Key] = Sale.[Stock Item Key] INNER JOIN Dimension.Customer ON Customer.[Customer Key] = Sale.[Customer Key] WHERE Sale.[Invoice Date Key] >= '2/1/2016' AND Sale.[Invoice Date Key] < '3/1/2016'; " |
Note that there is no need to double the apostrophes as the T-SQL is entered in double-quotes (and it is PowerShell, not dynamic T-SQL). Next, the file destination needs to be defined and the query prepared for execution:
|
1 2 3 4 5 6 |
$SqlCmd.CommandText = $SqlQuery $SqlAdapter.SelectCommand = $SqlCmd $DataSet = New-Object System.Data.DataSet $SqlAdapter.Fill($DataSet) $FileName = "Fact_Sale_" + $Today + "_" + $SQLServer + ".csv" $FullPathWithFileName = $FilePath + $FileName |
As with the prior code, there is latitude here for customization. The file name and extension may be adjusted as needed to make your version of this process as easy to manage as possible. Ideally, files should be easy to identify via automated processes so it is simple to move/read them. In addition, regular cleanup of old files may be a helpful step as well. Lastly, the data set can be exported to a CSV:
|
1 |
$DataSet.Tables[0] | export-csv -Delimiter $delimiter -Path $FullPathWithFileName -NoTypeInformation |
The code above can be pasted into the SQL Server Agent job step from above. (You can download the code from the Simple-Talk website here).

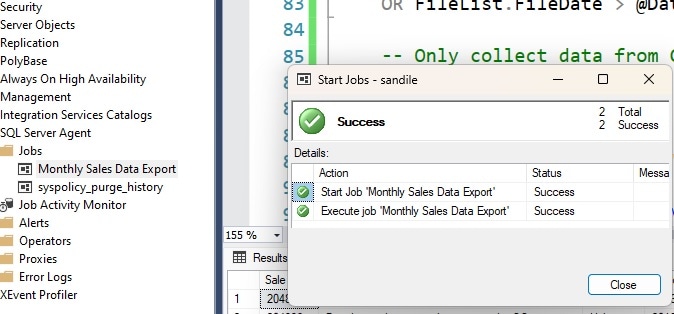
The job step and job can be saved. To test the newly created job, it will be run manually (if it does not work for any reason, editing the code in a tool like Visual Studio Code can be very helpful to find the issue. Common issues are security related, like the service account not having direct access to the directory you are exporting to.):
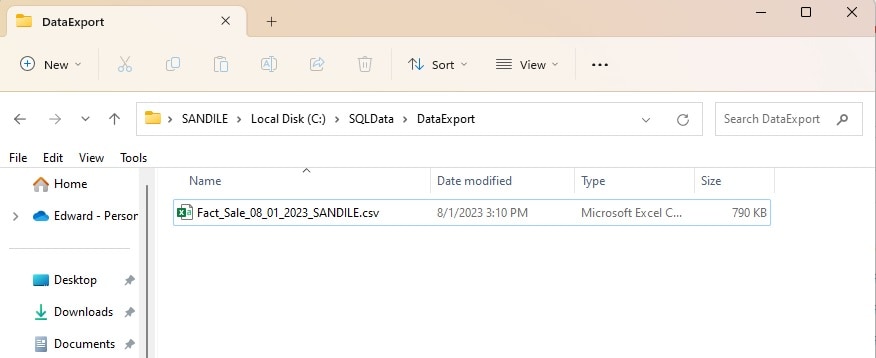
After the job succeeds, the target directory can be checked to confirm that the file was generated:
PowerShell may also be configured to run using the Windows Task Scheduler, which would allow it to run independently of SQL Server, without the need for a SQL Server Agent job. This may or may not be convenient but is an option that is available. This can be especially useful if you are working with an Express Edition server.
Note that there are many other ways to generate files from SQL Server that vary in process, simplicity, and need for operator intervention. You are welcome to use another method if it meets the needs of your database environment more effectively.
File Cleanup
If automatic cleanup is desired for CSV files, there are a couple of scenarios that can be handled here. First, if there is a need to remove empty CSVs, the following code can do that:
|
1 2 |
$path = "C:\SQLData\DataExport\"; Get-ChildItem -Path $FilePath -Recurse -Force | Where-Object { $_.PSIsContainer -eq $false -and $_.Length -eq 0 -and $_.Name -like '*.csv'} | remove-item |
This is useful if it is possible for empty files to be created and it is preferable to delete them than to move them around between file systems or servers and try to process them anyway.
Similarly, if there is no need to keep CSV files past a given retention period, a command like this can remove files older than a set number of days:
|
1 2 3 4 5 |
$limit = (Get-Date).AddDays(-7) $path = "C:\SQLData\DataExport\" # Delete files older than the $limit. Get-ChildItem -Path $path -Force | Where-Object { $_.Name -like '*.csv' -and !$_.PSIsContainer -and $_.LastWriteTime -lt $limit } | Remove-Item -Force |
This removes all CSV files older than 7 days and can be adjusted to whatever retention period is needed.
Automatic file cleanup of some sort is a good idea. Because forever is a long time to retain files! PowerShell can handle any retention scenario that can be dreamed up, whether similar to the examples provided here or not.
There are many ways to implement cleanup, such as a step added onto this SQL Server Agent job, a new job, or a Windows scheduled task. The method you choose should be based on your standards and what is easiest to maintain over time. Adding a step to this job is likely the simplest way to add cleanup, but not the only valid way.
Importing Data from CSV Files into SQL Server
Once created, data files can be compressed and moved to a target location, wherever that happens to be. PowerShell is an ideal tool for command-line operations, though you may have your own tools to accomplish common file manipulation tasks.
When complete, a file or set of files will now reside on a new server and be ready for import into a database. There are many ways to accomplish this task, each with strengths and weaknesses. The primary challenge when importing data into SQL Server using any method is aligning the data types in the source data set (the CSV files) with the data types in the target table. Anyone that has experience using the Data Import/Export Wizard in SQL Server Management Studio has undoubtedly felt the pain of mismatched data types, unexpected NULLs, and data truncation errors.
The first step to getting data imported into SQL Server is to have a table available that the data can be loaded into. It is critical that the data types in this table match the data types used earlier exactly. Mismatched data types can lead to data truncation, errors, bad data, and perhaps worst of all, a very difficult task of figuring out exactly where such errors are coming from in your source data!
This is a step that is worth double and triple-checking for accuracy! The following is the table structure that will be used for our staging table:
|
1 2 3 4 5 6 7 8 9 10 11 12 |
CREATE TABLE dbo.Fact_Sale_Staging ( [Sale Key] BIGINT NOT NULL CONSTRAINT PK_Fact_Sale_Staging PRIMARY KEY CLUSTERED, [Stock Item] NVARCHAR(100) NOT NULL, [Customer] NVARCHAR(100) NOT NULL, [Invoice Date Key] DATE NOT NULL, [Delivery Date Key] DATE NULL, [Quantity] INT NOT NULL, [Unit Price] DECIMAL(18,2) NOT NULL, [Total Excluding Tax] DECIMAL(18,2) NOT NULL, [Profit] DECIMAL(18,2) NOT NULL ); |
Note that while the column names match those used earlier, they do not have to match. A mapping can be created between source and target data if there is a need for differing naming conventions. That being said, there is value in consistency, and I recommend that column names are kept in sync between source data set, CSV file, and target table.
For our data import process, we will create an XML format file template up-front that will be used by OPENROWSET when data is read from the file. A prefabricated template provides some significant benefits, as well as a few drawbacks, including:
Pros:
- Guaranteed data type matching from source to target.
- Easy mapping of columns within the source data to target table.
- Flexibility to customize data type/length/terminator details extensively.
Cons:
- Schema changes in the source data must be reconciled with the format file prior to importing data.
- Mistakes in the format file will lead to errors
Note that that while format file mistakes will lead to errors when importing data, this is not completely a bad thing. Many operators would prefer an error to bad data or silent conversion problems.
Creating a Format File Template
We will create a format file template using XML. The file will be broken into three sections:
- Header
- Column size/terminator definitions
- Column names/data types
The header contains basic XML definition information and is universal to this format file, regardless of the tables/columns imported:
|
1 2 3 |
<?xml version="1.0"?> <BCPFORMAT xmlns=<a href="http://schemas.microsoft.com/sqlserver/2004/bulkload/format">http://schemas.microsoft.com/sqlserver/2004/bulkload/format</a> xmlns:xsi="http://www.w3.org/2001/XMLSchema-instance"> |
The next block of XML contains a row per column that describes field terminators, lengths, and collation:
|
1 2 3 4 5 6 7 8 9 10 11 12 13 14 |
<RECORD> <FIELD ID="1" xsi:type="CharTerm" TERMINATOR="," MAX_LENGTH="100"/> <FIELD ID="2" xsi:type="CharTerm" TERMINATOR="," MAX_LENGTH="100" COLLATION="SQL_Latin1_General_CP1_CI_AS"/> <FIELD ID="3" xsi:type="CharTerm" TERMINATOR="," MAX_LENGTH="100" COLLATION="SQL_Latin1_General_CP1_CI_AS"/> <FIELD ID="4" xsi:type="CharTerm" TERMINATOR="," MAX_LENGTH="100"/> <FIELD ID="5" xsi:type="CharTerm" TERMINATOR="," MAX_LENGTH="100"/> <FIELD ID="6" xsi:type="CharTerm" TERMINATOR="," MAX_LENGTH="100"/> <FIELD ID="7" xsi:type="CharTerm" TERMINATOR="," MAX_LENGTH="100"/> <FIELD ID="8" xsi:type="CharTerm" TERMINATOR="," MAX_LENGTH="100"/> <FIELD ID="9" xsi:type="CharTerm" TERMINATOR="\r\n" MAX_LENGTH="100"/> </RECORD> |
The numbers provided for FIELD ID should match the column order from the source table and CSV file. While it is possible to move these around, the resulting confusion is not worth the effort. The parts of this code that need to be modified with each different CSV file are the TERMINATOR, MAX_LENGTH, and COLLATION.
TERMINATOR will typically be a comma (for a CSV file), though it may be adjusted to another separator if the file was generated using another process.
MAX_LENGTH defines the maximum length that the column can be. If the column is a string, then the maximum length is whatever the column length is as defined in the source data set. For other data types, this maximum length should the most characters a column could consume. There is no need to be completely precise here on field length. A date may consume 10 characters exactly (MM/DD/YYYY), but if 20 or 50 or 100 is used, the performance difference will be negligible. Feel free to estimate, so long as the numbers used are greater than or equal to the actual column maximum length.
COLLATION is only used for columns that have a collation associated with them, which means only string/character columns. This includes CHAR, NCHAR, VARCHAR, NVARCHAR, TEXT, and NTEXT data types. If you work in an environment with many different collations, then there may be a need to add some additional code into the T-SQL code presented in the next section to handle that and ensure there are no collation conflicts when the file is read into SQL Server. Using an explicit or dynamic column list with COLLATE DATABASE_DEFAULT or something similar would accomplish the task effectively, if needed.
The final section of XML includes a row per column and additional details of the target table:
|
1 2 3 4 5 6 7 8 9 10 11 |
<ROW> <COLUMN SOURCE="1" NAME="Sale Key" xsi:type="SQLBIGINT"/> <COLUMN SOURCE="2" NAME="Stock Item" xsi:type="SQLNVARCHAR"/> <COLUMN SOURCE="3" NAME="Customer" xsi:type="SQLNVARCHAR"/> <COLUMN SOURCE="4" NAME="Invoice Date Key" xsi:type="SQLDATE"/> <COLUMN SOURCE="5" NAME="Delivery Date Key" xsi:type="SQLDATE"/> <COLUMN SOURCE="6" NAME="Quantity" xsi:type="SQLINT"/> <COLUMN SOURCE="7" NAME="Unit Price" xsi:type="SQLDECIMAL"/> <COLUMN SOURCE="8" NAME="Total Excluding Tax" xsi:type="SQLDECIMAL"/> <COLUMN SOURCE="9" NAME="Profit" xsi:type="SQLDECIMAL"/> </ROW> |
The data types may be a bit unfamiliar to those exposed to data types exclusively within databases. The following documentation assists in mapping SQL Server data types to the CLR data types used here:
While not wholly intuitive, the leap between these data types is not complicated.
As with the prior section of XML, ensure that the COLUMN SOURCE values match up with the FIELD ID values defined previously. NAME is the exact column name for the target table where this data will be imported to. Lastly, the type is the CLR data type discussed above.
Finally, the file should be concluded with a closing tag:
|
1 |
</BCPFORMAT> |
While creating a format file for the first time may be challenging, mistakes are relatively easy to resolve. For example, if the Quantity column were defined as a SQLDATETIME, instead of a SQLINT, the following error would be returned when importing the data:
Msg 257, Level 16, State 3, Line 40Implicit conversion from data type datetime to int is not allowed. Use the CONVERT function to run this query.
The error immediately implies that we should check DATETIME values and determine where a DATETIME is being mapped to an INT. In the example above, there are no other DATETIME columns, so locating the mistake is relatively painless.
Note: the XML file in its complete version is located in the downloads from the Simple-Talk website here).
A Note on Compression
If the CSV file that was generated earlier in this article is to be moved from server-to-server, then there is value in compressing it prior to moving it. Many popular utilities exist that can compress files, such as Gzip or 7Zip, or Windows’ built-in compression.
Regardless of whether the source table was compressed in SQL Server, the CSV file that is generated will not be. The larger the file gets, the more space that will be saved, reducing the bandwidth needed to move the file, and ultimately reducing the time needed to move it.
Importing Data to SQL Server
With the building blocks of a target table, CSV file, and format file complete, T-SQL may be written to import the CSV file. The script is relatively short and simple and leans heavily on the work that we have already done. Note that some parameters are defined at the beginning of the script and spliced into a dynamic SQL statement. If your file name/location never changes, you may use static T-SQL instead, and reduce the size of this code to 7 lines:
|
1 2 3 4 5 6 7 8 9 10 11 12 13 14 15 16 17 18 19 20 21 |
-- Adjust this to the local path where the file will be DECLARE @FileLocation VARCHAR(MAX) = 'C:\SQLData\DataExport\'; -- This can be determined dynamically, if needed. DECLARE @FileName VARCHAR(MAX) = 'Fact_Sale_08_01_2023_SANDILE.csv'; -- This is the schema name for the target table DECLARE @SchemaName VARCHAR(MAX) = 'dbo'; -- This is the target table name DECLARE @TableName VARCHAR(MAX) = 'Fact_Sale_Staging'; DECLARE @SqlCommand NVARCHAR(MAX); SELECT @SqlCommand = ' INSERT INTO [' + @SchemaName + '].[' + @TableName + '] SELECT * FROM OPENROWSET(BULK N''' + @FileLocation + @FileName + ''', FIRSTROW = 2, FORMATFILE = ''' + @FileLocation + @TableName + '.xml'', FORMAT = ''CSV'') AS CSVDATA;' EXEC sp_executesql @SqlCommand; |
Note, you can download the .CSV file on the Simple-Talk website here, if you only want to work on the importing code).
Some details about this code that can be customized:
- The file location, file name, schema name, and table name can all be adjusted to match the file that will be imported. If the table name, date, and server are all known, then those 3 strings can be concatenated into the CSV name with a bit of additional work.
FIRSTROWdepends on whether header data exists in the CSV file. Our file contains a single row at the start of the file with column names, therefore the first data row is 2.FORMATFILEis the location/name of the format file. Here, I chose to match the format file name and target table name. You may adjust this if convenient to be something else.FORMATwill be CSV, if CSV is the source file format.
Using BULK with OPENROWSET allows for a minimally logged bulk import of data into the target table. This is ideal for large analytic data loads, where full logging can be time-consuming and resource intensive. There are prerequisites for minimal logging, which can be reviewed here: https://learn.microsoft.com/en-us/sql/relational-databases/import-export/prerequisites-for-minimal-logging-in-bulk-import?view=sql-server-ver16.
When executed, the result is a speedy import of 5,196 rows and a success message:

Lastly, we can review the data that was imported into SQL Server:

The first time that data is imported from files, there is value in manually examining some of the data to ensure that it looks correct. Special attention should be paid to:
- Data Types
NULLvalues- Truncation/data length
The data set used in this article intentionally had no NULL values in any of the columns. If the source data set can be formatted effectively to remove NULL values and clean up abnormalities, then the import of data later on will be smoother and easier to manage.
It is far easier to debug data issues in the source data than those that occur downstream after data has been exported, compressed, moved, and imported.
If NULL is not removed from the source data (or somehow managed), then it will appear as the string “NULL” in the CSV. If that NULL string is mixed into an INT, DATE, or other non-string column, then it may result in unexpected errors or unusual data when imported.
To summarize: Agree on a way to manage data types, sizes, and NULL prior to exporting data.
Read also:
JSON data handling in SQL Server
XML storage and parsing in SQL Server
Temporary tables for staging imported data
Conclusion
The importing and exporting of data is likely one of the greatest administrative hassles to face data professionals. The number of ways in which things can go wrong is innumerable. Having a well-architected, tested, and reliable process to manage these processes can save immense time as well as greatly improve data quality.
Many of the manual GUI tools for moving data around are time-intensive, error-prone, and can lead to invisible bad data that is not detected until it is too late. When these processes can be automated, then the removal of the human factor can further speed up data generation/movement.
This article walked through a step-by-step approach for exporting data from SQL Server and then importing it into another SQL Server. There are many ways to accomplish this task. Feel free to experiment and customize to determine which methods and details are most effective for the tasks that challenge you.
All files and code used in these demos are provided for you to review and learn from. If you have any questions or ideas for future improvements, feel free to share with me anytime!
Fast, reliable and consistent SQL Server development…
FAQs: Exporting and importing data into SQL Server using files
1. How do you import a parquet file into SQL Server?
Use OPENROWSET with the BULK option and specify the parquet format. SQL Server 2022+ supports reading parquet files directly: SELECT * FROM OPENROWSET(BULK ‘filepath.parquet’, FORMAT = ‘PARQUET’) AS data. For earlier versions, convert parquet to CSV first using PowerShell or Python, then use OPENROWSET with FORMAT = ‘CSV’. For Azure SQL, use OPENROWSET with an external data source pointing to Azure Blob Storage.
2. How do you export SQL Server query results to a CSV file?
Use PowerShell’s Invoke-Sqlcmd to execute the query and Export-Csv to write the results: Invoke-Sqlcmd -Query ‘SELECT * FROM dbo.Orders’ -ServerInstance ‘ServerName’ | Export-Csv -Path ‘C:output.csv’ -NoTypeInformation. This avoids xp_cmdshell (a security risk) and integrates with SQL Server Agent for scheduling.
3. What is OPENROWSET and when should you use it for imports?
OPENROWSET is a T-SQL function that reads data from an external data source (file, linked server, or blob storage) without a permanent link. It supports minimally-logged bulk inserts, making it fast for large file imports. Use it for ad-hoc imports or automated file processing. It requires the BULK INSERT permission and, on SQL Server, the file must be accessible to the SQL Server service account.
This document contains proprietary information and is protected by copyright law.
Copyright © 2026 Red Gate Software Limited. All rights reserved


Load comments