
In this article, I am going to describe how to use the .NET SDK to build Cosmos DB client applications with the SQL API. You will see how .NET SDKs are useful for efficient programming and how to leverage them to perform various operations on Azure Cosmos DB. My last article covered core concepts in Cosmos DB and how to setup the Local Emulator to imitate creating collections and documents. This article will focus on creating and querying the collections and documents through the .NET SDK using C# code. It will also go over how to consume the Azure Cosmos DB Emulator through a client application.
Why Use an SDK?
Let’s begin with a brief overview of the .NET SDK and its importance in the world of application development. Microsoft Azure provides a platform that can be used to build highly scalable and reliable applications with ease. Like almost every other service in the cloud, Cosmos DB supports building web-scale applications.
You might be aware that almost every service on Azure uses REST (Representational State Transfer) APIs that supports HTTP operations. These HTTP requests provide an ability to create, update, delete and retrieve access to a service’s resources. You can use any HTTP client to perform any operation on Cosmos DB as long as you use the correct resource URL to point to a valid Cosmos DB resource you want to work on and the HTTP headers contain the proper authentication. The most primitive way to access the resources in the Cosmos DB is to issue REST calls, these REST requests are very tedious to create. You will have to keep track of very small details such as constructing a proper header messages and the body of the message so that it is accepted by the receiving Azure services. Additionally, you will also have to take care of deconstructing the responses received from the services.
To make a developer’s life more hassle-free, we have SDKs. As defined on Microsoft Documentation, .NET/.NET Core Software Development kit (SDK) is a set libraries and tools that allows developers to create applications and libraries. Today Microsoft provides SDKs for .NET/.Net Core, Python, Node.JS and JAVA. If you are developing an application on any of these platforms, then using the SDK makes your development experience much smoother as compared to making the REST and HTTP calls. SDKs abstract away the low-level details. Behind the scenes SDKs will take care of setting up the HTTP headers, making the REST calls and deconstructing the response back from Cosmos DB.
Let’s first go over the main components that we will be heavily relying on to create an application which connects and performs various operations on Cosmos DB emulator. In the next section, I will give you a brief overview of these components and you will see how they are helpful for creating a client .NET application.
What’s Needed to Create the Application?
This application is not difficult to create, but it relies on a handful of technologies and techniques described in this section.
Azure Cosmos DB .NET SDK – The Azure Cosmos DB / Document DB (SQL) API.NET SDK added to your project through the NuGet Package Manager.
DocumentClient instance – For accessing the Cosmos DB account through your client application, you will need to create a DocumentClient instance. You will have to supply endpoint and keys to the Cosmos DB account to the DocumentClient constructor. Once you have the DocumentClient, instance you simply call methods to perform various operations on the database such as Create/Modify/Delete Databases and Collections, Query Documents and Stored Procedures.
NOTE: See my previous article on setting up a Cosmos DB database in the local Cosmos DB Emulator.
Asynchronous operations – Post Operations to the Cosmos DB will be Asynchronous so the client code does not get blocked waiting for Cosmos DB after issuing requests. This article will use the useTask Parallel Library’s task objects as well as the async and await keywords. Let me give you a brief overview of what exactly async and await are.
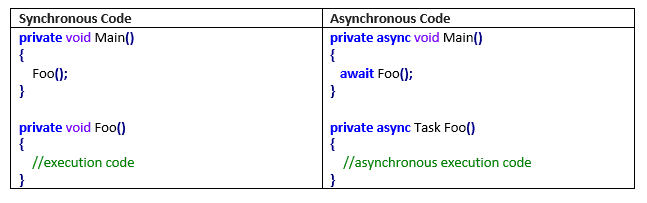
Async and await are the main keywords used in asynchronous programming. Through asynchronous programming you can make your application much more responsive, and it also helps in reducing performance bottlenecks. Using async/await you can write asynchronous code that looks synchronous. Your code will wait for the method to finish its job even though, normally, it wouldn’t because this is asynchronous call. For async to work you have to mark the method as having asynchronous behavior with the async keyword. You will have to call these methods using await keywords. Remember that every async method always returns a Task object. If that method has nothing to return then, it just returns the Task object. For instance, in the code below, the Foo() method is marked as async. Since it returns nothing, the return type is the plain Task object, which is practically same as returning a void. If you have some value to return such as bool or string, then you will use a generic form of Task object such as Task<bool> or Task<string>.
LINQ: Language Integrated-Query can be used to write a query expression with standard query operators in a declarative way in .NET supported programming languages. If you prefer to use LINQ over SQL then, .NET SDK supports a LINQ provider that can translate LINQ queries into Cosmos DB SQL for execution.
I assume at this point you might have a basic idea of all the important ingredients you need to cook your recipe, i.e. to develop a Client application and perform various operations on Cosmos DB.
Creating an Application with the Azure Cosmos DB .NET SDK:
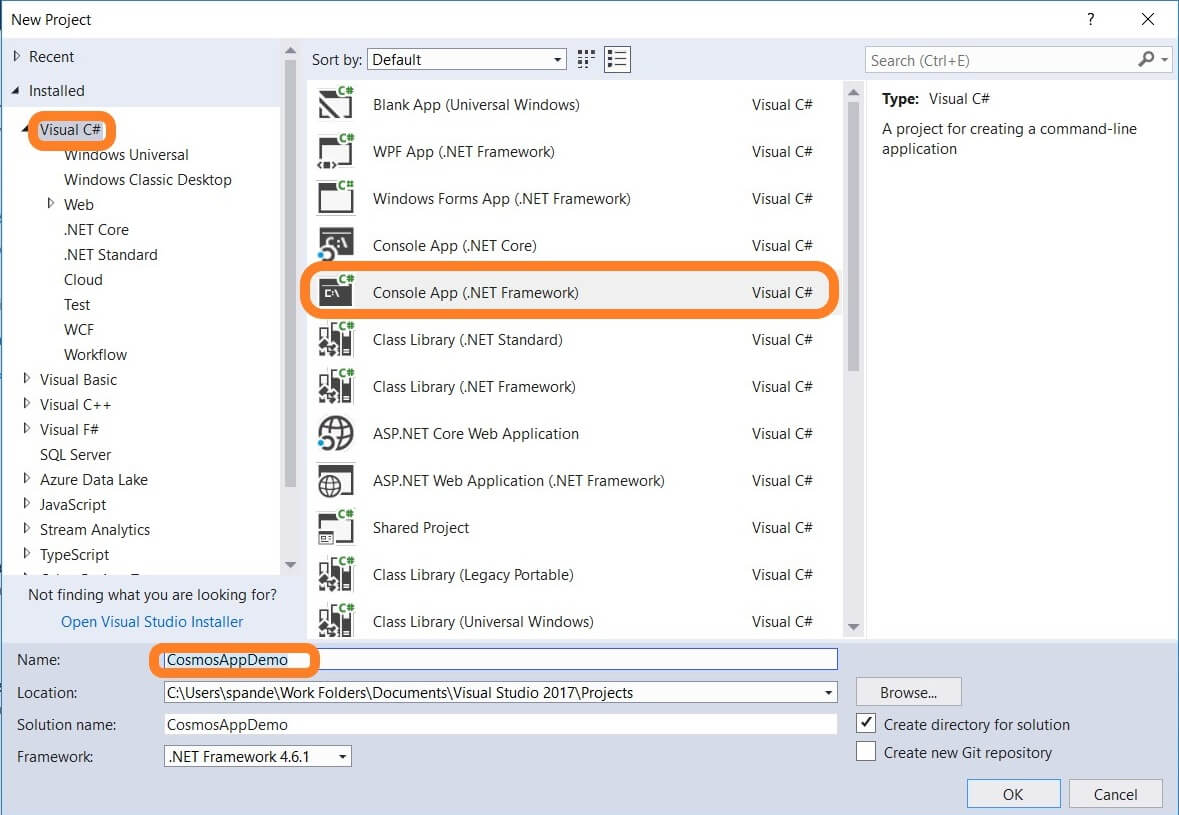
Here I am going to demonstrate how to create a .Net console application and use the Azure Cosmos DB .NET SDK. Start with a new Console application in Visual studio. For this go to File -> New -> Project which opens a new window. Select Visual C# -> Console App (.NET Framework). Provide a name for your Application, such as CosmosAppDemo.
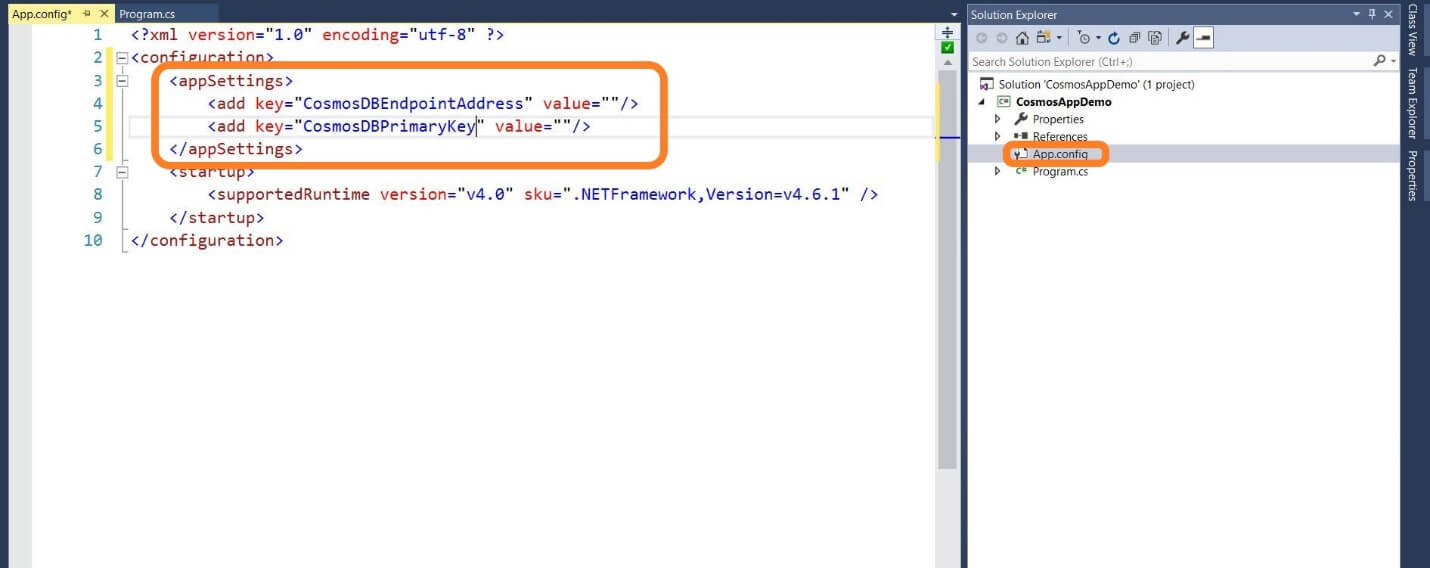
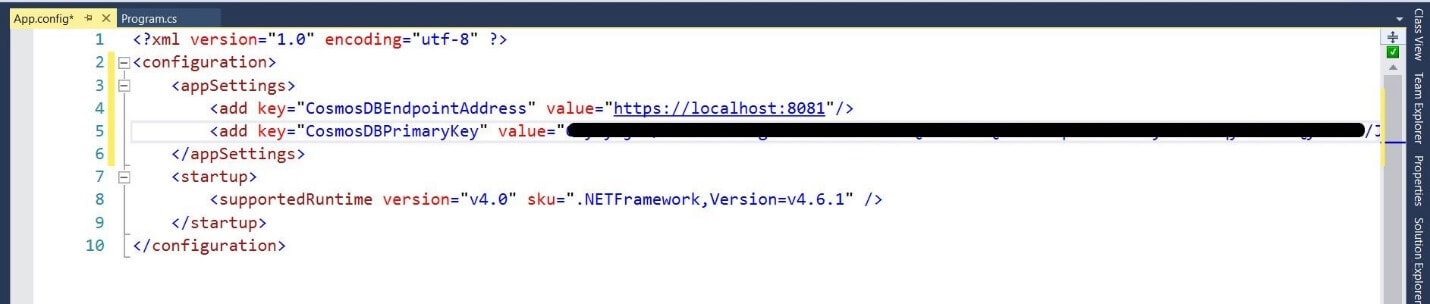
Once you click OK, you will see a new project is created. First add keys to the app.config file and then grab the the Endpoint and Primary key from the Local Emulator so that you can update and store them at the right place in app.config file.
|
1 2 3 4 |
<appSettings> <add key="CosmosDBEndpointAddress" value=""/> <add key="CosmosDBPrimaryKey" value=""/> </appSettings> |
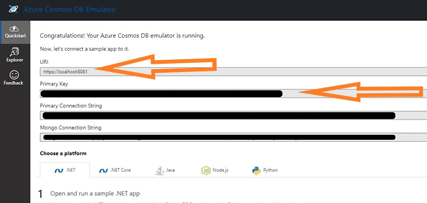
To get the Endpoint address and Primary key, you need to have Azure Cosmos DB Emulator running. Search for and run the Azure Cosmos DB Emulator. Once it’s running, you can access your Azure Cosmos DB Emulator using the local host address https://localhost:8081/_explorer/index.html. Copy the URI and Primary Key from the Emulator and paste them in the respective value fields you just added to the keys.
After you add the key, your app.config will look something like this:
Now to access the settings you just added to app.config, you will need to add a reference to System.Configuration to the project. To do this go to the Solution Explorer Window, right-click on References. Click Add reference and expand Assemblies. Select Framework from the top right corner. Scroll down and select System.Configuration.
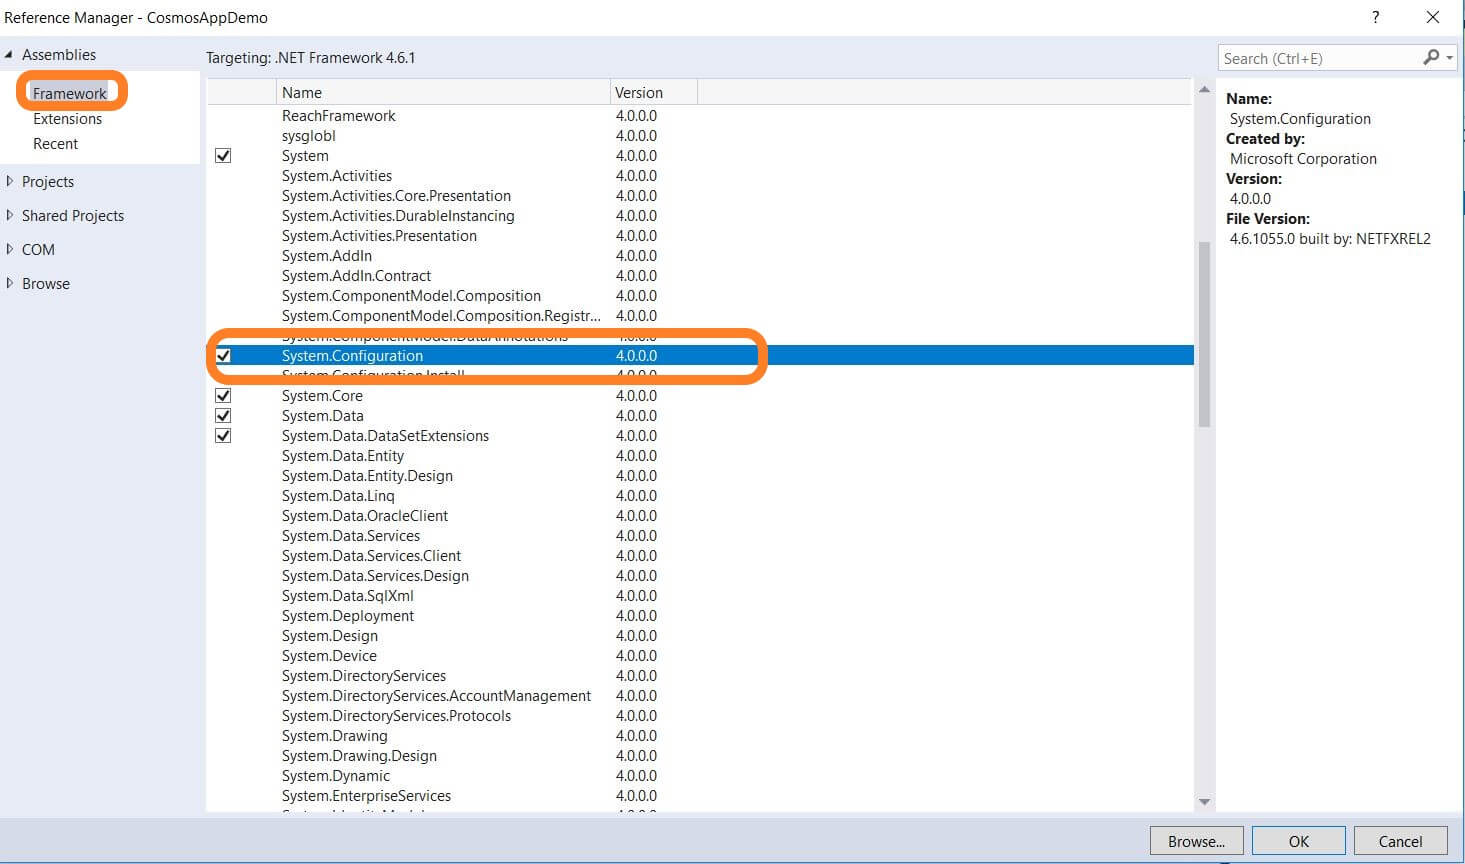
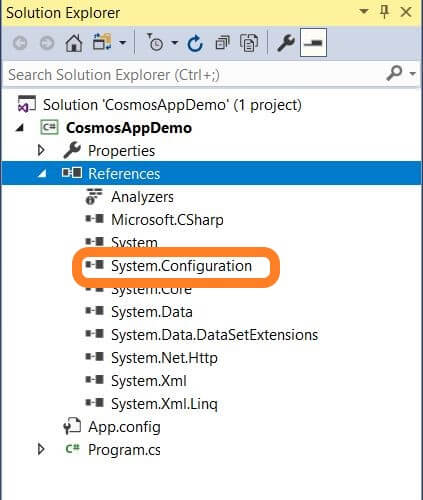
Once you click OK you will see System.Configuration added to the project’s references as shown below.
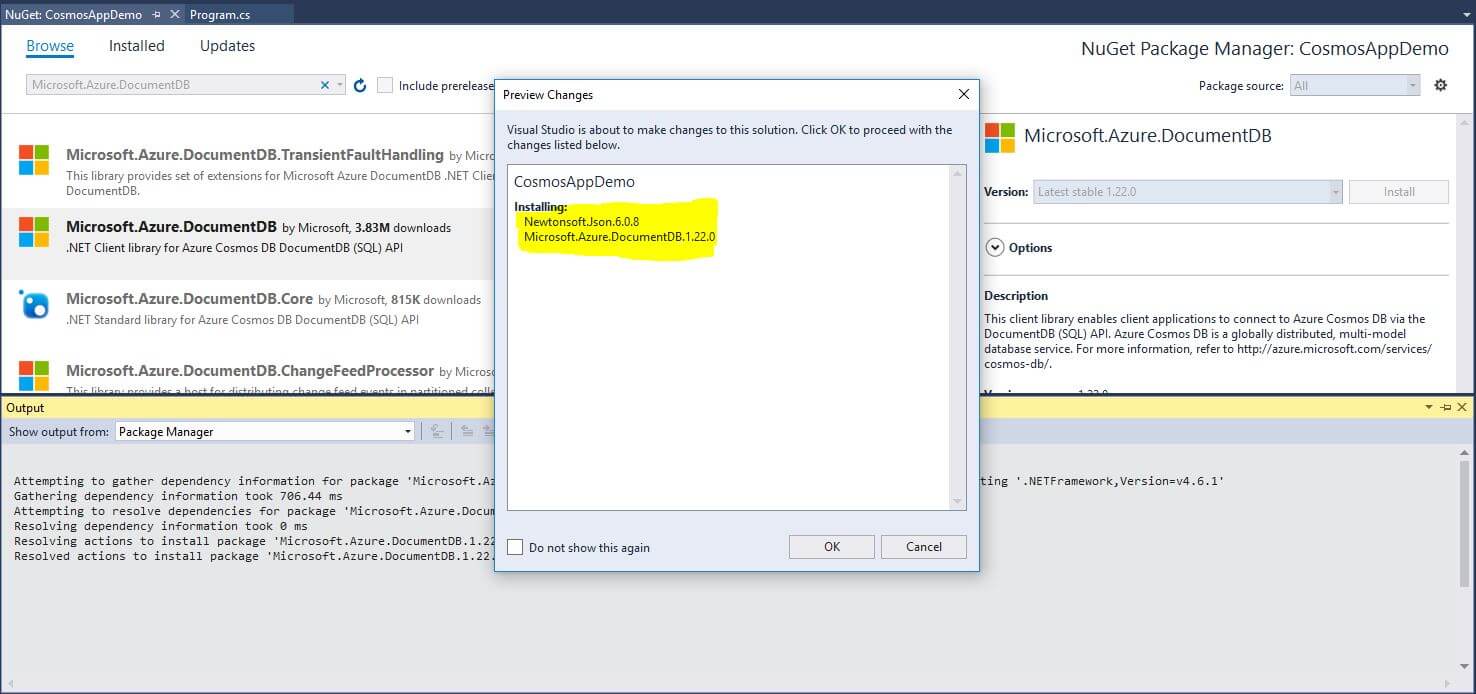
Next, you’ll need to get the Azure Cosmos DB .NET SDK in place which you can grab from NuGet. Right-click the project in Solution Explorer and select Manage NuGet Packages. Look for the package with the title Microsoft.Azure.DocumentDB. In this article you are going to use SQL APIs. Make sure you select a package that says SQL API in the description. You might have noticed that the name of the package still uses DocumentDB which is now called Cosmos DB. This might get changed in future. Although the API name is going to be changed at some point, it is still being called Document DB in order to maintain backwards compatibility with existing applications.
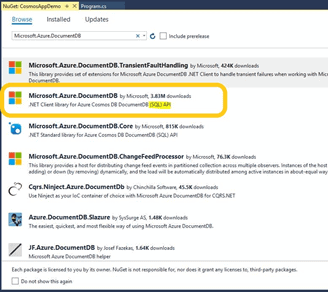
Once you select the package, click the Install button. You will see that the installation pulls Newtonsoft.Json which is a JSON serializer and also the Microsoft.Azure.DocumentDB.1.22.0 package. Now just click OK and accept the Licence aggrement.
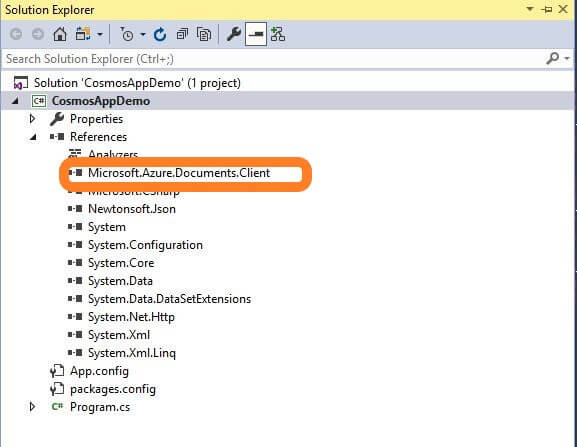
After the installation has finished, you will see the assembly reference in your project.
Using Azure Cosmos DB .NET SDK to work with Cosmos DB Emulator:
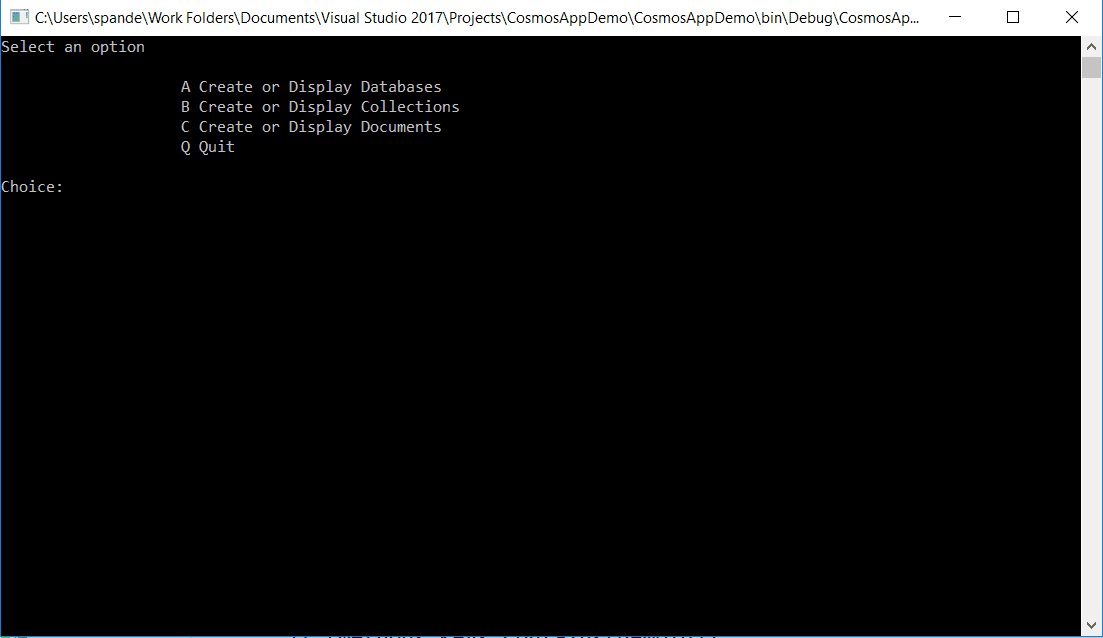
For making you aware of all the features available in the CosmosDemoApp project, I have created a menu option so that you can easily pick whether you want to work on the Database methods, Collection methods, or Document methods. When you have created the project, you will notice that the Program.cs class file is auto created. This project will contain a Menu option which will help you navigate through the app. This demo first creates the Database and uses that Database to create Collection. Then it creates a new Document using these newly created Database and Collection.
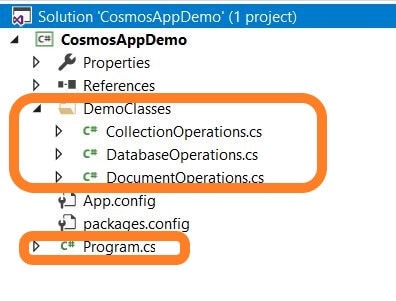
From Cosmos DB, the three important components that you are going to create and display in this demo are Databases, Collections, and Documents. Create a separate folder called DemoClasses in the project and add class files DatabaseOperations.cs for Database methods, CollectionOperations.cs for Collection Methods and DocumentOperations.cs for Document methods. Your project should look like the figure below.
The class files are invoked these Class files depending on what input user provides. The code in Program.cs, shown below, is self-explanatory. I won’t go into much details of this code as we need to focus more on Database, Collection and Document methods in details.
Note: I have shown the output at each stage of the program, but I would recommend that if you are running the code on your computer that you create all the Class files beforehand with the final code so that you don’t see many errors during runtime. (You can download the class files from the link at the bottom of the article.) Also, make sure you have your local emulator running.
Here is the code from the Program.cs file:
|
1 2 3 4 5 6 7 8 9 10 11 12 13 14 15 16 17 18 19 20 21 22 23 24 25 26 27 28 29 30 31 32 33 34 35 36 37 38 39 40 41 42 43 44 45 46 47 48 49 50 51 52 53 54 55 56 57 58 59 60 61 62 63 64 65 66 67 68 69 70 71 72 73 74 75 76 77 78 |
using System; using System.Collections.Generic; using System.ComponentModel; using System.Configuration; using System.Linq; using System.Text; using System.Threading.Tasks; using CosmosAppDemo.<a id="post-80384-_Hlk521950566"></a>DemoClasses; using Microsoft.Azure.Documents; using Microsoft.Azure.Documents.Client; namespace CosmosAppDemo { class Program { private static IDictionary<string, Func<Task>> methods; static void Main(string[] args) { methods = new Dictionary<string, Func<Task>>(); methods.Add("A", DatabaseOperations.Run); methods.Add("B", CollectionOperations.Run); methods.Add("C", DocumentOperations.Run); Task.Run(async () => { MenuOptions(); while (true) { Console.Write("Choice: "); var input = Console.ReadLine(); var demoId = input.ToUpper().Trim(); if (methods.Keys.Contains(demoId)) { var methodId = methods[demoId]; await ExecuteDemo(methodId); } else if (demoId == "Q") { break; } else { Console.WriteLine($"?{input}"); } } }).Wait(); } private static void MenuOptions() { Console.WriteLine(@"Select an option A Create or Display Databases B Create or Display Collections C Create or Display Documents Q Quit "); } private async static Task ExecuteDemo(Func<Task> demoMethod) { try { await demoMethod(); } catch (Exception ex) { var message = ex.Message; while (ex.InnerException != null) { ex = ex.InnerException; message += Environment.NewLine + ex.Message; } Console.WriteLine($"Error: {ex.Message}"); } Console.WriteLine(); Console.Write("Press any key to continue..."); Console.ReadKey(true); Console.Clear(); MenuOptions(); } } } |
Once you run the app, this code will produce results in the Console Window:
Database operations
First, I am going to demonstrate how different operations such as creation, deletion and displaying the Cosmos DB database is done. In the below code, I have created different methods to perform easy operations such as DisplayDatabases(client) to display, CreateNewDatabase(client) to create a new database, and DeleteDatabase(client) to delete the database from Cosmos DB. These are very basic tasks, but you will be using such tasks for consuming almost every Azure service.
The code itself is very descriptive, but let me give you a brief overview of the implementation. You are going to create a Document Client object by passing the Cosmos DB endpoint details and primary key to DocumentClient. It good practice to create just one instance of this object and use it wherever it’s needed. This will save several lines of code, and you don’t have to keep on creating and deleting the objects. Here you are using the using keyword that will make sure it is properly disposed of when execution of the inside code is done. Here are the three Main methods which are implemented in the below code:
- DisplayDatabases: This issues a database query called CreateDatabaseQuery() with no parameters. This query would return the result of all the Databases present in the Cosmos DB.
- CreateNewDatabase: This method is used to create a new database by passing the database name/details to the CreateDatabaseAsync method.
Implementation for Database Operations from DatabaseOperations.cs:
|
1 2 3 4 5 6 7 8 9 10 11 12 13 14 15 16 17 18 19 20 21 22 23 24 25 26 27 28 29 30 31 32 33 34 35 36 37 38 39 40 41 42 43 44 45 46 47 48 49 50 51 52 53 54 55 56 57 58 |
<a id="post-80384-OLE_LINK8"></a>using System; using System.Collections.Generic; using System.Configuration; using System.Diagnostics; using System.Linq; using System.Text; using System.Threading.Tasks; using Microsoft.Azure.Documents; using Microsoft.Azure.Documents.Client; namespace CosmosAppDemo { class DatabaseOperations { public async static Task Run() { Debugger.Break(); //get the keys from app.config var endpointAddress = ConfigurationManager.AppSettings["CosmosDBEndpointAddress"]; var primaryKey = ConfigurationManager.AppSettings["CosmosDBPrimaryKey"]; using (var client = new DocumentClient(new Uri(endpointAddress), primaryKey)) { //Display all databases in CosmosDB DisplayDatabases(client); //creates new database await CreateNewDatabase(client); //Display all the databases DisplayDatabases(client); } } private static void DisplayDatabases(DocumentClient client) { //get list of all the databases Console.WriteLine("Displaying all databases"); var databaseList = client.CreateDatabaseQuery().ToList(); foreach (var database in databaseList) { //list out the database one by one Console.WriteLine($" Database Id is : {database.Id}; Resource Id is : {database.ResourceId}"); } Console.WriteLine(); } private static async Task CreateNewDatabase(DocumentClient client) { Console.WriteLine("Please provide the name of the database which you want to create"); var name = Console.ReadLine(); //create new database Console.WriteLine("Creating new database"); var newDatabase = new Database {Id = name}; var details = await client.CreateDatabaseAsync(newDatabase); var databaseDetails = details.Resource; //print details for the newly created database Console.WriteLine( $"Created new database with Database Id is : {databaseDetails.Id}; Resource Id is : {databaseDetails.ResourceId}"); Console.WriteLine(); } } } |
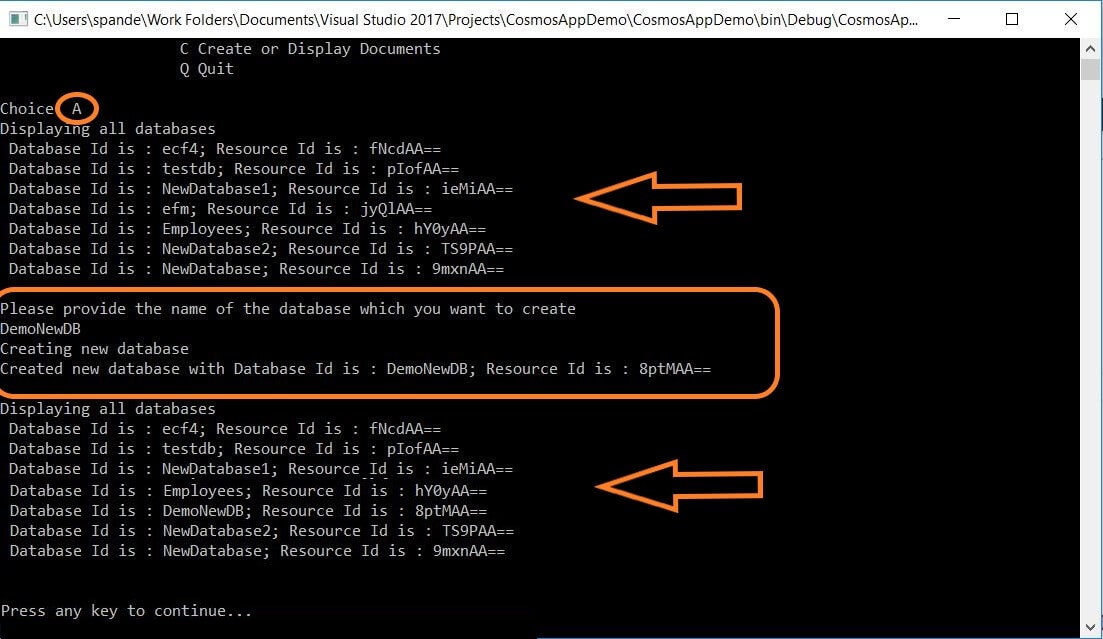
First select an option to create or display Database. Once you move further, you will hit the breakpoint at the beginning of DatabaseOperations.cs file. After you debug the application you will see the list of databases being displayed through DisplayDatabases method. Further you will be prompted to provide the database name that you want for your new database. I am providing DemoNewDB as the name of my database as shown below and you will see that the database is successfully created.
Exception During Code Execution
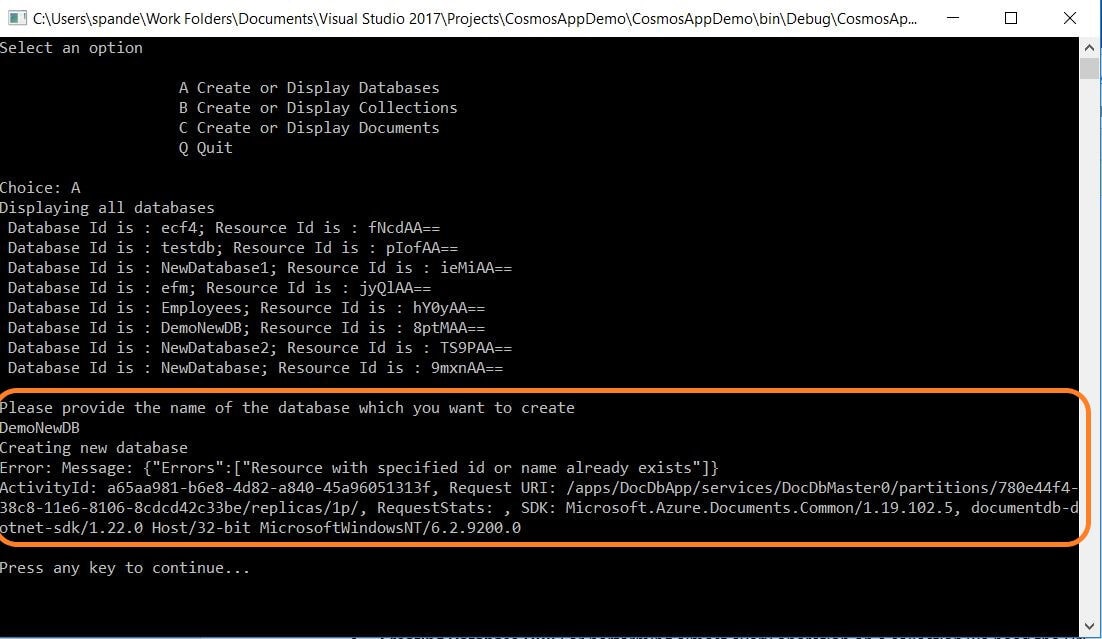
If by mistake you put the same name as that of an already existing database or collection, in a further demo the code in Program.cs will handle the exception and display it on Console window as shown below. All the exceptions coming from Cosmos DB are caught and shown by the code. Try creating database named DemoNewDBagain.
Collections Operations
As I said earlier, the API calls to the services would look similar, but the parameters would change depending on the type of feature you are using. In the case of a database query, you have used CreateDatabaseQuery. In the case of collections, you will use CreateDocumentCollectionQuery. Let’s walk through the main areas of the code to understand how Collections are implemented using the Azure Cosmos DB .NET SDK.
- Creating Database URI: For performing almost every operation on a collection, you need the Uri for the database on which you want to create a collection. As you can see in the code below, it creates a Database Uri for the database using the UriFactory.CreateDatabaseUri() method.
- Creating Collection: For creating a new Collection, I have added a CreateCollections method which issues a client call for the CreateDocumentCollectionAsync method. This method needs three mandatory details which are name of the Collection, Throughput and the Primary key. If you remember, these are the details that we had to provide on the Cosmos DB UI when creating the new Collection in the previous article.
- Displaying the Collection: This is done by issuing the CreateDocumentCollectionQuery method on the DocumentClient object.
There are some more terms that you might remember from my previous articles such as Throughput and partition key. Here I have provided a default value of 1000 Request units per second and partition on a default property called partition key.
Code Implementation for Collection Operations from CollectonOperations.cs :
|
1 2 3 4 5 6 7 8 9 10 11 12 13 14 15 16 17 18 19 20 21 22 23 24 25 26 27 28 29 30 31 32 33 34 35 36 37 38 39 40 41 42 43 44 45 46 47 48 49 50 51 52 53 54 55 56 57 58 59 60 61 62 63 64 65 66 67 68 69 70 71 72 73 74 |
using System; using System.Collections.Generic; using System.Configuration; using System.Diagnostics; using System.Linq; using System.Text; using System.Threading.Tasks; using Microsoft.Azure.Documents; using Microsoft.Azure.Documents.Client; namespace CosmosAppDemo.DemoClasses { class CollectionOperations { public async static Task Run() { Debugger.Break(); //get the keys from app.config var endpointAddress = ConfigurationManager.AppSettings["CosmosDBEndpointAddress"]; var primaryKey = ConfigurationManager.AppSettings["CosmosDBPrimaryKey"]; using (var client = new DocumentClient(new Uri(endpointAddress), primaryKey)) { Console.WriteLine(); //Ask for databse name in which you want to create a collection Console.WriteLine("Which database you want to use to create a Collection?"); var databaseName = Console.ReadLine(); //get the URI for the existing database var databaseUri = UriFactory.CreateDatabaseUri(databaseName); Console.WriteLine(); //Ask for databse name in which you want to create a collection Console.WriteLine("What is the name of the Collection that you want to create?"); var collectionName = Console.ReadLine(); //create new collection //set name of the new collection, throughput and partiion key var newcollectionId = collectionName; var throughput = 1000; string partitionKey = "/partitionKey"; await CreateCollections(client, databaseUri, newcollectionId, throughput, partitionKey); //Display all Collection in CosmosDB DisplayCollections(client, databaseUri); } } private static async Task CreateCollections(DocumentClient client, Uri databaseUri, string collectionId, int RUs, string partitionKey) { //create new Collection Console.WriteLine("Creating new Collection"); var partitionKeyDefinition = new PartitionKeyDefinition(); partitionKeyDefinition.Paths.Add(partitionKey); var newCollection = new DocumentCollection { Id = collectionId, PartitionKey = partitionKeyDefinition }; var requestOptions = new RequestOptions { OfferThroughput = RUs }; var details = await client.CreateDocumentCollectionAsync(databaseUri, newCollection, requestOptions); var collection = details.Resource; //print details for the newly created Collection Console.WriteLine($" Created new Collection with Id : {collection.Id}; and Resource Id is : {collection.ResourceId}"); Console.WriteLine(); } private static void DisplayCollections(DocumentClient client, Uri databaseUri) { //get list of all the Collection Console.WriteLine("Displaying Collection details"); var collectionList = client.CreateDocumentCollectionQuery(databaseUri).ToList(); foreach (var collection in collectionList) { //list out the Collections one by one Console.WriteLine($" Collection Id is : {collection.Id}"); Console.WriteLine($"Collection Resource Id is : {collection.ResourceId}"); Console.WriteLine($"Collection E-Tag is : {collection.ETag}"); } Console.WriteLine(); } } } |
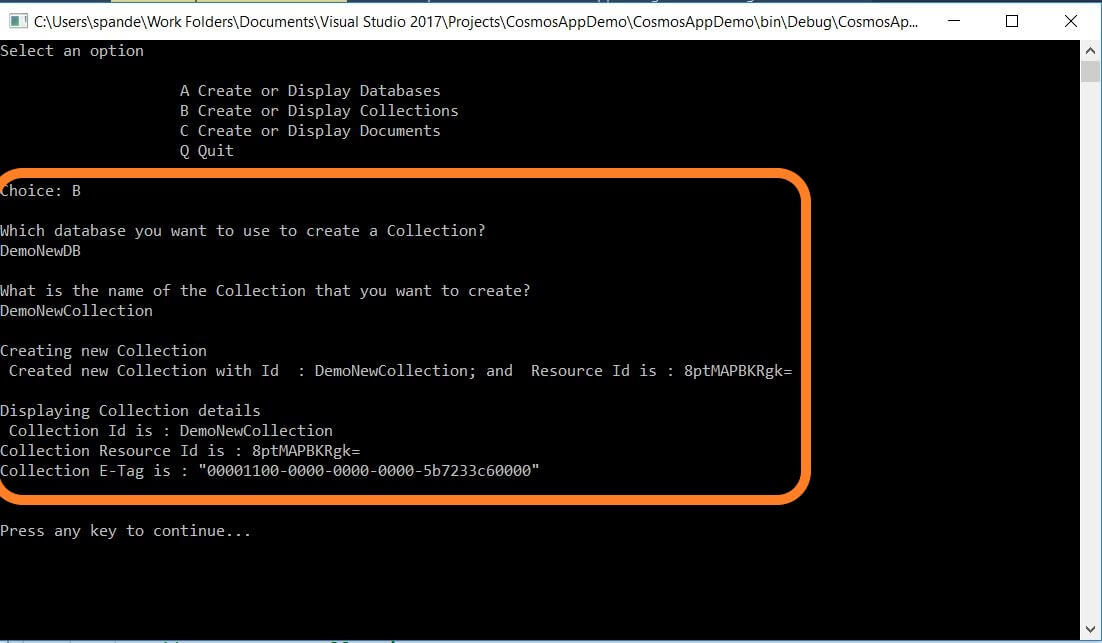
Here you will be asked to provide the Database name so that the code can generate Uri that can feed to method to create the collection in that database. Just provide the new database DemoNewDB for now. Further you need to specify the name of the collection. I have provided DemoNewCollection.
Creating and Querying Documents
Like the DatabaseUri property in the last demo, you have to create a CollectionUri property for creating the documents. You will have to specify both DatabaseUri and CollectionUri to perform any operations related to Documents. The key points for this implementation are:
- Creating Database Collection URI: For performing almost every operation on a Document, you need a Uri for the Collection. As you can see in the code below, there is a Collection Uri for the database DemoNewDB and Collection DemoNewCollection using UriFactory.CreateDocumentCollectionUri().
- Creating Documents: The code uses a Dynamic object C# feature to build the document object. This feature lets you bind to properties at run time without compiling the class at compile time. So, this may look like JSON but it isn’t. This is C# code and, it’s creating a .NET object but there is no class definition. Instead properties are inferred from the way the object is utilized. Another thing to notice here is that the ID property for this document hasn’t been supplied as this will be automatically generated by Cosmos DB in the form of GUID. It calls the CreateDocumentAsync method and the CollectionURI and Document objects are passed in to create a new Document.
- Querying the Documents: For querying documents, the query is created and passed to on to the CreateDocumentQuery method call. Also, you need to pass a parameter option that will dictate if you want to enable or disable cross Partition queries by making EnableCrossPartitionQuery true or false. This flag is basically made true if there are multiple queries being fired from your application and these queries are using different Partition Keys. For demo purposes, I have kept it enabled. You can write any type of SQL query according to your needs, and CreateDocumentQuery will bring in the data for you based on the requirements mentioned.
Code Implementation for Document Operations from DocumentOperations.cs:
|
1 2 3 4 5 6 7 8 9 10 11 12 13 14 15 16 17 18 19 20 21 22 23 24 25 26 27 28 29 30 31 32 33 34 35 36 37 38 39 40 41 42 43 44 45 46 47 48 49 50 51 52 53 54 55 56 57 58 59 60 61 62 63 64 65 66 67 68 69 70 71 72 73 74 75 76 77 |
using System; using System.Collections.Generic; using System.Configuration; using System.Diagnostics; using System.Linq; using System.Text; using System.Threading.Tasks; using Microsoft.Azure.Documents; using Microsoft.Azure.Documents.Client; namespace CosmosAppDemo.DemoClasses { class DocumentOperations { public async static Task Run() { Debugger.Break(); //get the keys from app.config var endpointAddress = ConfigurationManager.AppSettings["CosmosDBEndpointAddress"]; var primaryKey = ConfigurationManager.AppSettings["CosmosDBPrimaryKey"]; using (var client = new DocumentClient(new Uri(endpointAddress), primaryKey)) { Console.WriteLine(); //Ask for databse name in which you want to create a collection Console.WriteLine("Which database you want to use to create a Document?"); var databaseName = Console.ReadLine(); Console.WriteLine(); //Ask for databse name in which you want to create a collection Console.WriteLine("Which Collection you want to use to create a Document?"); var collectionName = Console.ReadLine(); //create Collection Uri var collectionUri = UriFactory.CreateDocumentCollectionUri(databaseName, collectionName); //create new Document await CreateDocuments(client, collectionUri); //Display all Collection in CosmosDB QueryDocuments(client, collectionUri); } } private static async Task CreateDocuments(DocumentClient client, Uri collectionUri) { //create new Collection Console.WriteLine("Creating new Document"); dynamic documentInput = new { name = "Tom Taylor", age = 60, address = new { Street = "Main Street", Apt = 45, City = "Austin", State = "TX", ZipCode = 75032 } }; Document newDocument = await client.CreateDocumentAsync(collectionUri, documentInput); //print details for the newly created Document Console.WriteLine($"Created new Document with Id : {newDocument.Id};"); Console.WriteLine(newDocument); Console.WriteLine(); } private static void QueryDocuments(DocumentClient client, Uri collectionUri) { //Query the documentsusing SQL queries Console.WriteLine("Displaying Documents details"); var query = "SELECT * FROM c"; //Enable cross partition key var crossPartition = new FeedOptions { EnableCrossPartitionQuery = true }; var documentsList = client.CreateDocumentQuery(collectionUri, query, crossPartition).ToList(); foreach (var document in documentsList) { //list out the documents one by one Console.WriteLine(document); } Console.WriteLine(); } } } |
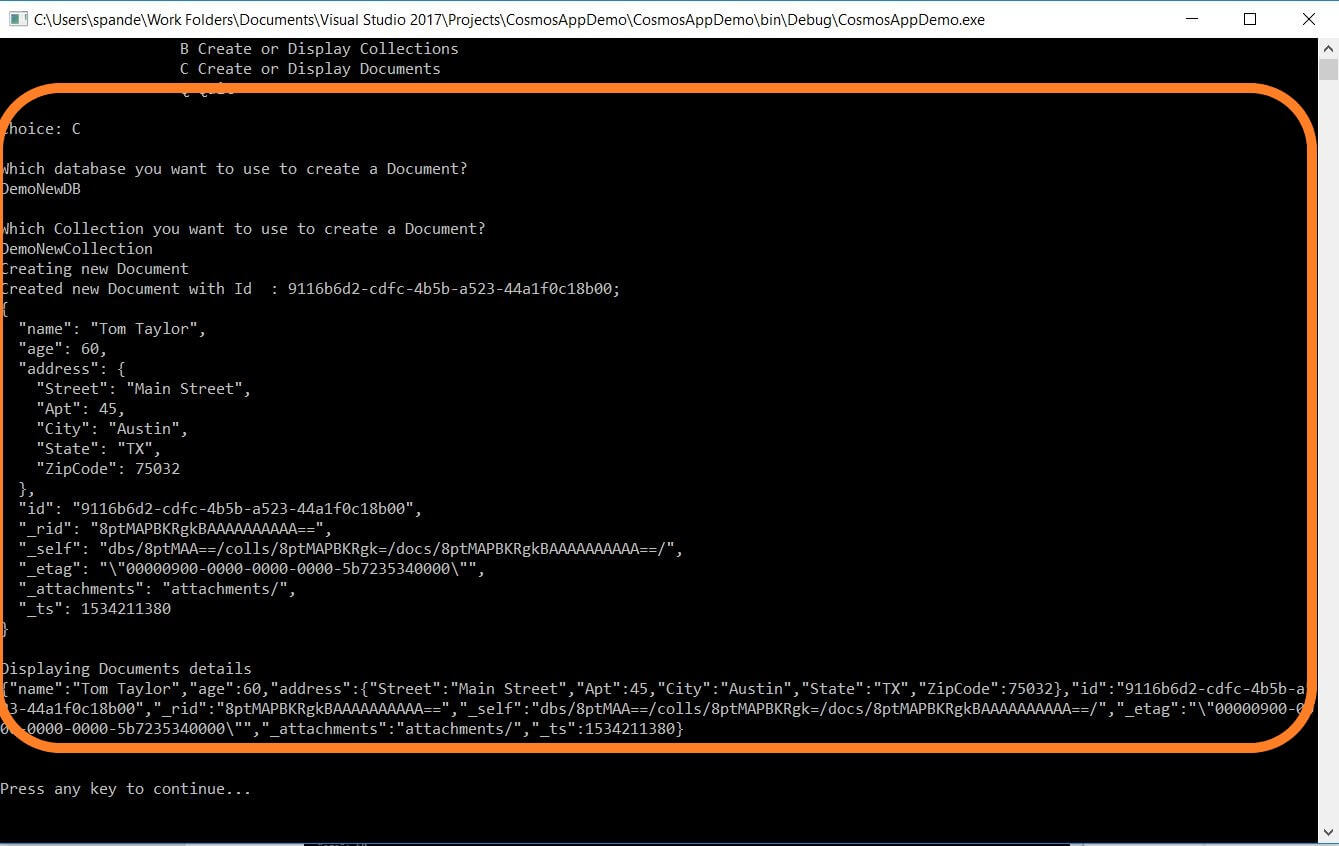
For creating the Document, just choose option C. This time, you need both the name of the database and name of the collection. Provide the new database DemoNewDB and collection DemoNewCollection that was just created.
As mentioned earlier, the ID is autogenerated for the newly created Document by Cosmos DB.
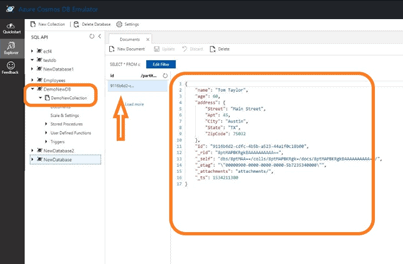
After you have created the document, you can check the Local Cosmos DB Emulator which will look something like the image below. A new Collection called DemoNewCollection is created in DemoNewDB. Additionally, a new document is added.
This demo used the Endpoint Address and Primary key for the Local DB Emulator so that you are able to reap all the benefits of Azure Portal through emulator without any cost overhead. If you wish to use Cosmos DB from your Azure Portal, you will just need to replace the value fields of both CosmosDBEndpointAddress and CosmosDBPrimaryKey to the actual keys from your Azure Cosmos DB account in the app.config file.
Conclusion
Through Azure .NET SDK, you can make use of various method calls to Azure services without going deep into the details of REST APIs and HTTP requests. Creating the Database, Collections, and Documents is very convenient by using Azure service packages. Additionally, you can make use of local the Cosmos DB emulator for most of your application development phase for no added costs and without an Azure Subscription. When the application is ready to deploy, just switch the Connection Strings to the real Azure Cosmos DB account.
References
https://docs.microsoft.com/en-us/azure/cosmos-db/sql-api-dotnetcore-get-started
https://docs.microsoft.com/en-us/rest/api/azure/
This document contains proprietary information and is protected by copyright law.
Copyright © 2026 Red Gate Software Limited. All rights reserved
Load comments