
SQL Server replication works well on a low latency, high bandwidth network. When actual networks have high latency or limited bandwidth, problems may occur. Such conditions can be emulated with hardware or software tools. You can quickly set up a test environment to emulate high latency and limited bandwidth by using free, open source software. WANem (Wide Area Network emulator) is an open source tool available on SourceForge. This guide shows you how to configure WANem to work in an isolated Hyper-V environment. I was unsuccessful in configuring WANem 3.0 in a Hyper-V virtual machine, which is why WANem 2.3 is featured. This approach was very successful in identifying replication problems under conditions very similar to real world network conditions for a global company. It is assumed that you have some familiarity with Hyper-V, Remote Desktop Connection, and basic networking.
WANem is an iso image of a Knoppix live cd packed in a tar file which is packed in a bz2 file. You’ll need something to extract the tar file and then extract the iso file. I recommend the free tool 7-Zip. If you search, you can find a portable version of 7-Zip, if you prefer.
Here is the network topology used for successful testing of SQL Server replication over a high latency, restricted bandwidth network. Static IP addresses were used so that they would remain constant to simplify the necessary IP routing.
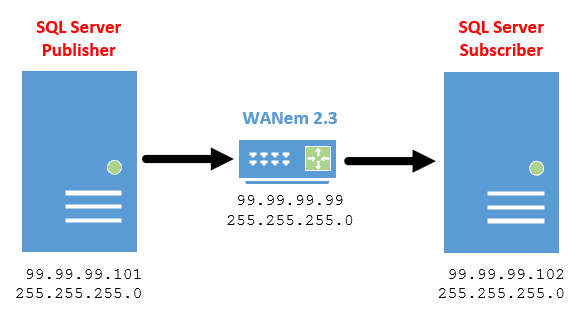
Figure 1. Topology of Hyper-V network.
Internal Network and Legacy Network Adapters
At large corporations, having a device such as WANem on the corporate network may violate corporate security policies. That is why this example has the network shared by WANem and the SQL Servers on a Hyper-V internal network. The SQL Servers were initially on the network when they were being built. After they were configured, they were switched from a Hyper-V external network to the Hyper-V internal network used by WANem.
Building the Virtual Switch
Since my goal was to keep the virtual machines completely off of the corporate network, an internal virtual switch was needed. I named it WANem Internal Network.
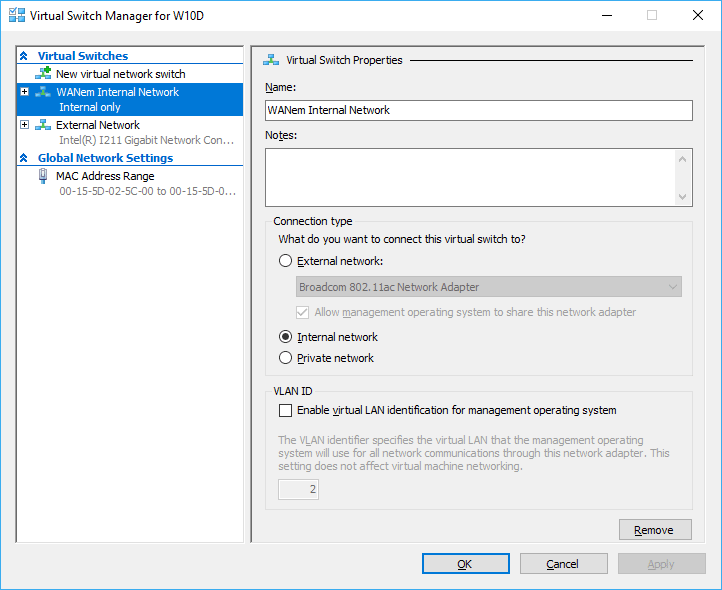
Figure 2. Create an internal only virtual switch to keep your test environment off of the corporate network.
The one internal virtual switch is sufficient for creating a working environment.
Create and configure the Hyper-V SQL Servers
Building the two virtual machines for the two SQL Servers is straightforward. Build them as generation 2 virtual machines for best performance. During the build process, you may want to connect them to an external virtual switch so that you can get the latest version of SQL Server Management Studio (SSMS). Once the machines are fully built, replace the external switch with the same internal switch that your WANem virtual machine will use.
After putting the SQL Servers on the Hyper-V internal network, configure a static IP address for each machine.
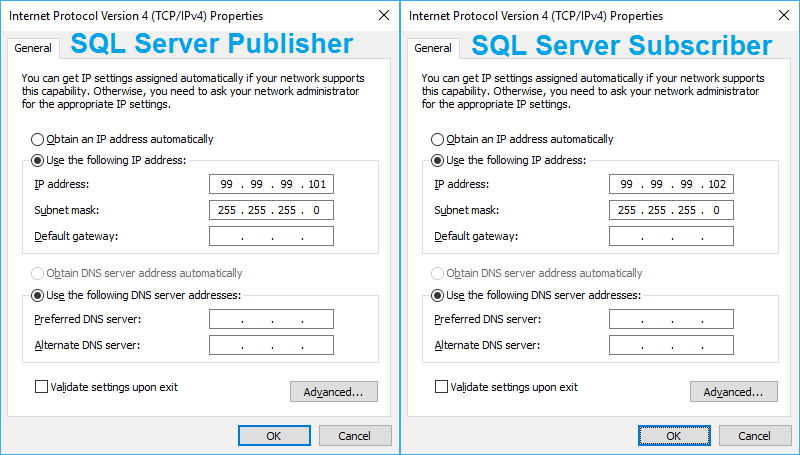
Figure 3. Set static IP addresses for your virtual SQL Servers.
Test the vm to vm connectivity before proceeding further.

Figure 4. Network connectivity testing.
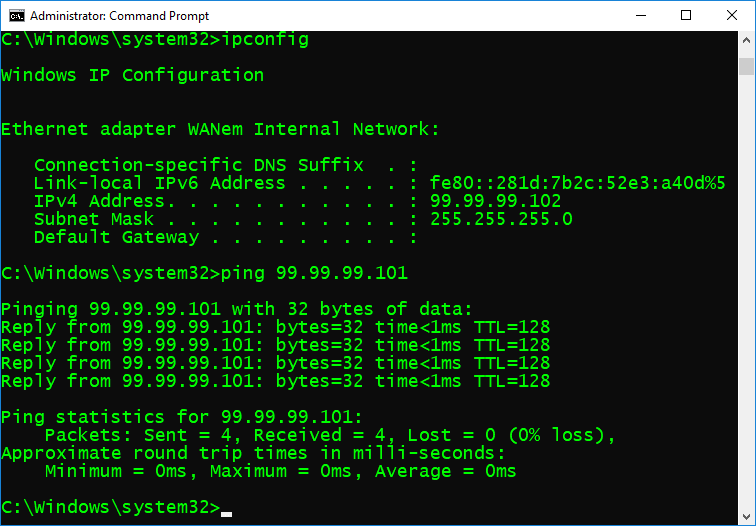
Figure 5. Network connectivity testing in the other direction.
Internal Network and Legacy Network Adapters
When building a Hyper-V virtual machine for running WANem on Knoppix, you must create a Generation 1 virtual machine because this build of Knoppix is incompatible with Hyper-V network adapters as evidenced by the following screen capture. Only Generation 1 virtual machines support Legacy Network Adapters.
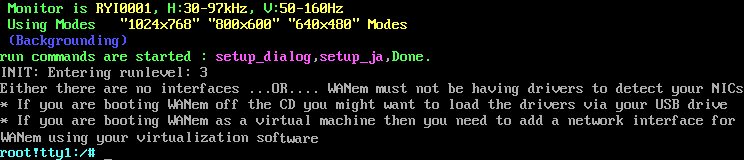
Figure 6. Hyper-V network adapter incompatible with WANem live CD.
Configuring the WANem live CD
When the Hyper-V network adapter is replaced with a Legacy Network Adapter, the Knoppix OS is able to detect and use it. I recommend using static IP addresses for your WANem and SQL Server replication servers. You can use DHCP, but as you will see, this may not be what you really want to do when configuring your test environment. Answer n for no to the DHCP question. You will discover that your Knoppix vm will capture your mouse. Use the standard Hyper-V CTRL+ALT+LEFT ARROW to free your mouse.
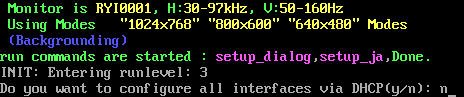
Figure 7. Answer n for no so that you can assign a static IP address.
Enter a static IP address for the WANem virtual machine. In this example, the WANem virtual machine’s IP address is set to 99.99.99.99. After you are done, enter y to save and next enter s to save and exit.
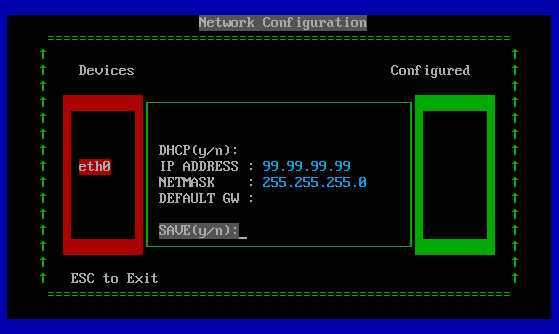
Figure 8. Provide an IP address and mask.
After setting the IP address, you can enter status to confirm your network adapter settings.
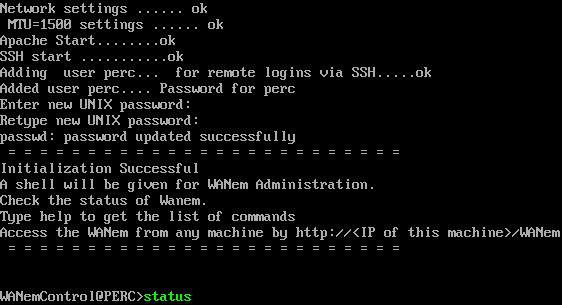
Figure 9. Using the status command in WANem.
After reviewing your network settings, press any key to continue.

Figure 10. Press any key to advance to the next screen.
Notice that you are prompted to optionally test connectivity to any machine in your virtual network.
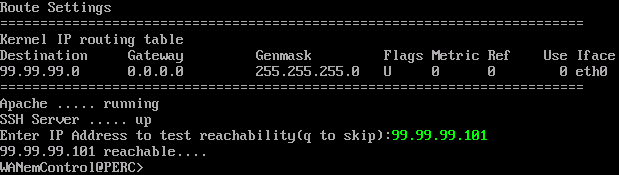
Figure 11. Testing connectivity to one of the SQL Server virtual machines.
Run the status command a second time to test connectivity from WANem to the other SQL Server virtual machine.
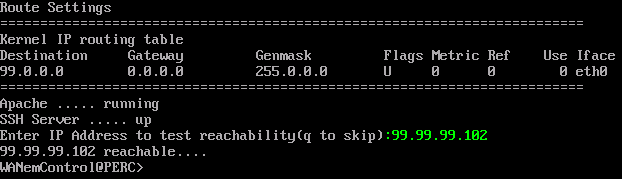
Figure 12. Testing connectivity to the other SQL Server virtual machine.
Test the connectivity from each of the SQL Servers to WANem.

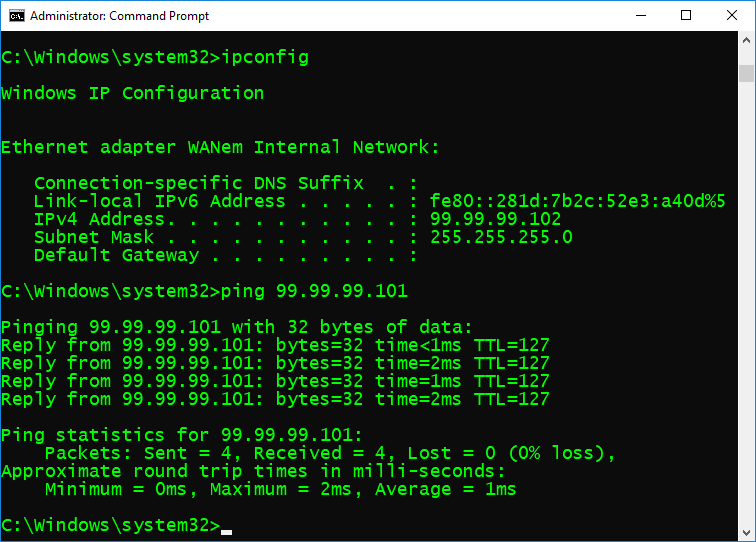
Figure 13. SQL Server to WANem connectivity testing.
Access WANem from either SQL Server virtual machine using a case sensitive URL that includes WANem’s IP address. In this example, the URL is http://99.99.99.99/WANem. Inside the SQL Server virtual machines, I set the browser’s start page to the WANem home page. Create a delay of 1000 msec and retest SQL Server to SQL Server connectivity.
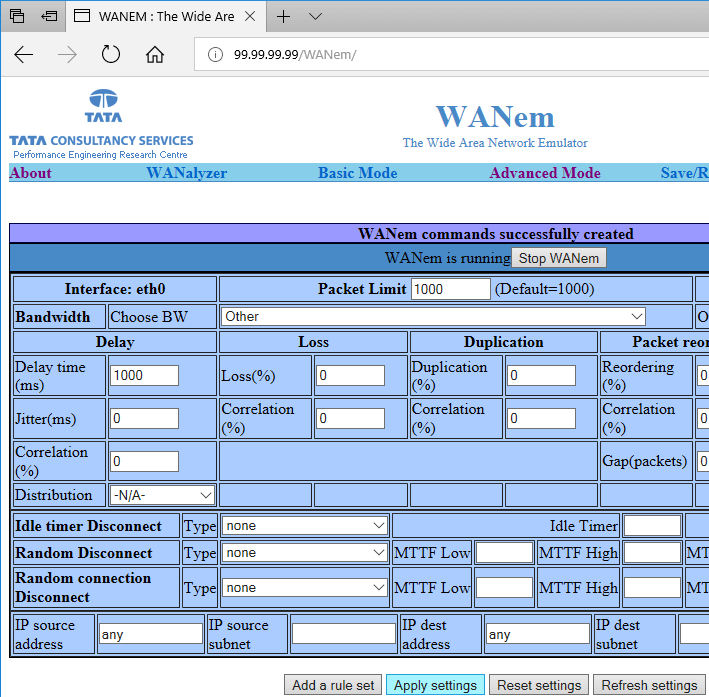
Figure 14. Create a 1 second delay.
Now that all three machines are connected and configured, test the connection between the two SQL Servers.

Figure 15. The delay specified in WANem does not appear in machine to machine testing before adding routes.
Notice that there isn’t any delay. That’s because there’s nothing preventing direct SQL Server to SQL Server communication. It’s necessary to add routes to force network traffic to go through WANem and prevent direct machine to machine communication. By adding the -p flag to a route add command, the route becomes persistent and will survive a reboot.
On the 99.99.99.101 virtual machine add the following route from an administrative command prompt:
route -p add 99.99.99.102 mask 255.255.255.255 99.99.99.99
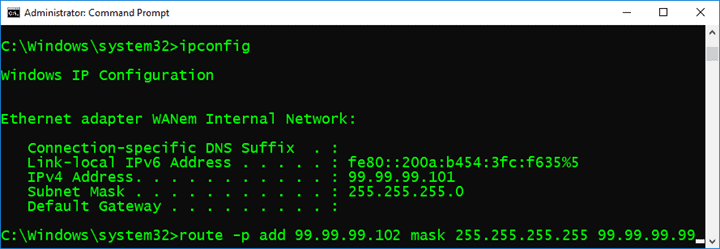
Figure 16. Add a static route from one SQL Server to WANem.
On the 99.99.99.103 virtual machine add the following route from an administrative command prompt:
route -p add 99.99.99.101 mask 255.255.255.255 99.99.99.99
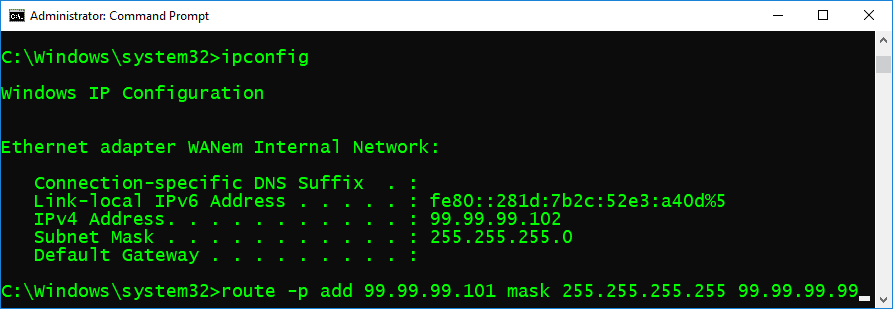
Figure 17. Add a static route from the other SQL Server to WANem.
With the static routes added, retest the SQL Server to SQL Server connectivity. Now you will see the network delay.
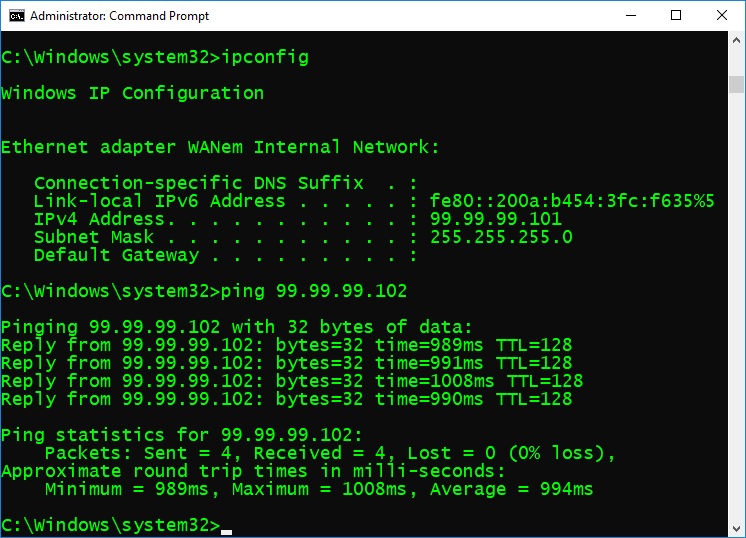
Figure 18. Testing connectivity with the two SQL Servers routing through WANem.
At this point you have a working environment where you can test replication with a variety of network conditions simulated.
You might want to optimally use Remote Desktop Connection to connect to your SQL Server virtual machines instead of using Virtual Machine Connection. Go to the host machine and find the Hyper-V network adapter that the SQL Server virtual machines are using. Right-click it and select Properties so that you can set a compatible static IP address.
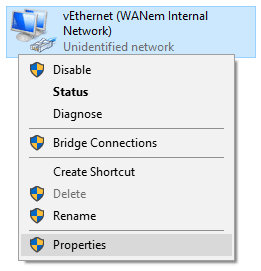
Figure 19. Set an IP address on the host for Remote Desktop Connection.
In this example, the Hyper-V host has an IP address of 99.99.99.100.
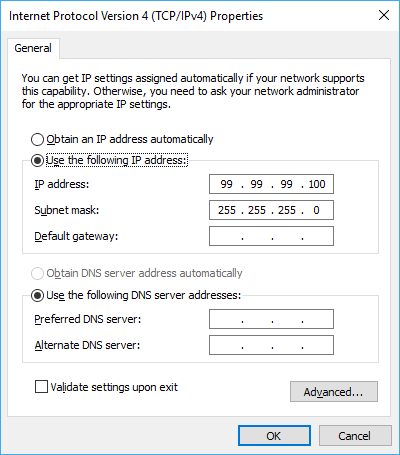
Figure 20. Static IP address on host side of virtual internal network.
To enable Remote Desktop Connection, you must configure a machine to accept RDP connections and allow it through the machine’s firewall. If you search you can find many articles telling you how to do this. The easiest way to allow RDP connections through the firewall is to turn on file and printer sharing.
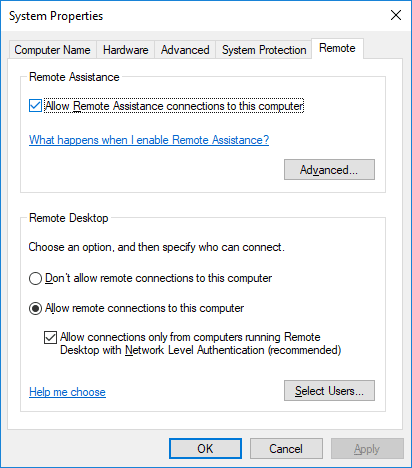
Figure 21. Allowing Remote Desktop Connection in Windows 10.

Figure 22. You can turn on file and printer sharing to indirectly allow RDP traffic through the machine’s firewall.
You can configure Remote Desktop Connection to allow file transfer between the SQL Server virtual machines and the host machine. Although this works, it doesn’t work well for transferring large quantities of data. A great alternative for getting large volume file copies into a virtual machine is to mount an iso file. You can find free utilities to create an iso file from the contents of a folder. Once you have an iso image, you can mount it on a running virtual machine. If you have particular test scenarios, each scenario can be its own iso file that you can include in your source code control system.
If you have SQL Server virtual machines already configured, once you understand what needs to be done, you can configure a WANem test environment in under 10 minutes.
Load comments