
On my article about Fabric source control extended features, I explained how Microsoft included the notebooks on the source control.
In this way we can include notebooks on a Software Development Lifecycle (SDLC) for Power BI objects.
In this way, the notebooks need to flow from the development environment to test and production environments. However, what happens with the references the notebook may contain?
The notebook may contain references to lakehouses and other configurations which may be different on each environment. We need to ensure these references are automatically changed when we promote the notebook to another environment.
Two types of references
The notebooks in Fabric can contain two types of references and we need to handle each type in different ways:
Configuration values: These are any value used in the notebook code.
Default Lakehouse: The default lakehouse is essential for most of the notebook tasks. The notebook code doesn’t contain the default lakehouse code directly. For this reason, the default lakehouse requires a different method to be handled than other references, becoming a 2nd type of reference.
Let’s analyse how to manage each one of these reference types on our notebooks.
Configuration Values
The rule we should use is simple: We should avoid using hard coded configuration values. We need to store the configuration externally to the notebook and in a way that we can change the values between environments.
It doesn’t matter where you choose to store the configuration values, you would need to repeat on every notebook the code to retrieve them.
This creates another requirement: We need to centralize this code in one notebook, and we need to be able to call this notebook from any other.
We can use the following statement:
%run “notebook name”
There are other methods to execute a different notebook, but this method makes the execution happen in the same session. In this way, the caller has access to the variables created on the centralized notebook.
In this way, the code used on the centralized notebook can load the configuration in variables and these variables will be accessible by the caller.
If we store the configurations in a JSON file in the lakehouse, the code of the centralized notebook will be like this:
df = spark.read.json("Files/configuration/config.json", multiLine=True)
urlprefix=df.collect()[0].__getitem__("functionURL")
database=df.collect()[0].__getitem__("database")
lakehouseName=df.collect()[0].__getitem__("lakehouseName")
On this way, we can move the notebook to different environments without the need to change any code.
Default Lakehouse
The default lakehouse would be way more difficult to change without Power BI’s help.
As explained on the previous blog, the source control saves the notebook as a set of several files. The most important one is a .PY file containing the notebook code.
The .PY file also contains metadata which includes the default lakehouse for the notebook.
Luckly, Power BI deployment pipelines support the creation of rules for notebooks, to change the default lakehouse of the notebooks.
Deployment Pipelines
Deployment pipelines are used to move objects from one workspace to another and keep the workspaces synchronized.
In this way, we can use different workspaces as development, test and production environment.
We can create rules about the transfer of objects from one workspace to another. In this way, when we transfer the objects, the rules will ensure some configurations are changed, such as the default lakehouse of the notebooks.
I have a published session about Deployment Pipelines in English or in Portuguese
Configuring Deployment Pipelines
Let’s build a small demonstration.
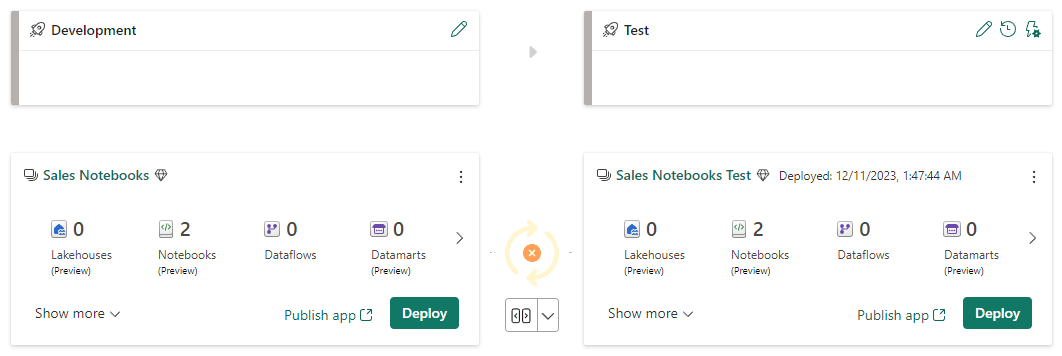
On the starting point, we will have 4 workspaces:
- 2 for the development environment, one with the lakehouse and the other with notebooks
- 2 for the test environment, one with the lakehouse, the other empty, it will receive the notebooks
On my example, the workspaces are “Sales Lakehouse”, “Sales Notebooks”, “Sales Lakehouse Test”, “Sales Notebooks Tests”.
- On the lakehouse “Sales Notebooks”, click the button Create Deployment Pipeline.
- On the Pipeline Name textbox, type “Sales Pipeline” as the name of the new deployment pipeline

- Click the button Next
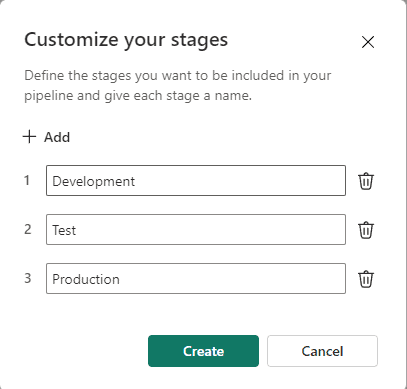
- On Customize your stages window, click the Create button
This window allows you to customize the name of each one of the stages on the SDLC. I will leave the default ones.
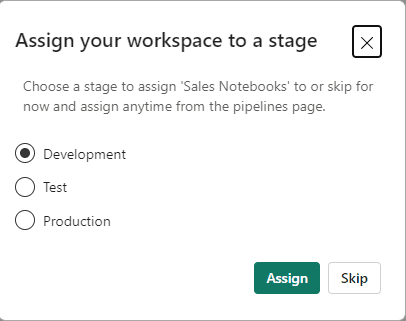
- On the Assign your workspace to a stage window, click the Assign button
We started the creation of the pipeline from one workspace. This window is questioning to which stage we would like to assign our workspace. The workspace is “Sales Notebooks”, we will assign it to the Development stage, which is selected by default.
- Open the drop down under the test environment and select “Sales Notebooks Test”
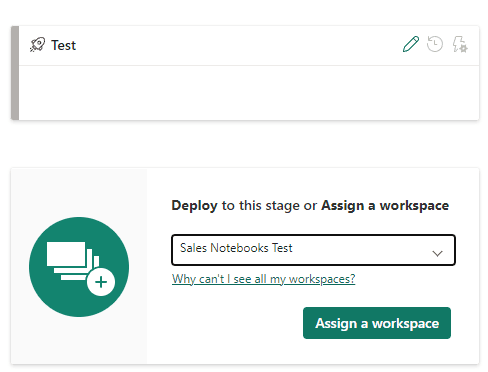
- Under the test environment, click the button Assign a Workspace
Once the development and test environment are assigned, the pipeline identifies the difference between the environments.
Making the Deployment
After configuring the environments of the pipeline, it’s time to make the deployment between the environments and make some tests.
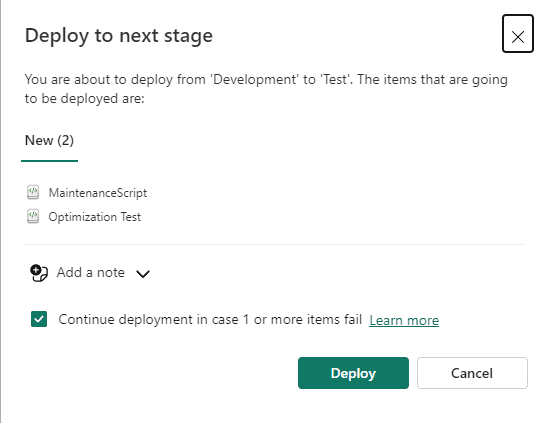
- Under the Development environment, click the button Deploy
We can only create pipeline rules after the first deployment has been made. The first deployment will be wrong, the notebooks will be pointing to the long lakehouse.
We do it anyway to create the rules and ensure the next deployment will be correct.
- On the Deploy to the next stage window, click the button Deploy
- On the Test environment, click the icon Deployment Rules
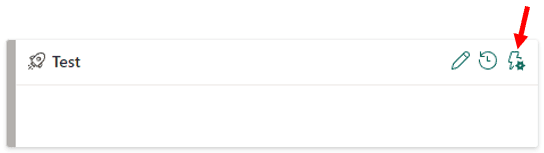
- On the Deployment Rules window, click one of the notebooks
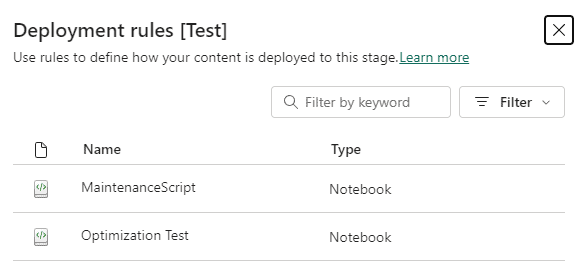
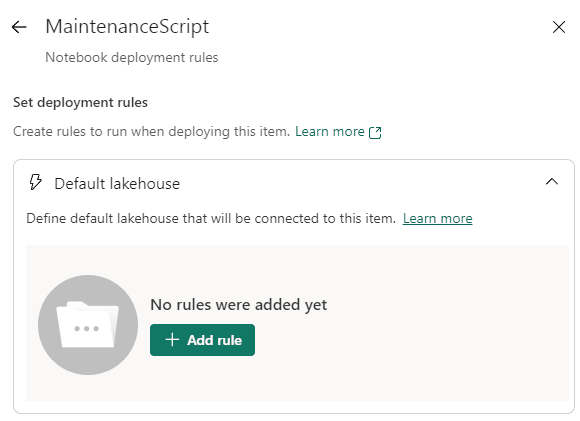
- On Set deployment rules, click the Default Lakehouse rule
- Click the button Add rule
- On the From drop down, select the Sales lakehouse, which will be the only option available.
- On the To drop down, select Other
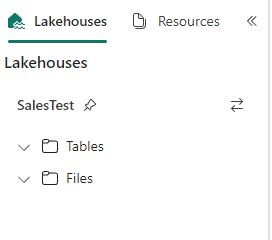
At this point, you need to discover the Id of the lakehouse “Sales Test” to include on the rules. The only method I identified for this is to access the lakehouse and get the Id from the URL.
The image below shows the URL format when you access a lakehouse and how to identify the Id in it:

- Fill the Lakehouse Id box with the Id recovered from the Lakehouse
- Fill the lakehouse name textbox with “Sales Test”
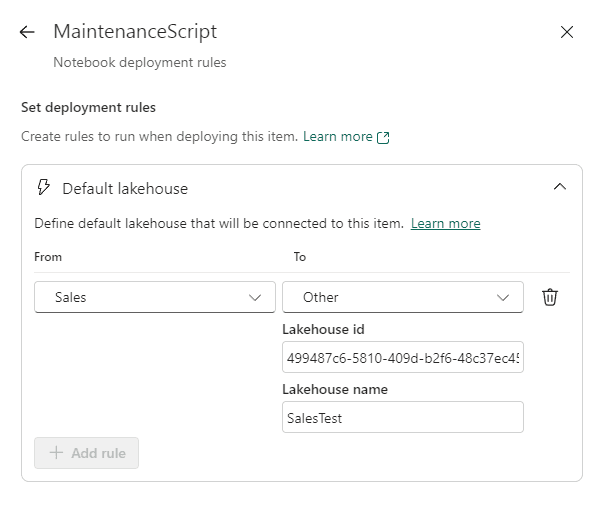
- Click the Save button
Before the rule definition, the content of both workspaces was identified as the same. We identified a difference after the rule definiton application.
The deployment pipeline takes the rules in consideration when calculating if two workspaces are in sync. The rule was just created and not applied, so the deployment pipeline considers the workspaces different.
Test the Pipeline Rules
- Under the development environment, click the Deploy button.
After the deployment, the workspaces are in sync again. However, we know they are not the same, becuase we applied the rule. The deployment pipeline considers this when calculating if the workspaces are in sync or not.

- Open a notebook in the workspace “Sales Notebooks Test”
You may notice the default lakehouse is SalesTest, illustrating the default lakehouse change from the development environment to the Test environment
Limitation: Notebook Ownership
There is one limitation for this entire process: The ownership of the objects.
- Only the owner of the notebook can create rules for the notebook
- The owner of the notebook needs to be the owner of the deployment pipeline
- Only the owner of the notebook can make a deploy overriding notebooks.
- There is no way, at the present date, to change notebook ownership
This leads to a big problem: How to handle team work on notebooks?
Proposed Solution: Notebook Ownership
One single team member should create all needed notebooks. He can create the notebooks empty and leave for the other team members to develop them, but only this team member can create the notebooks.
The same team member needs to be responsible for the deployment pipelines. He will:
- Create the pipelines
- Create the rules
- Deploy the pipelines
Of course, this is a strange work-around, but at this date, it’s needed.
Summary
We have the needed tools to include notebooks on the SDLC for Microsoft Fabric. Many other objects in Fabric still don’t have this feature. This is one reason to isolate the objects in different workspaces: Create one workspace for the objects not supported in source control, and a different workspace, with full implementation of SDLC and deployment pipelines, for the objects which are supported in source control.
On the article Source Control with GIT, Power BI and Microsoft Fabric I proposed different SDLC methods which could be used with Power BI.
Considering the features available for the notebook, we should be using a specific method: We can keep only the Dev workspace in source control and use deployment pipelines to synchronize Dev with Test and Production. It’s a similar method as used in Azure Data Factory and Azure Synapse Analytics.
There may be scenarios where we would still make a branch for the Test and another for the Production workspaces. However, on the source control repositories, the branches should never be compared or merged, because the deployment pipeline is handling differences on the files, the branches will always be different.
This document contains proprietary information and is protected by copyright law.
Copyright © 2026 Red Gate Software Limited. All rights reserved


Load comments