
I’m in the process of setting up a new environment using Azure SQL Databases, previously in Azure we’ve just used an Azure VM with SQL Server on it. I’m also fairly new to setting up a Continuous Integration environment and in-house we use Team City, so in this blog and probably the next few I’m going to go through how to set up Team City to deploy to an Azure SQL database. There are definitely other ways of doing it and probably better ways but this is how I tackled it.
In the full process, which I will cover in a series of blog posts, I will show you how to:
- Check for the existence of a database,
- Delete a database,
- Create a database,
- Sync the schema from source control
- Populate it with some data.
In this post we will cover points 1 to 3.
Assumptions:
- You have Team City setup and have a basic understanding of how it works, if however you need some help please refer to my blog post on the subject here
- You have a login to Azure
- You have created a Resource Group in Azure
- You have an understanding of Powershell
I write all my commands in Powershell and I write them using Visual Studio Code.
Before I start putting anything into TeamCity I write the code and make sure it’s doing what’s required and then I can quickly plumb it into TeamCity knowing that it’s basically working. One thing to remember when working with TeamCity is that you can parameterise everything, which means scripts can be written and used in different environments by changing the parameters, this obviously changes how we write the Powershell.
I also created a test database in the appropriate resource group via the Azure portal so that I had all the information I needed.
Before you start writing the Powershell code you will need to ensure that the required modules are installed as follows:

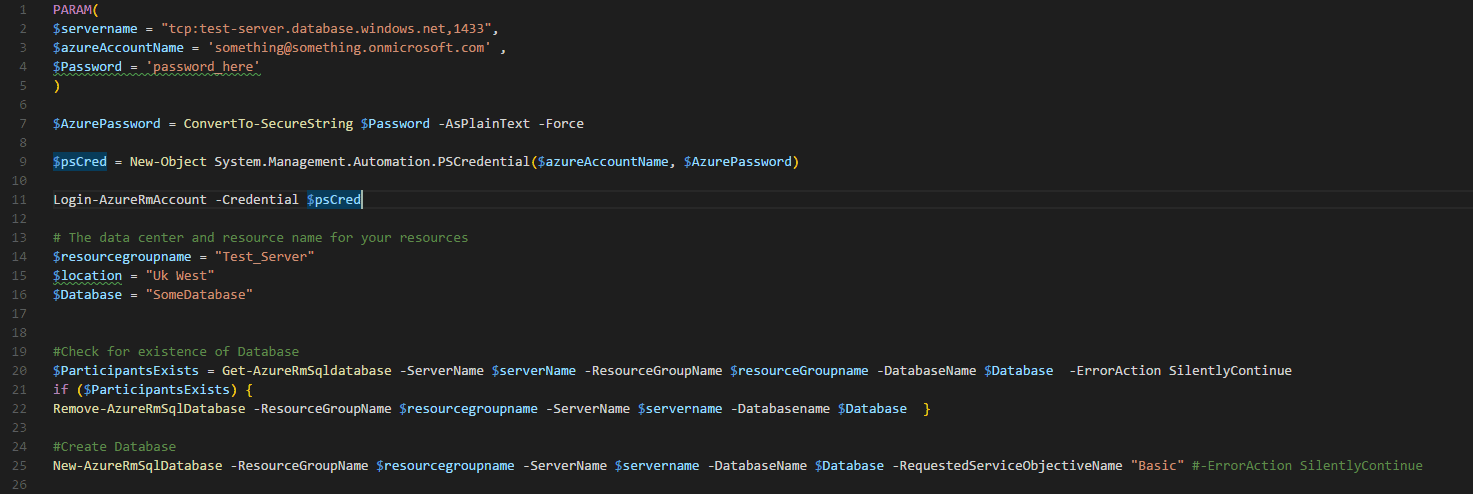
To create the database the parameters we will need are:
Server Name – the full name of the Azure Server, you can get this by clicking in the Azure Portal on the database need set up above and clicking on “Show database connection strings” and this will give you all the information you need in relation to the server.
Azure Account Name – this is the login you use to connect to the portal, it will be in the format something@something.onmicrosoft.com
Password – in Team City you can save a password in a secure string, for testing purposes you can just put the password here, but NEVER save it here.
So the powershell will look something like this:

We then need to convert the password to a secure string and set the result as a parameter using the following code:
![]()
Using these details I logged in to the azure portal using the following code:

This uses the username passed in as the parameter, the password that we’ve converted to a secure string which we have set to be a credential, and then using these credentials we’ve logged in to our Azure account.
We then need to pass in the detail of which resource group we want to use, which location and pass it a database name. We could parameterise these but in this case I haven’t as my resource group and location wont change, but if I wanted to use this code for a different resource groups or locations I’d definitely parameterise them.

Then we need to check whether our database exists, we can use an Azure command for this called Get-AzureRMSQLDatabase and we need to pass it the ServerName, ResourceGroupName and DatabaseName. We need to pass this to a variable because really all we want to know is if it exists, if it does we want to delete it because, in my opinion, when you are building a test database from a source controlled environment you want to start with an empty database. In future builds I will be building a pre-production environment in which case we will be comparing and making changes and not starting from empty.
To remove a database we use the command Remove-AzureRmSqlDatabase and we need to pass in the ResourceGroupName, ServerName and DatabaseName
The script to check and remove the database is as follows:

Once the database no longer exists we can create a new one. We have to use the New-AzureRmSqlDatabase command and pass in the ResourceGroupName, ServerName and DatabaseName and the RequestedServiceObjectiveName which is basically what tier of database do we want, I’m using Basic because it’s a test box and I’m only interested in building the cheapest I can without compromising performance. However remember some functionality which works on higher tiers may not work on this as I found out. For example Clustered ColumnStore indexes do not work on the Basic tier so consider your functionality when setting the level you want.
The code to do this is:
![]()
So the entire script looks like this:
Once we’ve tested this script and prove it works we need to plumb it in to TeamCity. However remember to remove the password, we don’t want to save a password in here. We could encrypt the password and save it in a file, but TeamCity handles it quite well so I’ll leave it there.
In TeamCity open your Build Configuration and add a build step.
The window will look like this:
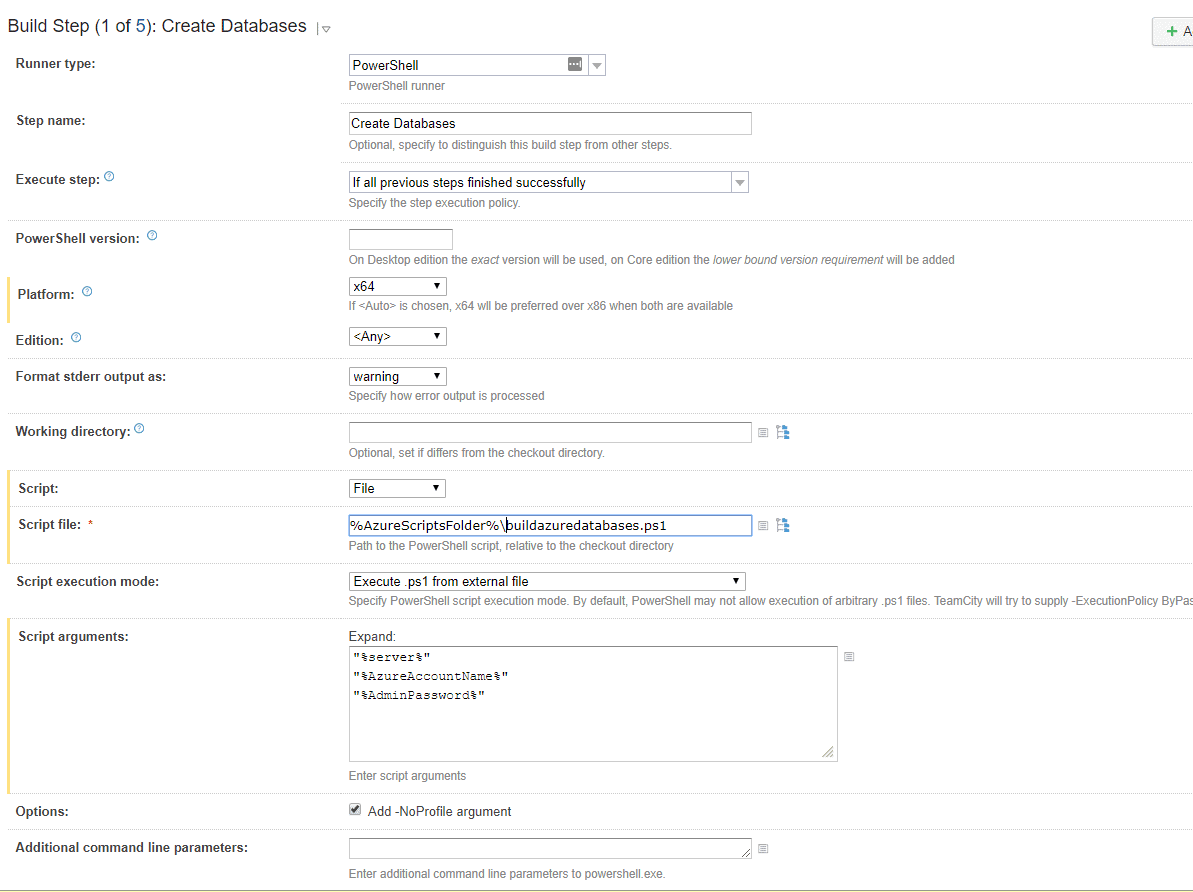
Going through this step by step:
- Runner type refers to what type of script we are using and in this case it’s Powershell.
- Step name is up to you, whatever makes sense,
- Execute Step defaults to “If all previous steps finished successfully”, but you can look at the options and choose which is most appropriate. I keep with the default because I don’t want it to continue if something hasn’t worked properly.
- Platform relates to the version you are using,
- Format stderr output as: defaults to Warning but if I want it to error if there is something that doesn’t work quite right so I often change this to Error.
- Script, select file as we are running a script from a file.
- Script File is, you will notice that I’ve used a parameter and then the \ and the file name, we’ll set the parameters shortly.
- Then you need to click on Expand and the script arguments will be displayed, you can see here I’ve added in the 3 parameters that we set in the powershell script. We have to put parameter names in % and “, I can’t explain why I just know that we need to!!!
Then we save it.
Now we need to click on Parameters on the left menu to set our parameters.
It will list all parameters used and there will be red text in the value box for those parameters with missing values.
Populate the missing ones with the details you set in the powershell.
To set the password ones, click on edit and click in here click on “Edit” and in display select Hidden and in Type select Password, that way you enter the password in once and then it’s hidden from sight.
Once these are all saved you can click on Run and Run the build, hopefully without error.
This document contains proprietary information and is protected by copyright law.
Copyright © 2026 Red Gate Software Limited. All rights reserved
Load comments