
Everyone who has ever backed up data using any kind of RDBMS knows a thing or two about backups. Backups are a central part of data integrity – especially nowadays, when data breaches are happening left and right. Properly tested backups are crucial to any company: once something happens to our data, they help us quickly get back on track. However, some of you may have heard about the differences between backups in database management systems – backups are also classified into a couple of forms unique to themselves. We’re talking about the physical and logical forms – these have their own advantages and downsides: let’s explore those and the differences between the two. This tutorial is geared towards MySQL, but we will also provide some advice that is not exclusive to MySQL.
What are Logical Backups?
Logical backups are backups of data consisting of statements that let the database recreate the data. Think of how you usually take backups within MySQL – no matter if you find yourself using the Export functionality within phpMyAdmin or using mysqldump to back up your most precious data, both of those measures have the same thing in common – they create statements that recreate data, creating logical backups as a result. And that’s exactly what defines logical backups – logical backups aim to recreate data by running SQL statements.
Sometimes though, developers might find themselves in waters where recreation of files is required.
What are Physical Backups?
Physical backups, as you might’ve guessed, copy the “physical” data – files – that comprise a database. As far as MySQL is concerned, the physical backup of MySQL usually consists of a copy of the data directory found here (Windows-based example – in Linux, the directory would be /var/lib/mysql/mysql5.7.36/data):
![]()
Logical Backups in MySQL
Taking logical backups within MySQL is easier than you might’ve guessed – think of any part of MySQL that backs up statements to recreate data. Got one? You’ve got yourself a logical backup!
In MySQL, logical backups are taken by:
- The Export functionality in phpMyAdmin
- Using
mysqldump - Or using the
SELECT [columns] INTO OUTFILE [path]statement in a specific database:
phpMyAdmin
Contrary to popular belief, the export functionality within phpMyAdmin can offer quite a lot of options to choose from. Users have a variety of options to choose from, including, but not limited to:
- The ability to choose whether to back up table structure, data, or both;
- The ability to choose the format of the backup;
- The option to can lock the tables while data is being written to them;
- The ability to export tables as separate files;
- The ability to compress the backup, skip tables larger than a specified value, etc.
Some of the abilities of phpMyAdmin can be seen below:
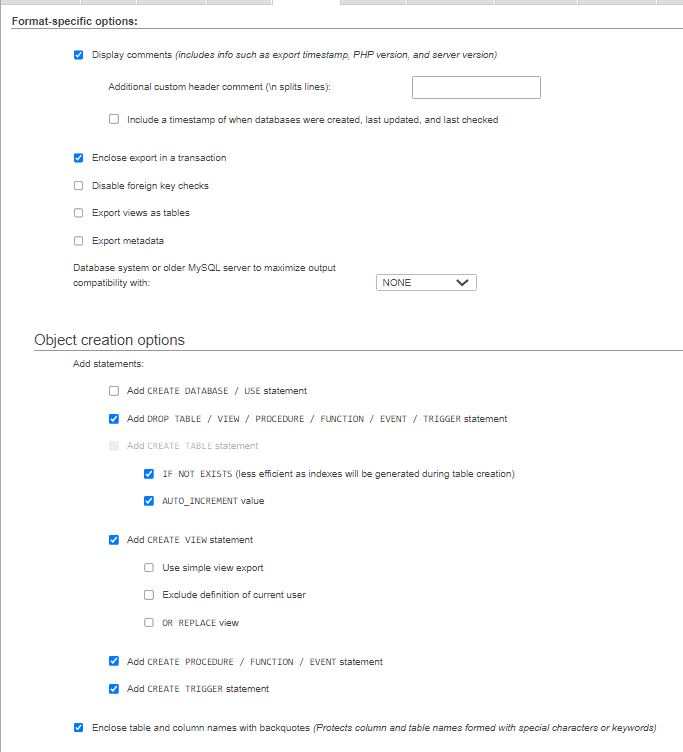
Since phpMyAdmin is one of the most widely used tools within MySQL, it’s logical (see what we did there?) that it offers a lot of options for both junior developers and experienced DBAs alike (see example above.) phpMyAdmin isn’t anything fancy and it’s been here for decades – yet, its slick UI and rich feature set make it stand out from the crowd.
mysqldump
The next tool in the toolset of a MySQL DBA is, of course, mysqldump itself – the tool works much like the Export functionality within MySQL, just that it’s command line-based. For all of the nitty-gritty details, refer to the first blog of these series, but in a nutshell, mysqldump is once again blessed with an extremely rich set of features including, but not limited to:
- An ability to let backups continue being performed even if errors are encountered.
- An ability to only dump the schema within the tables.
- Only dump data matching a specific
WHEREclause.
In order to use mysqldump, we need to be privileged enough to issue SELECT queries, and the syntax would look something similar to the following statement (to be issued before you log in to your database via the CLI on Windows or Linux):

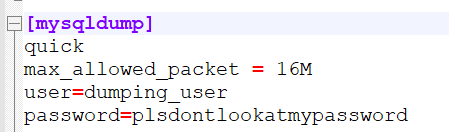
If you’re security minded, keep in mind that you can also prevent yourself from providing a username (-u) and the password (-p) by specifying it in the main configuration file of MySQL under the [mysqldump] heading like so (specify the user and password variables) – doing so will prevent anyone from seeing your username and password in the list of last issued commands in Linux:
For many people, phpMyAdmin and mysqldump provides enough of a grip into the world of backups – however, some might say the capabilities of the tools are a little lacking; those who venture into the world of big data might have to confirm the statement from experience – while both phpMyAdmin and mysqldump can offer powerful methods to back your data up in a fashion that is quicker than usual (LOCK TABLES provides developers with the ability to lock tables for a certain time until the backup is finished making its operations significantly quicker), both of those methods have a glaring flaw – the backups they create are riddled with INSERT statements.
There’s nothing “wrong” with INSERT statements per se, but their weakness is that they’re very ill-equipped to handle anything more than a couple million rows at a time: the core reason behind this is that INSERT statements come with a lot of overhead that MySQL has to consider – amongst other things, that includes parsing too. Imagine running 500,000 INSERT queries one after another where MySQL has to complete the following steps:
- Start.
- Check for permissions.
- Open tables.
- Initialize the query.
- Acquire locks.
- Do its work (run the query.)
- Finish (“end”) the query.
- Close tables.
- Clean up.
Complete these steps. Now complete them again and repeat everything for additional 499,998 iterations. Does that sound quick? Sure, if we lock the tables, we might avoid the steps #3 and #8, but our queries will be slow nonetheless – there are a lot of things MySQL has to consider when running INSERT queries. There is a solution, though – we should also look into the LOAD DATA INFILE [path] INTO TABLE [table] query which is specifically designed for big data sets.
SELECT INTO OUTFILE & LOAD DATA INFILE
An alternative to INSERT that’s specifically designed for big data sets looks something like this:
LOAD DATA INFILE ‘/tmp/data.txt’ INTO TABLE demo_table [FIELDS TERMINATED BY|OPTIONALLY ENCLOSED BY] “|”;
That’s the LOAD DATA INFILE query, of course. It’s designed specifically for bulk data loading, and it’s capable of loading data in with “bells and whistles”:
- It’s able to skip certain lines or columns.
- It’s able to only load data into specific columns.
- It comes with significantly less overhead for parsing.
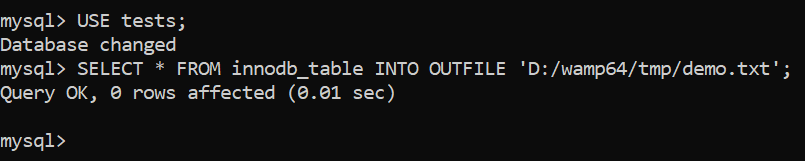
When LOAD DATA INFILE is in use, MySQL doesn’t perform as many operations as it does when INSERT INTO is in use, making operations significantly faster. To take a backup of your big data set use its brother – SELECT * INTO OUTFILE – like so:

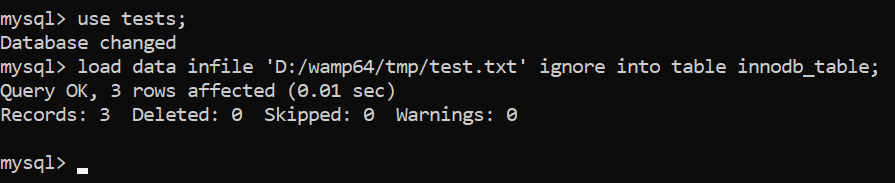
Then use LOAD DATA INFILE to load data back into your database (here we also use the IGNORE statement to ignore all potential errors – duplicate key issues, etc.):
Recap
- Backups taken by both phpMyAdmin and
mysqldumpcan be simply re-imported into MySQL by using a simple query like so or via the phpMyAdmin interface (remove the-uand-poptions if the username and password is specified in my.cnf):
mysql -u root -p [database_name] < database_backup.sql - To restore a backup taken using
SELECT … INTO OUTFILE, useLOAD DATA INFILE.
However, while these three options comprise logical backups – the most frequently used form of backups in MySQL – and the process of taking them is quick, easy and straightforward, keep in mind that there’s also another way to accomplish your goals – people can also take backups in a physical form. Such backups copy files containing the data instead of recreating statements that build the data.
Physical Backups in MySQL
Physical backups offer the ability to copy files (physical data) instead of the statements that recreate it. To take a physical backup in MySQL:
- Make sure MySQL is shut down (otherwise we’d be copying files that MySQL is still working with.)
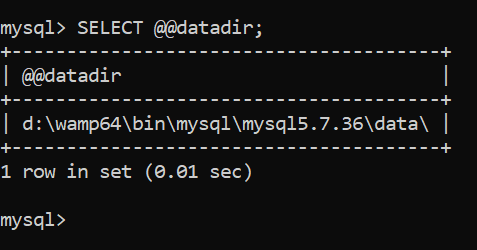
- Head over to the data directory (entering
SELECT @@datadirwhile logged in to your MySQL instance will help you see where it is):
- Head over to the directory where you’ll store the physical backup, then create a directory inside of it using
mkdir:
mkdir [directory_name] - Copy the files named ibdata1 (the main tablespace file of InnoDB), ib_logfile0 and ib_logfile1 (undo and redo logs exclusive to InnoDB) to the directory you just created, then copy the data directory itself. Do note that if the data directory is big, copying operations will take some time.
- You just took a physical backup!
If, for some reason, you find yourself using MyISAM (which is obsolete at the time of writing), taking physical backups of it is even easier – you just need to copy the data folder containing your databases, their data (.MYD files) and associated indexes (.MYI files.)
Physical backups can be useful when there’s a necessity to restore everything from a database from some media storage in one go, however, some might call the process of taking them a little tedious. To each their own though.
Recap
Physical backups copy the files that the data is based upon – to take a copy of them when using InnoDB, take a copy of the InnoDB tablespace (ibdata1) and the undo & redo logs (ib_logfile0 & ib_logfile1), then the data folder. To back up MyISAM, take a copy of all of the data and index files (.MYD and .MYI files) in the data folder.
Summary
MySQL offers everyone a couple of ways to back up data – while the most common option are logical backups that back up statements that recreate the data, indexes, partitions, and all related details, some might make use of physical backups where users copy the data files themselves: each option has its own upsides and downsides, so make sure to try both options out before your plan out your backup strategy. Familiarize yourself with all of the options, then make your own, physical or logical, decision.
We hope that this blog has been informational and that you’ve learned something new, and until next time!
This document contains proprietary information and is protected by copyright law.
Copyright © 2026 Red Gate Software Limited. All rights reserved


Load comments