


In a previous post I showed how to use a batching strategy to remove large amounts of data from a table while it is being used. Today I will apply the same technique to another common problem- changing the datatype of a column. A common use of this is to normalize a text column into an integer (that references another table), but could be used to transition to and from any datatype . Many of the considerations in the previous post apply, so I advise you to read it as well before using this technique.
Setting up the Demo Database
Once again I will use the StackOverflow2013 database provided by Brent Ozar for the examples. I will change the schema to create a problem that I will later fix as the example. In my version of this database, the Posts table does not contain the column OwnerUserId but instead has a new column OwnerEmail. Now this would have only a slight performance impact if we are simply reading the value from the table, but things may get bad very quickly if we start using this in a WHERE or JOIN clause. This is a common SQL ‘Code Smell’ or anti-pattern. Fixing it on a busy system without taking a downtime can be challenging. Let’s see how to do it.
To follow along, run the following SQL script to add a new column, Email, to the Users table, and OwnerEmail to the Posts table:
|
1 2 3 4 5 6 7 8 9 10 11 12 13 14 15 16 17 18 19 20 21 22 23 24 25 |
USE StackOverflow2013; GO ALTER TABLE dbo.Users ADD Email VARCHAR(100) NULL ALTER TABLE dbo.Posts ADD OwnerEmail VARCHAR(100) NULL GO UPDATE dbo.Users SET Email = CAST(Id as varchar(100)) + 'fakeemail@fakesample.com' GO UPDATE p SET OwnerEmail = u.Email FROM dbo.Posts p JOIN dbo.Users u ON p.OwnerUserId = u.Id ALTER TABLE dbo.Posts DROP COLUMN OwnerUserId ALTER TABLE dbo.Users ALTER COLUMN Email VARCHAR(100) NOT NULL ALTER TABLE dbo.Posts ALTER COLUMN OwnerEmail VARCHAR(100) NOT NULL GO CREATE INDEX IX_Users_Email ON dbo.Users (Email) GO |
The following two stored procedures are examples of stored procedures that the application would use to do typical user processing. As we change the structure of the table and the location of data the user needs, we will need to alter this code.
Note: If you are not using stored procedures, it will make the changes a bit more complicated. However, this method would still be achievable by altering the code being executed by the user interface, or perhaps even using triggers. The important thing is that you identify and address all of the code that uses the column being removed.
|
1 2 3 4 5 6 7 8 9 10 11 12 13 14 15 16 17 18 19 20 21 22 23 24 25 26 27 28 29 30 31 32 33 34 35 36 37 38 39 40 41 42 43 44 45 46 |
CREATE OR ALTER PROC GetUsersPosts @UserId INT AS SELECT p.Id ,p.Title ,u.DisplayName FROM dbo.Posts p JOIN dbo.Users u ON u.Email = p.OwnerEmail WHERE u.Id = @UserId GO CREATE OR ALTER PROC InsertPost @Body nvarchar(max) , @ParentId int =NULL, @PostTypeId int , @Tags nvarchar(150)=NULL , @Title nvarchar(250) , @OwnerEmail varchar(100) AS INSERT INTO [dbo].[Posts] ( [Body] ,[CreationDate] ,[ParentId] ,[PostTypeId] ,[Score] ,[Tags] ,[Title] ,[ViewCount] ,[OwnerEmail] ,[LastActivityDate] ) VALUES ( @Body ,GETUTCDATE() ,@ParentId ,@PostTypeId ,0 ,@Tags ,@Title ,0 ,@OwnerEmail ,GETUTCDATE() ) |
The Brute Force Method
First let’s look at the simplest way to perform this change, along with its downsides.
Note that you can execute this code if you want to see how it executes on your system. However, later code in the article will not execute without refreshing your copy of the database.
|
1 2 3 4 5 6 7 8 9 10 11 12 |
ALTER TABLE dbo.Posts ADD OwnerUserId INT NOT NULL DEFAULT (-100) GO UPDATE p SET OwnerUserId = u.Id FROM dbo.Posts p JOIN dbo.Users u ON u.Email = p.OwnerEmail WHERE p.OwnerUserId = -100 ALTER TABLE dbo.Posts DROP COLUMN OwnerEmail GO |
While this code is completely functional, it is impractical for many workloads. Under the default READ COMMITTED isolation level this will block all access to the table, even SELECT statements. Using the READ_COMMITTED_SNAPSHOT option will allow SELECT statements but will block all data modifications. This took about three and a half minutes on my laptop. For larger tables it could even take hours and run the risk of filling up the transaction log. If that happens (or if any other errors occur that cause the process to fail) we are looking at a lengthy rollback as well. It is much safer and more pragmatic to update the table in batches.
How to Change your Table without Downtime
At a high level, this is how we will update the database and application:
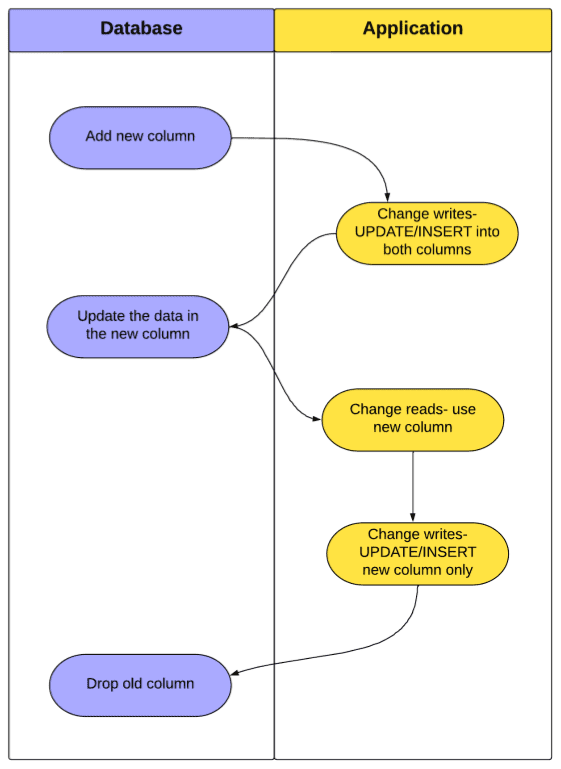
One of the advantages of this technique is that it can be paused at any moment. If we run out of time while updating the data in the new column we can stop the process, wait until the next day and pick up where we left off. We can verify and test after each step and move on at our own pace, rather than rushing through the change during a downtime.
Adding a new column
To start this process, we will create a new column with the desired datatype. In our example we want this column to be NOT NULL so we will create a default with a placeholder value, in this case -100. It’s important that the placeholder doesn’t exist in the table that we will eventually join to with this column. Creating a column with a default in this way doesn’t modify the pages of the table, only the metadata, which makes this a fast and efficient change.
|
1 2 |
ALTER TABLE dbo.Posts ADD OwnerUserId INT NOT NULL DEFAULT (-100); |
Be aware that this will require a schema stability lock so it might take a few seconds on a busy system. However it should not block for any significant length of time as it requires minimal IO. Using SQL Profiler, we can see it only took 10 milliseconds on my system:

After we have created the new column, we will need to modify any processes that write to the table to INSERT (and UPDATE) the table such that both the old and the new column are kept in sync.
Next, we need to alter the procedure for inserting a post. We do not need to modify the procedure to read a post, because the OwnerEmail column is still in the table. So now we will alter our example INSERT stored procedure:
|
1 2 3 4 5 6 7 8 9 10 11 12 13 14 15 16 17 18 19 20 21 22 23 24 25 26 27 28 29 30 31 32 33 34 35 36 37 38 39 40 41 |
CREATE OR ALTER PROC InsertPost --The inputs stay the same @Body nvarchar(max) , @ParentId int =NULL, @PostTypeId int , @Tags nvarchar(150)=NULL , @Title nvarchar(250) , @OwnerEmail varchar(100) AS -- Added in this revision DECLARE @UserId INT SELECT @UserId = Id FROM dbo.Users WHERE @OwnerEmail = Email INSERT INTO [dbo].[Posts] ( [Body] ,[CreationDate] ,[ParentId] ,[PostTypeId] ,[Score] ,[Tags] ,[Title] ,[ViewCount] ,[OwnerEmail] ,[LastActivityDate] ,[OwnerUserId] -- Added in this revision ) VALUES ( @Body ,GETUTCDATE() ,@ParentId ,@PostTypeId ,0 ,@Tags ,@Title ,0 ,@OwnerEmail ,GETUTCDATE() ,@UserId -- Added in this revision ) |
At this point, any new records will include proper data for the old column, Email, as well as our new column, OwnerUserId.
Moving the Data
Now we will use our batching technique to UPDATE our new column. As we did in the deletion example, we will first load up a temp table with the records we want to modify, filtering on our placeholder value in the OwnerUserId column. One advantage of doing this is that if the process is stopped for any reason, it can be resumed later without re-processing records that were updated the first time (by simply running the script again after fixing the error). With each batch we will join to the Users table to retrieve the OwnerUserId.
Let’s see the script:
|
1 2 3 4 5 6 7 8 9 10 11 12 13 14 15 16 17 18 19 20 21 22 23 24 25 26 27 28 29 30 31 32 33 34 35 36 37 38 39 40 |
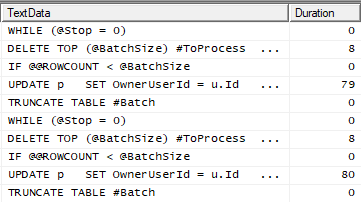
SET NOCOUNT ON --control the number of rows modified per iteration DECLARE @BatchSize INT = 5000 --variable used to tell the process to stop DECLARE @Stop INT = 0 IF (OBJECT_ID ('tempdb..#ToProcess') IS NULL) CREATE TABLE #ToProcess (Id INT NOT NULL PRIMARY KEY CLUSTERED) IF (OBJECT_ID ('tempdb..#Batch') IS NULL) CREATE TABLE #Batch (Id INT NOT NULL PRIMARY KEY CLUSTERED) -----------------Gather Ids------------------------------------ INSERT INTO #ToProcess (Id) SELECT Id FROM dbo.Posts WHERE OwnerUserId = -100 -----------------Main Loop------------------------------------ WHILE (@Stop = 0) BEGIN --Load up our batch table while deleting from the main set DELETE TOP (@BatchSize) #ToProcess OUTPUT DELETED.Id INTO #Batch (Id) --Once the rowcount is less than the batchsize, -- we can stop (after this loop iteration) IF @@ROWCOUNT < @BatchSize SELECT @Stop = 1 --Perform the UPDATE UPDATE p SET OwnerUserId = u.Id FROM dbo.Posts p JOIN #Batch b ON p.Id = b.Id JOIN dbo.Users u ON u.Email = p.OwnerEmail --Clear out Batch table TRUNCATE TABLE #Batch END |
When testing this technique before using in production (and you should test it!), look at the execution plan used by the UPDATE statement. You want it to look something like this:

Notice the thin bars connecting the operators and the Index Seek on both the Posts and the Users table. If you see thick bars, parallelism or a Scan operator, consider creating an index on the table you are joining too (in this case the Users table). If we had not created the IX_Users_Email index this would have been a much more expensive and time-consuming operation. Instead, it only took about five and a half minutes on my machine. While this is longer overall than the Brute force method, each iteration of the loop took under 100 milliseconds so any blocking would be minimal. You can see this by using SQL Profiler with the SQL:StmtCompleted event:
If I were doing this on an actual server rather than my laptop, I would likely increase the batch size to speed up the overall process (but not so large that the duration of each loop becomes an issue).
Finalizing the move
Once we have updated the entirety of the new column, we can change our processes once again. First, we will change any reads to reference the new column, and then we will remove any reference to the old column from any processes that write to the table:
|
1 2 3 4 5 6 7 8 9 10 11 12 13 14 15 16 17 18 19 20 21 22 23 24 25 26 27 28 29 30 31 32 33 34 35 36 37 38 39 40 41 42 43 44 45 46 47 48 49 50 51 52 53 54 55 |
CREATE OR ALTER PROC GetUsersPosts @UserId INT AS SELECT p.Id ,p.Title ,u.DisplayName FROM dbo.Posts p JOIN dbo.Users u ON u.Id = p.OwnerUserId WHERE u.Id = @UserId GO CREATE OR ALTER PROC InsertPost @Body nvarchar(max) , @ParentId int =NULL, @PostTypeId int , @Tags nvarchar(150)=NULL , @Title nvarchar(250) , @OwnerEmail varchar(100) AS -- Added DECLARE @UserId INT SELECT @UserId = Id FROM dbo.Users WHERE @OwnerEmail = Email INSERT INTO [dbo].[Posts] ( [Body] ,[CreationDate] ,[ParentId] ,[PostTypeId] ,[Score] ,[Tags] ,[Title] ,[ViewCount] --,[OwnerEmail] --Removed in this revision ,[LastActivityDate] ,[OwnerUserId] ) VALUES ( @Body ,GETUTCDATE() ,@ParentId ,@PostTypeId ,0 ,@Tags ,@Title ,0 --,@OwnerEmail --Removed in this revision ,GETUTCDATE() ,@UserId ) |
Once this is done, and once any QA checks have been completed, we can drop the old column:
|
1 |
ALTER TABLE dbo.Posts DROP COLUMN OwnerEmail |
This only took 15 milliseconds on my laptop, but again this is something you need to test in your environment, especially on very high activity servers for data that is transactional in nature. Better if your simple change doesn’t lose someone their purchase.

For very large tables on busy systems, dropping the column may be problematic. We might be better off with a variation of this technique that inserts rows into a new table entirely. In this case our UPDATE and INSERT statements have to be performed on both tables within a transaction while we are in the intermediate step.
Further Considerations
It’s always best to run through this process (likely a few times) on a non-production server with a copy of your production data. You want the update to be fast enough to be imperceptible to other processes, so understanding how long each batch takes to run and the impact it will have on your production system is very important. Selecting a batch size that allows this process to complete quickly and adding any necessary indexes are critical steps during the planning phase to minimize any impact.
It is also crucial to check your transaction log size to ensure you have enough space to hold these modifications. Consider increasing the frequency of your log backups while running the update and double check that you have alerting on the growth of the log and availability of space on the disk it is placed on.
Summary
Using a varchar column to reference another table can be a huge performance killer and stands in the way of a well-normalized database, but changing the schema of a table in use is a challenging problem. A lengthy downtime might be the quickest solution to come to mind, but this technique will allow you to do the work in smaller bites without taking a downtime, all while eliminating the risk and stress of a long rollback process in the case of an error or a full transaction log.
This document contains proprietary information and is protected by copyright law.
Copyright © 2026 Red Gate Software Limited. All rights reserved


Load comments