The Flyway Add Command Explained Simply
Flyway's add command creates an empty new migration file of the required type, ensuring use of the proper naming convention, assigning to it the correct version number, and placing it in the required location. This article explores how the command works and why it's especially useful when you want to add a new migration as part of an automated process.
—
This article is part of the Flyway Command series
—
Why is the add command useful?
The add command is used to create a new, empty migration script that follows the naming convention of your existing migrations and has the correct version number. At first glance, you might wonder why you’d need a specific command just to create a new migration file. Surely, a quick look at the files in the migration directory and their version numbers will tell you what the next one should be called? However, this can become a much bigger chore in larger Flyway projects with multiple directories and more complex versioning.
Flyway add becomes especially useful when you’re automating parts of the development workflow. For example, you might want to create a process that creates a new feature branch in response to a ticket, automatically adding the next migration file with the correct version and a description based on the ticket ID. Or perhaps a developer wants to generate the next migration directly from their code editor, without having to check the folder structure or versioning.
If you try to script this by hand, you might find that it’s surprisingly complicated. Flyway add does the hard work for you.
How Flyway Add works
To illustrate some of the hard work that the flyway add command is doing for us, under the hood, we’ll step through a simple example. We’ll cover the syntax in more detail later, but for now, we run the command with just a description of the new file we want to add, chosen carefully because it’s used in the filename and appears in Flyway logs and notifications:
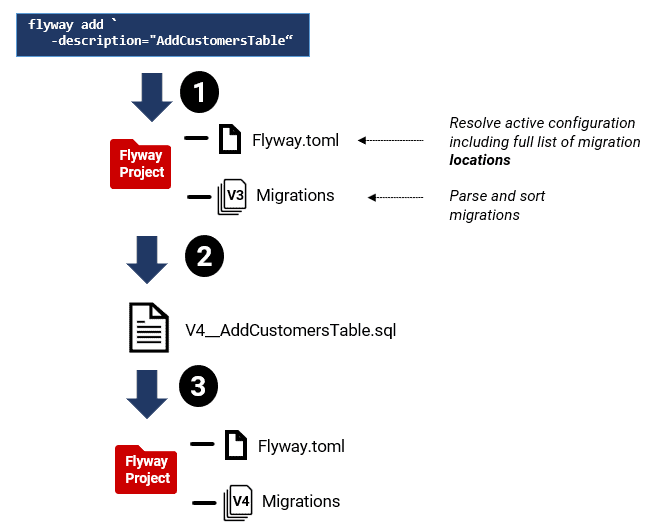
1. Locate and sort existing migration files
Before Flyway can create a new migration file, Flyway must assess the existing set of migration files. This required several steps.
- Determine the full list of locations
Flyway checks your configuration files, environment variables, and command-line parameters to resolve the active configuration, and work out where to find (and potentially place) migration files. - Scan all locations recursively
It searches through all specified directories, including subfolders, and will pick up any migrations that follow the configured naming conventions. - Parse and sort migration files
Flyway identifies the type and version of each migration, then sorts them to determine the correct next version number.
If you had to script all of this yourself, it’s complex because Flyway currently offers no built-in way to retrieve the final, resolved list of locations (there’s no built-in FLYWAY_LOCATIONS environment variable). Tracking Down Object Changes in Flyway Migration Files explains this process in detail and offers a workaround using Flyway’s debug output, though it’s far from ideal.
2. Name the new file, assigning the correct version number
Flyway add ensures that the new file follows the correct naming convention for the type of migration and has the appropriate version number, whereas there is some parsing, sorting and checking to do if we needed to script it by hand.
Flyway migration files follow a strict naming convention, as follows:
<type><version>__<description>.<ext>
- type – indicates a migration type of V (Versioned), U (Undo), R (Repeatable), or B (Baseline)
- version: the schema version number (e.g., V1.1), applicable to versioned, undo, and baseline migrations
- description: Follows a double underscore (__) and must use only letters, numbers, and underscores
- file extension: according to the migration file format (.sql, .ps1, .cmd, .sh, .py, etc.)
In this example, we specified neither the -type of file nor a -version, so by default Flyway add will create a versioned (V) SQL migration file, and assign the next version number automatically, based on the naming convention of your existing migrations and the detected increment.
Currently, flyway add assumes you want a SQL migration. If you need a .ps1, .sh, .bat or other script type, you can either:
- Adjust the extension of the generated file manually, or
- Set the
-nameOnlyparameter totrueso that Flyway outputs only the intended path/filename. Then create the file yourself with the right extension.
3. Create and save the new file
Finally, Flyway add will create and save an empty migration file, correctly named and versioned. Unless we specify a location, Flyway will save the new file in the default file location as specified in the configuration (the first filesystem location listed in flyway.locations). Otherwise, we can specify where we want the new file to appear, perhaps the one where the most recent migration lives, using the -location parameter.
Flyway’s add command in action
As you can probably tell by now, it’s convenient to have the option of letting Flyway handle all the hard work of creating migration files. With a few parameters, you can control exactly what kind of file gets created and where.
To use flyway add, you must run the command from your Flyway project directory, so that it can load the project configuration, resolve the migration locations, scan existing files, and with this information assign the correct next version number. However, if you prefer to specify the version yourself, just supply it via the -version parameter and Flyway will use it, assuming it doesn’t clash with an existing file:
|
1 |
flyway add -version="2.3" -description="AddDiscountColumn" |
The result is an empty file called V2.3__AddDiscountColumn.sql, saved in the first filesystem location in flyway.locations. If you want to save it somewhere else (e.g., a specific branch folder), you can use the -location parameter:
|
1 |
flyway add -version="2.3" -description="AddDiscountColumn"-location="./Branches/Develop/Migrations" |
What if you want to create an undo, repeatable or baseline file instead of a versioned one? Just specify the type:
|
1 2 |
flyway add -description="DropCustomersTable" -type=undo flyway add -version="2.15" -description="RC1" -type=baseline |
If you only want to get the filename without creating the file, use the –nameOnly parameter:
|
1 |
flyway add -description="AddIndexes" -nameOnly=true |
This gives me the option to generate the correct file reference and then create the file directly from my programmer’s editor. Let’s see how that works in practice.
Automating the creation of the next Flyway migration
There are times when you want to automatically create a correctly named and versioned ‘template’ for the next migration. It might be part of a process to spin up a new hotfix branch in response to an urgent bug. Or one that generates a Flyway migration from the output of a table designer or an ER Diagramming tool. The Ops team might want to do it in Staging, to add the production-only DCL code.
Here, I’ll demo the simple case of a developer like me, who prefers to keep as much of their work as possible inside their programmer’s editor, and wants to create the next migration from there, ready for coding, without the chore of hunting through directories working out what to call it.
We’ll start with a basic method that pipes the output of flyway add into your editor. Then, I’ll show how to wire up a PowerShell helper script that handles all Flyway’s location and configuration details and runs the correct flyway add command, in the background, so you can generate the next migration with a single keystroke, directly from your editor window.
Piping the correct filename into your programmer’s editor
Using the -q (quiet) and –nameOnly options, we can retrieve just the name of the new file from Flyway add and then then pass it easily to most code editors. Here’s a simple example using PowerShell (the Flyway project folder must be your current working directory):
|
1 2 |
# -q Suppresses all output, except for errors and warnings Editpad (flyway -q add -description=Try_It_Out -nameOnly=true) |
Alternatively, you could use DOS batch , invoking, say, Notepad. This example opens the newly created file in Notepad. Replace notepad with another editor such as VS code, as needed.
|
1 2 3 |
@echo off for /f %%f in ('flyway -q add -description=Try_It_Out -nameOnly=true') do ( start notepad "%%f") |
For Python you might do this:
|
1 2 3 4 5 6 7 8 9 10 11 |
import subprocess import os # Run the Flyway command and capture the filename result = subprocess.run( ["flyway", "-q", "add", "-description=Try_It_Out", "-nameOnly=true"], stdout=subprocess.PIPE, text=True ) filename = result.stdout.strip() # Open with default editor (cross-platform attempt) os.system(f"notepad {filename}") # On Windows; replace with your preferred editor |
Creating new migrations directly from your editor
You might have spotted the limitation of the simpler approach: when working in a programmer’s editor, you’re often editing files within a specific migration folder, not from the project root. If you run flyway add from the wrong location, it will not resolve the configuration correctly.
That’s where a PowerShell helper script can make life easier. I use one called CreateAnEmptyFlywayMigrationFile.ps1. It works out where the project root is, identifies the current branch, resolves the correct location from the Flyway config, and runs the appropriate flyway add command. The result? A correctly named and placed migration file opens directly in your editor.
You install the helper script into our text editor and trigger it with a keyboard shortcut or menu item. In my case, I’ve configured a new tool in EditPad called “Flyway create new migration file“. It uses EditPad’s %SELECTION% macro so that the -description parameter picks up whatever text I’ve highlighted at the time:
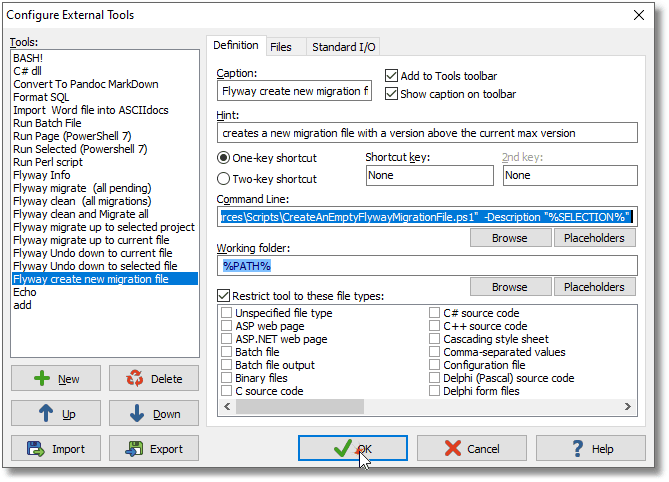
Here’s the command I configured in the tool. Of course, you’ll need to adjust <path to> to reflect the actual location of your script:
|
1 |
pwsh -File "<path to>\FlywayTeamwork\Resources\Scripts\CreateAnEmptyFlywayMigrationFile.ps1" -Description "%SELECTION%" |
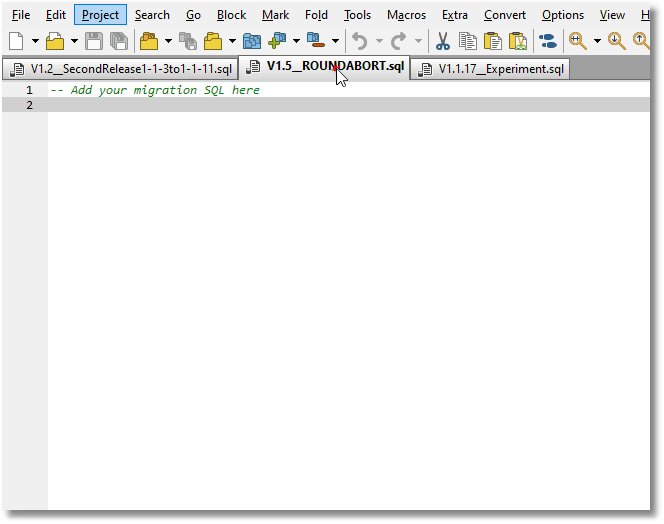
To use it, I simply highlight a word in any open file, say, ROUNDABORT, and invoke “Flyway create new migration file” from the Tools menu or a shortcut key.

Flyway generates the next migration file, names it correctly using the current version sequence, and opens it right in my editor, ready appears ready for tapping in the SQL code:
How the PowerShell helper script works
In my project layout, the Flyway project root is always an ancestor of the migration file’s path. So as long as your current directory, i.e., where you’re working in your code editor, is somewhere inside the project structure, the helper script can ‘walk up the path’ to find the root project/branch directory, make that the working directory (and you could easily adapt the logic to fit whatever file structure you use). From there, it constructs the appropriate flyway add command using any supplied parameters, resolves the correct output location based on the active configuration, and opens the newly created migration file in your code editor.
I’m using EditPadPro, but integrating Flyway with most code editors is straightforward. If yours can execute DOS commands, as most can, then it can probably also run external scripts or commands. You just need to ensure PowerShell can find the right version of Flyway, either by manually updating the PATH variable, or by setting the ‘Flyway’ alias to point to it, using a script saved in your PowerShell profile.
Here is the full code for the helper script. Once installed into your code editor, you can use it to get Flyway to create a correctly-named migration file that then appears directly within your editing window, as demonstrated above. It would be easy to extend it so that it provides your SQL Header to the file, but this is a matter of personal preference.
|
1 2 3 4 5 6 7 8 9 10 11 12 13 14 15 16 17 18 19 20 21 22 23 24 25 26 27 28 29 30 31 32 33 34 35 36 37 38 39 40 41 42 43 44 45 46 47 48 49 50 51 52 53 54 55 56 57 58 59 60 61 62 63 64 65 66 67 68 69 70 71 72 |
<# .NOTES =========================================================================== Created on: 23/04/2025 10:33 Created by: Phil Factor Filename: CreateAnEmptyFlywayMigrationFile.ps1 =========================================================================== .DESCRIPTION This script is designed to create a new migration file from a programmer's editor. .EXAMPLE pwsh -File "$env:FlywayWorkPath\Resources\Scripts\CreateAnEmptyFlywayMigrationFile.ps1" -Description "AuthorsAndEditions" pwsh -File "$env:FlywayWorkPath\Resources\Scripts\CreateAnEmptyFlywayMigrationFile.ps1" -Description "SQUAREABORT" #> param ( $description = 'Mysterious', # Description of the migration or undo $type=$null, #undo, baseline $location=$null, #if you want to specify where it should go $force=$null, #overwrite the existing file (default NO)? $nameonly=$null, #don't create the file(default Do create it)? $ProjectLocation = 'FlywayTeamwork' # Root folder of Flyway projects ) # we add whatever parameters are wanted and put them in the command line $TheType='';$Thelocation='';$Theforce='';$Thenameonly=''; if ($type -ne $null) {$TheType="-type `"$type`""}; #undo, baseline if ($location-ne $null) {$Thelocation="-location `"$location`""}; #if you want to specify where if ($force-ne $null) {$Theforce="-force `"$force`""}; #overwrite the existing file? if ($nameonly-ne $null) {$Thenameonly="-nameonly`"$nameonly`""}; #don't create the file if ("$pwd" -notlike "*$ProjectLocation*") { Write-Error "You must be editing within '$ProjectLocation' for this to work, not $($pwd.path)" -ErrorAction Stop; $NoReallyStop=$true } try { # Ensure the working directory is within the defined project space #We now need to eork out what branch we are working on $Splitpath=("$pwd" -split "$ProjectLocation\\") #this is dependent on our way of doing directories $ProjectAndBranch = $Splitpath[1] -split '\\branches\\' $PathToFlyway=$Splitpath[0]; $project = ($ProjectAndBranch[0] -split '\\')[0] $branch = switch ($ProjectAndBranch.count) { 1 { 'main' } # Default branch if none specified default { ($ProjectAndBranch[$psitem - 1] -split '\\')[0] } } } catch { Write-error @" { "Error" : "`"$($PSItem.ToString())`"" } "@ -ErrorAction Stop } $currentBranch=switch ( $branch ){ 'main' {$project} default { $branch }} #go to the appropriate directory # Change working directory to the project branch directory cd "$(($pwd -split "$currentBranch")[0])$Currentbranch" $result= flyway '-outputType=json' 'add' "-description=$description" $TheType $Thelocation $Theforce $Thenameonly; $ResultObject=($result|convertfrom-json) #Check for any errors if ($ResultObject.error -ne $null) {write-error $ResultObject.error -ErrorAction Stop} else { $TheFileWeveCreated=$ResultObject.migrationPath #we write the name back to the calling application $TheFileWeveCreated=($TheFileWeveCreated -replace 'file:///','') -replace '/./','/' write-host $TheFileWeveCreated #we can get EditPadPro to open a pane for the new file so you can enter your code. EditPadPro8.exe $TheFileWeveCreated } |
Conclusions
The parts of Flyway I like best are the ones that allow you the freedom to work the way you want, that adapt to your team processes, rather than the other way around. The Flyway CLI is like that. It accommodates a wide range of users and development styles, and the add command is a great example: it just makes more things possible.
So why not, I ask myself, use this with the generate and snapshot commands to automatically create all my UNDO files automatically? This way I can check through them, tidy them up, test them and add them to the migrations when they’re ready. You might even do this in a feature branch as part of your development work, and later retrospectively fold it into a clean, orderly migration.
That’s what makes Flyway CLI so useful. It gives you open-ended commands like this that support structure and automation, when you need it, but don’t insist you change the way you work.
Tools in this post
You may also like
-

Live training session
Flyway 101: Standardizing once the team and project grows
Once the above challenges are resolved how do they expand the process. Adopting standardized processes for script generation and version control from the developer perspective.
-

Article
Building a Database Directly from Object-level Source Scripts
Table manifests, and object manifests, which are just ordered lists, are a very useful output from and development database build. This article show how to generate a table manifest in SQL, and once you have it, you'll start to find several uses for it, besides the build process.
-

Article
A simple way to manage multi-environment deployments
Often when working with Flyway (and release automation in general) you will have a set of deployables – and a chain of environments these need to be delivered to in order. More often than not, these are along the lines of Dev Continuous Integration Staging Production In this quick tutorial we are going to look
-
Article
Flyway's Baseline Migrations Explained Simply
A Flyway Baseline migration script is a single script with a B prefix that will migrate an empty database, or one that Flyway has 'cleaned', to the version specified in the file name. It is useful both for consolidating a long, often complex chain of historical migrations, and for capturing the current production version of a database, as the starting point for developing subsequent migrations.
-
Article
Redgate Flyway’s Product Updates – February 2026
This month’s highlights include smarter dependency handling in Flyway Desktop, and a look at how we’re starting the year strong for Oracle users. Plus: last call to share your feedback in our Flyway user survey (the prize draw closes soon!). Even more control for your dependencies in Flyway Desktop One of Flyway’s strengths is tracking
-
Article
How Spawn is revolutionizing development for the unit testing framework, tSQLt
IT consultancy, sqlity.net, specializes in helping organizations get the best performance and business value from their SQL Server estates through Data Platform DevOps. The founder, Sebastian Meine, is also one of the co-creators of tSQLt, the only open source unit testing framework to enable true continuous integration and continuous delivery for SQL Server. We recently


