
In the first part of this article, we discussed which migration options are supported and we determined the requirements. After this was done, we prepared the Active Directory and installed our first Lync Front End Server with a Mediation Server co-located.
To continue with our migration we will first have to merge the OCS and Lync configuration, before we can start moving users across, and that’s what we’ll discuss now.
Merging the old OCS configuration with the new Lync configuration
Since OCS uses the Windows Management Interface (WMI) framework and Lync doesn’t (it stores most of its configuration settings in a SQL database), we will need to install a utility which can convert the OCS configuration to a Lync compatible format. WMI is a kernel-level instrumentation technology and, as the Lync Central Management Store is built on SQL Server, conversion is necessary.
This tool is called the WMI Backward Compatibility Package and can be found in the \SETUP\AMD64\SETUP\ directory on the installation media. The tool can be installed by running OCSWMIBC.MSI on any computer that contains the Lync Server 2010 Core Components and Lync Server Management Shell. In addition to these requirements, the Topology Builder must also be installed on the same machine
Once the installation is completed, we can then merge the topologies. To start this process, we need to launch the Topology Builder and select the Download topology from existing deployment option. Once the topology has been downloaded, select the Merge 2007 or 2007 R2 Topology option in the right-hand pane. This will start a wizard which will guide you through the process.
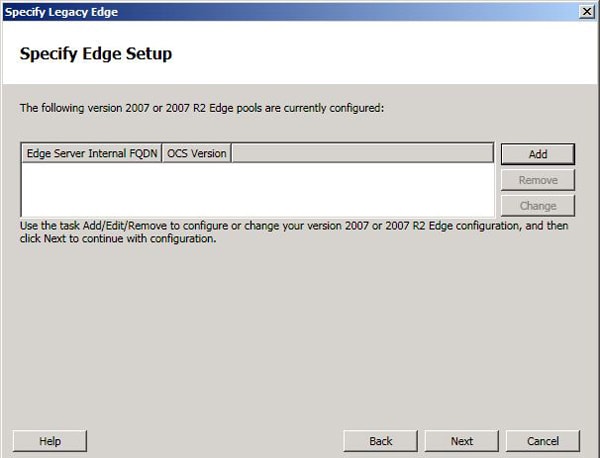
Figure 1. Specify Edge Setup
The process will start with specifying the Edge Server which can be used by the Lync environment to connect to the outside world. Press the Add button which will open up a separate wizard.
On the Specify Edge version page, select the Office Communications Server 2007 R2 Edge Server option, and in the next step we’ll need to select the edge type, which in our case is the Single Edge Server option.
One point to bear in mind at this stage is that if we have an Expanded Edge Server, we will first need to convert it to a Single Edge Server or Load-balanced Consolidated Edge server, according to the Microsoft TechNet documentation.
In the next two steps of the wizard we will need to specify both the internal and external Edge server settings, respectively. The internal settings are limited to:
- FQDN
- Internal SIP access port, used to access the Edge from the LAN, and by default 5061
- Internal web conferencing port (also used to access the Edge from the LAN), by default 8057
The external settings are limited to:
- FQDN of web conferencing edge
- External web conferencing port, by default 443
- Enable/disable edge pool to be used for federation and public IM connectivity
The last step of this wizard is to specify the next hop for the Edge Server. If we have an OCS 2007 Director, we can use this for federated traffic. Since we don’t have a Director server role in this situation, we will select the Front End Pool option and specify the FQDN of our OCS 2007 R2 Front End Server as ocs-fe.corp.local.
Now that we have specified all the necessary settings, we can close this wizard and continue with the original one (don’t worry, it gets less confusing from here on in). The next step of this wizard is to specify, once again, the Internal SIP port setting which is 5061 by default.
Before merging the topologies, a summary of everything we’ve configured will be displayed. Check all the settings again, and then click Next to start the actual merging process. Once the merge process is completed, verify that the status is Success.
Looking now at the Topology Builder, we will see an additional site has been added, called BackCompatSite. This site will contain all OCS 2007 R2 servers which are currently deployed in our environment.
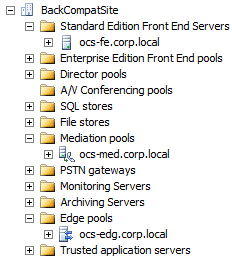
Figure 2. BackCompatSite added to Lync topology
For the next step of the merge process, we will need to republish the topology. This can be done by selecting the Publish Topology option, under the Action menu on the right-hand pane of the Topology Builder. To finish the merge of the topologies, we will need to import the current OCS policies into Lync, which can be done by using the following cmdlet in the Lync Management Shell:
|
1 |
Import-CsLegacyConfiguration |
This may generate a warning such as the one below:
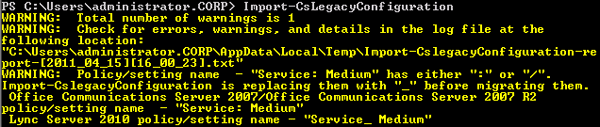
Figure 3. Warning message generated when importing the legacy configuration
The warning is purely informational and can be safely ignored. It simply informs we that “incorrect” characters are used in a policy (i.e. in OCS 2007 R2) and will be replaced with underscores. To verify that the policies have been imported successfully, open the Lync Server 2010 Control Panel and visually check the following items (located on left-hand pane):
- Voice Routing
- Conferencing
- External User Access
- Monitoring and Archiving (optional)
As we can see in the Lync Server 2010 Control Panel , the imported (legacy) policies are user-based policies, and a few points should be noted about this process.
First of all, the Anonymous Participants setting for Meetings is automatically set to Enforce per user in the conferencing policy.
In addition to this, the current PIN policy for dial-in conferencing is not migrated and, as a result,, the default PIN policy of Lync will be assigned to a migrated user. If this is not acceptable, then we will need make the necessary changes to the PIN policy in our Lync environment. This policy can be found in the Lync Server 2010 Control Panel on the PIN Policy tab, located on the Conferencing page.
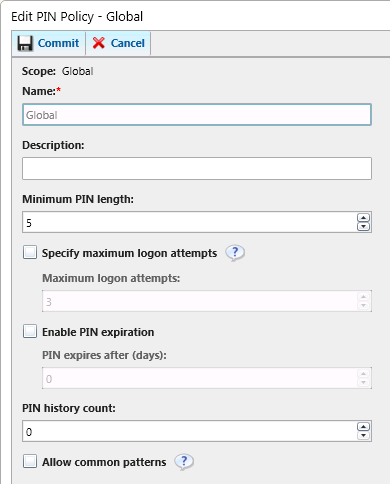
Figure 4. Global PIN Policy
Connecting Lync to the outside world
We already provisioned the Edge Server during the merge of the topologies, but there is an additional step required for Lync Server 2010 to be able to use the OCS 2007 R2 Edge Server. To perform this final step, we will need to use the Topology Builder again (If we already closed the Topology Builder, we just need to start it again and select the Download topology from existing deployment option). Get the properties of the Lync site by selecting it in the left-hand pane and then choosing Edit Properties in the Actions menu.
Select the Federated Route option on the left side of the newly-opened window, and change the option to Enabled and select the OCS 2007 R2 Edge Server from the dropdown menu. Press OK to close the window.
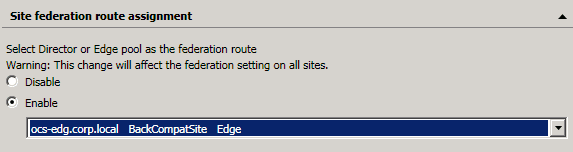
Figure 5. Assign site federation route
The next step is to associate the OCS 2007 R2 Edge Server with the Lync Front End Server. Expand the Standard Edition Front End Servers and get the properties of the Lync Front End Server by selecting Edit Properties in the Actions menu.
A new window will be opened with all related Front End Server settings. Search for the part called Associations and place a checkmark in the box next to Associate Edge pool (for media components). Finally, select the OCS 2007 R2 Edge Server from the dropdown menu for that option and press the OK button to close the window.
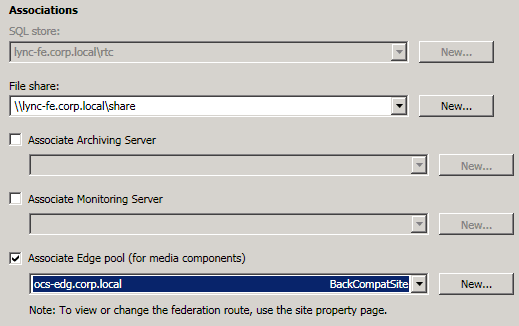
Figure 6. Associate OCS 2007 R2 Edge with Lync Front End
Now that all of the Edge-Server-related configuration is completed, we can publish the updated topology by selecting Publish Topology from the Actions menu.
Once the topology has been published, we need to make one final configuration change on the OCS 2007 R2 Edge Server. This is because, by default, the Edge Server (OCS 2007 R2) only accepts traffic from servers located on the Internal tab, and we need to change this.
To perform this action, we will need to logon to the legacy Edge Server using an account which is a member of the RTCLocalServerAdmins. Once logged in, start Computer Management (which can be found in the Administrative Tools group), expand the Services and Applications node, and get the properties of the OCS Server 2007 R2 object. Select the Internal tab, click on the Add button (located under the Add Server section), and specify the FQDN of the Lync Front End Server and click on OK to close the properties.
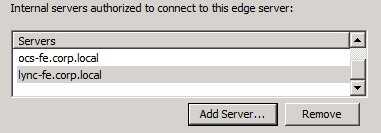
Figure 7. Lync Front End added to internal server list
With the completion of this last configuration step, our Lync environment is now connected to the internet, which will give users homed on the Lync Front End server the ability to communicate with external federated contacts.
Test migration
We’re almost done, but before migrating all resources, it is highly recommended to perform a test migration of just a few users to make sure everything works smoothly. Make sure that your users have the latest version of the Lync client installed (As discussed in the “Preparations” section of Part I), or else they will not be able to connect to the Lync Front End server once their accounts have been migrated.
This may sound paranoid or redundant but, for example, it may be the case that the migration will fail due to the fact that the initial user replication hasn’t completed. Lync retrieves all user information from Active Directory, using the LS User Replicator service to populate the Central Management Store. If this process hasn’t completed, then the Lync CMS database may not contain all the necessary information, and our migration will fail.
So, to confirm that the initial synchronization has completed, check the Lync Server specific Event Log. This can be found under the Application and Services Logs node when opening the Event Viewer.
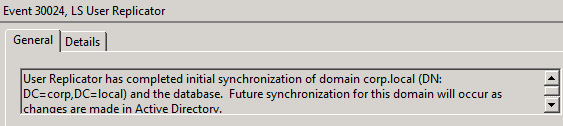
Figure 8. Initial synchronization has completed
Once we’re happy that our configurrations are correct, we can migrate some test users using one of the following methods:
- Lync Control Panel
- Lync Management Shell
Migrating Users via the Lync Control Panel
First of all, make sure the account we are using is member of the CsAdministrator group, or else we will not be able to login. Once this is confirmed, open the Lync Server 2010 Control Panel (Note that Silverlight 4 is a prerequisite). Select the Users menu item, create a search filter, use the Add filter option to only search for legacy users, and press the Find button.

Figure 9. Search filter to find legacy users
This will give an overview of all OCS 2007 R2 users, as seen below:
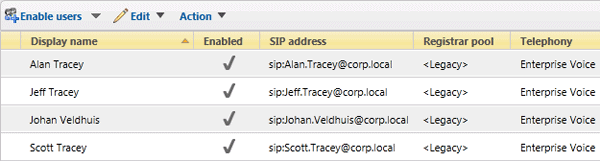
Select one of the users and use the Action menu to select the Move selected users to pool… option:
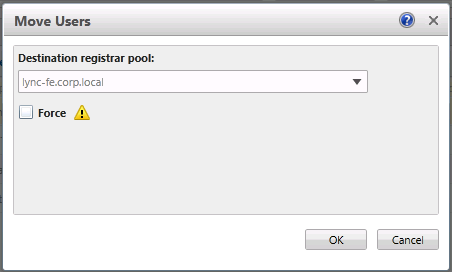
Figure 10. Select destination registrar pool
This will bring up a new window, giving we the option to select the destination registrar pool – in our case this is the Lync Front End Server called lync-fe.corp.local – Press OK to migrate the user to Lync. During this process, the user’s contact list will be migrated from OCS to Lync, and their AD properties will be updated. Don’t select the Force option unless we can’t migrate a user the normal way.
For example if the original Front End Server has crashed, we can’t migrate the OCS 2007 R2 data (contact list) to Lync Server 2010.The nice thing about the process is that a user can continue to work while his account is being migrated. Nevertheless, it’s highly recommended to perform these migrations during non-office hours, if only because it’s a good habit to cultivate.
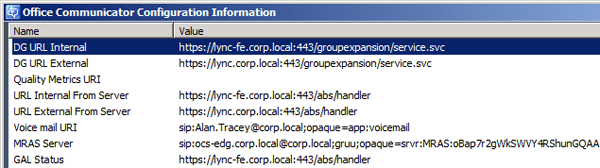
Figure 11. New URLs displayed in configuration information
When looking at the Lync 2010 Configuration Information on the client (fig. 11), we will see that the URL’s are updated automatically. That being the case, we might rightfully ask “What happens when a user signs out and signs in again?“. As it happens, everything just keeps working.
Let’s have a look at a trace to see how that happens (fig 12). First of all, we see that the user tries to authenticate, and at the 6th row we can see the OCS 2007 R2 Front End Server automatically redirecting the user’s request to their home server, which is the Lync Front End Server.
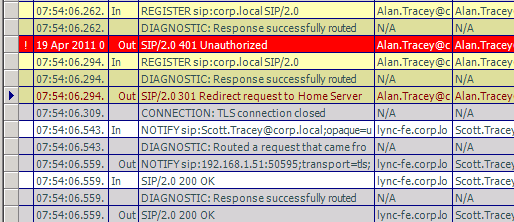
Figure 12. Redirect user to home server
As we can see, we don’t eed to change any DNS record for internal use.
Migrating Users via the Lync Management Shell
As mentioned earlier, there is a second method for migrating a legacy user. First of all, to get an overview of users who are homed on OCS 2007 R2 we can use the following cmdlet:
|
1 |
Get-CsUser -OnOfficeCommunicationServer |
This will display all OCS 2007 R2 users, together with detailed information. To move a user we will need to use their SIP address as their identity. For example, to move Jeff Tracey, who has Jeff.Tracey@corp.local as his SIP address, we will need to use the following cmdlet:
|
1 2 |
Move-CsLegacyUser -Identity sip:Jeff.Tracey@corp.local -Target lync-fe.corp.local |
A confirmation prompt will be displayed and, upon acknowledgement of that, the user will be migrated from OCS 2007 R2 to Lync.
Validating the functionality
Now we have migrated two users to our new Lync Server 2010 environment we can perform some validations. To make these easier, Microsoft has published a nice table which lists the various workloads and validation tests which can be performed (see below):
|
If you use this workload: |
Verify these policies and settings: |
|
Instant messaging (IM) and conferencing |
Presence policy Conferencing policy |
|
Dial-in conferencing |
Dial-in access numbers Dial plans |
|
Enterprise Voice |
Voice policy Voice routes Dial plans PSTN usage settings |
|
Communicator Web Access |
Simple URLs |
|
External users |
External access policies |
|
Archiving |
Archiving policy |
Table 1: Which policies and settings to verify and when
We can use the Lync Server 2010 Control Panel or Lync Server Management Shell to verify that these policies and settings are correctly migrated. Once this has been done, it’s time to perform some tests to check if the various scenarios work correctly.
These can be very easy tests; for example:
- can we send an IM message to another user?
- can we share programs or our desktop?
- can a user migrated to Lync still use the Enterprise Voice features?
- etc.
A good starting point for the functional tests can also be found on the TechNet website, although you may need to add or remove tests as applicable to your environment.
Keep in mind that we are still using the Edge Server from OCS 2007 R2, so it’s recommended to perform the remote functionality tests again once the Lync Server 2010 Edge Server is in place.
Summary
In this second article discussing the migration from OCS 2007 R2 to Lync Server 2010, we’ve seen how to merge the OCS 2007 R2 topology with the new Lync environment. This included connecting the Lync Front End Server to the internet by using the OCS 2007 R2 Edge Server, migrating a few test users, and performing tests to validate the migration.
In the next article, we will add a Lync 2010 Edge server to our topology, and will continue to migrate resources, such as the rest of our users, routing groups, and the dial-in access.
Load comments