
Message Classifications in Exchange 2007
Introduction
Exchange 2007 has a new feature known as message classification that allows users to apply a classification to a message in order that the actual usage of that message is understood by both the sending and receiving parties. In previous versions of Exchange the concept of message classification has been restricted to marking messages with high, normal or low importance. Now it’s possible to not only choose between the default message classifications that ship with Exchange 2007 but also to create custom classifications, as I’ll show you later in this article.
It’s important to understand that message classifications are also an Outlook 2007 feature and therefore this is the version of Outlook you need to deploy to take advantage of this feature. However, there are several configuration changes required in order to make message classifications available to Outlook 2007 clients. If you have Outlook Web Access 2007 clients, these can use message classifications without any further modifications.
As I’ve just mentioned, there are message classifications that are provided by default. In all, there are six default message classifications:
- A/C Privileged
- Attachment Removed
- Company Confidential
- Company Internal
- Originator Requested Alternate Recipient Mail
- Partner Mail
In the next section within this article I’ll be showing you how to export the message classifications to an XML file that the Outlook 2007 clients within your environment can locate. This is to allow Outlook 2007 to display the classifications within email messages. Therefore, if you plan on creating new custom message classifications, you should do so before you export the classifications to an XML file. I’ll be covering the creation of custom message classifications later in this article.
Creating the XML File
The first part of the process is the creation of the classification XML file that Outlook 2007 will reference. Fortunately Microsoft has made this part of the process easy by providing a PowerShell script that can do this for you. The script is installed along with Exchange 2007 and can be found in the \Program Files\Microsoft\Exchange Server\Scripts folder on the drive where you installed Exchange 2007. The script name is Export-OutlookClassification.ps1 as you can see from Figure 1.
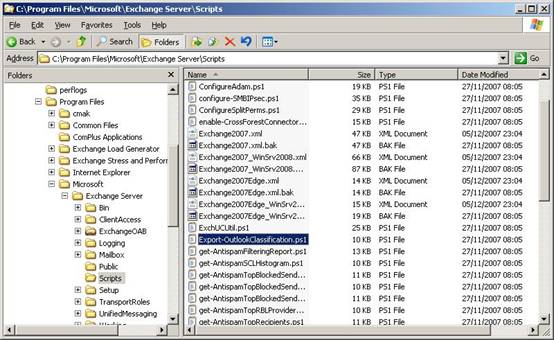
Figure 1: Exchange Scripts Folder
To use this script, bring up the Exchange Management Shell and run the following cmdlet:
./Export-OutlookClassification > c:\classifications.xml
As you can see from the cmdlet example, the output of the PowerShell script is redirected to a file called c:\classifications.xml. Of course, you are free to use a different file name if you choose. If running the cmdlet has been successful, you should be returned straight back to the command prompt; in other words, there is no ‘success’ message per se. To prove that the cmdlet has been successful, open the classification.xml file with Internet Explorer and check for valid contents. An example of what this file looks like when the six default message classifications have been exported is shown in Figure 2.
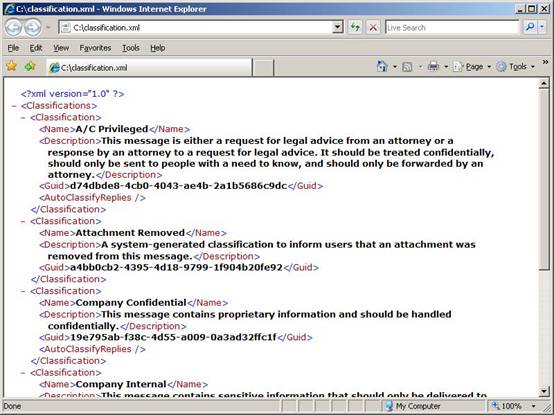
Figure 2: Contents of classification.xml
The classifications that you have exported to the XML file are those classifications that can be chosen by the users who are sending the message; they have nothing to do with the type of message classification that a user can receive. I will expand on this later in the article. Now that you have exported the classifications.xml file, there are two additional parts of the overall message classification configuration to complete. First, you need to store the classifications.xml file in a location that each Outlook 2007 client can access and second, you need to make a registry change to each Outlook 2007 client to enable message classifications. I’ll cover these two configuration elements in the next two sections of this article.
Locating the XML File
With regards to the location of the classification.xml file, you might think at first that the best location is on a network share, since you will only need to copy the file once to a specific location. However, it’s actually better if you copy the file locally to each Outlook 2007 client that requires the use of message classifications. You have to consider the case of Outlook 2007 clients that run in cached mode. Outlook 2007 clients that are running in cached mode are sometimes disconnected from the corporate network, such as those users connecting via Outlook Anywhere when working from home. I’m not suggesting that the model of copying the classification XML file to every Outlook 2007 client is the best model that Microsoft could have come up with, but at the same time this is what we, as IT professionals, currently have to work with. Therefore, you’ll need to produce a good working method, such as login scripts, to distribute the XML file to all Outlook 2007 clients along with the registry change that is detailed in the next section.
Required Registry Modification
Once you have copied the XML file to each client machine that requires the message classification functionality, you also need to create several registry values on these same client machines. The required registry information is as follows:
- Key:
- HKEY_CURRENT_USER\Software\Microsoft\Office\12.0\Common\Policy
- String Value:
- AdminClassificationPath
- Value:
- c:\classifications.xml
This is the location of the XML file and therefore must match the file name and location of your classification XML file.
- DWORD Value:
- EnableClassifications
- Value:
- 1
This setting simply controls whether message classifications are enabled or not. Set this to 1 to enable message classifications or 0 to disable them.
- DWORD Value:
- TrustClassifications
- Value:
- 1
The TrustClassifications setting should be set to 1 when the user’s mailbox is on an Exchange 2007 server. This setting can also be used to control the prepending of text to the message classification when sending messages to mailboxes on legacy versions of Exchange, since these versions of Exchange do not support message classifications. I will not be covering this area any further within this article.
The Policy key is not present by default, and so must be created. Once the new information has been entered, the registry should look like the one shown in Figure 3.
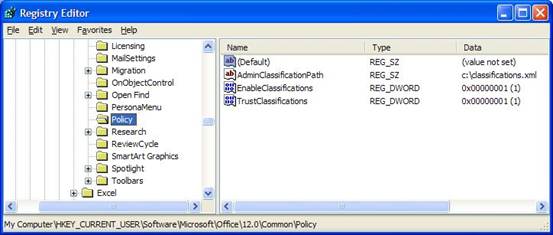
Figure 3: Registry Modifications
Creating a Classified Message
Having set up classifications, creating a classified message couldn‘t be easier. Once you’ve copied the classification XML file to the Outlook 2007 client and created the required registry settings, launch Outlook 2007 and compose a new message. If you had Outlook 2007 open when making the registry changes, restart Outlook 2007 to start using message classifications.
In the new message window, you’ll find the Permission button on the ribbon as you can see from Figure 4.
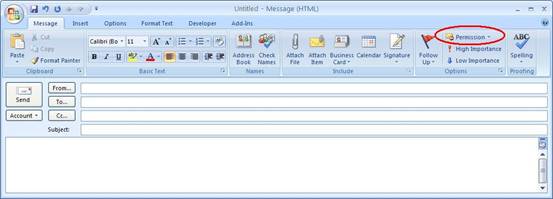
Figure 4: Outlook 2007 Permissions Button
Click the small down-arrow to the right of the Permission button and you will be presented with the six message classification options as defined in the XML file created earlier. You can see this in Figure 5.
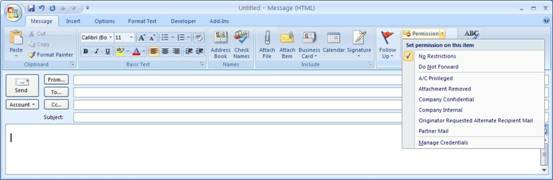
Figure 5: Default Classifications in Outlook 2007
Let’s say that I choose to classify this new message as Company Confidential. Once I’ve classified my message, it appears as shown in Figure 6 below.
Figure 6: New Message Classified as Company Confidential
What if the recipient, a user called Ann in this case, isn’t enabled for message classifications and therefore doesn’t have the required registry modifications in place? In this case, Ann just sees an ordinary message as shown in Figure 7.
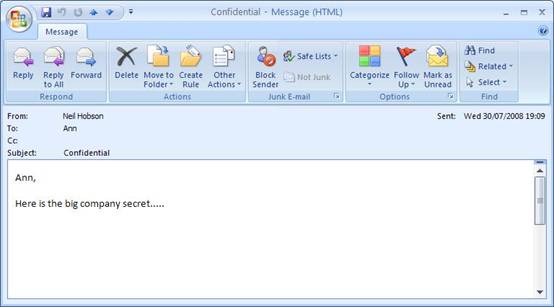
Figure 7: Received Message Without Classification
The message classification metadata is still associated with the message even if Ann’s client is not able to show it. We can determine that this is true by adding the required registry changes and restarting Ann’s Outlook 2007 client. Once this has been done, we can see the message classification is now shown as you can see in Figure 8.
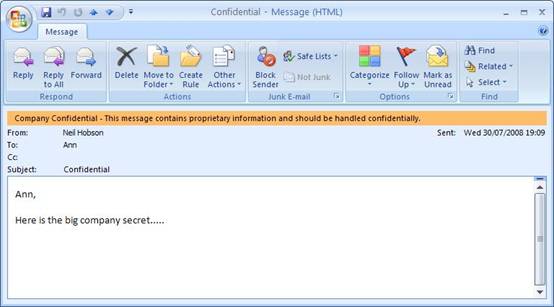
Figure 8: Received Message With Classification
Creating Custom Classifications
The six default classifications may suffice for your needs, but there is always the chance that you will need something a little different. With that in mind, let’s look at creating custom message classifications.
To create a new message classification you can use the New-MessageClassification cmdlet. In order to run this cmdlet, the account you are using must be delegated the Exchange Organization Administrator role, since you are making changes that affect the entire Exchange organization. Before we run the New-MessageClassification cmdlet, let’s run the Get-MessageClassification cmdlet to confirm the presence of the default six message classifications. This is shown in Figure 9.
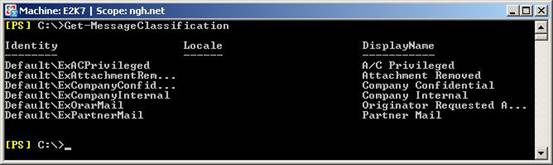
Figure 9: Default Message Classifications
If you run the New-MessageClassification cmdlet without any additional parameters, you’ll be prompted for three parameters to complete the creation process. They are the Name, DisplayName and SenderDescription parameters.
Name. This is the administrative name of the classification. For example, if you want to retrieve details about the message classification with a Name attribute of Custom, you can use the Get-MessageClassification -Identity Custom cmdlet.
DisplayName. The DisplayName attribute is the name of the classification as seen in Outlook 2007, as you have seen earlier in this article in Figure 5.
SenderDescription. This is the description that the sender of the message sees in Outlook 2007. This is the orange bar that you can see in Figure 6.
Figure 10 below shows the process of creating a new message classification using just the three basic parameters.
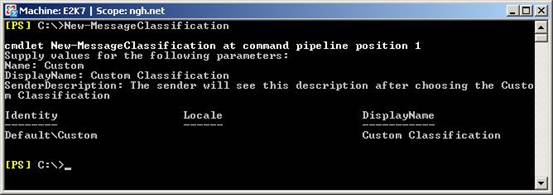
Figure 10: Creating a New Message Classification
Here’s something to note. Immediately after you have created this new classification, run the following cmdlet:
Get-MessageClassification custom | fl
This obtains full details about the newly created Custom message classification as you can see from Figure 11. What you may notice is that the RecipientDescription attribute is populated with the same text that we supplied for the SenderDescription attribute, even though we never had to specify the RecipientDescription information during the creation of this new message classification. This is expected behavior if you do not specify the RecipientDescription text during the creation of the message classification.
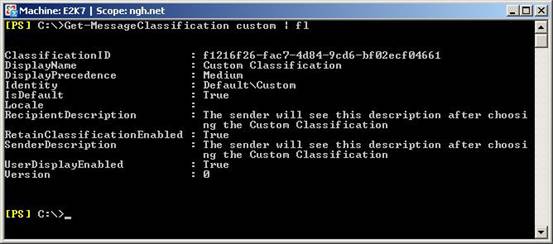
Figure 11: Custom Message Classification Parameters and Values
As you can probably guess, the RecipientDescription attribute contains the text that the recipient of the message will see when opening the classified message. Once you’ve created the message classification, you can easily alter the parameters as with any other Exchange Management Shell cmdlet. For example, the following cmdlet alters the RecipientDescription attribute on the Custom message classification that we’ve recently created.
Set-MessageClassification Custom -RecipientDescription “The recipient will see this description after opening a message sent with the Custom Classification”
Once you have configured your message classifications, you need to re-export the entire list of message classifications into a new XML file and re-distribute to the Outlook 2007 clients. Therefore, you should ideally plan your custom message classifications before you export the list of classifications into an XML file for the first time. As you can see from Figure 11, once Ann opens a new message that has been classified with the Custom message classification, the new recipient description text is now displayed.
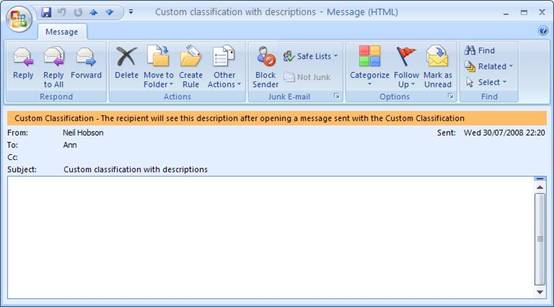
Figure 12: RecipientDescription Information Displayed
Manipulation With Transport Rules
With the introduction of transport rules within Exchange 2007, you can now begin to perform really useful administrative tasks that have previously been unavailable in legacy versions of Exchange, such as adding a disclaimer to all outbound email messages or perhaps copying messages from certain individuals to an additional mailbox.
You can also use transport rules to further extend the ability of message classification. For example, suppose that we need to add specific text to the subject of a message that has been marked with our custom message classification. Let’s see how we can use transport rules to do this. I’m going to use the Exchange Management Console in this example. Here’s what to do.
1. Run the Exchange Management Console and navigate to the Organization Configuration container.
2. Under the Organization Configuration container you will see the Hub Transport container. Click this and then choose the Transport Rules tab as you can see in Figure 12. Note that the Action pane has been removed for clarity.
Figure 13: Transport Rules Tab
3. Right-click the Hub Transport container and choose New Transport Rule… from the context menu. This invokes the new transport rule wizard.
4. On the opening screen of the transport rule wizard, give your rule a suitable name and make sure that the Enable Rule checkbox remains selected. Click Next to advance to the next screen.
5. The next screen of the wizard is the Conditions screen. Here, choose the marked with classification condition in the Step 1 area of the screen. You should now see that, in the Step 2 area of the screen, the marked with classification condition has now been added. An example is shown in Figure 13 below.
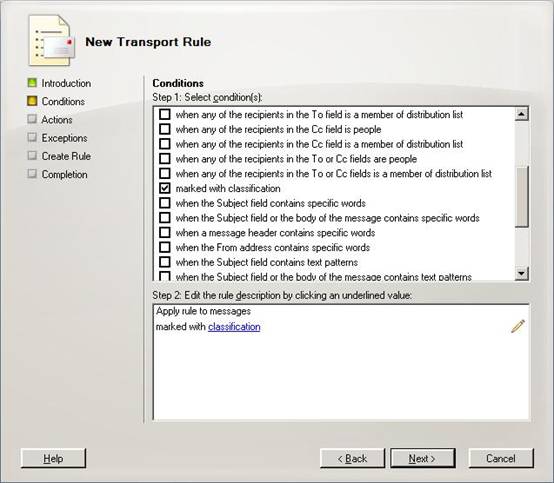
Figure 14: Transport Rule Conditions
6. In the Step 2 area of this screen, click the underlined word ‘classification’. This brings up the Select message classification window as you can see from Figure 14. Select the relevant message classification, which in this example is the Custom Classification, and then click OK.
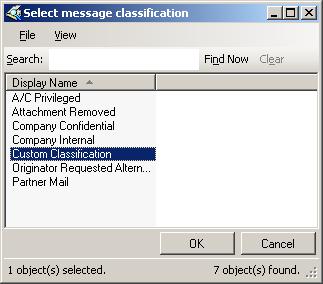
Figure 15: Select Message Classification Window
7. Back at the Conditions window of the transport rule wizard, you should now see that the Step 2 area of the screen shows your condition as marked with Custom. Click Next to proceed through the wizard.
8. You are now presented with the Actions screen of the wizard. In this example we are going to add additional text to the subject line of the messages, so choose the prepend the subject with string option in the Step 1 area of the screen.
9. In the Step 2 area of the Actions screen, click the underlined word ‘string’ and in the resulting Specify subject prefix window enter your desired text to be prepended to the subject. In this example, I’m going to add the text ‘CUSTOM CLASSIFICATION:‘. If you’ve done everything correctly, your Actions screen should look like the example shown in Figure 15.
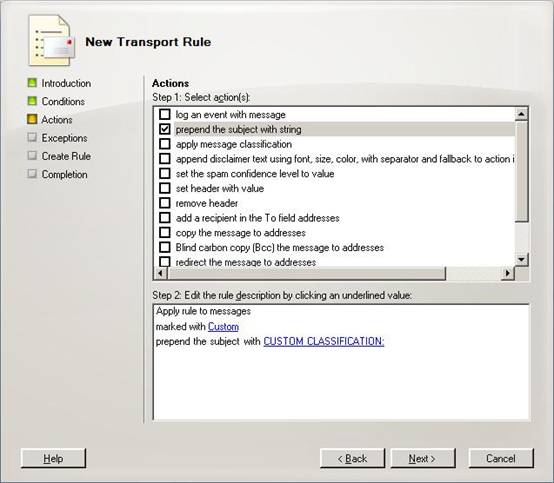
Figure 15: Transport Rule Actions
10. Clicking Next on the Actions screen takes you to the Exceptions screen where you can choose to apply exceptions to the rule. For the example within this article I’m not going to add any exceptions so I will simply click Next and move on to the next screen.
11. Finally we are now at the Create Rule screen that allows you to review your selections. If you are happy with your selections, click New to create the new transport rule.
12. If everything has been successful, you are presented with the Completion screen informing you of a successful creation as you can see in Figure 16.
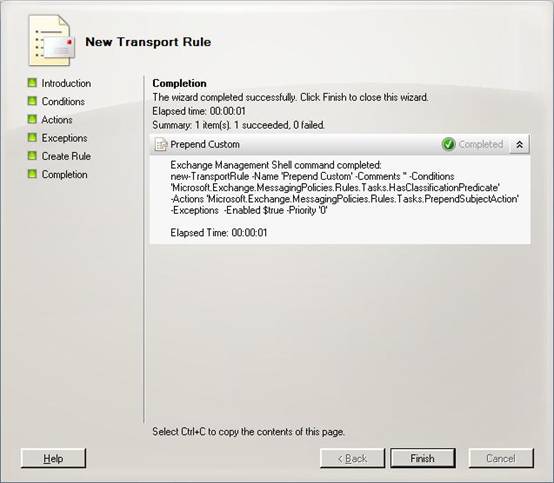
Figure 16: Transport Rule Completion Screen
The expected outcome of this transport rule is that whenever a message is sent and is marked with the Custom message classification, the subject line of that message should be prepended with the text ‘CUSTOM CLASSIFICATION:’. As you can see from Figure 17, the transport rule works perfectly.
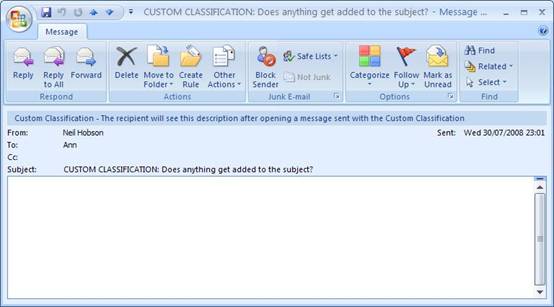
Figure 17: Transport Rule in Action
Summary
It’s now possible for the end users of an Exchange 2007 system to classify their messages such that recipients of those messages understand that there may be restrictions relating to the message content. For example, the message may contain sensitive information that should not be sent externally from the company. The flexibility of message classifications is further extended when you consider that transport rules can be created to perform specific actions on messages that have been classified by the users as you have seen in this article. In my experience not every company that deploys Exchange 2007 implements message classifications but nonetheless it is a useful and welcome addition to the Exchange 2007 feature set, particularly for those organizations that need to comply with regulations or other email policies.
Load comments