
In part one I explained how the transport queues in Exchange work and which commands are available to manage the queues and messages in it. In this part we will dive deeper and will explain how you can change configuration settings related to transport queues.
Modifying the retry configuration for mail queues and mailboxes
Most configuration things can be done either by making changes via the GUI or via PowerShell commands. But there are some things in Exchange which can only be configured by changing a configuration file, with the retry configuration for mail queues this is the case.
The configuration of these can be found in the edgetransport.exe.config file which is a XML file and can be located in C:\Program Files\Microsoft\Exchange Server\V14\Bin
For the retry part there are a few keys:
|
1 2 3 |
<add key="QueueGlitchRetryCount" value="<Integer>" /> <add key="QueueGlitchRetryInterval" value="<hh:mm:ss>" /> <add key="MailboxDeliveryQueueRetryInterval" value="<hh:mm:ss>" /> |
With the Queue glitch retry count you can specify how many times Exchange will retry to send a message immediately in case of an issue reaching the destination server. Default this value is set to 4 but it can contain a value between 0 and 15.
The queue glitch retry interval will let you specify the time between the glitch retries. Default this is set to 1 minute.
The last key called mailbox delivery queue retry interval will let you specify how frequently the Hub transport server tries to deliver the messages located in the delivery queue. The default value for this key is set to 5 minutes.
When you made changes to the file you will need to restart the Microsoft Exchange Exchange Transport (MSExchangeTransport) Service before the changes will take effect.
Transient failures
Related with the queue glitch retries are the transient failure retries. After the attempts configured with the queue glitch retry count Exchange will keep try sending the message. The connection attempts are configured as the transient retry count, the time between the attempts is configured as the transient failure retry interval.
The transient retry count and interval can be configured both via PowerShell and the GUI. Let’s start with the GUI:
For the Hub:
- Open the Exchange Management Console
- Expand the server configuration
- Select the Hub Transport server
- In the upper part of the result screen right click on the server
- Select the limits tab
- Modify the value in the field Transient failure retry attempts
- Modify the value in the field Transient failure retry interval (seconds)
For the Edge:
- Open the Exchange Management Console
- Select the Edge Transport server
- Click the properties link under the server name
- Select the limits tab
- Modify the value in the field Transient failure retry attempts
- Modify the value in the field Transient failure retry interval (seconds)
Via PowerShell you will need to execute the following command:
|
1 |
Set-TransportServer Hub01 -TransientFailureRetryCount 8 |
This will set the attempts to 8 so Exchange will try to deliver the message 8 times after the queue glitch retries.
|
1 |
Set-TransportServer Hub01 -TransientFailureRetryInterval 00:01:00 |
With the command above we will tell Exchange to wait 1 minute between the connection attempts.
Outbound connection failure retry interval
With the outbound connection failure retry interval you can specify the retry interval for outgoing connection attempts that have previously failed. The connection attempts which have previously failed are controlled by the TransientFailureRetryCount and the TransientFailureRetryInterval parameters.
The default value of this parameter on the hub, which is 10 minutes, differs from the default value of the Edge which is 30 minutes.
On both server roles this setting can be changed via the EMC or EMS, let’s start with the GUI.
For the Hub:
- Open the Exchange Management Console
- Expand the server configuration
- Select the Hub Transport server
- In the upper part of the result screen right click on the server
- Select the limits tab
- Modify the value in the field Outbound connection failure retry interval (minutes)
For the Edge:
- Open the Exchange Management Console
- Select the Edge Transport server
- Click the properties link under the server name
- Select the limits tab
- Modify the value in the field Outbound connection failure retry interval (minutes)
If you like to change it via PowerShell then execute this command:
|
1 |
Set-TransportServer Exchange01 -OutboundConnectionFailureRetryInterval 00:60:00 |
The command above will set the Outbound connection failure retry interval to one hour.
To make the previous values more clear below a workflow which gives a graphical overview:
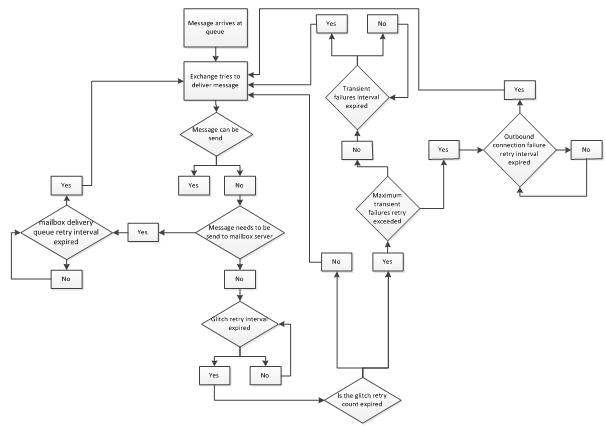
Figure 1 Workflow of queue
Modifying the retry, resubmit and expiration configuration for messages
Configuring the retry and expiration configuration for messages can be done by executing PowerShell commands and some by the GUI. Modifying the resubmit configuration can only be done by modifying the edgetransport.exe.config.
Message retry interval
With the message retry interval you can configure how much time will need to expire after which Exchange will retry to deliver a message that is in the retry state. By default this is 1 minute and Microsoft doesn’t recommend changing this value. If you would like to change it execute the following command:
|
1 |
Set-TransportServer Hub01 -MessageRetryInterval 00:05:00 |
With this command you will configure the server called Hub01 to deliver a message which is in retry state after 5 minutes.
Message expiration timeout
With the message expiration timeout you can configure how long Exchange will try to deliver the message before it’s removed from the queue, the default value for this is 2 days. This can be either done via PowerShell or via the GUI. For example:
|
1 |
Set-TransportServer Hub01 -MessageExpirationTimeout 4.00:00:00 |
This command will set the expiration timeout to 4 days. This means that after Exchange has tried to deliver the message for 4 days but has been unsuccessful the message will be deleted from the queue. If this happens the user will be informed with a message send to the user to inform him/her that the message can be delivered, this is also called a Non-delivery report (NDR).
To modify the configuration of the expiration timeout via the GUI follow the steps mentioned below:
For the Hub:
- Open the Exchange Management Console
- Expand the server configuration
- Select the Hub Transport server
- In the upper part of the result screen right click on the server
- Select the limits tab
- Modify the value in the field Maximum time since submission
For the Edge:
- Open the Exchange Management Console
- Select the Edge Transport server
- Click the properties link under the server name
- Select the limits tab
- Modify the value in the field Maximum time since submission
Resubmit Interval
With this parameter you can configure how much time needs to expire before a message is automatically resubmitted if the queue is in retry state. This can be either the mailbox delivery or remote delivery queue. This is only valid when the message itself isn’t in the suspended state.
As earlier mentioned the resubmit interval can only be changed by modifying the edgetransportconfig.exe.config. This file will contain the following line in the <appSettings> section:
|
1 |
<add key="MaxIdleTimeBeforeResubmit" value="<hh:mm:ss>" /> |
Delay DSN messages
Exchange will send a message automatically to a user when a message has not been delivered in a specific amount of time. Default a delay message is send to a user when the mail hasn’t been delivered within 4 hours.
The value can be changed either via the EMC or EMS:
For the Hub:
- Open the Exchange Management Console
- Expand the server configuration
- Select the Hub Transport server
- In the upper part of the result screen right click on the server
- Select the limits tab
- Modify the value in the field Notify sender when message is delayed more than (hours)
For the Edge:
- Open the Exchange Management Console
- Select the Edge Transport server
- Click the properties link under the server name
- Select the limits tab
- Modify the value in the field Notify sender when message is delayed more than (hours)
Or
|
1 |
Set-TransportServer Hub01 -DelayNotificationTimeout 06:00:00 |
Which will configure the server to send a notification if the message hasn’t been delivered after 6 hours.
Keep in mind that you will need to specify a value which is greater than the TransientFailureRetryCount x TransientFailureRetryInterval.
As already mentioned this functionality is enabled by default but can be disabled if you want to prevent this kind of messages being sent to users:
|
1 |
Set-TransportServer Hub01 -InternalDelayDSNEnabled $false |
Which will prevent delay messages send to internal users.
|
1 |
Set-TransportServer Hub01 -ExternalDelayDSNEnabled $false |
Result is the same as the previous command only for external users.
Configure the transport database
As explained in part one all queues are placed in an ESE database. To change the configuration you will need to modify the edgetransport.exe.config. This file contains the parameters listed below
|
parameter |
description |
default value |
|
QueueDatabaseBatchSize |
Specifies how many database I/O operations will be grouped together before they’re executed |
40 |
|
QueueDatabaseBatchTimeout |
Specifies the maximum time in ms that the database will wait for multiple I/O operations to group before they will be executed. After the time has expired the I/O operations are executed without a warning, this happens only if one or more of the following conditions is true: · The amount of I/O operations defined by the QueueDatabaseBatch · The time specified by the QueueDatabaseBatch |
100ms |
|
QueueDatabaseMaxConnections |
Specifies the number of maximum connections which can be made to the ESE database |
4 |
|
QueueDatabaseLoggingBufferSize |
Specified the amount of memory that can be used to cache transaction records. |
5242880 bytes |
|
QueueDatabaseLoggingFileSize |
Specifies the maximum size of transaction log files |
5242880 bytes |
|
QueueDatabaseLoggingPath* |
The path where the queue database log files are stored. |
Exchange Server\ |
|
QueueDatabaseMaxBackground |
Specifies the maximum number of background cleanup work items that can be queued to the database engine thread pool at any time |
32 |
|
QueueDatabaseOnlineDefrag |
Enables or disables online defrag of the ESE database |
$true |
|
QueueDatabaseOnlineDefrag |
Specifies when the online defrag needs to be executed |
1:00:00 (hh:mm:ss) |
|
QueueDatabaseOnlineDefrag |
Specifies the maximum duration an online defrag may take |
3:00:00 (hh:mm:ss) |
|
QueueDatabasePath* |
The path where the transport database is stored |
Exchange Server\ |
*Before changing this parameters make sure the directory exists where you want to create the files. Besides this please check that the following users have full control on this directory: Network Service, System and Administrators.
Recover transport queues
How do you recover the transport queue if the Hub server fails? In this chapter I will describe how you can recover those messages and perform maintenance on the transport database.
One scenario for example can be that the database will get so big so it can’t be stored on the volume anymore. Another scenario may be that you can’t bring a server back online which still has messages in the queue.
These are the requirements for recovering a database to another Hub server:
- Exchange version must be the same, so same service pack and rollup.
- Must have the same transport role installed as the source server, it’s not recommend to recover a database from a Hub to an Edge.
- Ideally the Hub server must be placed in the same AD site.
Before starting the recovery we need to move the transport database and log files to another temporary location. Because the files may be in use you will first need to check if the Microsoft Exchange Transport service is stopped, this can be done via the services.msc management console. If the service is running you can stop it either via services.msc or via a command prompt by executing net stop MsExchangeTransport.
Once the service is stopped you can move the files located in the queue database directory (c:\Program Files\Microsoft\Exchange\v14\Transport Roles\data\queue) to a temporary folder, for example Recovery.
To continue mail delivery as soon as possible you could decide to start the Exchange Transport service again, if the cause of the failure is database related. During the startup of the service Exchange will check if a database exists and if not will create a new one.
Just as with a mailbox database you will need to use eseutil to repair or perform maintenance on the transport database. The only difference between them is that the transport database uses circular logging which doesn’t give you the option to replay the log files.
Using the /r parameter you can start the repair of the database which will check the checkpoint file which log files have been committed to the database and which haven’t. The uncommitted log files will then be replayed to the database. If no checkpoint file exists, all log files are replayed, starting with the oldest first.
Here’s an example, the database and log files are placed in a temporary folder called Recovery. To start the recovery of the database we will need to run the following command:
|
1 |
Eseutil /r Trn /d c:\Recovery /8 |
Since all log filenames start with Trn we specify that as the name of the log file. Using the /d parameter we can specify the directory where the files are located and using the /8 parameter we will set the database page size to 8 kilobyte which will allow a faster recovery.
Once the database has been fixed the last action will be to place it back to its original location so messages which are in the queue database can be delivered.
As we have implemented a temporary queue database so that users can continue to receive messages we first need to make sure the temporary queue database is empty.
For this we will need to pause the Exchange Transport service, this can be done either via the services.msc or via a command prompt by executing net pause MsExchangeTransport.
Once it has stopped keep an eye on the queues using the Queue viewer or get-queue to monitor the delivery of current messages. When the queues are empty they will be displayed with a message count of 0.
It can happen that after performing these steps there are still some messages in the unreachable and poison queue. To force the delivery of these messages run the following PowerShell command, keep in mind that the poison queue might contain messages which are harmful for your environment:
|
1 |
Retry-Queue -Identity "Unreachable/poison" -Resubmit $True |
If messages still stay there then there is only one option and that is to export the messages:
|
1 2 |
Get-Message -Queue "Unreachable/poison" | Export-Message -Path "<ExistingLocalDirectory>" |
To prevent NDR’s being generated you may need to modify the message expiration time-out. This is only necessary in the following situations:
- The recovered database has been offline for more than 2 days.
- The recovered database contains messages which can’t be delivered to their final destination within 2 days.
You can modify the message expiration time-out by running the following PowerShell command:
|
1 |
Set-TransportServer -MessageExpirationTimeout <LongerTimeOutIntervalIndd.hh:mm:ssFormat> |
Now that all preparations have been made it’s time to place the recovered database back to its original location. You will need to begin by stopping the Microsoft Exchange Transport service, this can be done either via the services.msc or via the command prompt (net stop MsExchangeTransport).
Once the service has been stopped, copy the files from the recovery database back to the original location, which is c:\Program Files\Microsoft\Exchange\v14\Transport Roles\data\queue by default.
OK now that the recovered database is in place let’s fire up the Microsoft Exchange Transport service (net start MsExchangeTransport).
Then keep an eye on the queues to see if mail will be transported correctly. It may be necessary to resubmit messages which are stuck in several queues with the retry state.
You might choose to replace the recovered database again after all messages have been delivered. This can be the case if the database get’s corrupted again or messages will not leave the queue and you are unable to remove them. In that case stop the Exchange Transport Service, delete all files from the queue directory and start the Exchange Transport service again.
Performing maintenance on the transport database
Sometimes it may be necessary to perform maintenance on the transport database, for example the size on the disk where the database is located does not have enough space left. In that case you must use Eseutil with the /d parameter, this will perform an offline defrag of the transport database. Keep in mind that this offline defrag will create another database and therefore you will need to have enough disk space or place the other database on another volume by providing the /t parameter.
|
1 |
Eseutil /d mail.que /t"d:\tmpdb.que" |
The command above will perform an offline defrag on the mail.que database file but will place the temp file on the D drive.
Here ends the second part of a deep dive into transport queues which is also the last part of it. I hope you enjoyed reading if and if you got any questions don’t hesitate to contact me: j.veldhuis@dm-consultants.nl
Load comments