
Sometimes it’s worth it to step out of your comfort zone and to mess a little with Microsoft Build Engine (MSBuild) – the .NET Build Tool. It is a very comprehensive tool, but only some of its options can be set or invoked from within Microsoft Visual Studio. You might use MSBuild to display custom warnings, upload build results on the server, replace a compiler, or many more useful tasks.
When I started my adventure as a software engineer, I thought that I would just write code to make business applications do what they are supposed to do, and I had never really bothered about all the mystical and arcane stuff that happens within the build processes. Then I landed a job working on the RevDeBug project in which I had to learn how the Roslyn compiler works, how to hook into it, how to write Visual Studio Extensions, and how to extend the .NET application to build a pipeline. It turns out this knowledge is also quite useful when you write typical business applications. Now, after more than a year of doing all that, it’s not arcane to me anymore and a lot more fascinating.
I won’t introduce the basics of how MSBuild works as many resources are available, but I’ll show you several tasks which can then become a template to automate some of the more mundane steps in the build process.
Custom Warnings
For the first case, assume that I want to systematically update my old projects to the newer version of the .NET Framework, at least to version 4.0. It might not be suitable to upgrade them all at once, especially for some large codebases. It would be great if Visual Studio could warn that some of the projects use an outdated framework version.
This can be easily achieved with MSBuild. I can write a task that will display a warning during the build process for every project targeting a framework lower than 4.0. This approach makes the problem more visible and, hopefully, will lead to a faster upgrade process.
First, I’ll write code for the warning, and next I’ll show you how to hook it up to the build process.
An empty project file with the targets extension will be the entry point for the custom build step and looks like this:
|
1 2 3 |
<?xml version="1.0" encoding="utf-8"?> <Project xmlns="http://schemas.microsoft.com/developer/msbuild/2003"> </Project> |
Most of the declarations within an MSBuild project file can be conditioned using Boolean expressions. In this case, I want to create an additional property which will be set to true when an older framework is used during compilation. The <PropertyGroup> tag is used for that purpose. During the build, the information about the .NET Framework version is already available, I just need to gather it. You can find a list of more common properties here.
|
1 2 3 4 5 |
<PropertyGroup Condition="'$(TargetFrameworkIdentifier)' == '.NETFramework' and ('$(TargetFrameworkVersion)' == 'v2.0' or '$(TargetFrameworkVersion)' == 'v3.0' or '$(TargetFrameworkVersion)' == 'v3.5')"> <LowFrameworkVerUsed>true</LowFrameworkVerUsed> </PropertyGroup> |
The code reads the properties TargetFrameworkIdentifier and TargetFrameworkVersion (they are always set in MSBuild) and checks their values to determine if a warning should display.
The <PropertyGroup> tag declares new properties, but another task must be called that will emit a warning message. Those calls can be invoked only within a <Target> tag. The following code is a target that calls a predefined Warning task. A list of useful predefined tasks can be found here.
|
1 2 3 4 5 |
<Target Name="LowFrameworkVerUsedWarn"> <Warning Text= "Project '$(AssemblyName)' needs it’s framework upgraded. Version used now: '$(TargetFrameworkVersion)'."/> </Target> |
The next thing to do is to add the code to the build pipeline so the created target will be triggered during the build. To do that, override one of the *DependsOn properties. The *DependsOn properties consist of a list of tasks which must be finished before a certain target is called, e.g. CleanDependsOn is executed before each clean. All the steps that are available within a standard build process for .NET projects are defined in the Microsoft.Common.CurrentVersion.targets file which can be found in the MSBuild bin directory. The goal is to emit a warning if the compilation used an obsolete framework version. To do so, I’ll search Microsoft.Common.CurrentVersion.targets for a task that runs after the compilation phase. The description of the PrepareForRun task, ‘Copy the build outputs to the final directory if they have changed’ indicates this is the place to hook into.
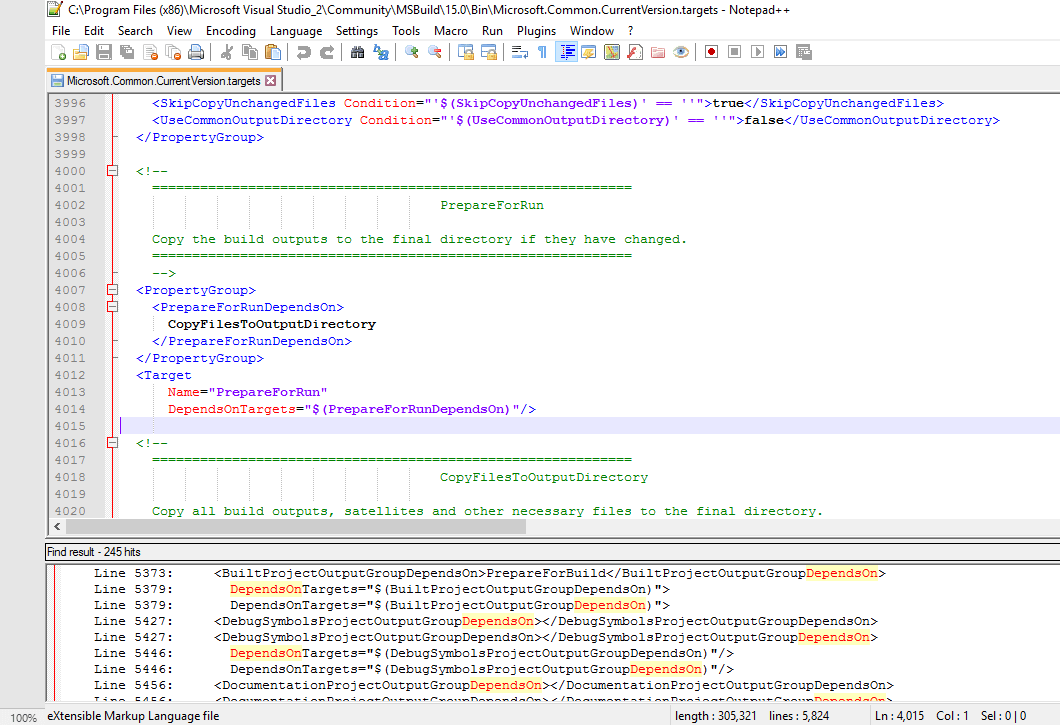
To check the version property and call the warning, add a task to the PrepareForRunDependsOn property:
|
1 2 3 4 5 6 |
<PropertyGroup Condition="'$(LowFrameworkVerUsed)' == 'true'"> <PrepareForRunDependsOn> $(PrepareForRunDependsOn); LowFrameworkVerUsedWarn; </PrepareForRunDependsOn> </PropertyGroup> |
Notice that this <PropertyGroup> checks the LowFrameworkVerUsed value in its condition. Therefore, I wrote $(PrepareForRunDependsOn) before adding the target. Be careful to always list $(PrepareForRunDependsOn) before actually adding new targets as I have done above, or you’ll override the property effectively removing all previous values which will lead almost inevitably to a broken build.
When done, the LowFrameworkVerUsed.targets file looks like this.
|
1 2 3 4 5 6 7 8 9 10 11 12 13 14 15 16 17 18 19 20 21 22 |
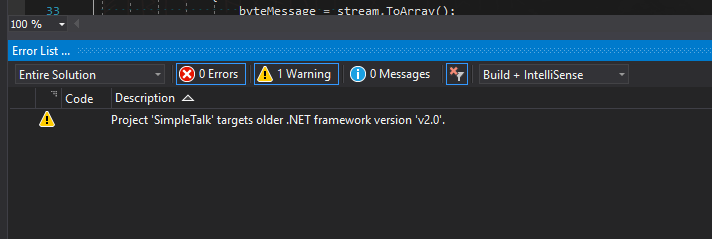
<?xml version="1.0" encoding="utf-8"?> <Project xmlns="http://schemas.microsoft.com/developer/msbuild/2003"> <PropertyGroup Condition="'$(TargetFrameworkIdentifier)' == '.NETFramework' and ('$(TargetFrameworkVersion)' == 'v2.0' or '$(TargetFrameworkVersion)' == 'v3.0' or '$(TargetFrameworkVersion)' == 'v3.5')"> <LowFrameworkVerUsed>true</LowFrameworkVerUsed> </PropertyGroup> <PropertyGroup Condition="'$(LowFrameworkVerUsed)' == 'true'"> <PrepareForRunDependsOn> $(PrepareForRunDependsOn); LowFrameworkVerUsedWarn; </PrepareForRunDependsOn> </PropertyGroup> <Target Name="LowFrameworkVerUsedWarn"> <Warning Text="Project '$(AssemblyName)' targets older .NET framework version '$(TargetFrameworkVersion)'."/> </Target> </Project> |
The very last step is to tell MSBuild to use the file during the build. There are two approaches to do so. One way is to add an import tag to the project’s csproj file:
|
1 |
<Import Project="C:\Common-build\LowFrameworkVerUsed.targets" />. |
This will work only for projects with the modification in the project file, so it’s not really that useful. The second solution hooks up to every project automatically. Just copy the LowFrameworkVerUsed.targets file to the directory where MsBuild looks for them by default which is %localappdata%\Microsoft\MSBuild\15.0\Microsoft.Common.Targets\ImportAfter\.
If such a folder doesn’t exist, you can create it. Just remember to point to the proper version of MSBuild. It is the same as the Visual Studio version if running 2013 or higher, 15.0 in my case.
Now I can be lazy updating my projects without worrying that any of them will slip by me, plus I have my own Visual Studio warnings, yay!
Creating a Build History
That example was relatively easy, so now I’ll show you how to implement something a little bit more complex and use some C# while doing it. This time I want the last 10 build artefacts to be preserved in a predefined directory creating a local history of builds.
To implement this custom MSBuild task, you could write a regular .NET library that will contain a class extending Microsoft.Build.Utilities.Task with all the logic in it. Afterwards, you’ll just have to call it from the targets file:
|
1 2 3 4 5 6 7 |
<UsingTask AssemblyFile="C:\MyLibrary.dll" TaskName="Namespace.MyClassExtendingTask" /> <Target Name="CallMyTask"> <MyClassExtendingTask/> </Target> |
The main problem with this approach is that you must provide the assembly somehow to the build process. It shouldn’t be a problem in smaller projects or for local-only solutions, but managing build specific assemblies can quickly become problematic, especially when you just want to add a small task that doesn’t have too much code. Another way to achieve the same effect is to write .NET code directly within the MSBuild project file. I’ll use this approach below just to have it as a self-contained example.
First I’ll start small with just a task that will compress and copy build outputs to chosen directory. To make it work, import a reference to Microsoft.Build.Tasks.v4.0.dll, define input parameters, and include code that will do the intended work. Here is how it should look:
|
1 2 3 4 5 6 7 8 9 10 11 12 13 14 15 16 17 18 19 20 21 22 23 24 25 26 27 28 29 30 31 |
<UsingTask TaskName="ArchiveBuildTask" TaskFactory="CodeTaskFactory" AssemblyFile="$(MSBuildToolsPath)\Microsoft.Build.Tasks.v4.0.dll"> <ParameterGroup> <PublishPath ParameterType="System.String" Required="true" /> <ArtifactsPath ParameterType="System.String" Required="true" /> <ArtifactsCount ParameterType="System.Int32" Required="true" /> </ParameterGroup> <Task> <Reference Include="System.IO.Compression.FileSystem"/> <Using Namespace="System"/> <Using Namespace="System.IO"/> <Using Namespace="System.Linq"/> <Using Namespace="System.IO.Compression"/> <Code Type="Fragment" Language="cs"><![CDATA[ int fileCount = 0; var sortedFiles = new DirectoryInfo(ArtifactsPath).GetFiles() .OrderByDescending(f => f.LastWriteTime).ToList(); foreach (var fi in sortedFiles) { fileCount++; if (fileCount>ArtifactsCount-1) { fi.Delete(); } } ZipFile.CreateFromDirectory(Path.GetDirectoryName(PublishPath), ArtifactsPath + @”\” + ”Publish” + DateTime.Now.ToString(“yyyyMMddHHmmss” + ”.zip”); ]]></Code> </Task> </UsingTask> |
Next, create a target, that will call ArchiveBuildTask and include it in the build process pipeline.
|
1 2 3 4 5 6 7 8 9 10 11 |
<Target Name="ArchiveBuild" Condition="'$(ArchivePath)' != '' and $(ArchiveCount) > '0'"> <ArchiveBuildTask ArtifactsPath="$(ArchivePath)" PublishPath="$(OutputPath)" ArtifactsCount="$(ArchiveCount)" /> </Target> <PropertyGroup> <PrepareForRunDependsOn> $(PrepareForRunDependsOn); ArchiveBuild; </PrepareForRunDependsOn> </PropertyGroup> |
Condition ‘$(ArchivePath)’ != ” and $(ArchiveCount) > ‘0’ states that the target won’t run as long as parameters are not set. This way you can control when archiving will take place.
The complete targets file then looks like this:
|
1 2 3 4 5 6 7 8 9 10 11 12 13 14 15 16 17 18 19 20 21 22 23 24 25 26 27 28 29 30 31 32 33 34 35 36 37 38 39 40 41 42 43 44 45 46 47 |
<?xml version="1.0" encoding="utf-8"?> <Project xmlns="http://schemas.microsoft.com/developer/msbuild/2003"> <PropertyGroup> <PrepareForRunDependsOn> $(PrepareForRunDependsOn); ArchiveBuild; </PrepareForRunDependsOn> </PropertyGroup> <UsingTask TaskName="ArchiveBuildTask" TaskFactory="CodeTaskFactory" AssemblyFile="$(MSBuildToolsPath)\Microsoft.Build.Tasks.v4.0.dll"> <ParameterGroup> <PublishPath ParameterType="System.String" Required="true" /> <ArtifactsPath ParameterType="System.String" Required="true" /> <ArtifactsCount ParameterType="System.Int32" Required="true" /> </ParameterGroup> <Task> <Reference Include="System.IO.Compression.FileSystem" /> <Using Namespace="System"/> <Using Namespace="System.IO"/> <Using Namespace="System.Linq"/> <Using Namespace="System.IO.Compression"/> <Code Type="Fragment" Language="cs"><![CDATA[ int fileCount = 0; var sortedFiles = new DirectoryInfo(ArtifactsPath).GetFiles() .OrderByDescending(f => f.LastWriteTime).ToList(); foreach (var fi in sortedFiles) { fileCount++; if (fileCount>ArtifactsCount-1) { fi.Delete(); } } ZipFile.CreateFromDirectory(Path.GetDirectoryName(PublishPath), @ArtifactsPath + @"\" + "Publish" + DateTime.Now.ToString("yyyyMMddHHmmss") + ".zip"); ]]></Code> </Task> </UsingTask> <Target Name="ArchiveBuild" Condition="'$(ArchivePath)' != '' and $(ArchiveCount) > '0'"> <ArchiveBuildTask ArtifactsPath="$(ArchivePath)" PublishPath="$(OutputPath)" ArtifactsCount="$(ArchiveCount)" /> </Target> </Project> |
I have saved it as ArchiveBuild.targets inside the
%localappdata%\Microsoft\MSBuild\15.0\Microsoft.Common.Targets\ImportAfter\ folder. That way MSBuild will be able to find it automatically no matter which project I’ll build.
Now just set the ArchivePath and ArchiveCount properties in the project csproj or csproj.user file to make it work.
|
1 2 3 4 |
<PropertyGroup> <ArchivePath>C:/PrivateBuilds/RevDeBug</ArchivePath> <ArchiveCount>10</ArchiveCount> </PropertyGroup> |
Each build will then cause the results to be saved to C:\PrivateBuilds\RevDeBug, and I can use it in as many projects as I’ll want to.
As you can see the MSBuild pipeline is so versatile, the possibilities are countless. You can use it to enforce rules, automate all the mundane tasks, generate code, or pull some resources from external sources. In my organization we are using it for several solutions including to pull translation resources from databases which keep the latest versions, compile a user manual using files located on various network shares, and to create virtual machines with the new build installed. I also saw it being used to check whether the latest binaries are not significantly smaller than the last ones (which might indicate a problem with build file or dependencies) and automatically producing release notes suitable for the web page. I’m quite sure you’ll find a handful of tasks that can be automated with MSBuild right away.
A good starting point is the Microsoft documentation for MSBuild. You can also quickly find interesting build properties examining the diagnostic output of MSBuild in Visual Studio. To do so, open ‘Tools > Options > Projects and Solutions > Build and Run’ And set ‘MSBuild project build output verbosity’ to Diagnostic. Now, whenever you build a project, you will see all the MSBuild properties with their values in the build output.
It’s also worth mentioning, that MSBuild sees environmental variables, so you can write a target that will run only if a specified variable is set in your system.
Summary
MSBuild can be extended far beyond the basic scenario in which you only clean, build, and deploy. You can use it to execute pre-defined tasks, console applications, or even new tasks written directly in .NET. You can easily tailor the build process to fit your needs.
If there are any actions you repeat more than once during build, there’s a great chance you should automate it with MSBuild to save time and to make your build less error-prone. One less thing to remember during build is one less thing you must worry about. As Scott Hanselman once said “The most powerful tool we have as developers is automation”.
This document contains proprietary information and is protected by copyright law.
Copyright © 2026 Red Gate Software Limited. All rights reserved
Load comments