
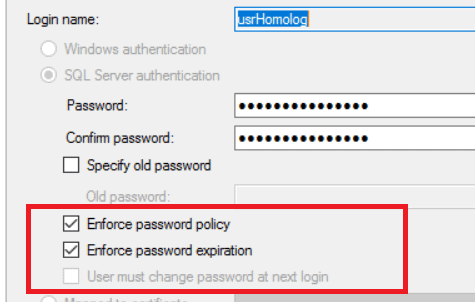
When we use Windows Authentication, Active Directory enforces password policy for the users, including expiration policy. This was an unwelcome difference between window and SQL Logins until SQL Server 2012, when SQL Server started to enforce windows password policies to SQL Server logins by default.
Policy settings for SQL Server Login
However, most people will ask why this is necessary. Only a user that is connecting directly to SQL Server in SSMS is able to change his password when it expires and the majority of SQL Server users will connect through some application which, in turn, connects to SQL Server using a single login created for it.
The application login is stored by the application in some kind of configuration file. In .NET, they are stored in the .config files with their passwords. In this case, why would you want to enforce domain password policy, if the application won’t be able to change the password anyway?
The answer is, of course, that you wouldn’t but what if the application could, in fact, change the password? Then an expiration policy makes sense. I will show in this article how we can achieve a security regimen where the application can conform to the password policy requirements automatically and no one, not even the developers, database or IT administrators, will know the password used by the application, thereby enhancing the security of our application environment.
Development Environment for this article
I’m using SQL Server 2017 CTP 2.1 and Visual Studio 2017 to develop this solution, but I will use a library from SQL Server 2014, as I will explain later in the article.
You can use different Visual Studio versions, but the solution as it stands will only work with Entity Framework 6.0 and later.
You will also need IIS (Internet Information Server) configured on the machine so you can simulate the deployment process.
I will use the ‘Northwnd’ sample database, which you can download from here. I will restore the ‘Northwnd.bak’ file twice, creating two databases: ‘Northwnd’ and ‘NorthProduction’.
We will start with an existing small solution with two projects. You can download the starting solution from this link: https://github.com/DennesTorres/ChangePassword/tree/master/slCustomersStarting . One of the projects is an MVC Web Application with a single controller and view. The controller accesses customers’ information in the ‘Northwnd’ database and exposes this information to the view. The database access is executed by the second project, a class library with the Entity Framework context.
The use of the password in the development process
How can we manage our development and deployment process without knowing the password for the database server?
Let’s suppose we have three environments: Development, QA/Test and Production. Developers need access to the development environment, so we can’t hide the password in this environment. QA/Test and Production, however, can have a stricter access control.
When the application is published from development to QA/Test, and thence to Production, the connection string is changed. Some people still do it manually, however, we have web.config transformations to do it for us during the publishing process.
The secret here is in the database layer: Each time a new deployment is completed, the DBA needs to reset the password for the database login to a starting password known by the deployment process and configured in the web.config.
The login needs to be configured with ‘User must change password at next login’ configuration, so the application will change the password during the first login after the deployment and no one but the application will know the new password.
However, after the password change, the password will be inside the web.config, won’t it? Yes, it will, but the IT team can encrypt the web.config during the deployment process. It’s already difficult to have access to the web.config, only some members of the IT team have this kind of access, with the automatic encryption the access will be even more restrict and we will achieve the objective: No one but the application will know the password.
In this article, I will build the application and test it as it was in the QA/Test environment and do some steps of the deployment process to the Production environment.
The Solution
Our solution needs to change the login password every time it expires, or when the login is marked with the ‘User must change password at next logon’ option. We will need to break the solution in parts to achieve a better code organization. These will be the parts of our solution:
- Part I: A class to change SQL Server login password.
This class will receive a connection string and change the password in the server and in the connection string
- Part II: A class to change the connection string in the .config file
Our solution can be used from a web application or a desktop application. This class will need to identify it and open the correct .config file (app.config or web.config).
- Part III: Intercept and identify connection errors
In this article, I will focus on Entity Framework and I will demonstrate how to use the retry strategy to intercept errors and identify whether the reason was the password.
Preparing the Logins
Before starting the development, we need to configure the SQL Server logins for QA/Test and Production environments. These will be our first steps:
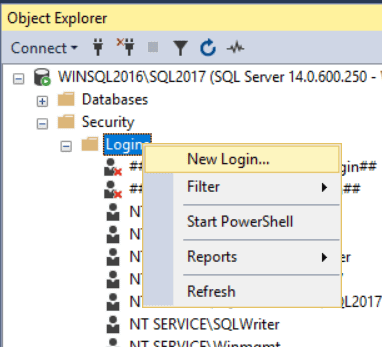
- Open SSMS (SQL Server Management Studio)
- Inside Object Explorer window, below your server, open folders ‘Security’ -> ‘Logins’
- Right-click the ‘Logins’ folder and click ‘New Login’ item in the context menu
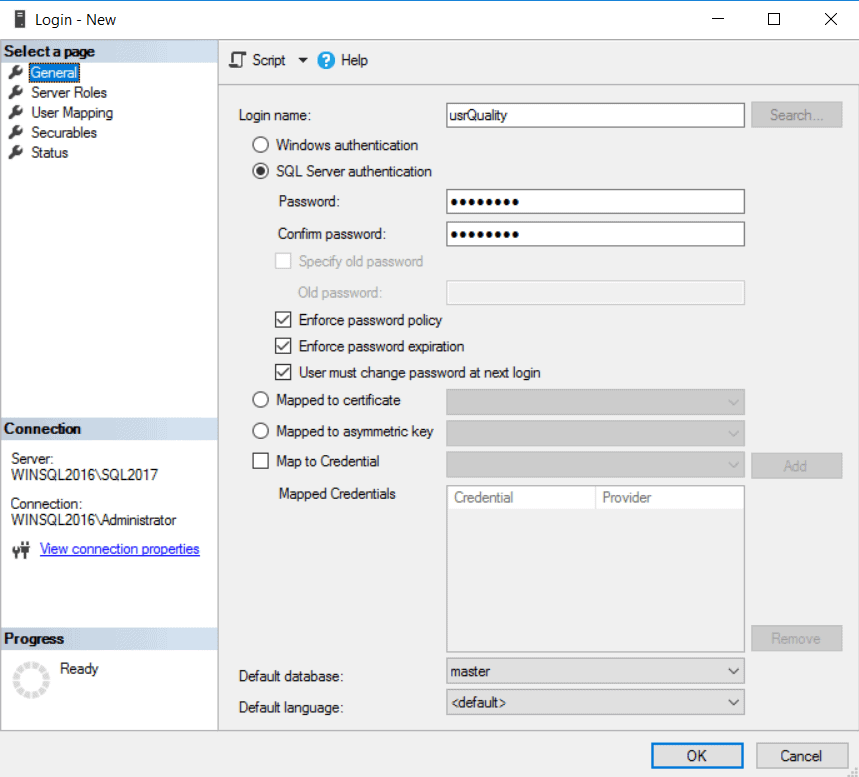
- In the ‘Login – New’ window, type ‘usrQuality’ in the ‘Login Name’ textbox
- Select ‘SQL Server Authentication’ radio button
- Type ‘Pa$$w0rd’ in the ‘Password’ textbox
- Type ‘Pa$$w0rd’ in the ‘Confirm Password’ textbox
- Click in the checkbox ‘User must change password at next login’ and keep it checked
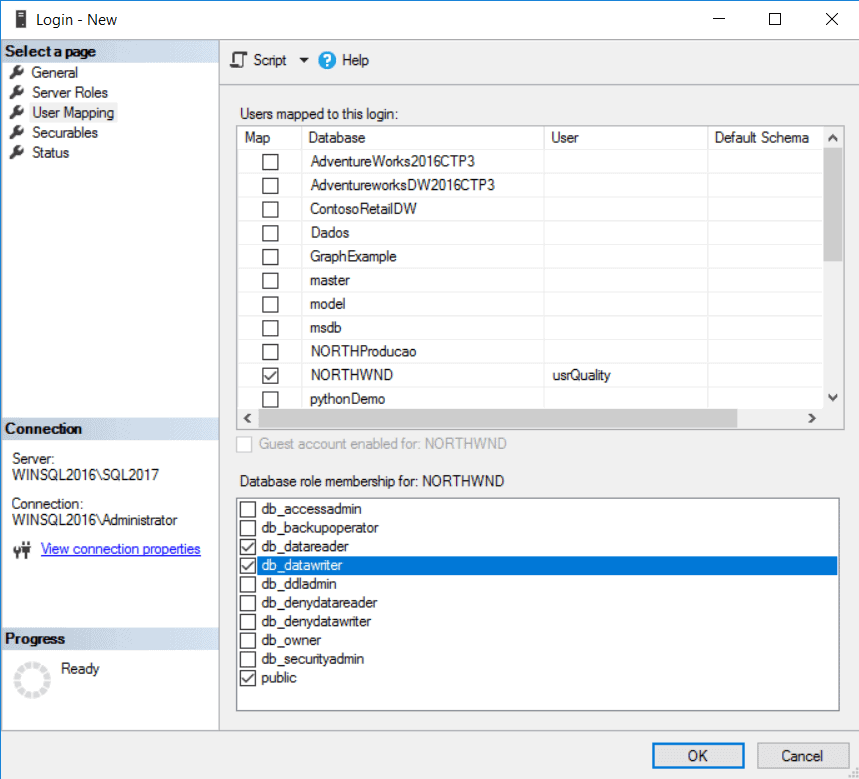
- In the left side of ‘Login – New’ window, below ‘Select a page’, click ‘User Mappings’
- Inside the ‘Users mapped to this login’ box, click the checkbox besides the ‘Northwnd’ database, keep it checked
- Inside the ‘Database role membership for: Northwnd’ box, click the checkbox besides ‘db_datareader’ role, keep it checked.
- Inside the ‘Database role membership for: Northwnd’ box, click the checkbox besides ‘db_datawriter’ role, keep it checked.
- Click the ‘Ok’ button
- Repeat steps 2 to 13 for the login ‘usrProduction’
Part I: Changing SQL Server login password
We can’t use a regular ADO.NET or Entity Framework connection to change the login password, especially because the password will be expired and we can’t connect.
SQL Server has a different set of objects, SMO (SQL Server Management Objects), which we can use to execute management tasks in the server, including a change of the password.
SMO can be installed with the SQL Server installation, choosing Client Tools SDK during the installation. There are some other installation options, you can see details here
We need only a single assembly: Microsoft.SqlServer.ConnectionInfo.dll. This assembly exists for each SQL Server version, however, after some tests, I was able to change the password of a login in SQL Server 2017 using the assembly from SQL Server 2014. Due to that, I saw no need to use some design pattern, such as provider model, to turn flexible the use of this library.
According the SQL Server version, this assembly can be in ‘C:\Program Files\Microsoft SQL Server\<version number>\SDK\Assemblies’ or ‘C:\Program Files (x86)\Microsoft SQL Server\<version number>\SDK\Assemblies’. Until version 120 (SQL Server 2014), the assembly uses the first path, after that uses the second.
Let’s do a step-by-step walk-through to start the creation of our solution and implement this first class:
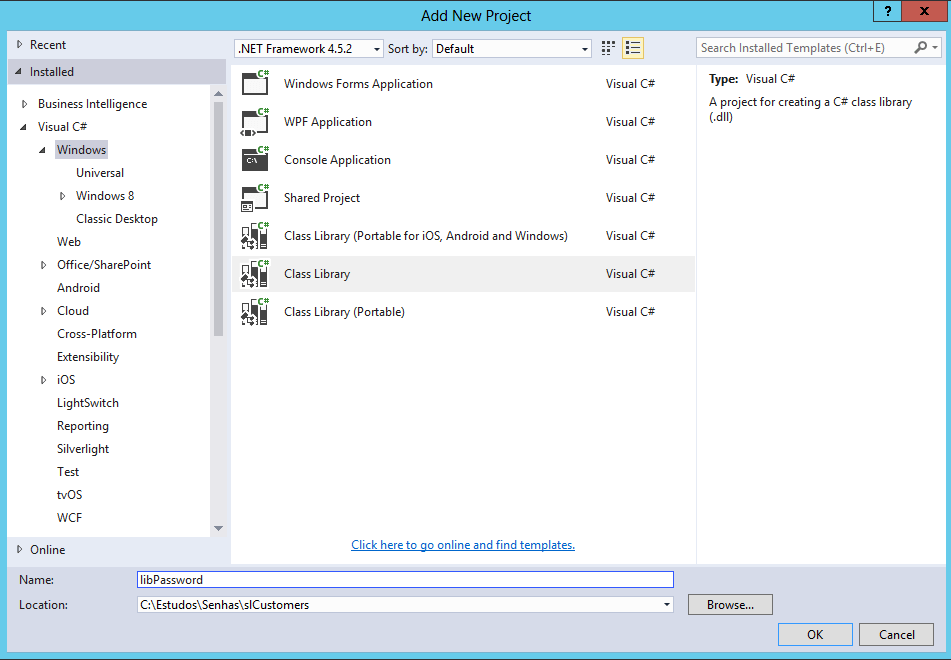
- Open the starting solution in Visual Studio
- Create the project ‘libPassword’
- In the ‘Solution Explorer’ window, right-click the ‘slHints’ solution and click ‘Add’->’New Project’ in the context menu
- In the right side of the ‘New Project’ window, select ‘Installed’->’Templates’->’Visual C#’->Windows in the tree
- In the middle of the ‘New Project’ window, select ‘Class Library’ project template
- In the ‘Name’ textbox, type ‘libPassword’ and click ‘Ok’ button
- In the ‘Solution Explorer’ window, right-click the ‘Class1.cs’ file, below the ‘libDados’ project, and click ‘Delete’ in the context menu
- Add reference to Microsoft.SqlServer.ConnectionInfo.dll
- In the ‘Solution Explorer’ window, right-click the ‘libPassword’ project and click ‘Add’->’Reference’ in the context menu
- In the ‘Reference Manager’ window, click ‘Browse’ button
- Navigate to the correct folder and select the file Microsoft.SqlServer.ConnectionInfo.dll
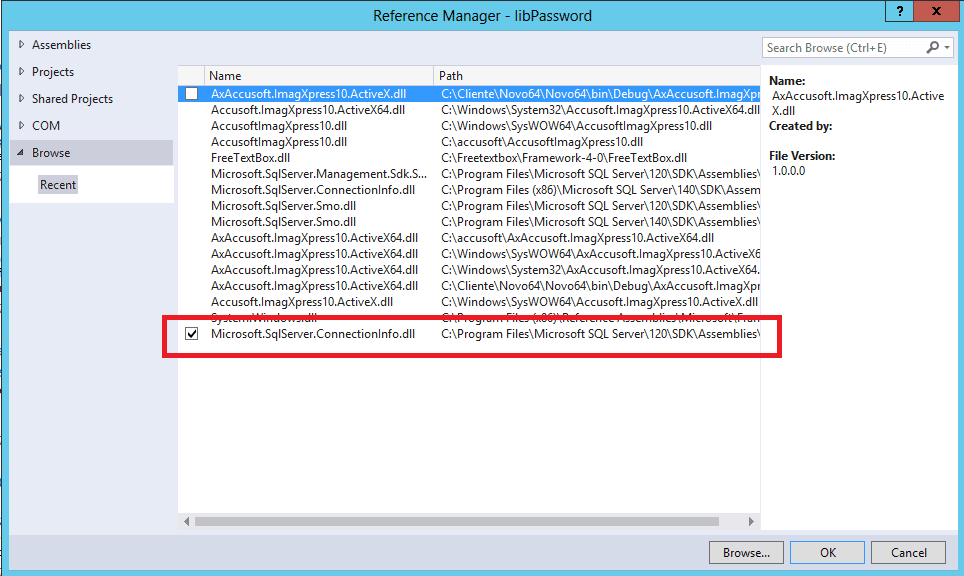
- Click ‘Ok’ button
- Create a new class called ‘SQLChangePassword’
- In the ‘Solution Explorer’ window, right-click the ‘libPassword’ project and click ‘Add’->’Class’ in the context menu
- Type ‘SQLChangePassword.cs’ in the ‘Name’ textbox and click the ‘Ok’ button
- Add the following lines to the top of the file ‘SQLChangePassword.cs’, just below the ‘Using’s:
12using Microsoft.SqlServer.Management.Common;using System.Data.SqlClient;
- Create the method ‘ChangePwd’ in the ‘SQLChangePassword’ class using the following code:
12345678910111213public static string ChangePwd(string ConnectionString,string newPassword){var builder = new SqlConnectionStringBuilder(ConnectionString);ServerConnection srvConn = new ServerConnection();srvConn.ServerInstance = builder.DataSource;srvConn.LoginSecure = false;srvConn.Login = builder.UserID;srvConn.Password = builder.Password;srvConn.ChangePassword(newPassword);builder.Password = newPassword;return builder.ConnectionString;}
This method uses two classes:
- SqlConnectionStringBuilder: This class is responsible to break the connection string in several pieces, so we can use each connection information.
- ServerConnection: This is the SMO class responsible for the SQL Server connection and with a method to change the password.
Part II: Saving the new password in the .config file
The main library of our solution is ‘libPassword’, all other projects are there only for the example. If our library is running as a desktop application, we need to save the password in the app.config file. However, if the library is running in a web application, we need to save the password in the web.config.
In both cases, we need to retrieve an instance of the ‘Config’ class, change the value and use the save method. However, for the desktop application we will use ‘ConfigurationManager’ to retrieve the ‘Config’ instance, while for the web application we will use ‘WebConfigurationManager’ for this task.
We can use the value of HttpRuntime.AppDomainAppId to identify whether our library is running in a web application or desktop application.
Let’s continue our walk-through:
- Create the class ‘SetConnectionConfig’
- In the ‘Solution Explorer’ window, right-click the ‘libPassword’ project and click ‘Add’->’Class’ in the context menu
- Type ‘SetConnectionConfig.cs’ in the ‘Name’ textbox and click the ‘Ok’ button
- Add a reference to ‘System.Web’ in the ‘libPassword’ project
- In the ‘Solution Explorer’ window, right-click the ‘libPassword’ project and click ‘Add’->’Reference’ in the context menu
- In the left side of the ‘Reference Manager’ window, select ‘Assemblies’->’Framework’
- In the ‘Reference Manager’ window, click ‘System.Web’ checkbox
- Click ‘Ok’ button
- Add the following lines in the top of ‘SetConnectionConfig.cs’ file, just below the ‘Using’s:
123using System.Web;using System.Web.Configuration;using System.Configuration;
- Create the method ‘SetConnection’ using the following code:
123456789101112131415161718192021public static void SetConnection(string ConnectionStringName,string ConnectionString){Configuration config;if (HttpRuntime.AppDomainAppId != null){config = WebConfigurationManager.OpenWebConfiguration("~");}else{config = ConfigurationManager.OpenExeConfiguration(ConfigurationUserLevel.None);}var connectionStringsSection =(ConnectionStringsSection)config.GetSection("connectionStrings");connectionStringsSection.ConnectionStrings[ConnectionStringName].ConnectionString = ConnectionString;config.Save();ConfigurationManager.RefreshSection("connectionStrings");}
Part III: Intercepting and Identifying connection errors
From version 6 and beyond, Entity Framework can use an Execution Strategy to control some aspects of the execution of statements in the database server, such as the retry policy.
When an error happens because of a password expiration, we can change the password and retry the query with the new password, making the retry policy a good centralized way to implement this solution, avoiding the need of error handling to deal with password problems all around the application.
This is the biggest part of our solution, we will need several steps to complete this third part:
- Create the class for the Execution Strategy
- Create the methods to deal with the connection string.
- Create the main method to control the retry policy
- Apply the Execution Strategy
Creating the class for the Execution Strategy
Let’s continue our walk-through creating a new class for the Execution Strategy:
- Create the class ‘PasswordStrategy’
- In the ‘Solution Explorer’ window, right-click the ‘libPassword’ project and click ‘Add’->’Class’ in the context menu
- Type ‘PasswordStrategy.cs’ in the ‘Name’ textbox and click the ‘Ok’ button
- Add the following lines in the top of ‘PasswordStrategy.cs’ file, just below the ‘Using’s:
123456using System;using System.Configuration;using System.Data.Entity.Core.EntityClient;using System.Data.Entity;using System.Data.SqlClient;using System.Data.Entity.Infrastructure;
- Change the inheritance of ‘PasswordStrategy’ class using the following code:
123public class PasswordStrategy : DbExecutionStrategy{}
- Add the following constants, using the code below. These codes are the error number returned by SQL Server if the password have expired or if the administrator configured the login to change the password on the next logon.
12const int PasswordExpired = 18487;const int MustChangePassword = 18488;
- We need to create static properties in the ‘PasswordStrategy’ class for the connection string name and the context. ‘PasswordStrategy’ needs the connection string name to retrieve and save the connection to the config file and needs the context to refresh the connection string in the context, otherwise the context wouldn’t notice the change.
This is the code for these properties:
1234567891011121314151617181920212223242526[ThreadStatic]private static string _ConnectionStringName;public static string ConnectionStringName{get{return _ConnectionStringName;}set{_ConnectionStringName = value;}}[ThreadStatic]private static DbContext _Context;public static DbContext Context{get{return _Context;}set{_Context = value;}} - Create a property called ‘ConStr’ to simplify the access to the connectionstring.
The information and context lifecycle
The ‘PasswordStrategy’ class needs the information from the entity context and the connection string. The lifecycle of these information, context and connection string, in this class and the lifecycle of the entity context in the application needs to be similar, otherwise the information will be wrong and nothing will work.
The Static definition for the properties specify the lifecycle as a single value for the entire application execution, however, the ThreadStatic attribute changes this lifecycle for a thread, so each thread can have different values for these properties.
The entity context can be used in several different ways. Some of them will be compatible with this lifecycle we are developing, whereas some of them will not and will require a different ‘PasswordStrategy’ class.
These are the uses of the entity context that are supported by this implementation:
- The same context instantiated in each thread: This is the main way of using the entity context that this solution is built for.
- Multiple contexts with different connection strings, in different threads: It doesn’t matter if the application has different contexts with different connection strings. As long as they are used in different threads, everything will be ok.
- Singleton context in a desktop application: As long as the context and the instance of ‘PasswordStrategy’ are in the same thread, there is no problem.
There are some other possible ways of using the context that will not be supported by this class:
- Singleton context in a web application: Because the ThreadStatic attribute the values of the properties will be lost.
- Multiple contexts using different connection string in the same thread: This class can’t store information about multiple contexts
- Multiple singleton contexts: Same problem, this class can’t store information about multiple contexts
12345678private string ConStr{get{return ConfigurationManager.ConnectionStrings[ConnectionStringName]?.ConnectionString;}}Pay heed to the following details in the code:
- For reading purposes, ConfigurationManager class can be used for both web applications and desktop applications.
- I’m using the new null operator created in C# 6.0 to check whether the connection string really exists.
- I will create a static attribute, ‘ChangingPassword’, to control the execution of the password-changing process. This process needs to be executed only once: If the process is already executing, then we won’t start the execution a second time.
1private static bool ChangingPassword = false;
Dealing with Entity Framework string
This sample application is using database first, so we have an Entity Framework connection string with the information about the EDMX and the SQL Server connection string is inside it.
We need to extract the SQL Server connection string from the Entity Framework string, change the password and create a new Entity Framework string with the new password. We’ll do this by creating two methods for these tasks: ‘ExtractString’ and ‘BuildString’.
- Create the method ‘ExtractString’:
12345private string ExtractSQLString(string ConnectionString){var efbuilder = new EntityConnectionStringBuilder(ConnectionString);return efbuilder.ProviderConnectionString;}
This method receives an Entity Framework connection string and uses the EntityConnectionStringBuilder class to extract the provider connection string, in our case, a SQL Server connection string.
- Create the method ‘BuildString’:
123456private string BuildEntityString(string ProviderString){var efBuilder= new EntityConnectionStringBuilder(ConStr);efBuilder.ProviderConnectionString = ProviderString;return efBuilder.ConnectionString;}
This method receives the provider string, reads the Entity Framework string from the config file using the ‘ConStr’ property, then uses the EntityConnectionStringBuilder to change the provider string and finally returns the complete Entity Framework string.
Retry policy: The main method
Let’s continue our walk-through and build the main method of our ‘PasswordStrategy’ class:
- Override the method ‘ShouldRetryOn’:
123protected override bool ShouldRetryOn(Exception exception){}
- Create the initial checks about the exception. We need to check three possibilities:
- If the exception isn’t a SQLException, we return false and no retry will be attempted.
- If the error number isn’t about the password, either that it is expired or required to change, no retry will be tried.
- If the variable ‘ChangingPassword’ is true, and the changing is already happening, return false so the context will be refreshed.
1234567if (!(exception is SqlException))return false;var number = ((SqlException)exception).Number;if ((number != PasswordExpired) && (number != MustChangePassword))return false;if (ChangingPassword)return false;
- Change the password using the following code:
123456789101112131415161718try{ChangingPassword = true; /* Starting the password change */if (string.IsNullOrEmpty(ConStr))return false;var provStr = ExtractSQLString(ConStr);var newPassword = System.Guid.NewGuid();provStr =SQLChangePassword.ChangePwd(provStr, newPassword.ToString());SetConnectionConfig.SetConnection(ConnectionStringName, BuildEntityString(provStr));Context.Database.Connection.ConnectionString = provStr;}finally{ChangingPassword = false; /* Finishing the password change */}return true;
This code is implementing the following steps:
- Check if the connection string name is valid
- Extracts the provider string from Entity Framework connection string
- Create the new password. It will be a GUID.
- Change the password in SQL Server, creating a new provider string with the new password.
- Save the new connection string, taking care to build a new Entity Framework connection string with the new password.
- Refresh the context connection string
- Change the field ‘ChangingPassword’ to false again
- Return true. The context will retry the execution, this time with the new password.
Applying the PasswordStrategy
Strategy classes, such as our ‘PasswordStrategy’ class, aren’t applied directly to the entity context. We need to create a new class inheriting from ‘DbConfiguration’ class inside the same project than our entity context. It’s like magic: The context will find the new ‘DbConfiguration’ class in the project and will use it.
In our solution, we also need to add some lines to the entity context constructor. Since we are using ‘database first’, this is a bit trickier, because the entire context code is re-created every time the T4 files are processed, deleting any customization we create.
The solution to this problem is create the customization inside the T4 files, so every time the T4 are processed the re-created code will already include our customization.
- Create a new class called ‘PasswordConfiguration’ inside ‘libData’ project.
- In the ‘Solution Explorer’ window, right-click the ‘libPassword’ project and click ‘Add’->’Class’ in the context menu
- Type ‘PasswordConfiguration.cs’ in the ‘Name’ textbox and click the ‘Ok’ button
- Add the following lines to the top of ‘PasswordConfiguration.cs’ file, just below the ‘Using’s:
12using libPassword;using System.Data.Entity;
- Implement the ‘PasswordConfiguration’ class using the following code:
12345678public class PasswordConfiguration : DbConfiguration{public PasswordConfiguration(){SetExecutionStrategy("System.Data.SqlClient",() => new PasswordStrategy());}}
- Inside ‘North.context.tt’ file, add the following ‘Using’:
1using libPassword;
- Inside ‘North.context.tt’ file, add the following lines inside the context constructor:
12PasswordStrategy.ConnectionStringName = "NORTHEntities";PasswordStrategy.Contexto = this;
You can recognize the constructor by the call for the ‘Base’ class with the connection string name as a parameter.
First test of the solution
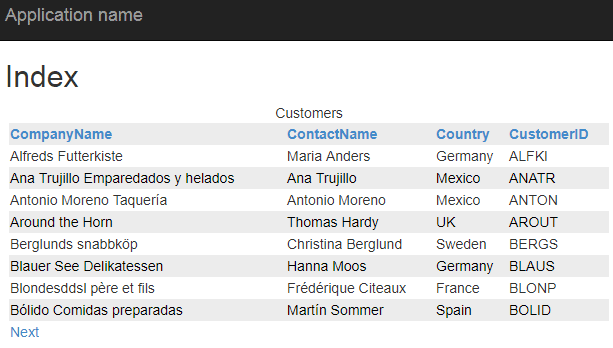
The first test is very simple: Just execute the web application. You will see the list of customers as a result, meaning everything worked fine, the application was able to change the password.
You can check the web.config file and you will notice that the password has changed in the connection string, proving that everything went fine.

If anything went wrong, if you need to review the previous steps, you will probably need to correct the SQL Server login and ensure the ‘User must change the password at next login’ attribute is set.
Publishing to Production
Our last step is the deployment to Production. There are several tools you can use to deploy the solution to Production. I will use web deployment in Visual Studio to illustrate how we can change the web.config file and encrypt the connection string during the deployment.
It’s important to keep in mind that this is only an example illustrating the potential of a process that hides the password from everyone. There are a many deployment solutions, and I’m sure that I will not need to detail too much of the other possibilities in this article.
There are some caveats in the publishing to Production:
- Our application needs the right to change the file with the new password. We will need to set ACL rights in the destination folders
- It’s not safe to open write permissions in the root of our web application. The best solution will be to split our web config, storing our connection strings in a different folder and set the ACL only for this different folder
- Web Config Transformations, which are needed to change the connection string between environments, do not work with split web.config files. It’s certainly possible to make it work, but it’s too awkward, so the best solution will be a work-around.
These are the deployment steps:
- Split the web.config, creating a different file for the connection string
- Configure Web.Config Transformations
- Create a publishing profile and configure encryption
- Configure the ACL in the publishing profile
- Publish the application
Web.Config Encryption and NLBS
Network Load Balancing Service, or NLBS, is a windows service used to create a pool of web servers with the same content, balancing the web request.
It’s important to notice the solution I’m presenting here will require further configuration if your application is running in an NLBS environment, because all web.config files will need to use the same encryption key. You can read more about this here, but this is beyond the planned scope for this article.
In fact, even besides the encryption, this solution will only work in a NLBS environment if you have some way to synchronize the web.config files across multiple servers. This is beyond this article.
Splitting the Web.Config
It’s very simple: we create a new file in a different folder, move the connection strings to the new file and connect both. Let’s do it:
- Create a new folder called ‘Config’
- In the ‘Solution Explorer’ window, right-click ‘webCustomer’ project and click ‘Add’ -> ‘New Folder’ context menu item
- Type ‘Config’ as the name of the new folder
- Create a new file called ‘conn.config’ inside the ‘Config’ folder
- Right-Click the ‘Config’ folder, click ‘Add’ -> ‘New Item’
- In the ‘Add new item’ window, select ‘Visual C#’ -> ‘Web’ in the left side
- In the ‘Add new item’ window, select ‘Web Configuration File’ in the right side of the window
- Type ‘conn.config’ in the ‘Name’ textbox and click ‘Add’ button
- Copy the ‘connectionString’ element from the ‘web.config’ to the ‘conn.config’
- Change the ‘connectionString’ element in the ‘web.config’ file to be as the following:
1<connectionStrings configSource="Config\conn.config" />
Configure Web.Config Transformations
‘Web.Config transformations’ is a feature that allows us to replace pieces of the web.config file, such as connection string, during the build and deployment process.
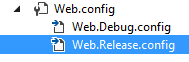
Besides the web.config file in your project, you also have an additional web.config file for each solution configuration and you can see these files in Solution Explorer window, by expanding web.config file. The file names are web.debug.config and web.realease.config.
Usually we could do some changes to Web.Release.Config file to transform our connection string from Development to Production. However, web.config transformations don’t work by default with split web.config files. We could configure a custom build task to transform the ‘conn.config’ file, but it will be much easier to just configure a transformation for the ‘configSource’ attribute, making the main web.config point to a different file in Production.
These are the steps we need to do:
- In the ‘Solution Explorer’ window, below the ‘Config’ folder, right-click the ‘conn.config’ file and click ‘Copy’ in the context menu
- Right-Click the ‘Config’ folder and click ‘Paste’ in the context menu
- Rename the new file ‘conn – Copy.config’ to ‘conn.Release.config’
- Copy the entire ‘connectionString’ element from the ‘conn.config’ file to the ‘conn.Release.config’
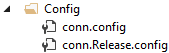
- Double-click the ‘conn.Release.config’ file to open it
- Change the ‘User Id’ in the connection string from ‘usrQuality’ to ‘usrProduction’
- Open the Web.Release.Config file in the root of the project
- Add the following tag just above the system.web element:
1<connectionStrings configSource="Config\conn.Release.config" xdt:Transform="SetAttributes" />
Pay heed to the attributes xdt:Transform. It’s responsible for the transformation, indicating how the tag will be transformed. In our example, the tags will be transformed by setting attributes, ‘configSource’ attribute in our example.
Create a publishing profile and configure encryption
The publishing profile is created when we publish our web application. However, we need to do a small change to the publishing profile and we can’t do this change through the publish wizard.
We will solve this ‘chicken and egg’ puzzle by executing the publishing wizard, cancelling the wizard before finishing, changing the publishing profile and executing the publishing wizard again, this time deploying the application.
Let’s do a walk-through to complete these steps:
- In Solution Explorer window, right-click ‘webCustomer’ project and click ‘Publish…’ context menu item
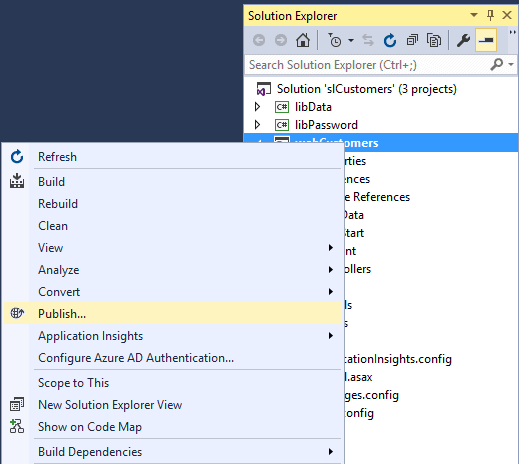
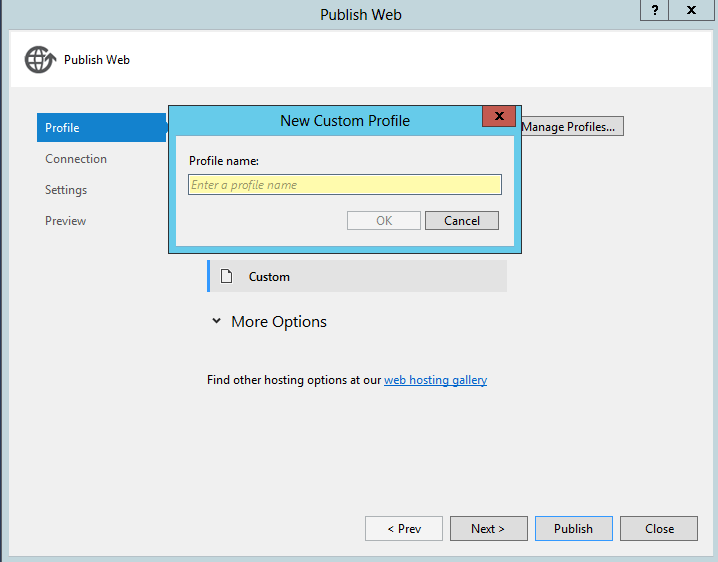
- In ‘Publish Web’ window, click ‘Custom’ button
- In ‘New Custom Profile’ window, in ‘Profile Name’ textbox, type ‘Production’ and click ‘Ok’ button
- Click ‘Next’ button to move to ‘Connection’ page in the wizard
- In the ‘Connection’ page, select ‘Web Deploy’ in the ‘Publishing Method’ drop down
- In the ‘Connection’ page, type ‘Localhost’ in the ‘Server’ textbox
- In the ‘Connection’ page, type ‘Default Web Site/webCustomers’ in the ‘Site Name’ textbox
- In the ‘Connection’ page, type ‘http://localhost/webCustomers’ in the ‘Destination Url’ page
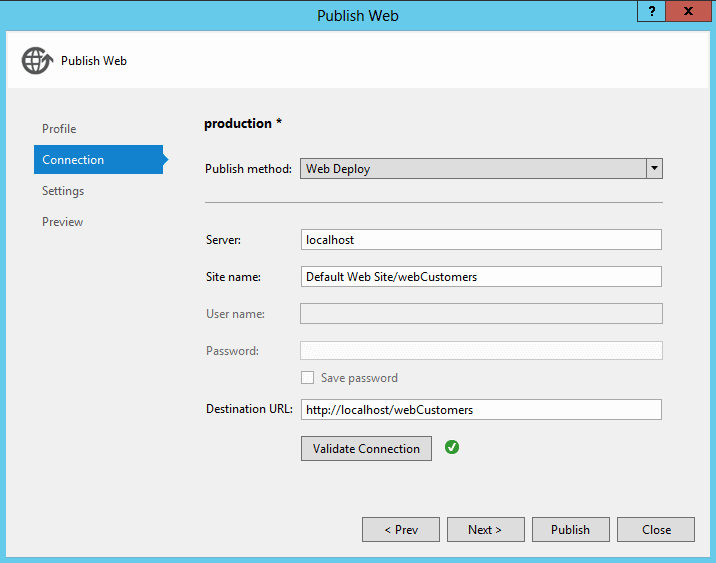
- Click ‘Next’ button
- In the ‘Settings’ page, click ‘Next’ button.
- In the ‘Preview’ page, click ‘Close’ button
- In ‘Solution Explorer’ window, below ‘webCustomers’ project, expand ‘Properties’
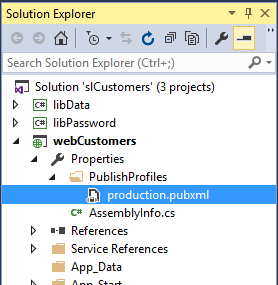
- Double-click ‘Production.pubxml’ file to open it
- Insert the following tag below ‘</PropertyGroup>’ tag:
1234<Target Name="CustomPostPublishActions" AfterTargets="MSDeployPublish"><ExecCommand="C:\Windows\Microsoft.NET\Framework\v4.0.30319\aspnet_regiis -pe connectionStrings -app /webCustomers" /></Target>
Pay heed to the following details:
- The AfterTargets attribute determine when the task will be executed
- The Exec element is responsible for the execution
- Although there are other configurations to encrypt the ‘connectionString’ element, this is the only one that will work with a split web.config file
Configure the ACL in the publishing profile
We need to add permissions to the web site to change the file inside the ‘Config’ folder. We can just include the following configuration to the ‘Production.pubxml’ file, just below the previous ‘Target’ element we included:
|
1 2 3 4 5 6 7 8 9 10 11 12 13 14 15 16 17 18 19 20 21 22 23 24 25 |
<Target Name="SetupCustomAcls" AfterTargets="AddIisSettingAndFileContentsToSourceManifest"> <ItemGroup> <MsDeploySourceManifest Include="setAcl"> <Path>$(_MSDeployDirPath_FullPath)\Config</Path> <setAclAccess>Read,Write,Modify</setAclAccess> <setAclResourceType>Directory</setAclResourceType> <AdditionalProviderSettings>setAclResourceType;setAclAccess</AdditionalProviderSettings> </MsDeploySourceManifest> </ItemGroup> </Target> <Target Name="DeclareCustomParameters" AfterTargets="AddIisAndContentDeclareParametersItems"> <ItemGroup> <MsDeployDeclareParameters Include="SetAclParam"> <Kind>ProviderPath</Kind> <Scope>setAcl</Scope> <Match>^$(_EscapeRegEx_MSDeployDirPath)\\Config$</Match> <Description>Add write permission to the App_Data folder.</Description> <DefaultValue>{$(_MsDeployParameterNameForContentPath)}/Config</DefaultValue> <Value>$(_DestinationContentPath)/Config</Value> <Tags>Hidden</Tags> <Priority>$(VsSetAclPriority)</Priority> <ExcludeFromSetParameter>True</ExcludeFromSetParameter> </MsDeployDeclareParameters> </ItemGroup> </Target> |
The web deployment process creates a manifest for the application and executes the manifest during the deployment. We can only see the manifest when we publish the application to a deployment package instead directly to the server.
The first ‘Target’ element is defining a ‘setAcl’ action inside the manifest. The second ‘Target’ element is parameterizing the action, so the deployment process will be able to deal with the path when the application is deployed to different servers.
Publish the application
After configuring everything, publish the application is very easy:
- In ‘Solution Explorer’ window, right-click the ‘webCustomer’ project and click ‘Publish…’ context menu item
- In the ‘Publish Web’ window, click ‘Publish’ button
Once again, if everything is done correctly, you will see the web browser with the list of customers.
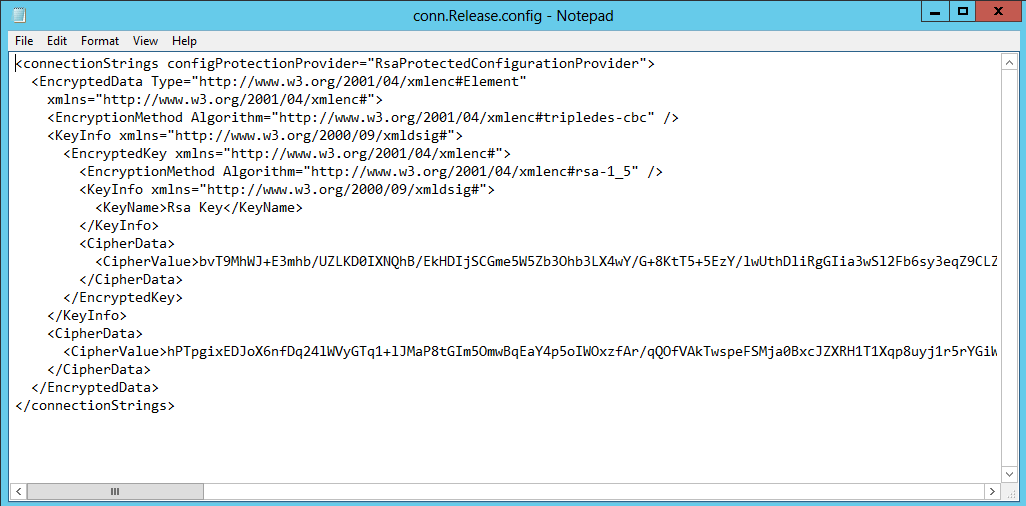
You can open the ‘conn.release.config’ file in the ‘C:\inetpub\wwwroot\webCustomers\Config’ folder and you will see something similar to the image below.
Conclusion
The solution proposed in this article is able to greatly increase the security of your application environment by ensuring that access control conforms to a stringent policy. The higher security is not only because nobody knows the password but also because the administrator can enforce standard password policies to all application accounts instead of having to compromise by treating them as exceptions, using the attribute ‘Password Never Expires’.
SQL Server will follow the password expiration policy and the application will change its password from time to time, ensuring a good password security.
Another increase in security is the fact that this solution only works if every application has its own login. If two applications share the same login, the solution will not work.
You can download the solution and contribute to it here: https://github.com/DennesTorres/ChangePassword


Load comments