
One of the commonest difficulties in web application development occurs when you need to deploy the application to all the delivery environments with one set of source code. During the lifecycle of a web application, a new version is frequently released. The release pipeline requires that it is deployed to several server environments for purposes such as testing before finally being deployed to the production environment. It can be fiddly and error-prone if the developers have to track different configuration files for each environment and keep making changes in all the necessary places during development to keep everything in sync.
If any issues happen in production, or if you hit a problem in one of the test environments that cannot be reproduced in the development environment, the developer who is tasked with fixing the problem has to open a code base that has production-specific settings, and debug against that to catch the issue. This is like maintaining separate code bases, one for each environment.
There are a number of differences between delivery environments: Each environment is likely to have its own connection string pointing to different databases, different web service endpoints for each environment, security settings and switches to disable or enable debug options and settings. There will be different application settings, usually contained in XML configuration files that are specific to the release environment.
For an application that is using Entity Framework (EF), for example, the task of changing a single configuration file to the one that is appropriate for the specific release environment can be achieved by using the web.config transformation and Entity Framework transformation process. The purpose of this article is to describe a way of standardizing the process for creating a transformation for a new Microsoft ASP.NET deployment.
The example Project
This project will be deployed to multiple environments. At the time of this writing, they include:
- Debug
- Dev
- Prod
- QA
- Training
Users of those environments need different data sources. (Those sources are a combination of various databases and web services.) The current solution for that requirement is to use a transformation for each environment. Typically, such transformations can be accomplished with the web configuration. If the project uses Entity Framework to access the databases, we also need to transform the Entity Framework model files. Those are the two high level tasks for creating a transformation. Changing the web.config is easy process whereas the cloning the EF files can be tricky; so instead of cloning and redoing stuff for each environment, we can use the transformation process to make it easy to publish an application to any environment.
Essentially, Transformation is an XML/XSLT process that allows certain settings to be automatically changed, or modified, based on the configuration type. web.config is an ASP.NET configuration file that plays an important role, and controls the settings that change between different environments. If that file is not well-deployed or has invalid settings then the deployed application will cease to work as expected, or may fail entirely. We will be explaining how to set up a web.config transformation process for the application. Once it is done, it overcomes the challenging tasks of deploying the application to various environments simply by changing the environment setting in the IDE and publishing the application along with the respective configuration files.
The Project’s architecture
ORM frameworks provide an abstraction for data access in an object-oriented application. For .NET applications, Microsoft’s recommended ORM is the Entity Framework. This example project is an ASP.NET application with a SQL Server back-end with a Database-first EF model. However, this process can be extended to any ASP.NET application, and works with other relational databases at the back-end. The example will use Visual Studio (VS) and Team Foundation Server (TFS) as part of the development environment.
The task
We need to define various release configurations such as Dev, QA, Training and Prod. To meet security requirements, there will be differences in SQL Server’s access control such as the schema owner. There are likely to be differences in the way that servers are configured. These differences mean that there will be corresponding differences in the configuration required for EF to communicate properly with the respective relational Databases. The Visual Studio IDE allows you to create transformation files for any XML-based resource file in the project. These will typically comprise web.config and app.config , along with any XML files that have application specific settings. The web.config file should have separate associated transformation files for each of the different configurations that are required. Once you have set up the transformation, you can then point to the respective environment in the VS IDE and run against it so as to debug and troubleshoot issues in the code with the configuration that is specific to that delivery environment.
ASP.NET web.config transformations are a great way to manage configurations in several delivery environments for changing the connection strings, security settings, active directory and network addresses, proxy settings, service endpoints and so on while building and deploying the application. We can also insert new settings, remove existing settings and so on during deployment
The entire transformation process is divided in to 2 major steps. The first step is to set up the web.config transformations and second step is to generate the Database files for each environment.
Setting up the web.config transformation
To create the web.config transformation file for a specific environment, for example, we need to follow these steps.
By default, VS provides debug and release configurations. To add another environment configuration such as QA, Dev, Prod or Training, first click on the Project menu Build –> Configuration Manager and add the respective configurations.
Add environment-specific web.config Transform file to the project
Right lick on web.config and select the menu item ‘Add Config Transforms’.
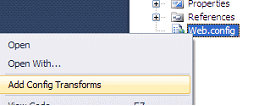
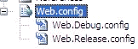
This will create the default web.debug.config and web.Release.config files.
Once you add other environment configurations such as QA, Training, Prod, using Build –> Configuration Manager, then ‘Add Config Transform’ creates respective files for each environment set up as below.
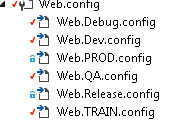
On clicking the ‘Add Config Transform‘ command, VS will automatically create the transform files for the defined configurations by detecting any files that do not exist already while preserving the original web.config file. We can delete a particular configuration transform file if it is not required.
Write transforms to change settings for “QA” in Web.QA.config
The Transform file, web.QA.config for example, needs to have the XML Document Transform namespace registered at the root node as shown below:
|
1 2 3 |
<?xml version="1.0"?> <configuration xmlns:xdt="http://schemas.microsoft.com/XML-Document-Transform"> </configuration> |
The following attributes are important to understand because they drive the XML Transformation.
- Transform – This attribute is used to modify web.config file for specific configuration (i.e. QA in this example).
- Locator – This attribute is used to identify a node by setting exact XPath of where to find a node for which transform should be applied for a different environment and match on value of a node’s attribute and a condition match to find a node
If we take a simple unencrypted connection string, it can be defined like this following example in web.config. This is a connection string that is used to connect to a dev database.
|
1 2 3 4 5 6 |
<?xml version="1.0" encoding="UTF-8"?> <configuration> <connectionStrings> <add id="MyDB"" connectionString="Server=DevServer; Database=DevDB; User id="user1;" password=pwd " providerName="System.Data.SqlClient" /> </configuration> |
We need to add a transform to the web.QA.Config file such that the connection string points to QA database. To do that, we must open the web.QA.Config file and change the connection string section as below.
|
1 2 3 4 5 6 7 |
<?xml version="1.0"?> <configuration xmlns:xdt="http://schemas.microsoft.com/XML-Document-Transform"> <connectionStrings> <add id="MyDB"" connectionString="Server=QAServer; Database= QADB; UserId=user2; password=pwd2" providerName="System.Data.SqlClient" xdt:Transform="Replace" xdt:Locator="Match(name)" /> </configuration> |
We have added Transform and Locator attributes into the connection string. Locator will find the node whose name attribute matches with the name attribute of the <add> node in web .config file and Transform used here will “Replace” the node that is found by locator that matches the name attribute when Build or deployment is done. Apart from Transform and locator , there are other attributes that we can use such as remove, removall, inse rt, SetAttributes, RemoveAttributes, InsertAfter and InsertBefore .
If you have, for example, enabled error logging and wanted to get emails on errors that occur when users run the application and set up different email addresses for receiving emails from Dev,QA,Prod and so on, you can write transforms as below.
|
1 2 3 4 5 6 7 8 9 10 11 12 13 14 15 16 17 18 19 20 |
<add key="Errorlog_file" value="C:\Logs\MyTestProject.log" xdt:Transform="SetAttributes" xdt:Locator="Match(key)"/> <add key="VerboseErrorContentToUser" value="Yes" xdt:Transform="SetAttributes" xdt:Locator="Match(key)"/> <add key="EmailEnabled" value="Yes" xdt:Transform="SetAttributes" xdt:Locator="Match(key)"/> <add key="EmailServer" value="SmtpRelay.xx.com" xdt:Transform="SetAttributes" xdt:Locator="Match(key)"/> <add key="EmailSubject" value="Employee System(Dev Server) - Error Notification" xdt:Transform="SetAttributes" xdt:Locator="Match(key)"/> <add key="EmailFromAddress" value="dev_error@xx.com" xdt:Transform="SetAttributes" xdt:Locator="Match(key)"/> <add key="EmailToAddress" value="devuser1@xx.com" xdt:Transform="SetAttributes" xdt:Locator="Match(key)"/> |
For example for replacing any web service end points it can be written like below.
|
1 2 3 4 5 6 7 |
<system.serviceModel> <client xdt:Transform="Replace"> <endpoint address="https://QAWebServer/myproj/Crypting.asmx" binding="basicHttpBinding" bindingConfiguration="CryptingSoap" contract="CryptingReference.CryptingSoap" id="CryptingSoap"" /> </client> </system.serviceModel> |
When these different web.config files are created, such as web.dev.config, web.qa.config and so on, they are not a complete copy of the original web.config and you have to make the changes wherever you want the transformation to happen. Developers can install a small Visual Studio extension called SlowCheetah for XML Transforms that generates lot of stuff when the developer clicks on Add Config Transforms to different web.Environment.Config files. The SlowCheetah extension adds tooling to desktop projects also to create XDT transforms. If the developer installs that extension then all the functionality is installed to %LOCALAPPDATA%\Microsoft\MSBuild\SlowCheetah\v1\ and lives in a standard MSBuild .targets file.
The second step in the transformation process is the Entity Framework Transformation for various environments. Steps for DEV, QA environment transformation are explained in this example.
. EDM (Entity Data Model)
Three main parts of the EDM are the conceptual model, the storage model and mapping between them. The conceptual model is different from the design of the database objects in that it exposes database objects as entities with their relationships as associations. The storage model is the database design model which includes tables, views, stored procedures, their relationships and keys and the mapping consists of information about how the conceptual model is mapped to the storage model.
EF introduces two different approaches called ‘Code First’ and ‘Database First’ for designing the Entity Data model. As the names suggest, the ‘Code First’ approach is based on first writing the domain requirement classes and then generating the database on the fly based on those classes. The Database-First EF model can be managed by creating an EDMX file for an existing database that is designed for an application, and then installing generators that are used to generate the entities.
With EF, one of the common issues that a few developers face is that whenever the database is altered by adding a column or changing a datatype then the ” update model from database” menu item may not work properly. The developer then has to delete and recreate the model before regenerating all the DbContext classes. There are two ways of doing it without issues or maybe more accurately with only minimal issues.
- Using EDMX: After you update your model from database, Run ‘Custom Tool’
- No EDMX: Generate your POCO classes one time (no EDMX file) by using Entity Framework Power Tools and then use ‘Reverse Engineer Code First‘ then manually make changes to your classes when database model changes (that obviously would work only with incremental database changes).
Out of these two methods, the first way of using EDMX and updating by means of the EDM custom tool should work well. It is the preferred way in most cases. In this example we use the ‘Database First’ approach for applying transformation to generate files for various environments.
EDMX and Model Files Generation
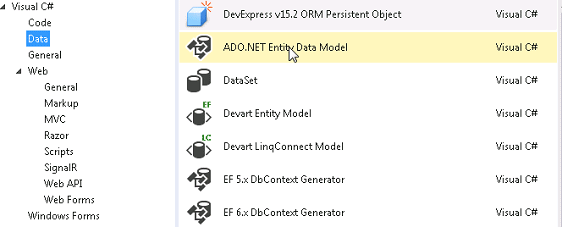
Right click the DAL(Data Access Layer) folder or any folder where you want to create the model files and select ‘Add New Item’ and as shown in below screenshot select ADO.NET Entity Data Model.
- In the wizard select “Generate from Database” option.
- Go through the self-explanatory wizard’s next steps and set up connection to the database and choose all the database objects needed such as tables, procedures, functions…etc. and click on the finish button to generate the EDMX file and others as in this screen shot.
-

DbSet for each table will be created under DevDBModel.Context.cs and the class representing each table will also be generated Under the DevDBModel.tt
The Transformation Process of Model Files for different environments
- In this process we have to create subfolders that will be used to encapsulate the Model Files for each of our targeted environments under the “DAL” subfolder.
- Create DEV_EF,,DEBUG_EF,QA_EF,TRAIN_EF and PROD_EF folders under the DAL Folder and Copy the EDMX files, along with the other files(as shown in above picture), from the DAL folder to the DEV_EF folder.
- When we build and run the application or publish database model files from respective subfolder (Dev_EF,QA_EF. etc…) will be used.
- If the configuration is set as Dev in Visual Studio IDE and you build the project then Visual Studio transformation process uses the connection string and other configurations from Web.Dev.Config and takes the edmx and model files from DAL folder and transforms them to generate the Dev database model files.
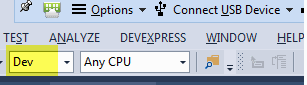
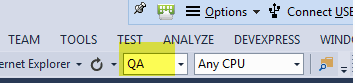
- The files generated in DAL folder corresponds to the environment set in IDE while building the project as in below screenshot. If we set that to QA then Visual Studio uses Web.QA.Transform and transforms files in DAL folder to point to QA configuration.
Creating Model files for the Dev Environment
Follow the below detailed steps to create Dev database DB model files that can be copied to the folder Dev_EF, files from which they will be used for deploying the application to Dev server.
- Set the configuration settings to “DEV” in your VS IDE
- Take the Latest code from TFS.
- Clean and build the project without any errors. If there are any errors and then double-click the EDMX file to launch the editor.
- Once the EF editor is launched. if there are any changes to database since you created model files, then you will need to click the menu item ‘Update Model from Database‘.

- Once the changes are done save it.
- If there are changes to database since you build the initial edmx file like for example if Salary table is added to DevDB database in this example, to generate the Salary class in object model, right click on DBModel.tt file and run custom tool.
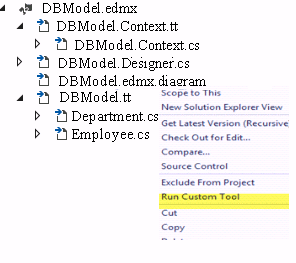 This process generates salary.cs file as below for the newly added table.
 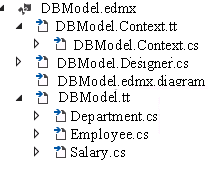 Right click the DBModel.Context.cs file and select the ‘Run Custom Tool’ context-menu item again to generate the salary DbSet under object model and then click on the ” Save” button .
Launch Windows Explorer and navigate to the DAL subfolder of your TFS local workspace. Select all the files directly under the DAL folder. The Files are the newly-generated Files that point to Dev Database and they need to be copied to the DEV_EF subfolder so as to persist your changes. Preferably, please delete all the FILES under DEV_EF before pasting the copied ones.
Note: By default, the configuration setting In VS is set to “DEBUG” which should be the same as the “DEV” configuration. So you need to make sure that you replicate the same set of files in DEV_EF subfolder to the DEBUG_EF Subfolder. 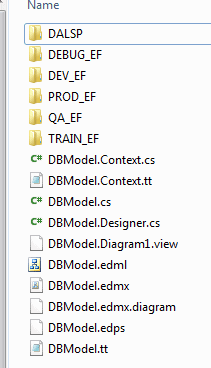
Open VS, clean the solution and rebuild the project.If the database objects are not properly resolved within Entity Framework, the build may end up with errors. Open the EDMX file again and fix the issues.In situations like this, you may need to repeat the whole process and exclude any unwanted or erroneous objects to get the project to compile. Failing that, you might need to tweak one or more generated definitions or relational constraints to successfully compile the project. The best way to do this is to follow these steps: Shutdown VSEnsure that the TFS work space is not read-only.Navigate to the local TFS workspace and delete all the contents of the DAL subfolderLaunch VSAccess Team Explorer and once again check out the latest copy of DAL subfolderOnce more repeat all the steps of modifying the Entity Framework definition.
Creating the files for the QA environment
Once the Dev files are created and you are able to build the application and then run it successfully, you can follow these steps for creating the files for the QA environment.
- Set the configuration settings to “QA” in your VS IDE
- Take the latest code from TFS
- Build the project without any errors. This process generates DB files for the QA database in the DAL folder.
- The build can produce errors if the QA database does not match the Dev database because one or more objects are changed or missing. Make all necessary changes to the QA database so it matches the Dev database and then rebuild the project pointing to QA. If there are any changes to the database as we’ve described in the Dev process, then update the model from the database and run the custom tool.
- Once the necessary changes have been made and saved, open up Windows Explorer and copy everything underneath the DAL subfolder directly to the QA_EF subfolder.
- Once that is done - go back to VS with the configuration still set to “QA” and click on ‘build all’. If everything goes fine, you should be able to build the project against the QA environmentwithout any issues. When we publish applications to the QA environment then transformation uses database files from the QA_EF folder.
Modify Project File to pick up correct EF files for deployment to an environment
- For deployment purposes, the solution file will be modified to include certain steps that will ensure that the correct web.config and Model files are used.
- Right-click on a project node and select “unload”. Then select ‘edit‘, and add the following content towards the end for handling assembly needed for transformation purposes in the build process.
1<UsingTask TaskName="TransformXML" AssemblyFile="$(MSBuildExtensionsPath)\Microsoft\VisualStudio\v12.0\Web\Microsoft.Web.Publishing.Tasks.dll" />
- Add the following lines to do the actual transformation of the web.config file based on the target being deployed.
123<Target id="TransformConfigFiles"" AfterTargets="AfterBuild"><TransformXML Source="Web.config" Transform="$(ProjectConfigTransformFileName)" Destination="$(WebProjectOutputDir)\Web.config" /></Target>
- Add the following section of code to copy the “Correct” model files to the appropriate location before the build process for the Model file kicks in. $(Configuration)_EF can be Dev_EF when it is published to the dev or QA_EF subfolder when it is pushed to QA from where the exact matching DB files will be picked up for publishing.
123456<Target id="CopyModelFiles"" BeforeTargets="EntityDeploy"><ItemGroup><ANTLR Include=".\DAL\$(Configuration)_EF\*.*" /></ItemGroup><Copy SourceFiles="@(ANTLR)" DestinationFolder="$(SolutionDir)DAL" OverwriteReadOnlyFiles="true" SkipUnchangedFiles="true" /></Target>
Creating the ‘Publish’ Profile
Finally, once we set up all environments web configuration transformations and EF model files, we are ready to publish the application to any environment . Publish Profile files are used to configure deployment for a web project in Visual Studio. When you are ready to publish, you choose the profile you want to use, and click the ‘Publish ‘ button in the wizard
- In the Solution Explorer, right-click the project and select ‘Publish‘ (or ‘Publish Web Site’ for web site projects) to open the ‘Publish Web’ wizard. You can import any existing profile or create new profile and set up properties in the ‘Connection’ and ‘Settings‘ tabs.
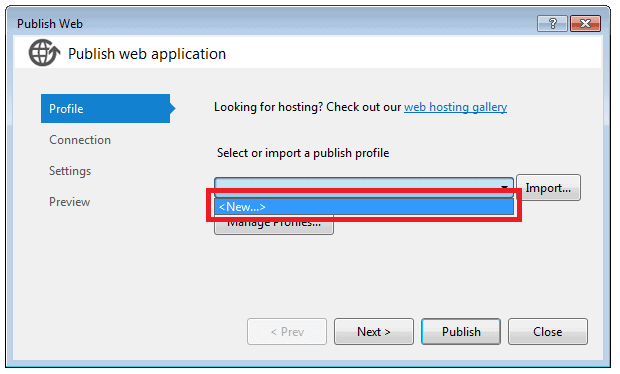
- Click on ‘New’ as in the above screenshot and set up the profile names such as ‘Dev’, ‘QA’ or ‘Prod’ to create a profile.
- We can choose any publishing method in the ‘Connection‘ tab such as ‘filesystem‘, ‘web deploy‘, ‘web deploy package’ or ‘FTP‘.
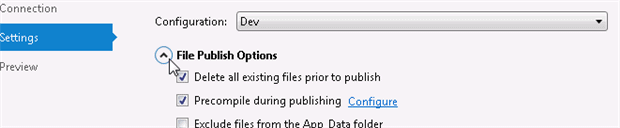
- Under ‘Settings’ as in the following screen shot you can select ‘configuration’ and then choose to delete or keep and overwrite existing files in a published folder and whether to precompile during publish.
-
- Preview finally all the publish settings in the ‘Preview’ tab and click on ‘Publish‘
Once the ‘Publish‘ button is clicked, the web.config file will be changed with the new settings according to the publish profile, with the connection string, EF and service end points pointing to the selected profile. Publish profiles and various config files will be created as shown below

Sample publish profile file will be as below
|
1 2 3 4 5 6 7 8 9 10 11 12 13 14 15 16 17 18 |
<?XML version="1.0" encoding="utf-8"?> <Project ToolsVersion="4.0" XMLns="http://schemas.microsoft.com/developer/msbuild/2003"> <PropertyGroup> <WebPublishMethod>FileSystem</WebPublishMethod> <LastUsedBuildConfiguration>QA</LastUsedBuildConfiguration> <LastUsedPlatform>Any CPU</LastUsedPlatform> <SiteUrlToLaunchAfterPublish /> <LaunchSiteAfterPublish>True</LaunchSiteAfterPublish> <PrecompileBeforePublish>True</PrecompileBeforePublish> <EnableUpdateable>True</EnableUpdateable> <DebugSymbols>False</DebugSymbols> <WDPMergeOption>DonotMerge</WDPMergeOption> <ExcludeApp_Data>False</ExcludeApp_Data> <publishUrl>C:\MyProject_QA</publishUrl> <DeleteExistingFiles>True</DeleteExistingFiles> </PropertyGroup> </Project> |
You can repeat the same web.config and EF transformation sets for any environment besides Dev and QA – such as Training, Prod or Staging – to generate the respective Database Model files for that environment.
Conclusion:
The transformation process makes the cycle of code, build and deployment smoother because it becomes possible to deploy to different environments such as Dev, QA, Training and Production with a single set of source code checked into a version-control system (VCS) such as TFS. Effective use of the web.config transformation process makes the developer’s life easier by storing different configurations in different files. These settings automatically end up in the final config file used for deployment to various delivery environments. Developers can leverage the Entity Framework templates for code generation of strongly typed classes and object layer. If they then use the EF transformation process detailed above, the developer can generate database model files in the respective environments and thereby produce the buildable artifacts for the project.
This document contains proprietary information and is protected by copyright law.
Copyright © 2026 Red Gate Software Limited. All rights reserved
Load comments