
Successful enterprises can grow organically or through acquisition. Either way, this will increase the volume and complexity of the data flowing through enterprise applications. Disconnected and separate systems bring various issues such as data inconsistency, fragmented data, data inaccuracy, and an increasing difficulty and effort within IT departments in reacting to changing business needs. It is this increasing task of disentangling the complex data issues that makes the case to have a centralized system that can define, integrate, cleanse, manage, and finally distribute data to various systems.
Master Data Management (MDM) defines a process of collecting enterprise data from various sources, applying standard rules and business processes, building a single view of the data, and finally distributing this ‘golden’ version of data to various systems in the enterprise, thereby making it accessible to all consumers. Here is more detailed article about MDM and its importance.
Master Data Services (MDS)
Master Data Services is a Microsoft product for developing MDM solutions that is built on top of SQL Server database technology for back end processing. It provides service-oriented architecture endpoints using Windows Communication Foundation (WCF). You can implement a hub architecture using MDS to create centralized and synchronized data sources to reduce data redundancies across systems.
Configuration Manager
Configuration Manager is a starting point for configuring Master Data Services. You can use it create and configure the MDM database. This database comes with many stored procedures, database tables, and functions which collectively support back-end processing. You can also create a web application called Master Data Manager and, finally, you can associate the database and web application together, thereby creating an MDM solution.
MDS Architecture
Master Data Services has a three-tier architecture consisting of the database layer, service layer, and UI/Add-in layer. This is illustrated in an architecture diagram below that shows MDS integrated with Data Quality Services and SQL Server Integrations Services. In order to understand MDS the area better, I have put blue rectangular box around the MDS components.
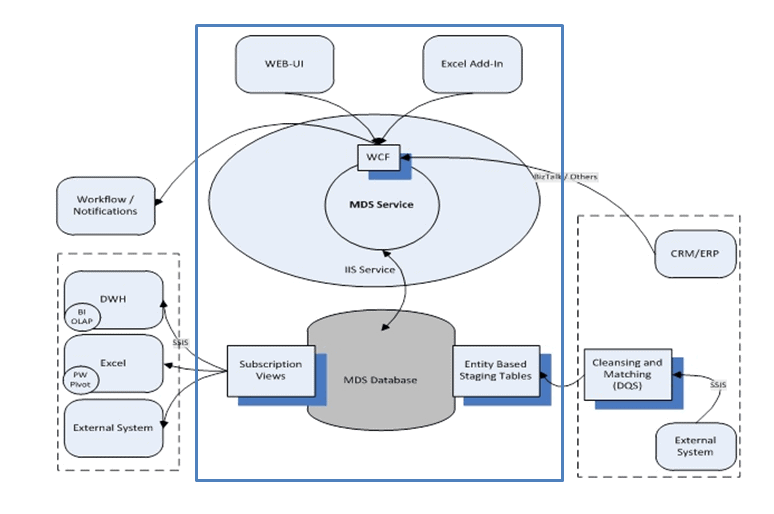
Borrowed from Microsoft website and put blue rectangle box to keep things in context.
History, installation and configuration
Microsoft first introduced Master Data Services with SQL Server 2008 and, as generally happens with first versions, there were limited features and some defects as well. Also, because there was little awareness and appreciation of master data management systems at the time, it is hardly surprising that its introduction went mostly unnoticed. Subsequent versions of SQL Server 2012, 2014, and 2016 brought some new features and product stability to MDS too. With SQL Server 2016, Master Data Management capabilities are now of similar quality and sophistication as any other enterprise-grade MDM solution.
The following installation instructions are based on SQL Server 2016 available on Microsoft Azure Cloud platform and should work fine with other MDS versions supported on SQL server as well.
- Login with your Azure account or create azure account if you have not done so already.
- Search for a virtual machine with following name “SQL Server 2016 RTM Enterprise on Windows Server 2012 R2”.
- Follow the simple ‘provisioning VM’ wizard, which mostly involves clicking ‘next-next’ with some occasional user inputs. Be sure to carefully note down the details as you go, especially the credentials.
- Start the recently-created virtual machine, and note down the public IP address that is assigned to it.
- You can ‘remote desktop’ into the virtual machine using its public IP address once it is fully up, running and operational. This might take a while depending on VM capacity.
- This virtual machine has pre-installed SQL Server 2016 and Master Data Services too. For others, the installation of Master Data Services is simple: You merely open setup.exe and follow the installation wizard.
Master Data Services is a two-step process; Firstly comes Database Configuration, and then Web Application Configuration.
MDS database configuration
Because MDS is implemented on SQL Server, most of the core logic is written in stored procedures. There are about three hundred stored procedures that get created as part of the database creation procedure. About fifty tables also get created as part of database setup along with some database views and functions. The process to set up the database is as follows:
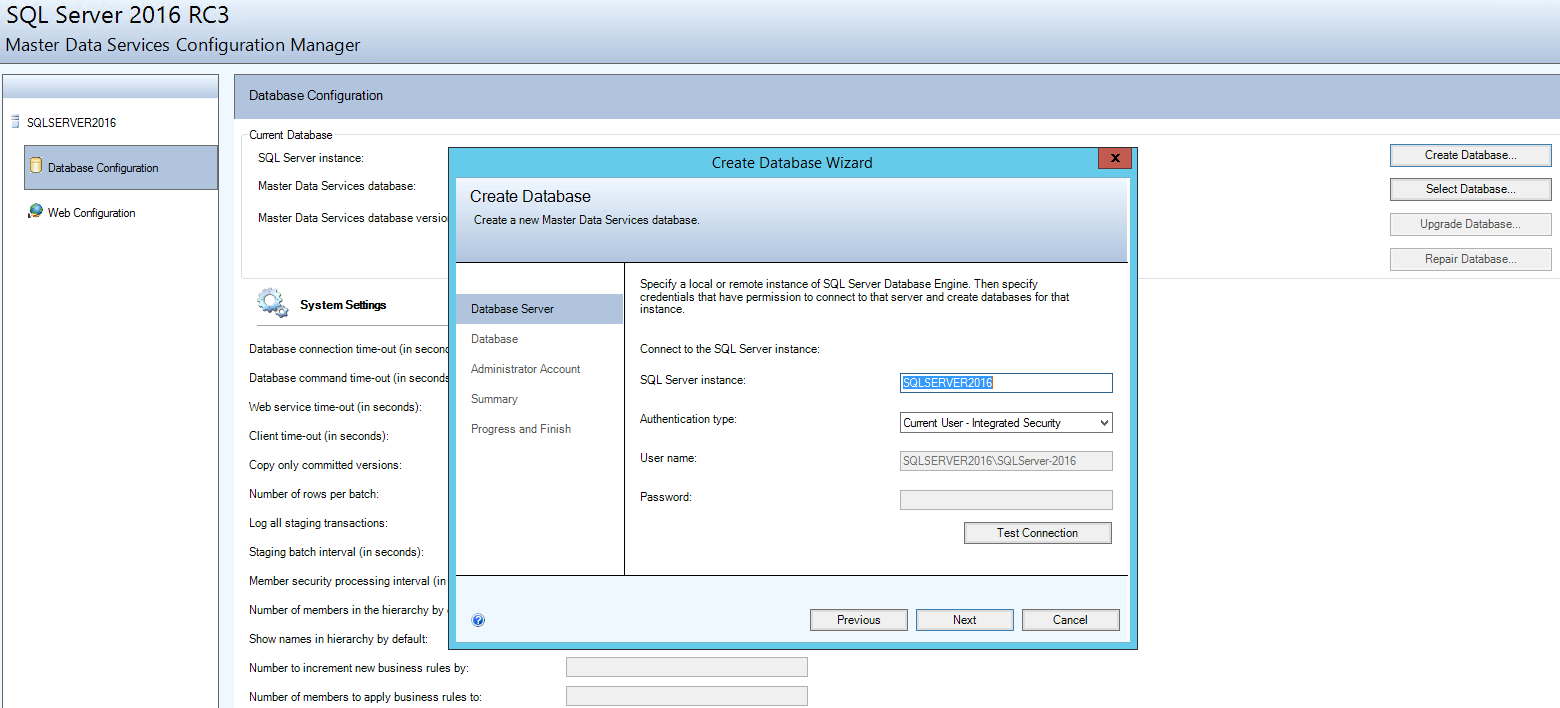
- Launch the Configuration Manager for Master Data Services from the installed programs.
- You will see two options; Database Configuration and Web Configuration. We will create the website shortly to access the MDM features using the web user-interface.
- Select the Database Configuration option.
- Create the Database. The wizard will ask you to specify some user inputs and it will set up the database according to your user inputs. For now, let’s proceed with windows authentication only.
- You can connect to your newly-created database using SQL Server Management Studio which is also preinstalled.
- Here are some database tables that you will need to understand:
- tblModel – Contains information about MDM models, also known as business domain like Customer, Product, etc.
- tblEntity – Contains information about MDM entity. It stores information about entities for all models.
- tblAttribute – Contains attributes details for each entity. It is more like a database column.
- tblAttributeGroup – It is a logical grouping of similar attributes for a particular entity.
- tblModelVersion – to model versions.
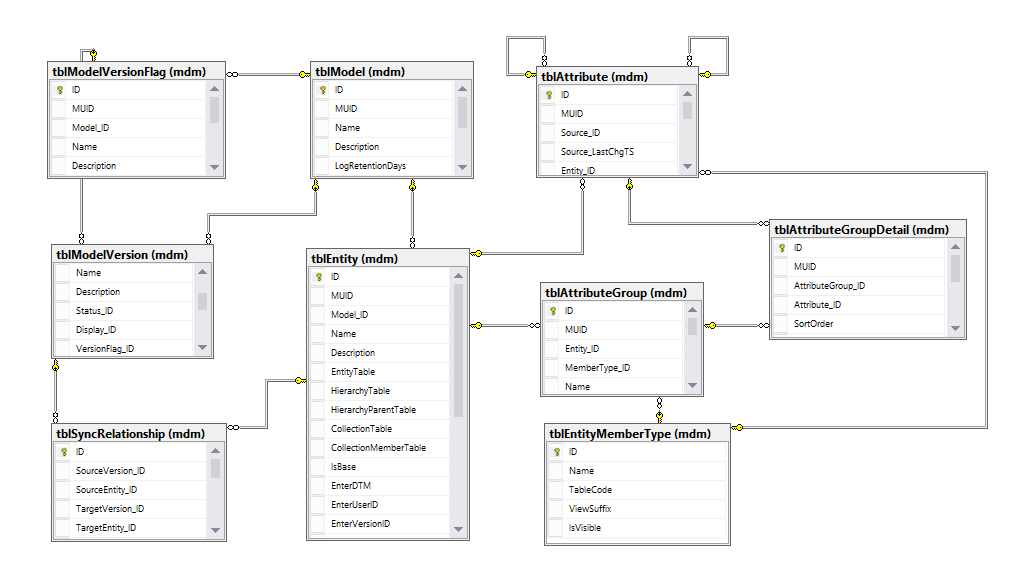
Model & Entity related tables from MDS database
MDS is a highly configurable system and it does not come with any predefined domains or domain entities. More database tables get created as you proceed with model and entity creation.
MDS web UI setup
MDS provides a web application for administrative tasks such as the creation of models, entities, business rules, deploying models, integration management, version management, and users and group permission management. The web application also supports some non-administrative tasks such as updating data. The web application talks to the backend MDS service which is a web service based on Windows Communication Foundation (WCF). WCF is a framework for building service oriented applications. The process to create the web site, or rather the web application, goes as follows:
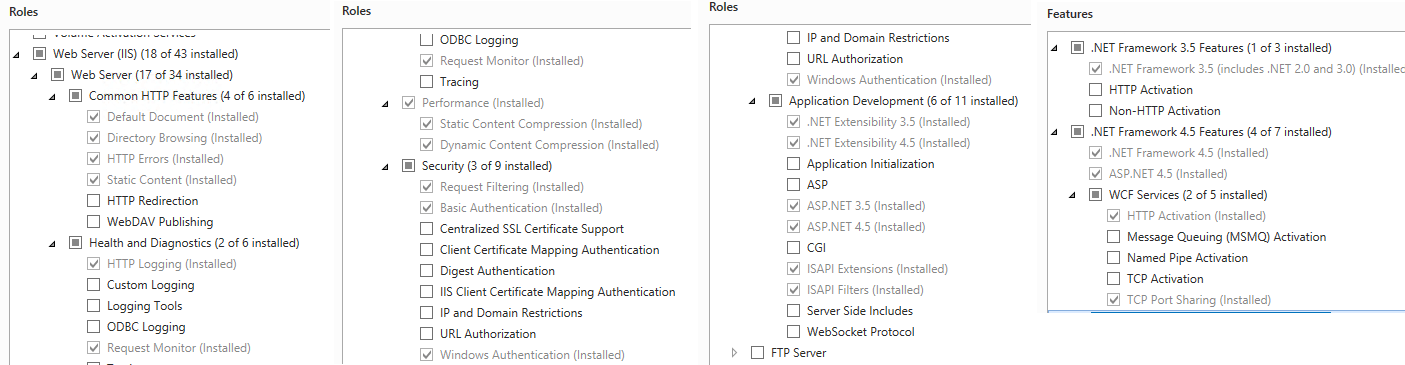
- IIS is preinstalled on this virtual machine but the installation of Roles and Features is required.
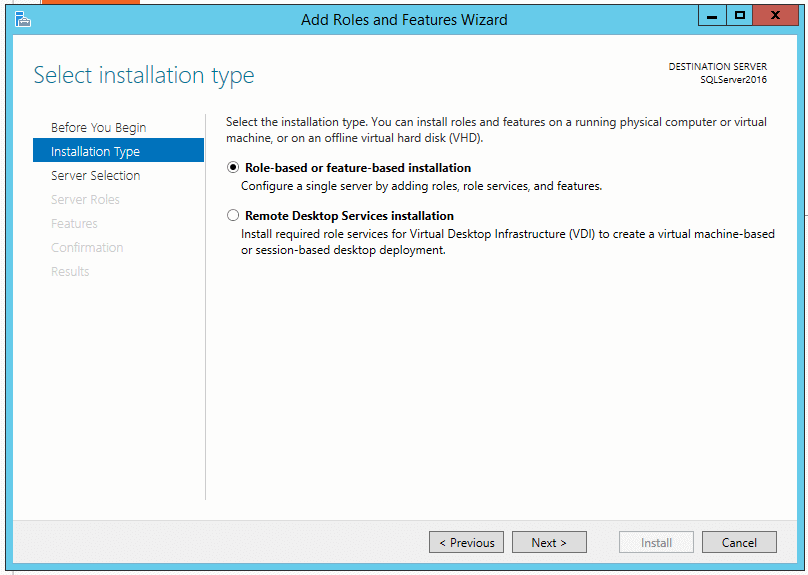
- To install required IIS roles and features for the MDS web application, open Server Manager and then click ‘Manage’ ‘Add Roles and Features’
- Select default installation type which is Role-based or feature-based installation

- You will see only one server for select a server from the server pool
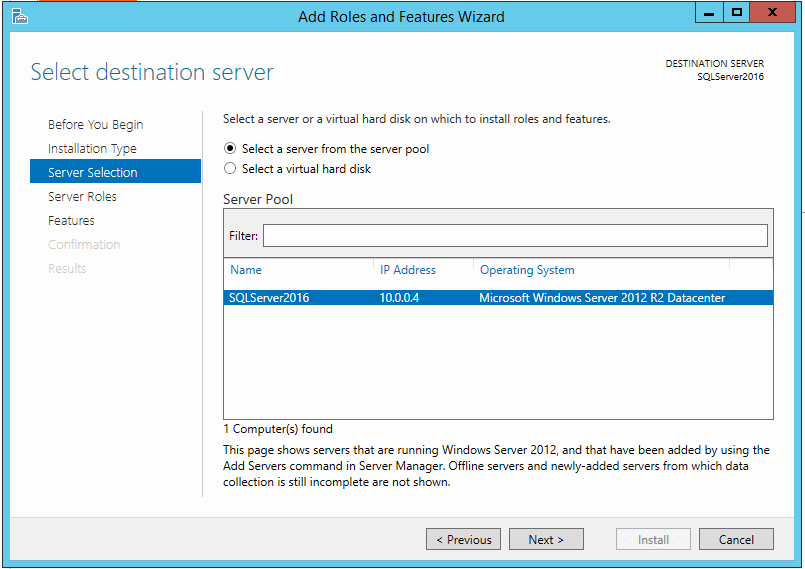
- Select Roles and features as per the following picture.
- Complete the installation after selecting roles and features.
- If you open MDS configuration manager and select web configuration even before installing these roles and features, you will receive errors complaining about missing roles and features.
- Open Master Data Services Configuration Manager from installed programs
- Click on Web Configuration option and select the Default Web Site option from drop down.
- Clicking ‘create’ will give you options to specify application context name (Alias). Input MDS.
- You can use the same credentials as you windows VM credentials and click ‘OK’.
- Now select recently create database and hit ‘Apply’ to create web application. ‘Apply’ will open the user-interface in your default browser.
- You should be able to access
http://localhost/mdsafter few seconds.
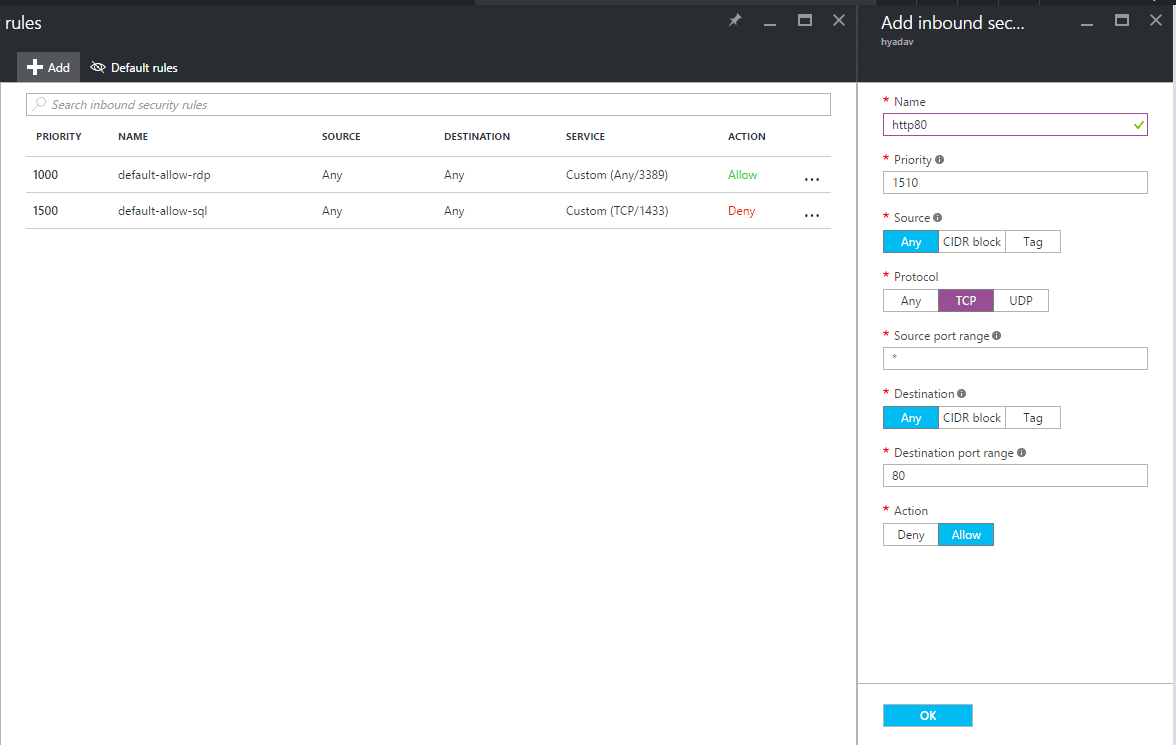
Azure inbound rule setup for HTTP access over the internet
By default, any cloud provider will disable HTTP access to cloud resources from external sources, so does Azure. To access the MDS UI from your computer, you have to add an inbound rule for the HTTP protocol on port 80 or port of IIS server currently configured.
- Login to azure portal
- ‘All Resources’ Network Security Group (associated with your instance) ‘Inbound security rules’ ‘Add’
- Specify the option mentioned in the picture below and click ‘Ok’.
- Now you should be able to access MDS web application from your computer using the URL
http://publicipofvm:port/mds
Tools and components of MDS
Master Data Manager
Master Data Manager (‘UI’), is a graphical user interface to handle master data services tasks. The two types of tasks that can be performed are Data tasks, and Administrative tasks.
Data Tasks
User can view entities, entity dependencies, hierarchies, collections, and change sets at entity level. Member data can be created, viewed, updated, or deleted. You can also apply business rules, view history of any member. The model list selection acts as the context when you work with data tasks.
Administrative Tasks
Administrative tasks can be grouped in following four categories:
System Administration
You can perform CRUD operations on models, entities, attributes, attribute groups, hierarchies, indexes, and business rules. You can also create model packages without data to deploy in other environments and can also deploy previously-created model packages.
Integration Management
Integration management is about ways to get data in or out of MDS. You can import data into MDS in batches. You can also create subscription views to export data out of MDS and your downstream systems can subscribe to these SQL views.
Version Management
You can create a version of master data, lock-unlock versions, view ancestry, and purge members. You can also manage version flags. By default four version flags are created; archive, current, plan, and prior. You can also add or delete version flags. When you deploy model packages with data only version is created which is neither validate nor committed. You can validate and commit versions. You can also access transactions for a particular version of the model.
Security / User and Group Permissions
On installation of MDS, only the administrator account gets created; and more users or groups can be created to grant permission to specific MDS functions or to restrict access to functions. MDS security can be managed using Master Data Manger UI or programmatically by calling web service operations. Master Data Service security is based on Windows or Active Directory domain users and groups.
To set up security, here are the general steps to follow:
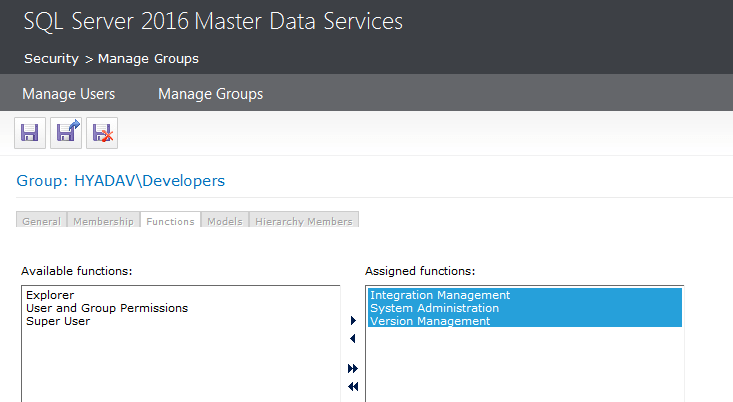
- Assign functional area access, out of five functional areas like Explorer, System Administration, Integration Management, Version Management, and User and Group Permissions.
- Assign Model object permissions, to determine attribute-level access and the type of access (Read or Write) for those attributes.
- Assign Hierarchy member permissions (optional and mostly not needed), to determine member-level access and the type of access to those members.
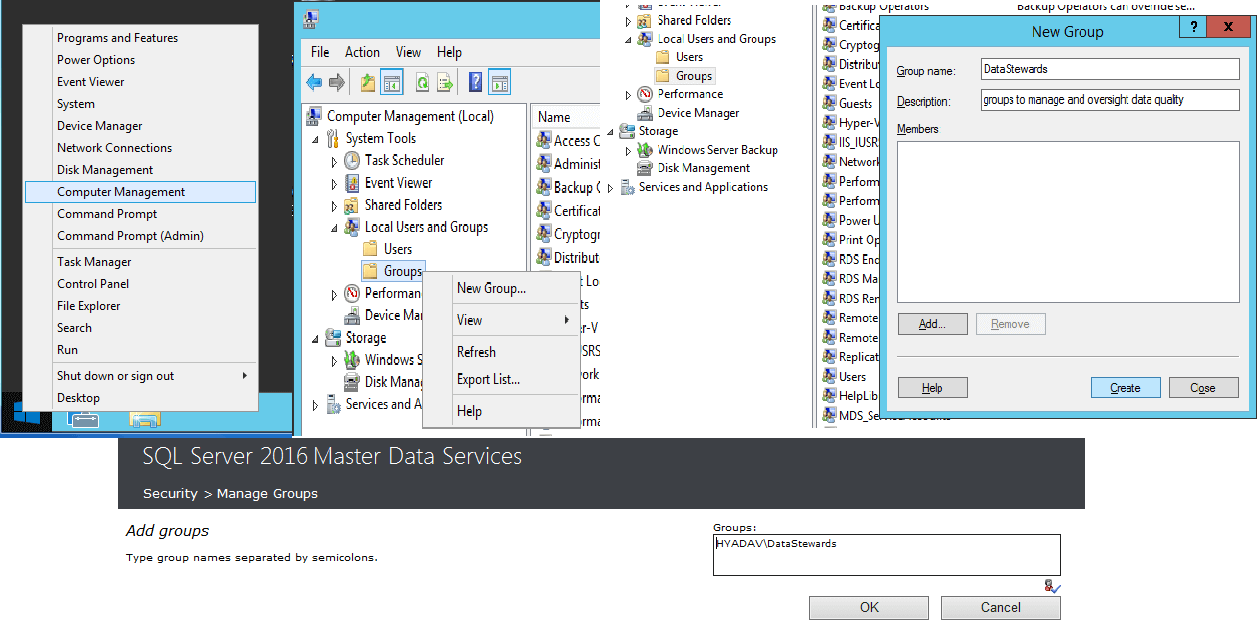
Security best practice for any system is to always create the group first and then assign permission to groups. Having done that, you can then add or remove users from groups anytime without juggling through specific permission.
Add a Group
Add a group to local users and groups on windows host where master data services is hosted. Add users to this group. You have to add a group to the application using the UI as well.
Add a User
Add a user to local users and groups on windows host where master data services is hosted. Add this user to designated group. You have to add the user to the application using the UI as well.
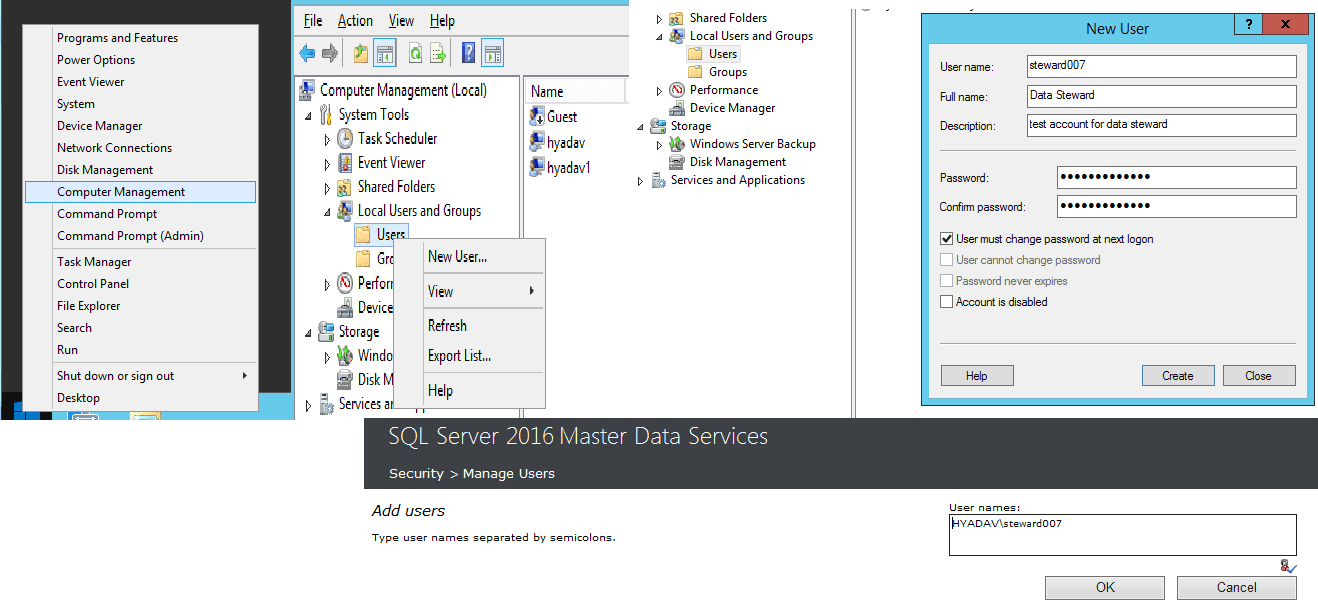
Assign functional permissions
Select the group whose permission you want to change/associate and edit the permissions. You can move functions between available and assigned lists.
Assign Model permissions
Select the group whose permission you want to change/associate and edit the permissions. You can select a specific model under the ‘Models’ tab and assign permission as you need.
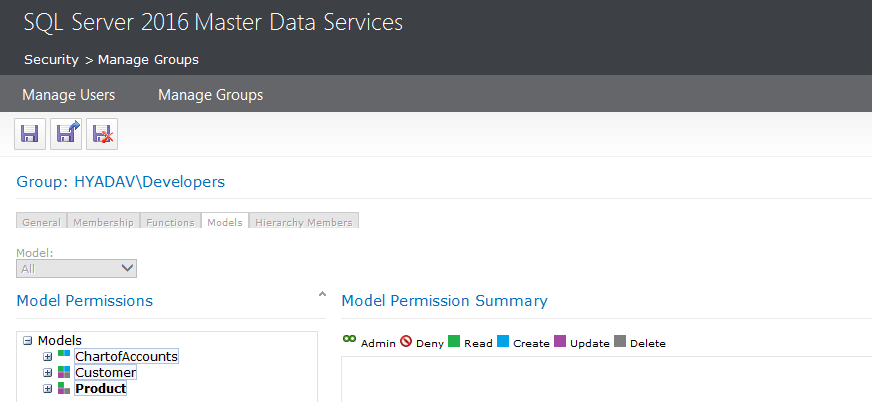
The granularity of security does not stop at functions and models; rather you can assign permissions for entities, Leafs, Consolidated, collections, attributes, etc.
MDSModelDeploy.exe
MDSModelDeploy.exe utility is a tool that is used to create deployment packages of existing model objects with or without data, and it can also deploy previously-created model object packages. This is another way of deploying packages apart from UI deployment wizard. MDSModelDeploy can be used together with following commands:
- listservices – returns a list of all service instances on this MDS server
12MDSModelDeploy listservicesMDS services <Service, Website, Virtual Path>: MDS1, Default Web Site, MDS - listmodels – returns a list of all models
123456MDSModelDeploy listmodelsModels:ChartofAccountsCustomerProduct - listversions – returns a list of all versions for the specified model
123MDSModelDeploy listversions – model CustomerVersions of model Customer:VERSION_1 - deployclone – deploy a clone of a model. All Names and IDs will be identical to the model in the package
1MDSModelDeploy deployclone –package samplemodel.pkg – service MDS1 - deploynew – create a new model by deploying a model package
1MDSModelDeploy deploynew –package samplemodel.pkg –model Customer –service MDS1
Deploying sample models
MDS comes with three sample model packages and are available under directory “C:\Program Files\Microsoft SQL Server\130\Master Data Services\Samples\Packages”. Follow these steps to deploy these models:
- Copy models from sample/packages to ../../Configuration directory where MDSModelDeploy.exe utility is present.
- Check service name by executing command “MDSModelDeploy listservices”
- To deploy ChartsofAccount
MDSModelDeploy deploynew -package chartofaccounts_en.pkg -model ChartofAccounts -service MDS1
- To deploy Customer
MDSModelDeploy deploynew -package customer_en.pkg -model Customer -service MDS1
- To deploy Product
MDSModelDeploy deploynew -package product_en.pkg -model Product -service MDS1
MDS Web Service
Service Oriented Architecture is a standard way to go for an enterprise with disparate tools and technologies. MDS provides a web service, which can be used to extend MDS capabilities or develop custom solutions. The MDS web service provides complete set of operations to allow developers to control all those functions that are supported by the Master Data Manager UI.
Previous versions of MDS had a simple configuration to enable web service using Master Data Service Configuration Manager but recent versions including 2016 do not provide web service enablement using Configuration Manager. You have to modify web.config xml from web site configuration and set flag enableWebservice=true.
Once the web service is enabled and the server is online, you can access WSDL using following URL: http://servername:port/mds/service/service.svc?singleWsdl and here are available web service operations:
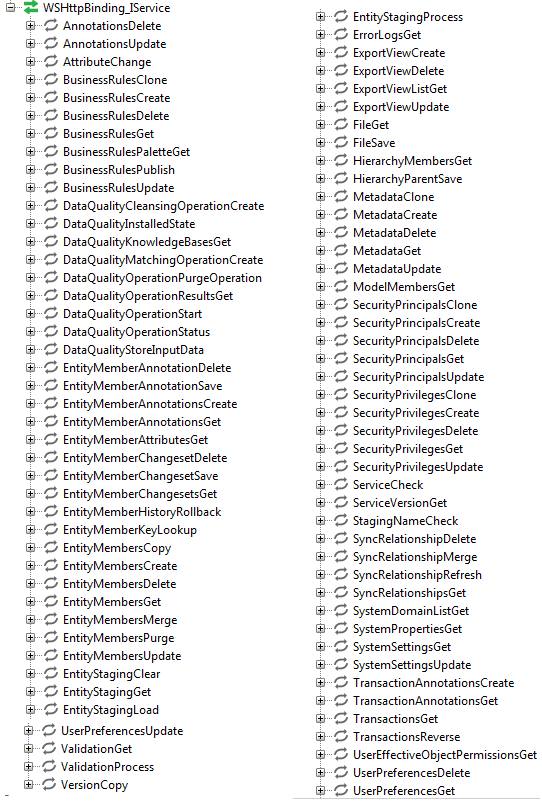
The conceptual grouping of service operations are:
- Model Operations
- Entity Operations
- Member Operations
- Attribute Hierarchy Operations
- Business Rule Operations
- Annotation Operations
- Transaction operations
- Version and Validation Operations
- Data Quality Operations
- Data Import Operations
- Data Export Operations
- Security Operations
- System Operations
Add-in for Excel
When it comes to supporting MDM features, all vendors support more or less same features. The only difference is the user-experience in using MDM systems. Master Data Services Add-in for Excel is master-stroke because it empowers business users directly using their favorite tool Excel. At the beginning of any MDM implementation, the bulk data load is the key requirement for any enterprise and most enterprises end up by investing a good chunk of budget in developing custom solutions for data migration including high vendor consulting rates. Master Data Services Add-in for Excel, allows business users to manage data while also allowing administrators to create new entities and attributes with ease. Most of the features available via Master Data Manager are also possible using the Excel plugin.
To download the Add-in for Excel, log in to the Master Data Manager UI and click on “Install Master Data Services in Excel” which will take you to Microsoft website. Once there, you can download an installer based on your computer architecture (32 bit or 64 bit). You will then see the Master Data menu in Excel after successful installation. Enable plugin from ‘File‘ ‘options‘ ‘Add-ins‘ select ‘Master Data Services Add-in for Excel’, if you don’t see Master Data at top level menu.
To connect Excel with MDS server, you have to configure MDS connection in Excel by following these steps as per below picture:
- Click on ‘Master Data’ menu
- Click Connect/Manage Connections
- Create a new connection by specifying connection name and MDS server address
- Server address should be like
http://serveripaddress:port/website - My IIS is running on port 80 which is the default http port. That is why you won’t see the port mentioned in below server address.
- The easiest way to find it out is by launching MDS Configuration Manager. Select your website and hit ‘apply’.This will open the website in your browser something like
http://hostname:port/mds/gettingstarted - Your server address for Excel Add-in will be
http://hostname:port/mds
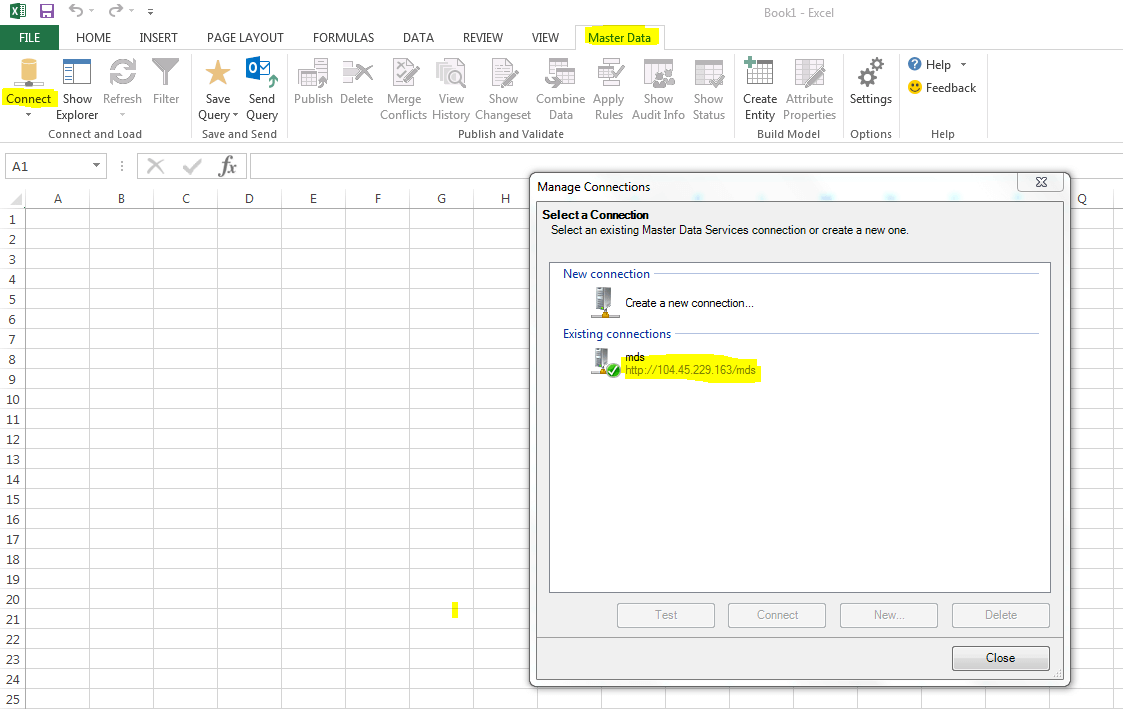
You will receive an authentication failure because the Add-in does not provide a way to provide credentials. To resolve this issue, you can login to your MDS application using the browser(s) and save the password. Saved credentials will then be used by Excel for authentication. For enterprise use, the MDS server will be integrated with the corporate LDAP/AD server and Excel can then use your Windows authentication.
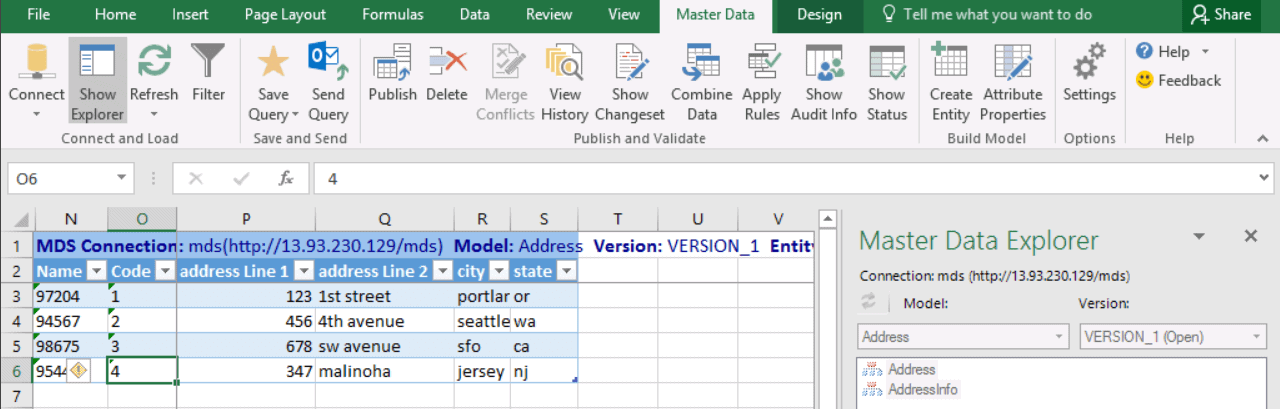
Accessing sample data set using Excel
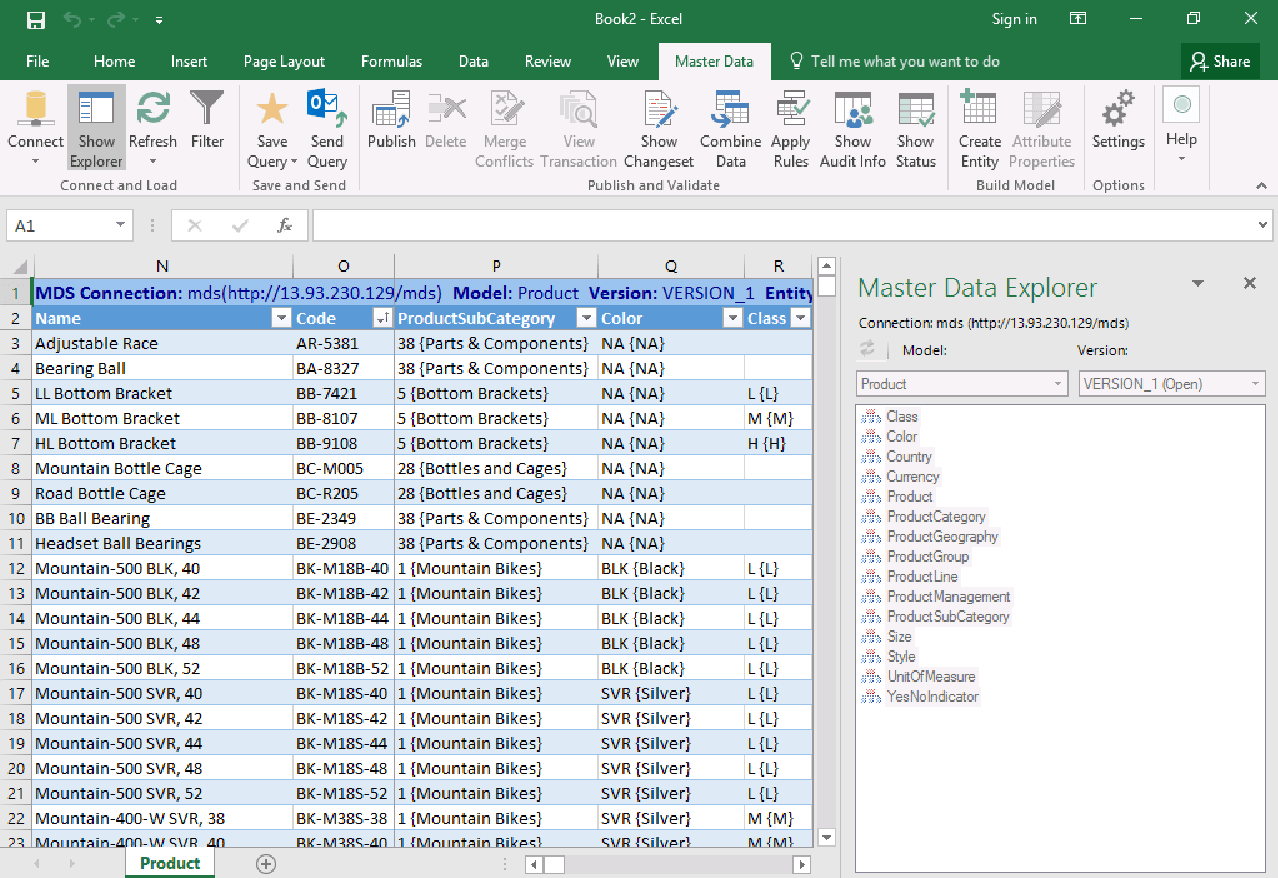
Connect and Load
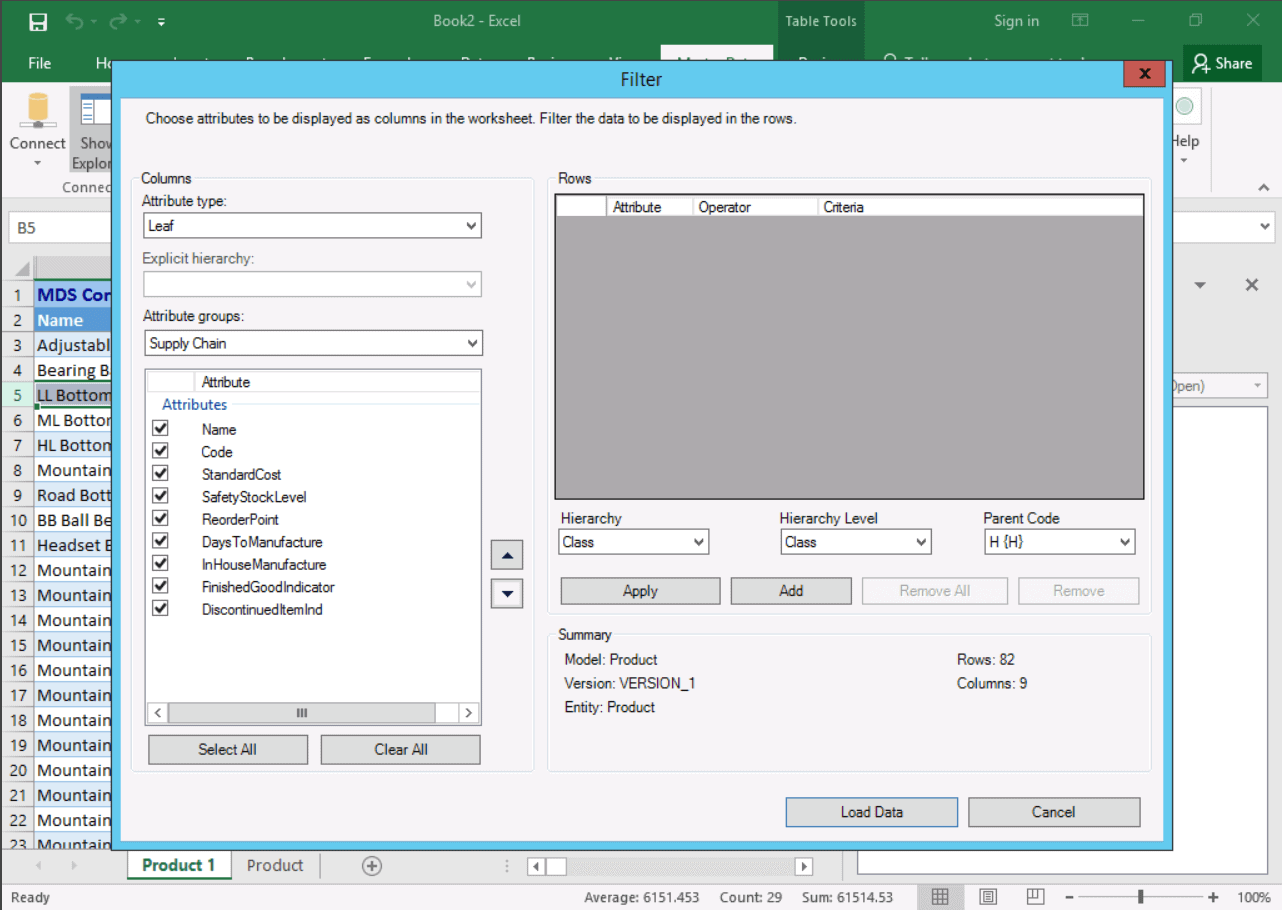
You can manage one or more connections to MDS servers in different environment such as Dev, QA, or Prod. By selecting ‘entity’ from Master Data Explorer, you can click ‘refresh’ to fetch data from server into worksheet. You can also apply filters to load selective data sets. A filter gives you the capability to fetch selecting columns, a selective attribute group, a hierarchy, and so on.
Save and Send Query
Once the connection is established and data is retrieved with or without applying a filter, you can save this retrieval info as a shortcut query. This Shortcut query contains information about active connection, model, version, entity, and any applied filters. You can also email this query by clicking the ‘Send Query’ option which will email the query file as an attachment.
Publish and Validate
This has the most widely-used functions such as to publish data to the MDS database, delete selective rows, merge the publish conflicts, view selected member history and annotation, combine date from external worksheet into the entity, apply business rules, and show-hide audit info and validation status.
Build Model
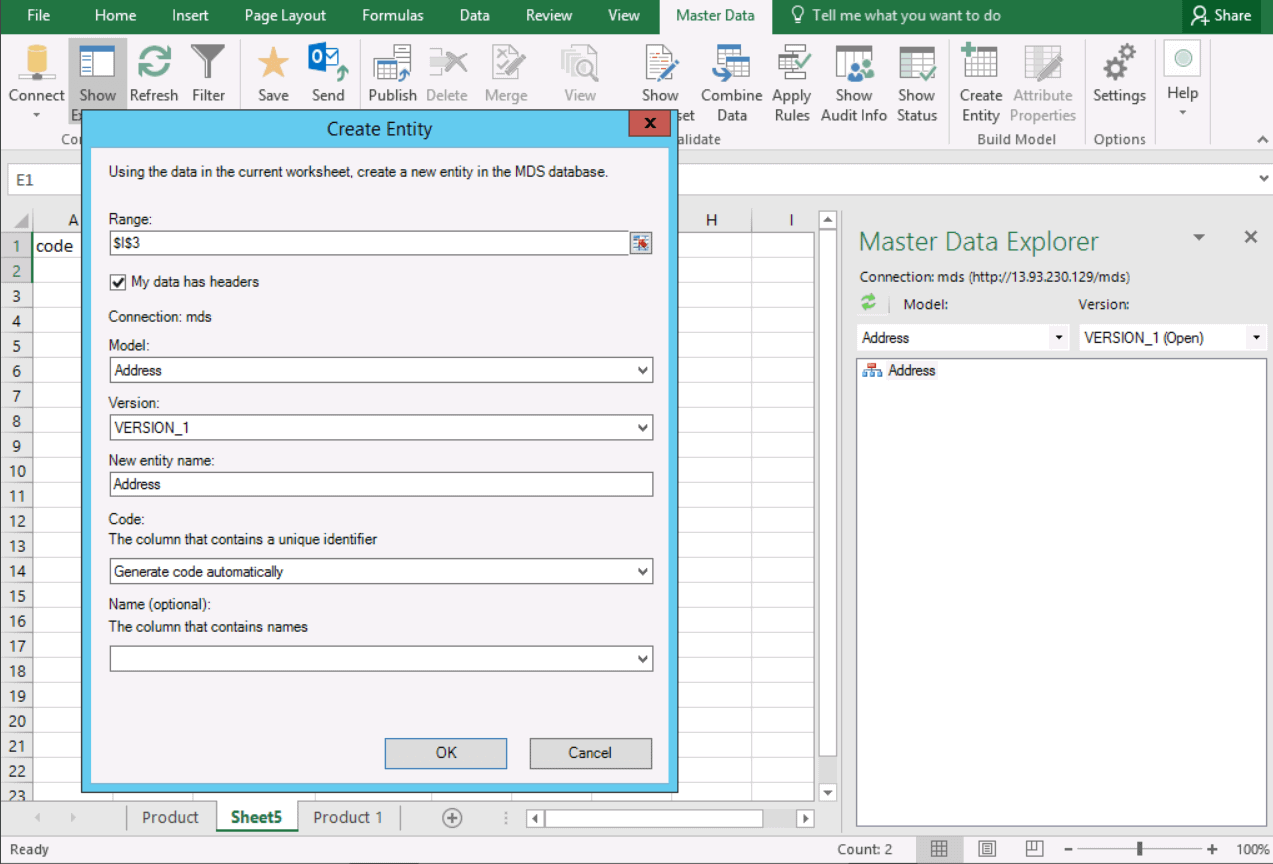
If you are administrator then you can create a new entity in the MDS database by providing entity attributes information in a worksheet and then clicking “Create Entity”. It will ask you about the Model info, version info, entity name, and so on. Make sure that the model has been created using the UI or by using the web service before you create the entity under ‘new model’ or ‘select existing model’.
Conclusion
In this article, I have presented the context for Master Data Services and given a basic explanation of the internal architecture including various integration points. I’ve also described a detailed step-by-step process of installation and configuration on Azure platform. This includes Azure HTTP port permission to access the MDS system over the internet. The Tools and component section lists out the various features available in MDS, what you can do using those features and how to use those features. With this article you are ready to explore Master Data Services and possibly you can start implementing your organization’s master data management program.
This document contains proprietary information and is protected by copyright law.
Copyright © 2026 Red Gate Software Limited. All rights reserved
Load comments