
Container orchestration has become a cornerstone of modern application deployment. For beginners stepping into the world of modern application deployment and orchestration, understanding the essence and significance of Kubernetes is essential.
A container is a compact and self-contained package comprising essential components like code, runtime, libraries, and system tools necessary for running an application.
Container orchestration tools manage and automate the complete lifecycle of containers, including provisioning, deployment, and scaling.
Kubernetes is a platform for container orchestration that is open-source. It is and has immensely transformed the way you manage, scale, and deploy their applications.
But what exactly is Kubernetes, and why is it such a fundamental tool in the world of software development? If you’re a complete beginner to Kubernetes, this guide is tailored just for you.
In this guide, we’ll start from the Kubernetes utmost basics. In addition, this guide will cover:
- Kubernetes architecture
- Kubernetes objects,
- Getting started with Minikube
- Basic Kubernetes operations like:
- Interacting with Kubernetes using Kubectl
- Creating Kubernetes objects
- Viewing resources.
By the end, you should have the knowledge and confidence to explore Kubernetes further and apply it to your projects. So, let’s get started!
Prerequisites
You are expected to have some foundational knowledge in the following areas to follow along easily with this guide.
- Basic Docker knowledge
You should have a fundamental understanding of Docker concepts, including containers, images, Dockerfile, and Docker commands. This includes knowledge of how to create, run, and manage Docker containers. You can go to the official Docker documentation to learn more about Docker. - Command line
Familiarity with the command line is essential. You should be comfortable navigating the command line interface, running basic commands, and managing files and directories. - Docker installation
You should have Docker installed on your local machine or the environment. You can go to the official Docker documentation to get more information about installing Docker. - Text editor familiarity
You will need to use a text editor to create and edit configuration files, such as YAML files. Knowledge of text editor shortcuts and basic file editing is advantageous. We will be using VS Code text editor for this tutorial.
What is Kubernetes?
As mentioned earlier, Kubernetes streamlines deployment, scaling, and management of containerized applications. Utilizing containerization enables consistent packaging and deployment for developers.
Kubernetes simplifies complex tasks, allowing you to deploy applications consistently, scale them effortlessly, and manage them seamlessly, all while ensuring high availability and resilience. With Kubernetes, you can run your applications in a highly efficient, cloud-native manner, regardless of whether you’re dealing with a small personal project or a large-scale enterprise application.
Whether you’re a developer, system administrator, or someone simply curious about this technology, this guide will walk you through the fundamental concepts of Kubernetes, step by step.
Kubernetes features
Kubernetes is a powerful container orchestration platform with a wide range of features for deploying, scaling, and managing containerized applications. Kubernetes features include:
Container orchestration
Kubernetes automates the coordination of multiple containers in distributed applications. This enhances efficiency, scalability, and reliability which is crucial for modern applications in dynamic and distributed settings.
Autoscaling
Kubernetes can automatically scale the number of application instances based on your criteria. This helps applications handle varying workloads.
Service discovery
Kubernetes provides built-in service discovery. This makes it easy to locate and communicate with other services within the cluster.
Load balancing
Kubernetes offers load balancing for incoming traffic to distribute requests evenly across available pods. This ensures high availability and reliability.
Rolling updates and rollbacks
Kubernetes supports rolling updates, allowing you to update applications without downtime. If issues arise, you can easily roll back to the previous version.
Self-healing
Kubernetes incorporates self-healing mechanisms to guarantee the reliability and availability of applications in its container orchestration platform. These include automatic container rescheduling upon failure and using ReplicaSets to maintain desired replicas.
Resource management
Kubernetes allows you to allocate and manage computing resources (CPU and memory) for pods. This ensures efficient resource utilization.
Storage orchestration
Kubernetes provides dynamic provisioning and management of storage volumes. This makes it easier to attach and use storage in containers.
Configurability
Kubernetes is highly configurable using declarative configuration files (YAML or JSON). This enables you to define your entire application stack.
Secrets management
Kubernetes offers a secure way to manage sensitive information like passwords, API keys, and certificates through Secrets. This enhances application security.
These features collectively make Kubernetes a powerful platform for container orchestration and application management. Due to these features, Kubernetes has been widely adopted in modern cloud-native development and deployment.
The role of Kubernetes in Container Orchestration
Containers provides a clever solution to the long-standing challenge of making applications easily transferable. They encapsulate an application and its dependencies into a single, lightweight unit that can run consistently across various environments,
The encapsulated application can run from a developer’s laptop to a production server. They contain everything needed to run software, including the code, runtime, libraries, and system tools. Containers are lightweight, autonomous software bundles that contain applications and their dependencies, ensuring uniform and isolated execution across diverse environments.
As applications become larger and more complex, managing containers becomes a complex process. This is where Kubernetes steps in.
Kubernetes acts as an orchestra conductor for your containerized applications. Imagine you have a fleet of containers, each representing a microservice of your application. Kubernetes takes charge of these containers, ensuring they are deployed, scaled, and managed efficiently. It abstracts away the underlying infrastructure complexities, providing a unified platform to define, deploy, and maintain your applications in containers.
Significance of Kubernetes in modern software development
Kubernetes isn’t just another tool; it’s a paradigm change in how to approach software deployment and development. The significance of Kubernetes in modern software development is as follows:
Automation
Kubernetes automates many manual tasks involved in managing containers. It frees developers and operators from the drudgery of configuring, scaling, and monitoring containers manually. This automation accelerates the development cycle and minimizes human error.
Scalability
With Kubernetes, scaling your applications becomes a much easier process. Whether you’re experiencing a sudden surge in user traffic or need to scale down during quieter periods, Kubernetes dynamically adjusts the number of containers to meet demand. This elasticity is essential in today’s dynamic software environments.
Portability
Kubernetes uses the “write once, run anywhere” approach. Applications developed and containerized in Kubernetes can run consistently across on-premises data centers, public clouds, and hybrid environments. This portability empowers organizations to adopt a cloud-native approach without vendor lock-in.
Resilience
Kubernetes is built for high availability. It automatically replaces failed containers, redistributes workloads, and ensures that your applications stay up and running even in the face of hardware failures or other disruptions.
Ecosystem
Kubernetes has a thriving ecosystem of tools and services that complement its core functionality. Kubernetes integrates seamlessly with various DevOps practices, fostering a culture of continuous improvement.
Kubernetes empowers organizations to embrace cloud-native development practices, enabling them to innovate faster, scale efficiently, and deliver more resilient applications.
Kubernetes Architecture
To understand all the Kubernetes capabilities effectively, it’s crucial you know the fundamental architecture of Kubernetes. In this section, we will cover the core components of a Kubernetes cluster. We will also discuss the roles and responsibilities of each component.
This will enable you to gain a good understanding of how Kubernetes orchestrates containerized applications.
When you deploy Kubernetes, you get a cluster. A Kubernetes cluster is a set of interconnected physical or virtual machines, known as nodes, that collectively provide the runtime environment for containerized applications. It acts as the foundation for deploying, managing, and scaling container workloads efficiently. A Kubernetes cluster consists of control plane nodes and worker nodes.
The following Kubernetes architecture diagram shows all the components of the Kubernetes cluster in detail.
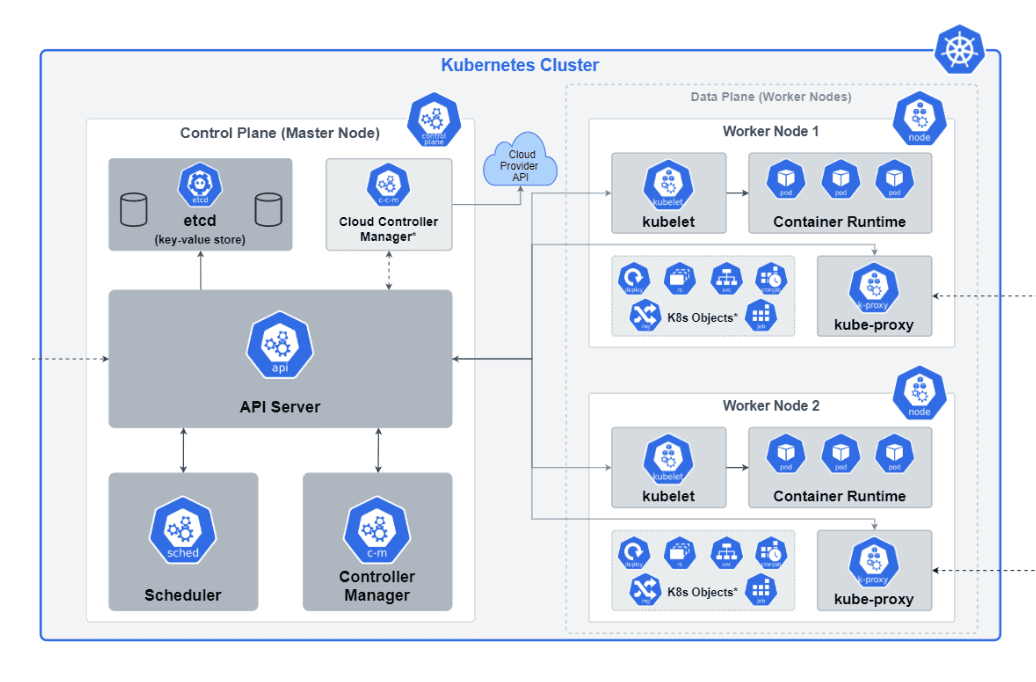
Let’s now discuss each of these components in detail.
Nodes
At the heart of a Kubernetes cluster are the worker machines known as nodes. Nodes are responsible for running containers and managing the associated workloads. There are two primary types of nodes:
Master node/control plane
Also known as the control plane, the master node manages the overall state and control of the cluster. It oversees tasks like scheduling, maintaining desired state, scaling, and monitoring. It consists of several components that collaborate to manage the overall state of the cluster and make global decisions.
The control plane is manager of a Kubernetes cluster. It tells the worker nodes what to do and manages the Pods that run on the cluster. In production environments, the control plane is usually spread out over multiple computers to make it more reliable and available.
The control plane consists of the following components:
- kube-apiserver
- etcd
- kube-scheduler
- kube-controller-manager
- cloud-controller-manager
Worker node
Worker nodes are the worker bees of the cluster and tasks assigned by the master node. These tasks are encapsulated within containers thus providing isolation. This ensures that applications run consistently regardless of the underlying infrastructure.
The worker Node consists of the following components:
- Kubelet
- kube-proxyContainer runtime
Control plane components in a Kubernetes cluster
- Let’s discuss the key control plane components in a Kubernetes cluster in more detail.
kube-apiserver
The kube-apiserver is the front-end component of the Kubernetes control plane. It serves as the API server for the entire cluster.
It has the following responsibilities
- API endpoint
It exposes the Kubernetes API, which is used by various components and users to interact with the cluster. - Request handling
kube-apiserver receives RESTful requests, validates them, and performs operations like creating, updating, or deleting resources within the cluster. - Authentication and authorization
It handles the authentication of users and processes, verifying their identity. It also enforces authorization policies based on RBAC (Role-Based Access Control) rules. - Validation and admission control
It validates incoming requests, ensuring they adhere to predefined constraints. Admission controllers can be configured to perform additional checks and modifications. - Resource watch
kube-apiserver provides a resource watch mechanism that allows clients to monitor changes to resources in real-time. - High availability
To ensure high availability, multiple instances of kube-apiserver can be run behind a load balancer. This setup distributes incoming requests and provides redundancy.
etcd
etcd is a distributed key-value store used as the cluster’s backing store. It not only stores configuration data but date about deployment, runtime, nodes and pods.
etcd has the following responsibilities in the container process:
- Consistent storage
etcd ensures consistency in the data stored across the cluster, making it suitable for storing critical information. - Data persistence
It persists data to disk, ensuring that the cluster state is not lost even if the entire cluster restarts. - Watch mechanism
etcd supports a watch mechanism that allows components to watch for changes in configuration and state. - Reliability
etcd is designed for reliability and fault tolerance. It often operates as a distributed cluster to prevent data loss and maintain high availability.
kube-scheduler
The scheduler is responsible for distributing work (in the form of pods) across nodes. It considers resource requirements, hardware constraints, and affinity/anti-affinity rules to optimize pod placement and maintain balanced resource utilization.
kube-scheduler takes care of the following:
- Node selection
It selects the most suitable node for a pod based on factors like resource requirements, constraints, and affinity/anti-affinity rules. - Workload distribution
kube-scheduler evenly distributes workloads across the available nodes, optimizing resource utilization. - Interoperability
It can interact with multiple, user-defined scheduling plugins to make complex scheduling decisions. - Customization
Administrators can customize the scheduling process by defining their policies and extending the scheduler’s functionality.
kube-controller-manager
The kube-controller-manager runs various controller processes that regulate the state of the cluster, ensuring it matches the desired state.
There are many different types of kube-controller-managers. Some examples of them are:
- Node controller
Monitors the state of nodes and handles various aspects of node management, including node failures. - Replication controller
Makes certain that the configured set of pod replicas is running at all times. - Endpoints controller
Populates the Endpoints object, which links services and pods together. - Service account and token controller
Creates default accounts and access tokens for pods. - Custom controllers
Administrators can develop custom controllers to manage and automate specific tasks within the cluster.
cloud-controller-manager
The cloud-controller-manager is an optional component that extends Kubernetes to interact with cloud provider-specific features and services.
This manager has the following responsibilities.
- Abstracting cloud providers
It abstracts cloud-specific operations, allowing Kubernetes to remain cloud-agnostic while still utilizing cloud-specific functionalities. - Node lifecycle operations
Manages cloud-specific node lifecycle operations, such as node provisioning and termination. - Load balancer integration
Ensures the integration of cloud provider load balancers with Kubernetes services. - Multi-cloud support
Kubernetes clusters can be deployed across different cloud providers, and each cloud provider may have its cloud controller manager to handle provider-specific operations.
These control plane components collectively orchestrate the cluster’s operations. They ensure that pods are deployed, managed, and maintained according to the desired state. Additionally, they ensure pods interact with the underlying infrastructure, storage, and cloud provider services as necessary.
Worker node components in a Kubernetes cluster
Let’s discuss the key worker node components in a Kubernetes cluster in more detail.
kubelet
The kubelet is an essential component of a Kubernetes worker node, responsible for maintaining communication between the master node (control plane) and the worker node. It ensures that containers are running within the pods as per their desired state.
It has the following responsibilities:
- Pod lifecycle
kubelet manages the lifecycle of pods on a worker node. It receives pod definitions from the control plane and ensures the specified containers are running. - Health checks
It continuously monitors the health of containers within the pods. If a container fails, kubelet takes the necessary actions to restart or recreate the pod. - Resource management
kubelet enforces resource constraints specified in the pod’s configuration, such as CPU and memory limits. - Image management
Based on the pod specifications, it pulls container images from container registries when needed. - Garbage collection
kubelet cleans up unused pods and resources, helping to maintain the node’s cleanliness and resource availability. - Interactions
kubelet communicates with the control plane components, primarily the kube-apiserver, for pod definitions and updates. It also interacts with the container runtime to create and manage containers.
kube-proxy
kube-proxy is responsible for network proxying on worker nodes. It maintains network rules on nodes and enables communication to and from the pods.
The kube-proxy process manages the following:
- Service abstraction
kube-proxy abstracts the service layer, allowing pods to access services by their logical names rather than dealing with pod IP addresses directly. - Load balancing
It implements load balancing for services that span multiple pods. kube-proxy ensures traffic is evenly distributed among the pods in a service. - Network policy
kube-proxy also enforces network policies that control pod-to-pod communication, adding a layer of security. - IP tables rules
On Linux-based nodes, kube-proxy often uses IP table rules to manage network traffic. - Network modes
Depending on the Kubernetes networking model (e.g., Kubernetes Networking Plugin, CNI, or others), kube-proxy can operate in different modes to fulfill its responsibilities.
Container Runtime
The container runtime is a key component of the worker node responsible for running containers. It pulls container images from a registry, handles the creation and management of containerized applications, and interfaces with the operating system’s kernel to execute containers. Kubernetes is compatible with various container runtimes, including Docker, CRI-O, and rkt.
It has the following responsibilities:
- Container lifecycle
The container runtime handles the start, stop, and execution of containers as per the pod specifications. - Resource isolation
It ensures that containers have resource isolation, such as CPU, memory, and filesystem namespaces, to prevent conflicts and ensure stability. - Image management
The runtime is responsible for pulling container images from registries and caching them locally for efficient use. - Security
It enforces security features, such as container image verification and confinement, to protect the host and other containers. - Pluggable nature
Kubernetes supports various container runtimes, allowing users to choose the runtime that best fits their requirements and infrastructure.
These worker node components work together to ensure that containers run effectively within pods and are accessible on the network.
Kubernetes Objects
Kubernetes Objects are fundamental entities used to represent various components and functionalities within the cluster. They define what the desired state of your applications, workloads, and resources should be within the cluster. Kubernetes uses these objects to manage, deploy, and orchestrate the various components of your containerized applications.
Kubernetes objects can be categorized into two main groups, each serving distinct purposes within the orchestration framework
- Basic Objects
- Pods
- Services
- Volumes: Persistent Volumes (PVs) and Persistent Volume Claims (PVCs)
- Namespaces
- High-Level Objects (Controllers)
- Deployments
- Replication controllers
- ReplicaSets
- ConfigMaps and Secrets
- StatefulSets
- DaemonSets
- Jobs
Basic objects
Basic objects are foundational components within Kubernetes and are often used to define the core building blocks of an application or service. They include:
Pods
In Kubernetes, a pod is the smallest deployable unit. It represents a single instance of a process running within the cluster. While it’s common for a pod to host a single container, Kubernetes allows multiple containers to run within the same pod. This facilitates scenarios where containers need to share resources and network namespaces.
Pods play a pivotal role in ensuring the scalability and high availability of applications. They can be automatically scheduled onto available nodes by the Kubernetes scheduler, allowing for efficient utilization of resources.
Services
Services provide a stable and consistent endpoint for accessing a group of pods. They abstract the network details and allow you to expose your applications to the network, both within and outside the cluster. Services are essential for load balancing and service discovery.
Types of Kubernetes services
- ClusterIP
This is the default type of service. It provides an internal, cluster-only IP address. ClusterIP services are accessible only within the cluster, making them suitable for internal communication between pods. - NodePort
NodePort services expose applications on a specific port across all nodes in the cluster. This allows external access to the service using the node’s IP address and the assigned port. - LoadBalancer
LoadBalancer services are used to expose applications externally in cloud environments. They automatically provision cloud load balancers (e.g., AWS ELB) to distribute incoming traffic across pods. - ExternalName
This service type allows pods to access external services outside the cluster by mapping the service name to an external DNS name. It acts as an alias for an external resource.
Persistent Volumes (PVs) and Persistent Volume Claims (PVCs)
Persistent Volumes (PVs) and Persistent Volume Claims (PVCs) are essential components in Kubernetes that manage and provide persistent storage resources for applications.
A Persistent Volume (PV) in Kubernetes represents a physical storage resource within a cluster. This can be a disk, SSD, network-attached storage (NAS), or any other storage medium. PVs are abstract representations of these storage resources.
A Persistent Volume Claim (PVC) is a request for storage by a user or application. When a pod requires persistent storage, it requests a PVC, which is then bound to an available PV that matches the request.
Namespaces
Namespaces in Kubernetes provides a way to logically partition and isolate resources like pods, services, and other objects within a cluster. They are a fundamental feature that helps manage and organize objects in a multi-tenant or multi-environment Kubernetes environment.
High-level objects (controllers)
Deployments
A Deployment in Kubernetes is a resource object that defines a desired state for an application. It specifies which container images to use and the number of replicas (copies) to run. It also specifies how updates to the application should be managed. They ensure that your application remains available, scalable, and up to date.
Deployments use a declarative approach to define the desired state of the application. You specify what the application should look like, and Kubernetes takes care of the declarations.
One of the primary benefits of Deployments is the support for rolling updates. You can change the desired state of your application, such as updating the image version or altering resource requirements, and the Deployment controller will automatically orchestrate the update without causing downtime. It gradually replaces old pods with new ones. This ensures a smooth transition.
Replication controllers
Replication Controllers in Kubernetes are a resource that ensures a specified number of replica pods are running at all times. They are an earlier, lower-level resource used for maintaining the desired number of pod replicas, especially in scenarios where more advanced features provided by Deployments are not required.
Replication Controllers maintain a set number of identical pod replicas. If pods fail or are deleted for any reason, the Replication Controller creates new ones to replace them. This ensures that the desired number is always running.
You define the desired state of your application by specifying the number of replicas in the Replication Controller’s configuration. Kubernetes continuously works to reconcile the actual state (the number of running pods) with the desired state.
Replication Controllers are responsible for managing pods, and once a pod is created, it should not be altered directly. If you need to make changes, you typically modify the template used by the Replication Controller and allow it to create new pods with the desired changes.
ReplicaSets
ReplicaSets are similar to Replication Controllers but offer more advanced selectors for pod management, allowing for more granular control over which pods should be maintained or scaled. It continuously monitors the number of running pods and takes action to maintain the desired count, creating or deleting pods as needed.
ReplicaSets are designed for immutable updates. To change the configuration of pods, you create a new ReplicaSet with the desired changes, and the old ReplicaSet gradually scales down while the new one scales up.
ConfigMaps
ConfigMaps and Secrets are Kubernetes resources used for managing configuration data and sensitive information, respectively. They are both essential for separating configuration from application code and for securely storing secrets like passwords and API keys.
ConfigMaps are used to decouple configuration data from containerized applications. They allow you to store configuration settings, environment variables, or configuration files in a centralized and Kubernetes-native way.
ConfigMaps are typically used to store configuration that is expected to change independently of the application code, such as database connection strings, environment variables, or application settings.
Key features of ConfigMaps
- Immutable
Once created, ConfigMaps are typically considered immutable. If you need to change the configuration, you usually create a new ConfigMap with the updated values. - Mounting as Volumes
ConfigMaps can be mounted as volumes or exposed as environment variables within pods. This allows applications running in pods to access configuration data. - Pod Agnostic
ConfigMaps are not tightly coupled to a specific pod or application. Multiple pods can use the same ConfigMap, ensuring consistency in configuration across different parts of an application.
Secrets
Secrets are used for storing sensitive information like passwords, API keys, or TLS certificates in a secure manner. They are base64-encoded, but they are not secure encryption mechanisms.
Secrets are commonly used for database credentials, access tokens, and other sensitive data that should not be exposed in plaintext within the cluster.
The following are some key features of secrets
- Encrypted at rest
Secrets are stored securely within the etcd database, and access to them is controlled using Kubernetes RBAC (Role-Based Access Control). - Mounting in pods
Like ConfigMaps, Secrets can be mounted as volumes or exposed as environment variables within pods. This allows applications to access sensitive data without exposing it directly. - Immutable
Secrets are also considered immutable once created. To update a secret, you create a new one with the updated values.
Types of Secrets
- Opaque
Generic secrets that can hold any type of data. - Service account tokens
Automatically create secrets that hold credentials for the default service account of a pod. - Docker config
Used to authenticate with container registries like Docker Hub or private registries. - TLS
Used for storing TLS certificates and private keys. For more information about TLS certificates, check out this article
StatefulSets
StatefulSets are a Kubernetes resource designed for managing stateful applications. Unlike stateless applications, which are easily replaceable and can scale horizontally without concern for individual instances, stateful applications require stable and unique network identities. They also require stable storage and ordered scaling. StatefulSets provides the framework to manage these complex stateful applications within a Kubernetes cluster.
DaemonSet
DaemonSets are a type of workload in Kubernetes designed to ensure that a specific pod runs on all or a subset of nodes within a cluster. Unlike other workload controllers that aim to maintain a desired number of replicas, DaemonSets aims to run exactly one copy of a specified pod on each eligible node in the cluster.
DaemonSets are an essential resource for cluster administrators and developers who need to ensure that specific workloads run consistently across every node in a Kubernetes cluster. They provide a straightforward and automated way to manage node-level tasks and deployments.
Jobs are a type of resource used to create and manage a workload consisting of one or more pods. Jobs are designed for running short-lived, parallelizable, and non-daemon tasks in a Kubernetes cluster. They are primarily used for tasks that need to run once to completion, such as batch processing, data analysis, or backups.
Installing and using Kubernetes
In the previous section we have discussed the theoretical part of Kubernetes. We have covered:
- What is Kubernetes?
- Kubernetes features
- The role of Kubernetes in Container Orchestration
- Significance of Kubernetes in modern software development
- Kubernetes architecture
- Kubernetes objects
In this section we will start implementing the Kubernetes concepts using practical examples. We will learn how to install and use Kubernetes in real-world projects. We will also create a Kubernetes cluster where we will create and deploy our Kubernetes objects. In this article, we will create Minikube as our Kubernetes cluster.
We will then create and deploy the Kubernetes objects we have previously discussed into Minikube.
Let’s now get started with Minikube.
Getting started with Minikube
Minikube is a lightweight tool that lets you use a single-node Kubernetes cluster on your local machine. It’s designed to simplify the setup and management of a local Kubernetes environment. It makes it easy for developers to experiment with Kubernetes features and test their applications in an environment that closely resembles a production cluster.
Installing MiniKube
To install Minikube, follow these steps:
Step 1 — Download the Minikube binary.
You can download the Minikube binary for your operating system from the Minikube download page: https://minikube.sigs.k8s.io/docs/start/.
Go to this site and select the binary download for your specific operating system. On this site, you can select the OS you want to install Minikube and download the latest Minikube stable binary release.
Step 2 — Verifying that your system meets the requirements.
Minikube requires Docker to be installed and a hypervisor such as VirtualBox or Hyper-V.
To verify if your system meets the requirements run this command in your terminal:
minikube check
Executing this command will check if Docker is installed and configured properly and if a supported hypervisor (such as VirtualBox or Hyper-V) is available on your system.
Step 3 — Making the Minikube binary executable.
For Linux and macOS, run the following command in your terminal:
chmod +x minikube
For Windows, run the following command in your terminal:
.\minikube.exe
Step 4 — Moving the Minikube binary to a directory that is in your PATH environment variable.
Moving the Minikube binary to a directory that is in your PATH environment variable allows you to run the Minikube command from any location in the terminal without specifying the full path to the binary. The /usr/local/bin directory is a common location for storing user-installed binaries on Unix-like systems, including Linux and macOS.
- For Linux or macOS, move the binary to the
/usr/local/bindirectory. - For Windows, move the binary to
C:\Program Files\Minikube\
Step 5 — Starting Minikube.
From a terminal with administrator access (but not logged in as root), run the following command in your terminal to start Minikube
minikube start
Minikube will create a single-node Kubernetes cluster on your computer. This process may take a few minutes. After successful execution, you will see the following output on your terminal:
|
1 2 3 4 5 6 7 8 9 10 11 12 13 14 15 16 17 18 19 20 |
[output] W1003 13:26:37.189084 18240 main.go:291] Unable to resolve the current Docker CLI context "default": context "default": context not found: open C:\Users\Administrator\.docker\contexts\meta\37a8eec1ce19687d132fe29051dca629d164e2c4958ba141d5f4133a33f0688f\meta.json: The system cannot find the path specified. * minikube v1.31.2 on Microsoft Windows 11 Pro 10.0.22621.2361 Build 22621.2361 * Using the docker driver based on existing profile * Starting control plane node minikube in cluster minikube * Pulling base image ... * Restarting existing docker container for "minikube" ... * Preparing Kubernetes v1.27.4 on Docker 24.0.4 ... * Configuring bridge CNI (Container Networking Interface) ... * Verifying Kubernetes components... - Using image gcr.io/k8s-minikube/storage-provisioner:v5 - Using image docker.io/kubernetesui/dashboard:v2.7.0 - Using image docker.io/kubernetesui/metrics-scraper:v1.0.8 * Some dashboard features require the metrics-server addon. To enable all features please run: minikube addons enable metrics-server * Enabled addons: default-storageclass, storage-provisioner, dashboard * Done! kubectl is now configured to use "minikube" cluster and "default" namespace by default |
Step 6 — Verify that Minikube is running
To verify that Minikube is running, run the following command in your terminal:
minikube status
You should see the following output that indicates that Minikube is running and that the Kubernetes cluster is healthy.
|
1 2 3 4 5 6 7 8 9 10 11 12 13 14 |
[output] W1003 13:29:32.416926 9924 main.go:291] Unable to resolve the current Docker CLI context "default": context "default": context not found: open C:\Users\Administrator\.docker\contexts\meta\37a8eec1ce19687d 132fe29051dca629d164e2c4958ba141d5f4133a33f0688f\meta.json: The system cannot find the path specified. minikube type: Control Plane host: Running kubelet: Running apiserver: Running kubeconfig: Configured |
Basic Kubernetes Operations
To perform basic Kubernetes operations, we will start by interacting with Kubernetes using kubectl, the command-line tool. You can interact with Minikube using `kubectl`.
What is kubectl?
Kubectl is a command-line tool used for interacting with Kubernetes clusters. It serves as the primary interface for administrators and developers to manage various aspects of Kubernetes, including deploying applications, inspecting cluster resources, scaling workloads, and troubleshooting issues
Installing kubectl
Before using kubectl, you need to install it. To install kubectl, follow these steps:
Step 1 — Download the kubectl binary
You can download the kubectl binary for your operating system from the Kubernetes website: https://kubernetes.io/docs/tasks/tools/.
Step 2 — Making the kubectl binary executable
For Linux and macOS, run the following command in your terminal:
chmod +x kubectl
For Windows, run the following command in your terminal:
.\kubectl.exe
Step 3 — Moving the kubectl binary to a directory that is in your PATH environment variable
For Linux or macOS, move the binary to the /usr/local/bin directory. For Linux and macOS you need to move the kubectl binary using this command but for Windows as long as you run this command .\kubectl.exe, everything will work out
Step 4 — Verifying that kubectl is installed.
To verify that kubectl is installed, run the following command in your terminal:
kubectl version
You should see the following output that indicates the version of kubectl that is installed.
|
1 2 3 4 5 6 7 8 9 10 11 12 13 14 15 16 17 18 19 20 |
[output] WARNING: This version information is deprecated and will be replaced with the output from kubectl version --short. Use --output=yaml|json to get the full version. Client Version: version.Info{Major:"1", Minor:"27", GitVersion:"v1.27.2", GitCommit:"7f6f68fdabc4df88cfea2dcf9a19b2b830f1e647", GitTreeState:"clean", BuildDate:"2023-05-17T14:20:07Z", GoVersion:"go1.20.4", Compiler:"gc", Platform:"windows/amd64"} Kustomize Version: v5.0.1 Server Version: version.Info{Major:"1", Minor:"27", GitVersion:"v1.27.4", GitCommit:"fa3d7990104d7c1f16943a67f11b154b71f6a132", GitTreeState:"clean", BuildDate:"2023-07-19T12:14:49Z", GoVersion:"go1.20.6", Compiler:"gc", Platform:"linux/amd64"} |
Once kubectl is installed, let’s start using it to interact with Minikube.
Interact with Minikube
Interacting with Minikube involves using the kubectl command-line tool to manage your local Kubernetes cluster. The following are some common tasks and kubectl commands to help you get started:
Checking cluster status
You can verify the status of your Minikube cluster using kubectl command:
kubectl cluster-info
This should output something similar to:
|
1 2 3 4 5 6 7 8 9 10 |
[output] Kubernetes control plane is running at https://127.0.0.1:60718 CoreDNS is running at https://127.0.0.1:60718/api/v1/namespaces/kube- system/services/kube-dns:dns/proxy To further debug and diagnose cluster problems, use 'kubectl cluster-info dump'. |
This command displays essential information about the cluster, including the Kubernetes master and DNS service.
Viewing nodes
To see the nodes in your Minikube cluster:
kubectl get nodes
This will output:
|
1 2 3 |
[output] NAME STATUS ROLES AGE VERSION minikube Ready control-plane 41h v1.27.4 |
This command lists the nodes in the cluster along with their status.
Now that we have our Minikube cluster ready and Kubectl tool installed, let’s create some Kubernetes objects such as namespaces, pods, services, and deployments.
Creating Kubernetes objects
In this tutorial, we will create a namespace, pods, services, and deployments to demonstrate how to use Minikube and Kubectl.
Creating a namespace
Create a namespace using kubectl create command. Use the kubectl create command with the namespace resource type to create a new namespace. Open your terminal and run the following command:
kubectl create namespace <namespace-name>
Replace <namespace-name> with your desired namespace name.
Example:
kubectl create namespace kubernetes-tutorial
This will create a new namespace named kubernetes-tutorial.
Creating pods
The smallest units of deployment are Pods in Kubernetes. They can contain one or more containers. To create a pod, you typically define a YAML file that specifies the pod’s configuration, including container images and resource requirements.
Example YAML for a simple pod:
|
1 2 3 4 5 6 7 8 |
apiVersion: v1 kind: Pod metadata: name: my-pod spec: containers: - name: nginx-container image: nginx |
Save this YAML to a file (I named mine pod.yaml), then using the following kubectl command in your terminal:
kubectl apply -n <your_namespace_name> -f pod.yaml
The command will create a `Pod` named `nginx-container` using the `nginx` Docker image. This `Pod` will be created inside your Kubernetes namespace
Creating services
Services are used to expose pods to network traffic, either within the cluster or externally. To create a service, you define a YAML file specifying the service type, ports, and selectors to target pods.
Example YAML for a ClusterIP service:
|
1 2 3 4 5 6 7 8 9 10 11 |
apiVersion: v1 kind: Service metadata: name: nginx-service spec: selector: app: my-app ports: - protocol: TCP port: 80 targetPort: 8080 |
Apply this YAML using the following `kubectl` command in your terminal:
kubectl apply -n <your_namespace_name> -f service.yaml
The command will create a `Service` named `nginx-service` inside your Kubernetes namespace.
Creating deployments
Deployments are used to manage replica sets of pods, ensuring a desired number of pods are running and enabling rolling updates. A deployment’s YAML includes the desired number of replicas, the template for creating pods, and update strategies.
Example YAML for a simple deployment:
|
1 2 3 4 5 6 7 8 9 10 11 12 13 14 15 16 17 |
apiVersion: apps/v1 kind: Deployment metadata: name: nginx-deployment spec: replicas: 3 selector: matchLabels: app: my-app template: metadata: labels: app: my-app spec: containers: - name: nginx-container image: nginx |
Apply this YAML using the following `kubectl` command in your terminal:
kubectl apply -n <your_namespace_name> -f deployment.yaml
The command will create a `Deployment` named `nginx-deployment` using the `nginx` Docker image. This `Deployment` will be created inside your Kubernetes namespace
Viewing resources
The next step is to view all the Kubernetes objects created after applying the kubectl commands.
Listing namespaces
To verify that the namespace has been created, you can list all namespaces using the following command:
kubectl get namespaces
Output:
|
1 2 3 4 5 6 7 8 |
[output] NAME STATUS AGE default Active 41h kube-node-lease Active 41h kube-public Active 41h kube-system Active 41h kubernetes-dashboard Active 40h kubernetes-tutorial Active 17h |
Listing pods
To verify the pod was created, list all pods using the following command:
kubectl get pods -n <your_namespace_name>
|
1 2 3 4 5 6 |
[output] NAME READY STATUS RESTARTS AGE my-pod 1/1 Running 1 (8m10s ago) 17h nginx-deployment-549c4bf7d9-7jb54 1/1 Running 1 (8m10s ago) 17h nginx-deployment-549c4bf7d9-87x9m 1/1 Running 1 (8m10s ago) 17h nginx-deployment-549c4bf7d9-cxv6v 1/1 Running 1 (8m10s ago) 17h |
Listing deployments
To verify that the deployment has been created, you can list all deployments using the following command:
kubectl get deployments -n <your_namespace_name>
This returns:
|
1 2 3 |
[output] NAME READY UP-TO-DATE AVAILABLE AGE nginx-deployment 3/3 3 3 17h |
Listing services
To verify that the service has been created, you can list all services using the following command:
kubectl get services -n <your_namespace_name>
Returns:
|
1 2 3 |
[output] NAME TYPE CLUSTER-IP EXTERNAL-IP PORT(S) AGE nginx-service ClusterIP 10.103.136.11 <none> 80/TCP 17h |
Expose a service
Now let’s make this NGINX service accessible. To make the `nginx-service` accessible on port `80`, run the following commands in your terminal:
kubectl expose service nginx-service --type=NodePort --target-port=80 --name=nginx-service-exposed -n kubernetes-tutorial
Output:
|
1 2 |
[output] service/nginx-service-exposed exposed |
Minikube dashboard
To open the Minikube dashboard directly in the browser, run the following command in your terminal:
minikube dashboard
You can access the Minikube dashboard from the browser as shown below.
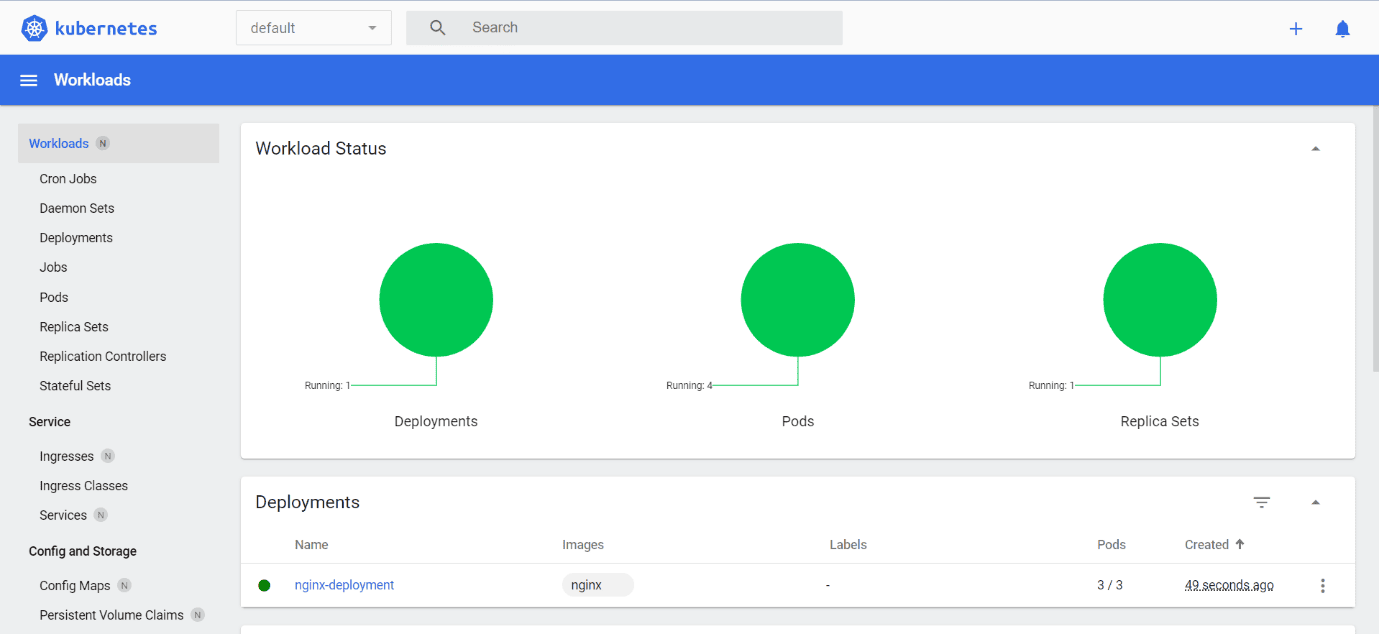
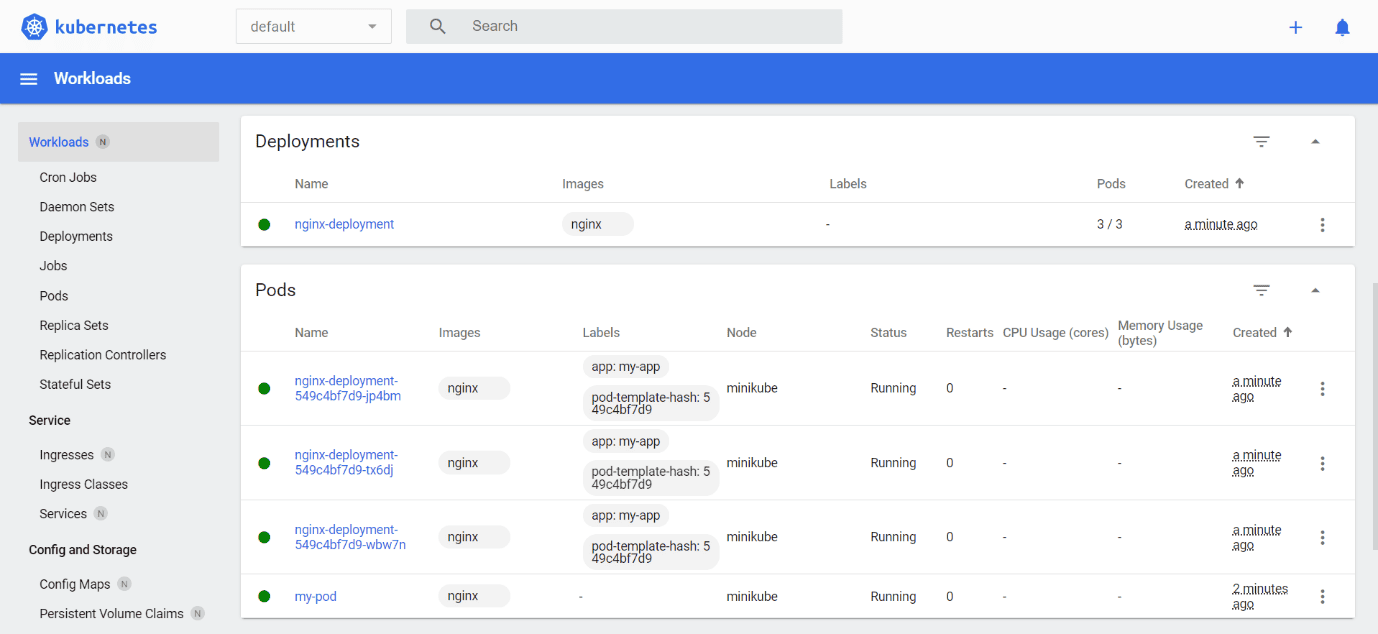
The Minikube Dashboard shows the Kubernetes objects such as namespaces, pods, services, and deployments.
Conclusion
In conclusion, remember that Kubernetes is an essential tool in modern software development. It streamlines the process of deploying, scaling, and overseeing application containers, making it essential in today’s cloud-native landscape.
In this guide, you’ve learned about Kubernetes architecture and core components. You’ve learned about key Kubernetes objects, including Pods, Services, and Deployments. In addition, you have also learned basic Kubernetes Operations like interacting with Kubernetes using kubectl, creating Kubernetes Objects, and viewing resources. You’ve also gained hands-on experience by setting up a local cluster with Minikube and accessing the Minikube dashboard.
Kubernetes is a dynamic field with endless possibilities. Whether you’re starting fresh or enhancing your skills, embrace Kubernetes to master container orchestration. Your journey has just begun, so dive deeper and continue your exploration of this transformative technology.
To learn more about Kubernetes check out the official Kubernetes documentation. Happy Learning!
This document contains proprietary information and is protected by copyright law.
Copyright © 2026 Red Gate Software Limited. All rights reserved


Load comments