
I have mentioned LogParser before on my blog and have decided to create a series of walk-through style articles to show someone new to LogParser what it can do and how to use it. It is appropriate to all sorts of job roles in IT, whether you are a System Administrator or a SQL DBA.
LogParser, and all of its documentation, can be downloaded from http://www.microsoft.com/downloads/details.aspx?FamilyID=890cd06b-abf8-4c25-91b2-f8d975cf8c07&displaylang=en and its a very simple installation process.
For the scripts in this series I will work with these files: Person_Address.csv and Sales_SalesOrderDetail.tsv, these are available for download from here as individual zip files or in Everything.zip or you can create your own from the AdventureWorks database by running the script LP_SourceData.sql (contained in the zip file) and saving the results from SQL Server Management Studio to C:LP on your own computer.
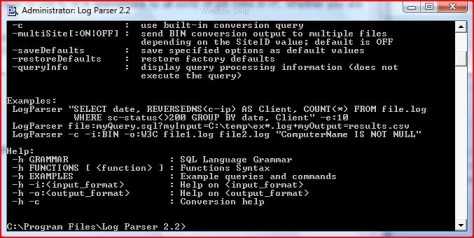
Downloaded? Installed? Good, Lets go. Start LogParser2.2 from your Start menu or navigate to and run C:Program FilesLog Parser 2.2LogParser.exe and you will have the command prompt-like LogParser interface open as per image01.
|
| Image 01 |
As you can see by scrolling up and down the window there is extensive documentation and support within the product, there is also a compiled help file that installs in the same directory that is a great resource if you ever have any need for it. The end of the start up process leaves the following in the window
| -h GRAMMAR | : SQL Language Grammar |
| -h FUNCTIONS [ ] | : Functions Syntax |
| -h EXAMPLES | : Example queries and commands |
| -h -i: | : Help on |
| -h -o: | : Help on |
| -h -c | : Conversion help |
This shows that in the command line simply using the -h switch wil bring you the help you require.
For example, to get help on importing a csv file type, enter LOGPARSER -h -i:csv and you will be rewarded with
Input format: CSV (CSV Format) Parses text files containing comma-separated values
FROM syntax:
[, …] | http:// | STDIN Path(s) to CSV file(s)
| Parameters: | |
| -headerRow ON|OFF | : Treat first row of each file as a header (containing field names) [default value=ON] |
| -iHeaderFile | : File containing header (overrides individual files’ header definitions) [default value=not specified] |
| -iDQuotes Auto|Ignore | : Behavior with double-quoted fields; Auto:automatically detect double-quoted fields; Ignore:leave double quotes in fields [default value=Auto] |
| -fixedFields ON|OFF | : Fixed number of fields in the log [default value=ON] |
| -nFields | : Number of fields in the log (-1=detect at runtime) [default value=-1] – |
| -dtLines | : Read this amount of lines to detect field types at runtime [default value=10] |
| -nSkipLines | : Number of initial lines to skip [default value=0] |
| -comment | : String prefix of comment lines to be skipped [default value=not specified] |
| -iCodepage | Input codepage (0=system codepage, -1=UNICODE) [default value=0] |
| -iTsFormat | : Format of TIMESTAMP fields [default value=yyyy-MM-dd hh:mm:ss] |
| -iCheckpoint | : Save checkpoint information to this file [default value=no checkpoint] |
Fields: Field names and types are retrieved at runtime from the specified input file(s) Examples: List the fields extracted from a CSV file: LogParser -h -i:CSV myfile.csv -headerRow:on As you can see, the help available is quite comprehensive and in many cases has several examples so that you can write a successful LogParser script very quickly
Before we go any further, its worth noting that in LogParser all commands start with LOGPARSER, I have no idea why, I just accept it and go along with it.Edit: Many thanks to Chris who has pointed out in the comments that the LogParser that starts every command is calling the executable, that is an unfortunate demonstration of my lack of experience with DOS!
OK, that’s almost it for this instalment but I’ll leave you with the syntax to let you open up some files and see the contents. This is where its at its most simple, you can view data from a file by starting LogParser and typing LOGPARSER “SELECT * FROM C:LPperson_address.csv” and their contents of the test.csv file will be listed to you.
In the next part of this series we will review some different output formats and how to control what data is selected. Thanks for reading and please leave a comment if you have any thoughts on the content you find in this blog.
Load comments