This is part of a series on Dynamic Data Masking by Ben Johnston. For the rest of the series, click here
This is the second part of a series on SQL Server Dynamic Data masking. The first part in the series was a brief introduction to dynamic data masking, including use cases.
The focus of this blog will is setting up masking and some base examples.
Configuring Masking
Masking data is a straightforward process. Choose the table and columns to be masked, decide on the appearance of the mask, execute the masking script, and verify the results. Masking data also assumes some foundational setup tasks have been done and minimal best practices are being followed. Users that need to retrieve data that has been masked only need minimal viable security (generally SELECT privileges), no table ownership or dbo rights. If the user owns the table or has dbo rights, the data isn’t masked for them.
Simplicity is important with security design and implementation. Simple design doesn’t imply only using the default database roles or assigning the same security to each user. Applied simplicity is like Occam’s Razor for security. It is the most straight forward security design that will support your known current and future security needs.
A simple security design is easy to maintain, and the security of each user is clear. This relates directly to dynamic data masking. Table selection for masking is an important task and involves working closely with the business. Data shouldn’t be restricted via masking unless necessary.
Remember, masking isn’t a method to implement general security, it is a supplement to existing security and a way to expose additional data in a relatively safe manner that users couldn’t ordinarily access. The most sensitive data shouldn’t be exposed even with masking, so items like social security numbers, tax IDs, etc. should still only be exposed via masking with extreme caution and to the most trusted users, if at all.
Mask Appearance
Choosing the appearance of the mask is also a business decision that can be guided by the architecture. Selecting a standard for patterns on your project is recommended. Consistency makes it easier for users to interpret the data they are seeing, knowing that data is masked, and it also speeds the development process since the mask doesn’t need to be determined for each column, just each column type.
From a technical perspective the appearance doesn’t impact functionality. General guidelines for masks would be to choose something that is not a default for your unmasked columns or a mask that has meaning in your organization.
Preparation
The examples in this series are based on the WideWorldImporters database, that is the current standard demo database from Microsoft. More information about how to acquire that database as well as to initialize
Script Creation
Adding masking to an existing table follows the standard alter syntax.
|
1 2 3 4 5 6 7 8 9 10 |
USE WideWorldImporters GO /* * Add masking to sales.Customers.CreditLimit column. * This is the syntax for a manual ALTER statement */ ALTER TABLE Sales.Customers ALTER COLUMN CreditLimit ADD MASKED WITH (FUNCTION = 'default()') GO |
If you add masking to the column in your create script the syntax is very similar to that of a constraint. If you are in a devops environment with continuous deployment, near continuous deployment, or just automated deployments, this is likely the syntax needed.
|
1 2 3 4 5 6 7 8 9 10 11 12 13 14 15 16 17 18 19 20 21 22 23 24 25 26 |
USE WideWorldImporters GO /* * Add masking to sales.Customers.CreditLimit column * during table creation. * This is the syntax for a devops environment using * SSDT/sqlpackage.exe or other automated deployment. * * Note that previous examples add masking to * additional columns. * Each column needs to have masking functionality added * in a devops environment using declarative coding. * */ CREATE TABLE Sales.Customers( CustomerID int NOT NULL CONSTRAINT PK_Sales_Customers PRIMARY KEY CLUSTERED ,CustomerName nvarchar(100) MASKED WITH (FUNCTION = 'default()') NOT NULL ,BillToCustomerID int NOT NULL ,CustomerCategoryID int NOT NULL -- <columns skipped for size> ,LastEditedBy int NOT NULL ,ValidFrom datetime2(7) NOT NULL ,ValidTo datetime2(7) NOT NULL ); |
Limitations
Some column types and columns used in temporal tables can’t be masked. Microsoft documentation includes columns encrypted with Always Encrypted, filestream columns, COLUMN_SET or columns part of a column set, columns used in Polybase, and computed columns (but the referenced column can be masked).
Although not listed by the documentation, period columns for system-versioned temporal tables can’t be masked and there are exceptions to the computed columns. For example:
|
1 2 3 4 |
--Show default mask for date ALTER TABLE Application.People ALTER COLUMN ValidFrom ADD MASKED WITH (FUNCTION = 'default()'); |
Trying this will cause the following error to be raised:
Msg 13599, Level 16, State 1, Line 5
Period column 'ValidFrom' in a system-versioned temporal table cannot be altered.
Computed columns can’t be masked directly, but the referenced columns can be masked and that will flow through to the computed column. The order that computed columns and masked columns are added to the table are important and will determine if the column can actually be masked.
The following shows that the referenced columns can’t be masked after the computed column is created.
|
1 2 3 4 5 6 7 8 9 10 11 12 13 14 15 |
--Example showing computed columns can't be masked --and columns used by computed columns cant be masked --after the table is created USE WideWorldImporters; GO --Computed column ALTER TABLE Application.People ALTER COLUMN SearchName ADD MASKED WITH (FUNCTION = 'default()'); GO --Column referenced by computed column ALTER TABLE Application.People ALTER COLUMN PreferredName ADD MASKED WITH (FUNCTION = 'default()'); GO |
This returns:
Msg 4928, Level 16, State 1, Line 8
Cannot alter column 'SearchName' because it is 'COMPUTED'.
Msg 5074, Level 16, State 1, Line 14
The column 'SearchName' is dependent on column 'PreferredName'.
Msg 4922, Level 16, State 9, Line 14
ALTER TABLE ALTER COLUMN PreferredName failed because one or more objects access this column.
The easiest solution for this is to create the table with masking enabled in the CREATE TABLE statement. Then add the computed column later via an ALTER statement, but this solution won’t work for temporal tables.
Msg 13724, Level 16, State 1, Line 62
System-versioned table schema modification failed because adding computed columns while system-versioning is ON is not supported.
Adding the masked columns to the computed column referenced columns at the time of creation is successful.
|
1 2 3 4 5 6 7 8 9 10 11 12 13 14 15 16 17 18 19 20 21 22 23 24 25 26 27 28 29 30 31 32 33 34 35 36 37 38 39 40 41 42 |
CREATE TABLE [Application].[PeopleV2]( [PersonID] [int] MASKED WITH (FUNCTION = 'default()') NOT NULL, [FullName] [nvarchar](50) MASKED WITH (FUNCTION = 'default()') NOT NULL, [PreferredName] [nvarchar](50) MASKED WITH (FUNCTION = 'default()') NOT NULL , SearchName AS (concat([PreferredName],N' ',[FullName])) PERSISTED NOT NULL, [IsPermittedToLogon] [bit] NOT NULL, [LogonName] [nvarchar](50) MASKED WITH (FUNCTION = 'default()') NULL, [IsExternalLogonProvider] [bit] NOT NULL, [HashedPassword] [varbinary](max) MASKED WITH (FUNCTION = 'default()') NULL, [IsSystemUser] [bit] NOT NULL, [IsEmployee] [bit] NOT NULL, [IsSalesperson] [bit] NOT NULL, [UserPreferences] [nvarchar](max) NULL, [PhoneNumber] [nvarchar](20) NULL, [FaxNumber] [nvarchar](20) NULL, [EmailAddress] [nvarchar](256) NULL, [Photo] [varbinary](max) NULL, [CustomFields] [nvarchar](max) NULL, [OtherLanguages] AS (json_query([CustomFields],N'$.OtherLanguages')), [LastEditedBy] [int] NOT NULL, [ValidFrom] [datetime2](7) GENERATED ALWAYS AS ROW START NOT NULL, [ValidTo] [datetime2](7) GENERATED ALWAYS AS ROW END NOT NULL, CONSTRAINT [PK_Application_PeopleV2] PRIMARY KEY CLUSTERED ( [PersonID] ASC ), PERIOD FOR SYSTEM_TIME ([ValidFrom], [ValidTo]) ); WITH ( SYSTEM_VERSIONING = ON (HISTORY_TABLE = [Application].[People_ArchiveV2]) ); GO |
This will execute without error. Note that since altering the table to add masking isn’t possible, so if you want to add it you will need to create a new temporal table and move the history. More about this can be found in this blog about changing temporal history.
Verification
After masking has been implemented verification and testing follows. Verification, or a smoke test, will require a user with limited access. A user without a login is a good choice for this verification and can be safely use in production environments. If your test team isn’t familiar with this technique or their testing tools don’t support this scenario, an actual login and user account can be created. If there is a use case for unmasked data, testing this scenario is warranted. Special attention should be paid to intersections of additional security. Row Level Security (RLS), user roles, group assigned security should all have separate test cases.
In comparison to RLS, which requires an access predicate and a security policy, a single statement is required for data masking. Users with UNMASK, ALTER permission or dbo permission will view unmasked data, other users will see the mask which is the default of 0. The basic select statement returns the following.
Note that the sample code contains the EXECUTE AS statement, which runs the query as the MaskedReader database user. This is the user setup previously in the sample without unmasking privileges. To use the EXECUTE AS statement, you must run the query with a user that has IMPERSONATE rights. If your current login doesn’t have proper permission, you will get the message “Cannot execute as the database principal because the principal “MaskedUser” does not exist, this type of principal cannot be impersonated, or you do not have permission.”. Full documentation on the statement is available here: https://learn.microsoft.com/en-us/sql/t-sql/statements/execute-as-transact-sql?view=sql-server-ver16
|
1 2 3 4 5 6 7 8 9 10 11 12 13 |
USE WideWorldImporters GO EXECUTE AS USER = 'MaskedReader' GO SELECT CustomerID ,CustomerName ,CreditLimit FROM sales.Customers WHERE CreditLimit IS NOT NULL; GO REVERT; GO |
Looking at the returned data, all of the CreditLimit values will appear to be 0.

It is interesting to note that NULL columns return without a mask as NULL. This piece of information may be valuable in some scenarios, so understand that it works in this way.
Setup in Azure
Microsoft Azure SQL Database includes the option to mask columns via the GUI. This can be useful for test cases or smaller companies wanting to try out masking. I am a strong advocate of automated deployments, multiple environments for testing and development, and repeatability of deployments, so this wouldn’t be my first choice. It can be a quick way to test masking and is useful for administrators not familiar with SQL Server.
In Azure, the overview for the database shows that Dynamic Data Masking is configured. If you click into the masking box, the columns that are masked are shown. You also get the option to configure additional columns with masking.

This shows the columns configured with the setup scripts for this article, plus the SSN column created and masked during one of the examples in this article.
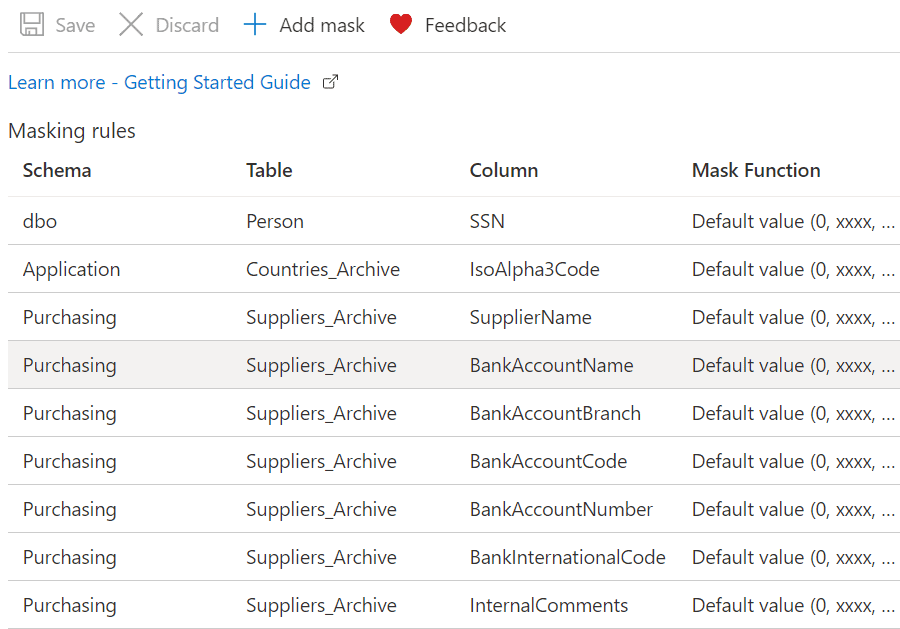
Scrolling down further shows columns not masked, but recommended for consideration for masking. The default mask can be added by simply clicking the button to the left of the column. The column to be masked then moves to the previous list, Masking rules, and will be added once the Save button is pressed. If more control is wanted, click the “Add mask” button at the top of the screen.
![]()
This opens a new window allowing you to select the schema, table, column, and specific mask to apply.
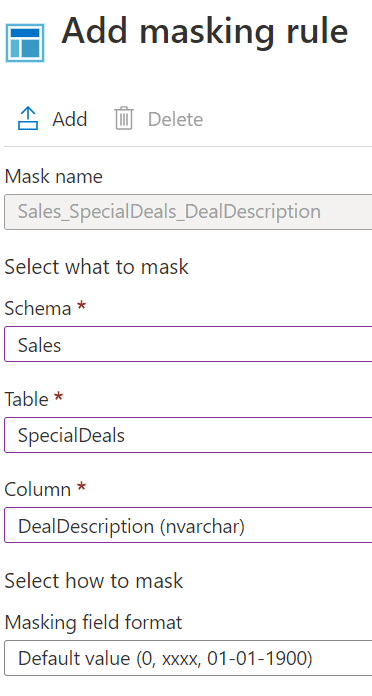
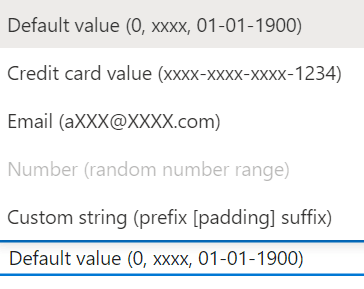
The column then shows up in the Masking rules table. It also needs to be saved before it is applied to the table.

Remember to script out the table definition and add the masking definition to your database project if you use automated deployments with SSDT. The column definition will look similar to the following when scripted.
|
1 2 |
[DealDescription] [nvarchar](30) MASKED WITH (FUNCTION = 'default()') NOT NULL, |
Masking can be removed in a similar fashion in Azure. Select the masked column, select the Delete button, and save the changes. The same rule applies here for DevOps environments, the column should also be removed from the table script.
Testing
Testing will involve your regular process and full verification with your test team. Testing stories should include all tables with masking, all masked columns, masked users and users with elevated authority. If you have other layers of security, such as RLS, it is recommended to test the intersection of masking with those layers.
Consistency and the ability to recreate tests is an important aspect of testing. If your team uses an automated test suite, masking should be part of those tests. Test scripts can include simple SELECT statements and execute as a specific user account. The setup section shows creating a user without a login. Users like this can be created for testing. They are relatively safe even in production since the user changing context needs the impersonation privilege.
|
1 2 3 4 5 6 7 8 9 10 11 12 13 14 15 16 17 18 19 20 21 22 23 24 |
USE WideWorldImporters; GO EXECUTE AS USER = 'MaskedReader'; GO SELECT CountryID ,CountryName ,IsoAlpha3Code FROM Application.Countries WHERE CountryName IN ('Armenia','Bahrain','Belize'); GO REVERT; GO EXECUTE AS USER = 'UnmaskedReader'; GO SELECT CountryID ,CountryName ,IsoAlpha3Code FROM Application.Countries WHERE CountryName IN ('Armenia','Bahrain','Belize'); GO REVERT; GO |
Resultset with a non-privileged user.

Resultset using a privileged user.

The test team can also use the Azure dashboard to verify masking options if they have the proper authorization to view the database there. If they can’t access the database view the dashboard, they can use SSMS and SQL scripts to verify the table definition and the metadata. This will be dependent on the skills of the test team, but exploratory scripts presented later in this article can be used by the team to validate masked columns and the mask used. Scripts can also be used to validate unmasking privileges for users.
|
1 2 3 4 5 6 7 8 9 10 11 12 13 14 15 16 17 18 19 20 21 22 23 24 25 26 27 28 29 30 31 32 33 34 35 36 37 38 39 40 41 42 43 |
/* * The following can be used to validate masking security for users * It requires a basic understanding of the security structure * used by the application and database. * It can be expanded for SQL Server 2022 to include column level masking. */ SELECT @@SERVERNAME COLLATE Latin1_General_100_CI_AS ServerName ,DB_NAME() COLLATE Latin1_General_100_CI_AS DatabaseName ,SU.name COLLATE Latin1_General_100_CI_AS UserName ,SR.name COLLATE Latin1_General_100_CI_AS RoleName ,'Database role' COLLATE Latin1_General_100_CI_AS SecurityType FROM sys.database_role_members DRM INNER JOIN sys.sysusers SU ON DRM.member_principal_id = SU.uid INNER JOIN sys.sysusers SR ON DRM.role_principal_id = SR.uid wHERE SR.name IN ('db_owner') UNION SELECT @@SERVERNAME COLLATE Latin1_General_100_CI_AS ServerName ,'master' COLLATE Latin1_General_100_CI_AS DatabaseName ,SP.name COLLATE Latin1_General_100_CI_AS LoginName ,ROL.name COLLATE Latin1_General_100_CI_AS RoleName ,'Server role' COLLATE Latin1_General_100_CI_AS SecurityType FROM master.sys.server_role_members SRM INNER JOIN master.sys.server_principals SP ON SRM.member_principal_id = SP.principal_id INNER JOIN master.sys.server_principals ROL ON SRM.role_principal_id = ROL.principal_id WHERE ROL.name IN ('sysadmin') UNION SELECT @@SERVERNAME COLLATE Latin1_General_100_CI_AS ServerName ,db_name() COLLATE Latin1_General_100_CI_AS DatabaseName ,SUGR.name COLLATE Latin1_General_100_CI_AS UserName ,DP.permission_name COLLATE Latin1_General_100_CI_AS RoleName ,'Database permission' COLLATE Latin1_General_100_CI_AS SecurityType FROM sys.database_permissions DP INNER JOIN sys.sysusers SUGR ON DP.grantee_principal_id = SUGR.uid WHERE DP.permission_name IN ('ALTER ANY MASK','CONTROL','UNMASK') |
Testers, and administrators, can use the output from a script like the above to validate masking. The script can be modified to include column level unmasking for SQL Server 2022. It is a general pattern to assign security at a group level, so be sure to include that in your test plans.

Masking Data
In this section I will demonstrate how masks look by default, and then what you can alter them to look like using a custom mask.
Default Masks
Default masks by type follow. Other preconfigured masks include email, random, custom, and datetime. The mask displayed is a purely aesthetic preference. It has no impact on performance, security, or storage.
In all of the examples so far, I have set the mask to DEFAULT. These are the default values for the basic datatypes:
|
Data type |
Default mask |
|
Date |
01.01.1900 |
|
String |
XXXX |
|
Numeric |
0 |
|
Binary |
0 |
|
Datetime (SQL 2022) |
01.23.2023 (depends on datepart masked) |
In the next code, I will add a few more masks to the data:
|
1 2 3 4 5 6 7 8 9 10 11 12 13 14 15 16 17 18 19 20 |
--Show default mask for string ALTER TABLE Application.People ALTER COLUMN LogonName ADD MASKED WITH (FUNCTION = 'default()'); GO --Show default mask for numeric ALTER TABLE Application.People ALTER COLUMN PersonID ADD MASKED WITH (FUNCTION = 'default()'); GO --Show default mask for date ALTER TABLE Purchasing.PurchaseOrders ALTER COLUMN OrderDate ADD MASKED WITH (FUNCTION = 'default()'); GO --Show default mask for binary ALTER TABLE Application.People ALTER COLUMN HashedPassword ADD MASKED WITH (FUNCTION = 'default()'); GO |
Specialized Masks
Specialized masks can be used for any column type. This is very similar to application front end development. A hard-coded character can be used, a different date format, random values or a custom string. Most common formats are represented in the specialized masks available in SQL.
Basic default masks, random mask, custom string and the new datetime mask are shown below. Note that the datetime mask is new to SQL 2022 and will only work in that engine or Azure SQL.
|
1 2 3 4 5 6 7 8 9 10 11 12 13 14 15 16 17 18 19 20 |
--Show default EMAIL mask ALTER TABLE Application.People ALTER COLUMN EmailAddress ADD MASKED WITH (FUNCTION = 'email()'); GO --Random mask ALTER TABLE Purchasing.PurchaseOrders ALTER COLUMN SupplierID ADD MASKED WITH (FUNCTION = 'random(1,100)'); GO --Custom string ALTER TABLE Application.People ALTER COLUMN PhoneNumber ADD MASKED WITH (FUNCTION = 'partial(6,"555-555",1)'); GO --Datetime (SQL Server 2022 functionality) ALTER TABLE Purchasing.PurchaseOrders ALTER COLUMN ExpectedDeliveryDate ADD MASKED WITH (FUNCTION = 'datetime("M")'); GO |
Sample output from default masks created above.
|
1 2 3 4 5 6 7 8 9 10 11 12 13 14 15 16 17 |
EXECUTE AS USER = 'MaskedReader'; GO SELECT TOP 100 AP.PersonID ,AP.LogonName ,AP.HashedPassword ,AP.EmailAddress ,AP.PhoneNumber ,PO.OrderDate ,PO.SupplierID ,PO.ExpectedDeliveryDate FROM Application.People AP INNER JOIN Purchasing.PurchaseOrders PO ON AP.PersonID = PO.LastEditedBy; GO REVERT; GO |
The output from this code shows you the various masks in use:
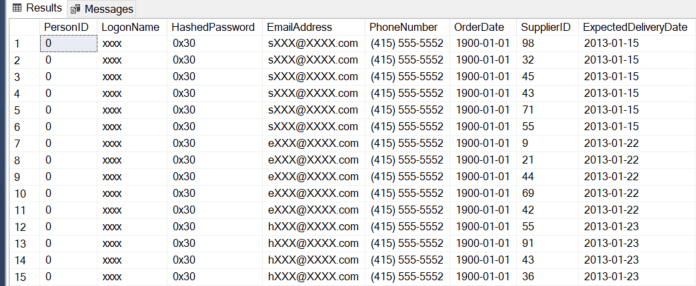
Note that the above example shows the PersonID getting masked in the base table. This type of masking gap will be explored in later sections, but you wouldn’t perform masking like this without masking all references to the column also. The PersonID can be determined by joining to another table via a foreign key and looking at the referencing column.
Joining to Data
When a primary key / unique constraint is masked, it can still be used for the join column. The key for this is to remember to mask every child table that references the masked column. Without masking on both tables, there is no need to unmask data and no concerns with malicious unmasking, the unmasking is already done by the database developer. If the child table isn’t masked, this is a glaring gap in the masking strategy. There is a long-standing debate on the use of natural keys for a primary key versus artificial keys. This is a clear reason to use artificial keys. The use of masking implies that there is some implicit knowledge in the column value, so an artificial key (identity or GUID), removes that implicit knowledge.
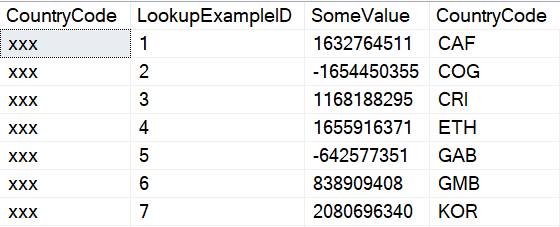
The following example shows an example of masking a primary key column but not the corresponding child table. The child data can be used to unmask the parent data, so design your masking carefully.
|
1 2 3 4 5 6 7 8 9 10 11 12 13 14 15 16 17 18 19 20 21 22 23 24 25 26 27 28 29 30 31 32 33 34 35 36 37 38 39 40 41 42 43 44 45 46 47 48 49 50 51 52 53 54 55 56 57 58 59 60 61 62 |
USE WideWorldImporters; GO CREATE TABLE dbo.KeyExample ( CountryCode nvarchar(3) MASKED WITH (FUNCTION = 'default()') NOT NULL CONSTRAINT PK_dboKeyExample PRIMARY KEY CLUSTERED ) CREATE TABLE dbo.LookupExample ( LookupExampleID int NOT NULL CONSTRAINT PK_dboLookupExample PRIMARY KEY CLUSTERED identity ,SomeValue int NOT NULL ,CountryCode nvarchar(3) NOT NULL CONSTRAINT FK_dboLookupExample_dboKeyExample FOREIGN KEY REFERENCES dbo.KeyExample(CountryCode) ); GO --Execute as a user that can view unmasked data --Current user has dbo rights INSERT INTO dbo.KeyExample ( CountryCode ) SELECT IsoAlpha3Code FROM Application.Countries ORDER BY IsoAlpha3Code; --Uses the TABLESAMPLE keyword to return semi-random rows --Very efficient but will not return an exact number of rows INSERT INTO dbo.LookupExample ( SomeValue ,CountryCode ) SELECT --Psuedo-random numbers. Each value will differ by row. --RAND() function will return same value for each row. CONVERT(INT,CONVERT(VARBINARY,NEWID())) SomeValue ,IsoAlpha3Code FROM Application.Countries TABLESAMPLE(10 ROWS); EXECUTE AS USER = 'MaskedReader'; GO --Select from the masked column and the unmasked column --You wouldn't normally repeat the columns, but this shows --the gap in masking SELECT KE.CountryCode ,LE.LookupExampleID ,LE.SomeValue ,LE.CountryCode FROM dbo.KeyExample KE INNER JOIN dbo.LookupExample LE ON KE.CountryCode = LE.CountryCode; GO REVERT; GO --Cleanup --Drop this first or drop the foreign key before the --parent table DROP TABLE IF EXISTS dbo.LookupExample GO DROP TABLE IF EXISTS dbo.KeyExample GO |
Output from the above script shows the masked and unmasked values. If the masked data was treated as if it were the value of the mask, you would end up with many many rows returned because every row would match the other.
Moving masked data to a new table
SQL includes many methods to move data, modify data, merge data, and extract data. Basic CRUD (CReate, Update, and Delete) functionality. Masking data does not limit that functionality, but it does introduce some caveats.
If a user without authorization to view unmasked data tries to move that data, in any way, the data moved will still be masked, in fact, it will be permanently obfuscated in the destination. If you can only view masked data and you perform a SELECT INTO, the new table that you create will only contain masked data. If you perform an INSERT or an UPDATE to a different or new table, those impacted columns will contain masked data. Anything else would completely compromise the intention of masking the data.
Users with authorization to view unmasked data can perform all of these operations and retain the original, unmasked data. If a transactional, user application contains masked data, the INSERT and UPDATE operations will need to be performed by a user with the correct authorization.
|
1 2 3 4 5 6 7 8 9 10 11 12 13 14 15 16 17 18 19 20 21 22 23 24 25 26 27 28 29 30 31 32 33 34 35 36 37 38 39 40 |
USE WideWorldImporters; GO EXECUTE AS USER = 'MaskedReader'; GO --MaskedReader only able to see masked data SELECT CustomeriD ,CustomerName FROM Sales.Customers; --Insert data from the base table into #Customer SELECT CustomerID ,CustomerName INTO #Customer FROM Sales.Customers; --Validate that the data is still masked SELECT CustomerID ,CustomerName FROM #Customer; --Revert back to dbo (or current user) REVERT; GO --Run as a user that is able to see masked data --Same dataset as MaskedReader (due to RLS for MaskedReader) --Notice that CustomerName is unmasked SELECT CustomerID ,CustomerName FROM Sales.Customers WHERE CustomerID IN (74,84,116,431,454,488,560,821,1050,1051); --Temp table created by MaskedReader --Data in the table is masked since the user that --created the table could only view a masked version of CustomerName SELECT CustomerID ,CustomerName FROM #Customer; DROP TABLE #Customer; GO |
The masked user only sees the masked version of the CustomerName column.
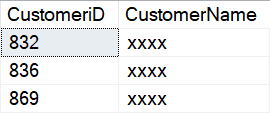
The data is still masked when it is inserted into a new table, in this instance, the temp table #Customer.
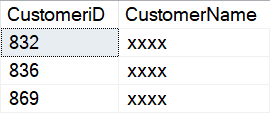
A privileged account is able to see CustomerName, but notice that the temp table created by the MaskedReader account only contains masked data.

In the new table, #Customer, the data is permanently obfuscated, even with a privileged account.
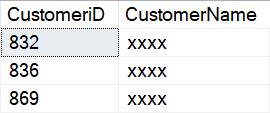
If a user without authorization to see masked data also has rights to update that masked data, the base data is not obfuscated. It is correct at the physical level, but masked users, even the user that inserts or updates the data, is not able to see the unmasked version of the data.
|
1 2 3 4 5 6 7 8 9 10 11 12 13 14 15 16 17 18 19 20 21 22 23 24 25 26 27 28 29 30 31 32 33 34 35 36 37 38 39 40 41 42 43 44 45 46 47 48 49 50 51 52 53 54 |
USE WideWorldImporters; GO --Show the unmodified version of Sales.Customers --For an ID that is available to MaskedReader via RLS --CustomerName = 'Tailspin Toys (Indios, PR)' --Run as dbo / privileged account SELECT CustomerID ,CustomerName FROM Sales.Customers WHERE CustomerID = 74; GO --Allow MaskedReader to update the Sales.Customers table --Note that due to RLS, even with UPDATE rights --on the table, the account can only update rows --available via RLS GRANT UPDATE ON Sales.Customers TO MaskedReader; GO --Run as MaskedReader EXECUTE AS USER = 'MaskedReader'; GO --Update CustomerName --The column is masked for this user UPDATE Sales.Customers SET CustomerName = 'Update for masked user' WHERE CustomerID =74; GO --Even though the user just updated the column, --it is still masked SELECT CustomerID ,CustomerName FROM Sales.Customers WHERE CustomerID = 74; GO --Revert back to dbo REVERT; GO --Remove UPDATE rights REVOKE UPDATE ON Sales.Customers TO MaskedReader; GO --Show the column when queried by a privileged user --Note that the column is the original text - not a masked text SELECT CustomerID ,CustomerName FROM Sales.Customers WHERE CustomerID = 74; GO --Reset the CustomerName to the original value UPDATE Sales.Customers SET CustomerName = 'Tailspin Toys (Indios, PR)' WHERE CustomerID = 74; GO |
The first dataset returned by that batch of statements shows the unmodified version of the CustomerName for CustomerID 74, when run with a privileged account.

The second dataset shows the CustomerName after the MaskedReader has updated the value. Even though the user updated the column, that user is not able to see the unmasked value.

The final dataset shows output when a privileged user accesses the data.

Allowing access to data
There are several ways to allow access to masked data. The most straightforward path is granting a user UNMASK rights to a table. This can also be done by granting the user ALTER to the table, or to the schema. The ALTER ANY MASK permission also grants this right but wouldn’t be used for most users. Some scenarios require the ability for users to temporarily unmask data. Even if a user doesn’t have the ability to unmask the data, it can be displayed in a query by using the EXECUTE AS command utilizing a user with the correct access. This must be done in the context of a stored procedure or by a user with the proper rights.
Performance
Dynamic data masking has no discernable notice on performance. Masking is performed in the data engine and only has to modify data as it is output. While queries are running in the engine, there is no impact to the data. It doesn’t impact the query plan, indexes, statistics, storage on the page, standard security, or RLS.
The only potential impact happens during output when masking security is verified and the column output is obfuscated.
Coded Alternatives to Dynamic Data Masking
There are several alternatives to dynamic data masking that can be implemented on the database tier. As mentioned previously, masking is available in almost all front-end application languages. If users aren’t allowed to hit data directly, masking can still be used to control what is returned to the user. This can be helpful for reporting scenarios.
Views
Dynamic data masking works without modification in views. Reporting scenarios or other use cases where default masking behavior is desired. Additional custom scenarios are also supported by using views.
A common scenario in reporting or even transactional systems is excluding sensitive data by only allowing access in a view, and not including certain columns. In the following example, the masked columns can remain masked or masking can be removed. If the data is not available to users, and they don’t have direct access to the database, the data will not be presented.
|
1 2 3 4 5 6 7 8 9 10 11 12 13 14 15 16 17 18 |
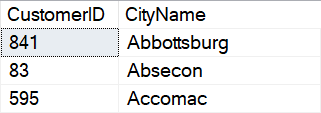
USE WideWorldImporters; GO CREATE OR ALTER VIEW dbo.vw_CustomerCity AS SELECT CustomerID ,CityName FROM sales.Customers C INNER JOIN Application.Cities CTY ON C.DeliveryCityID = CTY.CityID; GO EXECUTE AS USER = 'MaskedReader'; GO SELECT * FROM dbo.vw_CustomerCity; GO REVERT; GO |
The output for this view is the same for every user since the masked column, CustomerName, is not presented in the view.
Data can also be masked directly in the view without using dynamic data masking by partially masking the data in the view. This is similar to dynamic data masking but it applies to every user hitting the view. In the following example, every user will receive a masked version of the CustomerName column. The rows returned will differ based on their RLS security.
|
1 2 3 4 5 6 7 8 9 10 11 12 13 14 15 16 |
USE WideWorldImporters; GO ALTER TABLE sales.Customers ALTER COLUMN CustomerName DROP MASKED; GO CREATE OR ALTER VIEW dbo.vw_CustomerName AS SELECT CustomerID ,LEFT(CustomerName,1) + N'xxx' CustomerName ,CityName FROM sales.Customers C INNER JOIN Application.Cities CTY ON C.DeliveryCityID = CTY.CityID; GO |
Selecting from the view with the restricted user account shows fewer rows, with masking applied.
|
1 2 3 4 5 6 7 8 9 10 11 12 13 14 15 |
USE WideWorldImporters; GO EXECUTE AS USER = 'MaskedReader'; GO SELECT CustomerID ,CustomerName ,CityName FROM dbo.vw_CustomerName ORDER BY CustomerName ,CityName; GO REVERT; GO |
This returns the following (abbreviated for space) dataset:

Selecting from the view using the less restricted user account returns more rows, but the CustomerName is still restricted.
|
1 2 3 4 5 6 7 8 9 10 11 12 13 14 15 |
USE WideWorldImporters; GO EXECUTE AS USER = 'UnmaskedReader'; GO SELECT CustomerID ,CustomerName ,CityName FROM dbo.vw_CustomerName ORDER BY CustomerName ,CityName; GO REVERT; GO |
As shown by the output, all users are returned the obfuscated CustomerName when the view is used.

Reenable masking on the Sales.Customers.CustomerName column.
|
1 2 3 4 5 6 |
USE WideWorldImporters; GO ALTER TABLE sales.Customers ALTER COLUMN CustomerName ADD MASKED WITH (FUNCTION = 'default()'); GO |
One of the disadvantages of custom masking in views is the loss of much of the functionality afforded by dynamic data masking. The ORDER BY statement in the SELECT applies to the masked data, not the base, unmasked data. Other functionality such as using the column for joins or functions is also lost or severely restricted. This still may fit the need of projects depending on the design patterns. It also simplifies implementation. It also assumes that the users don’t have access to the base table, Sales.Customers, if they shouldn’t have access to the masked column. If the purpose of masking is to prevent data from appearing in reports, it would also suit that need.
Stored Procedures
Stored procedures have added functionality available to work with dynamic data masking. Adding some additional checks to a stored procedure allows the user security to be changed dynamically, by using EXECUTE AS USER. There are multiple ways security for a user can be created and verified. In the following example, a new user role is created in the database, AllowUnmasking, and the MaskedReader user is added to this role.
|
1 2 3 4 5 6 7 8 9 10 11 12 13 14 15 16 17 18 19 20 21 22 23 24 25 26 27 28 29 30 31 32 33 34 35 36 37 38 39 40 41 42 43 44 45 46 47 48 49 50 51 52 53 |
USE WideWorldImporters; GO --Create a role for unmasking CREATE ROLE AllowUnmasking AUTHORIZATION dbo; GO --Add the MaskedReader to the new role ALTER ROLE AllowUnmasking ADD MEMBER MaskedReader; GO CREATE OR ALTER PROCEDURE dbo.prcSalesCustomers_SELECT WITH EXECUTE AS OWNER --Execute as owner, dbo, so EXECUTE AS USER can --be called in the procedure AS SET NOCOUNT ON; --Find the original user executing the stored procedure. --Store the value in the @User variable DECLARE @User nvarchar(255); EXEC AS CALLER; SELECT @User = USER_NAME(); REVERT; --Check if the calling user is a member of the --AllowUnmasking role defined earlier --If it is a member, execute the SELECT as UnmaskedReader --In a production scenario, you may want to create a --different account --if RLS is present or additional security is needed. IF (SELECT IS_ROLEMEMBER('AllowUnmasking',@User)) = 1 BEGIN EXECUTE AS USER = 'UnmaskedReader'; END ELSE BEGIN --Execute as the original calling user if --they are not a member of the AllowUnmasking role, --reverting back to default behavior. --This could also use EXECUTE AS USER = 'MaskedReader' EXECUTE AS USER = @User END SELECT C.CustomerID ,C.CustomerName ,CTY.CityName FROM sales.Customers C INNER JOIN Application.Cities CTY ON C.DeliveryCityID = CTY.CityID ORDER BY CustomerName ,CityName; --Revert back to the calling user REVERT; GO GRANT EXEC ON dbo.prcSalesCustomers_SELECT TO MaskedReader; GO |
Executing as a user that would normally have masked data, but is setup with the AllowUnmasking role returns unmasked data from the stored procedure, but not when accessing the table directly.
|
1 2 3 4 5 6 7 8 9 10 11 12 13 14 |
USE WideWorldImporters; GO EXECUTE AS USER = 'MaskedReader'; EXEC dbo.prcSalesCustomers_SELECT; GO SELECT C.CustomerID ,C.CustomerName ,CTY.CityName FROM sales.Customers C INNER JOIN Application.Cities CTY ON C.DeliveryCityID = CTY.CityID; REVERT; GO |
Output from the stored procedure shows the full CustomerName. Access to a stored procedure can be limited in many ways. The access can be controlled by an API layer or a report layer, schema level access can be granted or denied, the individual stored procedure can be limited, and additional lookups can be done in the stored procedure itself to determine if the user can be unmasked or not. In this example, any user calling the procedure is checked against the role AllowUnmasking to determine how the data is presented.

Even though the user is part of the AllowUnmasking role in this example, direct access to the data is not allowed, as shown int the output for the direct query.

Summary
SQL Server Dynamic Data Masking can be implemented using repeatable scripts and automated via standard dev-ops deployments or it can be configured manually via the GUI. Some alternatives to dynamic data masking were presenting, including using a standard UI lay, a view layer, or stored procedures. Future sections included side channel attacks, mitigations to those attacks and other considerations for implementation.


Load comments