
By now you may have seen the first public alpha release of Node Tools for Visual Studio on CodePlex announced in Scott Hanselman’s excellent overview of the suite. You may have noticed Red Gate’s name associated with this and, particularly if you’re a Visual Node user, you’re probably wondering what’s going on, and where all this has come from.
The short version is that since the summer we’ve been working with Microsoft on Node Tools for Visual Studio (NTVS) to make Node.js development a first class citizen in Visual Studio, and Visual Studio the de facto environment for Node development on Windows. NTVS supports:
- Various Node project types, including the ability to create NTVS projects from existing Node apps,
- IntelliSense and Editing,
- Debugging, including remote debugging on Linux,
- Profiling,
- npm,
- Azure deployment.
The great news about this is that NTVS is completely free and open source so, if you want to give it a try – and I strongly recommend you do, because it’s awesome – you can download it from:
https://nodejstools.codeplex.com/
And it’s definitely worth reading Scott’s post and running through his Ghost blogging engine example:
http://www.hanselman.com/blog/IntroducingNodejsToolsForVisualStudio.aspx
Once you’ve had a chance to play with it, please tell us what you think. We’d love to hear how you’d like us to improve NTVS. Equally if you run into problems, please let us know about those:
- To report bugs/issues/problems, or to request features/improvements: https://nodejstools.codeplex.com/workitem/list/basic
- For general feedback/discussion: https://nodejstools.codeplex.com/discussions
Please also vote on the issues/improvements you’d most like to see us work on.
Question: I’m a Visual Node user – what should I do?
If you’re already a Visual Node user I recommend you immediately upgrade to NTVS because it represents a quantum leap over the functionality provided by Visual Node*. If you have projects you need to migrate from Visual Node to NTVS just follow these instructions:
- Download and install NTVS.
- Open up Visual Studio 2012 or 2013.
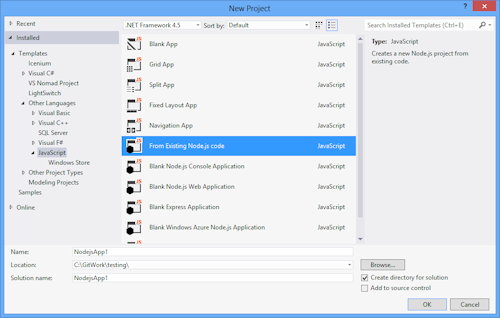
- Click File > New Project.
- In the templates pane on the left expand Installed > Templates > Other Languages > JavaScript.
- Select the From Existing Node.js code project type then click OK. (Don’t worry about the Name, Location and Solution name settings at the bottom, since these will be ignored.)
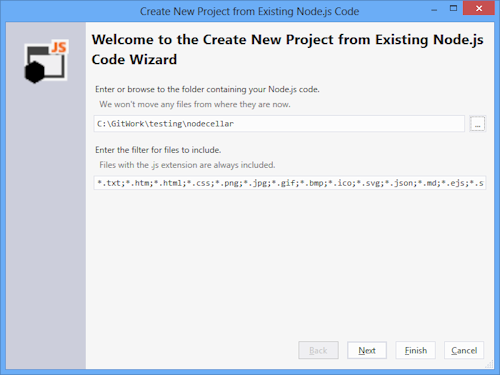
- In the wizard specify the location of the root folder of your Visual Node project, then click Next.
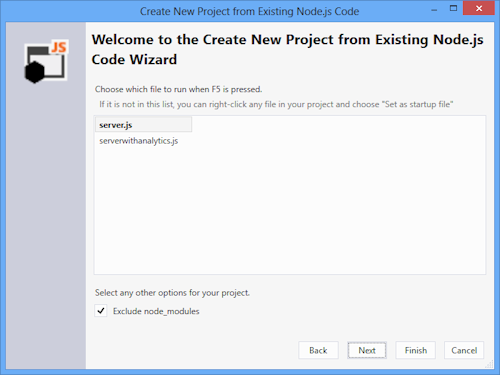
- Now specify the JavaScript file that should be run when you hit F5, and click Next.
- Tell Visual Studio where you’d like to save the project file, then click Finish.
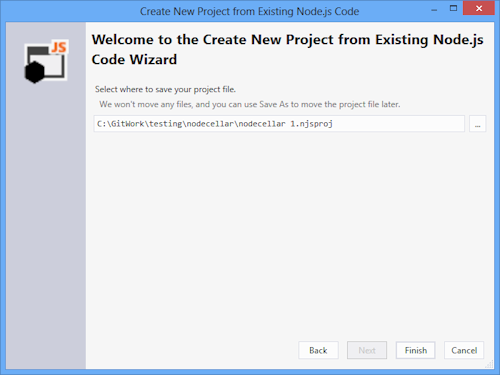
- You’re done – your project should be sucessfully migrated to NTVS. You can now just hit F5 to run it.
As a result we’re going to be retiring Visual Node, and we’d like to thank those of you who signed up, and tried it out. Your feedback has been incredibly valuable, and has helped us improve NTVS – and it will continue to do so (we’re only at alpha, after all!).
If you run into problems, or need help or support, please do post in https://nodejstools.codeplex.com/discussions, and we’ll get back to you as soon as we can. And, as I said, if you have bug reports or suggestions for improvement please post them at https://nodejstools.codeplex.com/workitem/list/basic.
*N.B. NTVS only works with Visual Studio 2012 and 2013 so DON’T upgrade if you’re still using Visual Studio 2010!
Load comments