
Every good DBA and Developer keeps their code under source control. What? You don’t? Well, read this and then go and investigate it, there are plenty of options, some free, some you need to pay for. Getting that all sorted is content for another blog (or two!) so let’s get back to editing PowerShell files when you have them in a Visual Studio / TFS solution.
For some obscure reason Visual Studio doesnt recognise a ps1 file or offer any intellisense or code colouring like it does with VB, C, SQL etc. If you double click a ps1 file in Visual Studio it opens in a plain text editor that is little more evolved that Notepad. It is possible however to configure Visual Studio so that it passes the file editing duties over to an alternative editor application. Let’s look at how we do that, so that we get a better PowerShell experience.
Step 1 – open Visual Studio and locate a solution that contains some of your PowerShell files.
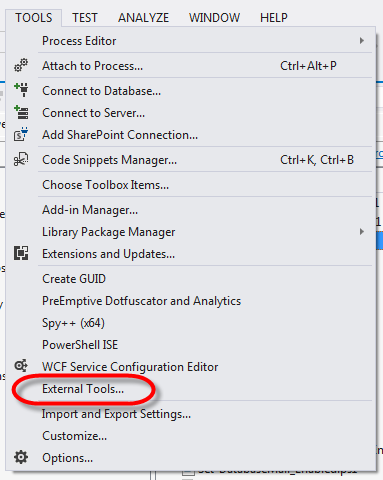
Step 2 – click the Tools menu and select External Tools
Step 3
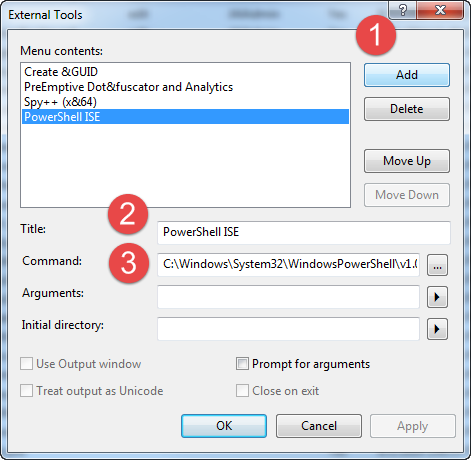
- Add a new tool
- Give the new tool a title of your choosing
- Locate the new tool .exe
- Click OK
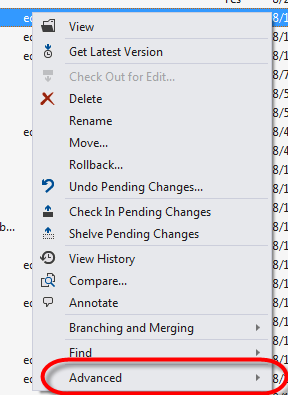
Step 4 – right click on a PS file in your VS folder and click ‘advanced’ on the pop up menu
Step 5 – Click ‘view with’ on this advanced menu

Step 6

- Select PowerShell_ISE (or the editor you are adding as an external tool)
- Click ‘set as default
- Note that the (default) appears next to the program you chose
- Click OK
Now, check out a PowerShell file and then double click it and it will open in PowerShell_ISE where you will have all the benefits that come with that application.
Note: If you have PowerShell_ISE already started then the file will open as a new document in that application, if you don’t have the ISE open already then it will be started. This may not make a big difference to you unless you run the ISE under a different account for elevated permissions settings.
[edit – 7th Jan 2015]
It has come to my attention that the above screen shots are not based on a vanilla installation of Visual Studio. In order to get the ‘View with…’ option shown at Step 5 above you need to have the Microsoft Visual Studio Team Foundation Server Power Tools installed (https://visualstudiogallery.msdn.microsoft.com/b1ef7eb2-e084-4cb8-9bc7-06c3bad9148f). Be careful when you install this to choose the custom option and select to install the PowerShell Cmdlets feature.
Load comments