
In Microsoft Dynamics 365, by default, database is optimized for database record storage and not for files or attachment storage. Hence, cost effective storage management of huge sized data files becomes one of the most critical aspects for the organizational users. This blog narrating the process of optimizing storage capabilities of Microsoft Dynamics 365 CRM using Azure Blob and SharePoint.
Azure Blob is much known for storing large amounts of unstructured object data including images, audios and multimedia. Whereas apart of its document storage, management and other offerings, SharePoint also allows the record wise sorting of the documents. Hence, optimizing the Microsoft Dynamics 365 CRM storage using both Azure Blob and SharePoint could be an easy, efficient and viable solution.
Azure Blob Storage Configuration
Let’s be clear with our basic requirements:
- The Web Resources to create custom UI to add and view the data files
- Azure Blob configuration into the CRM in order access the information of the blob storage. We will create a setting entity to add azure account name and key there
Following the process described below to configure Azure Blob storage
[1] Setup the Environment
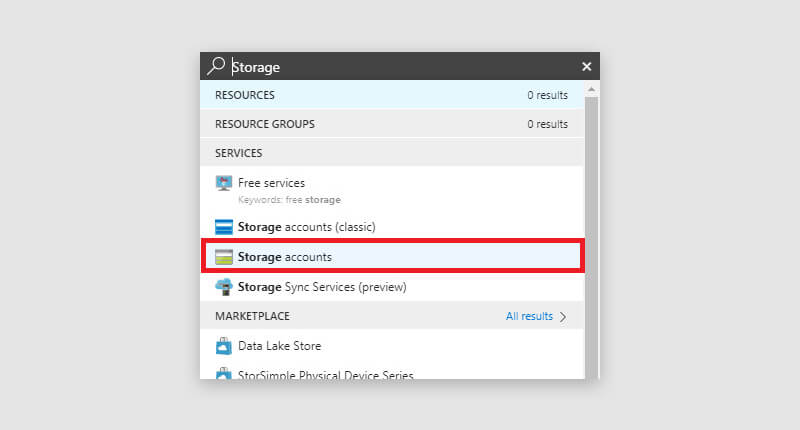
Use the URL https://portal.azure.com and search for ‘storage’ in search panel. Select the Storage accounts (Blob) from the displayed search results.
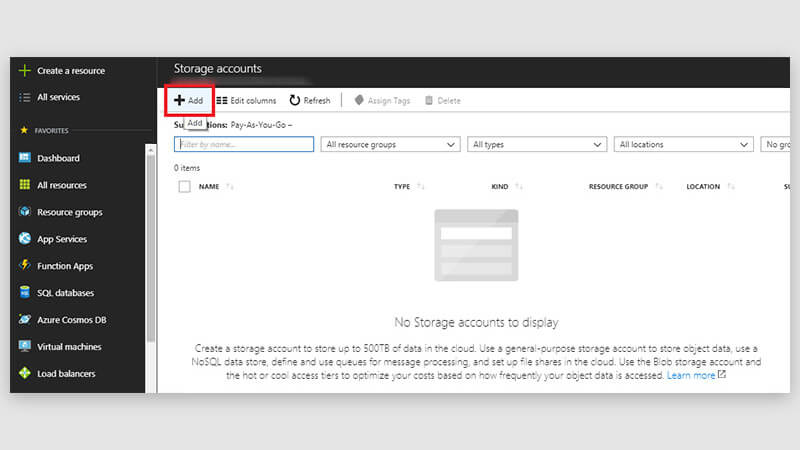
Once you are navigated to ‘Storage accounts’ dashboard, click ‘Add’ in order to create a new account.
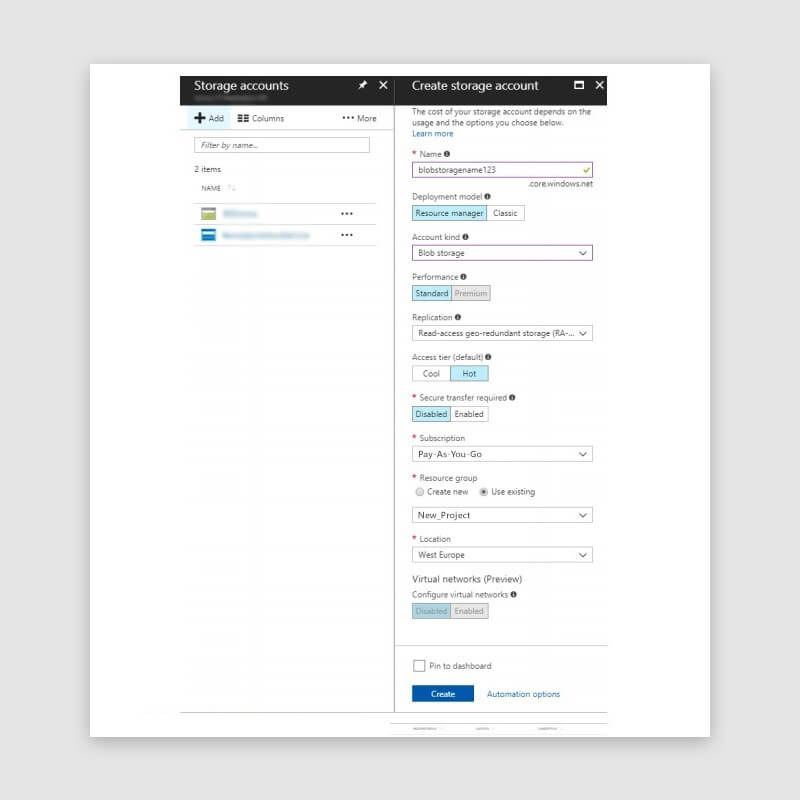
Either key in or select from dropdown options the relevant details for to each field.
- Name
- Account kind: Blob Storage – Must be Blob Storage
- Replication: Keep Default
- Subscription: Usage-Based
- Resource Group: Select the Resource Group
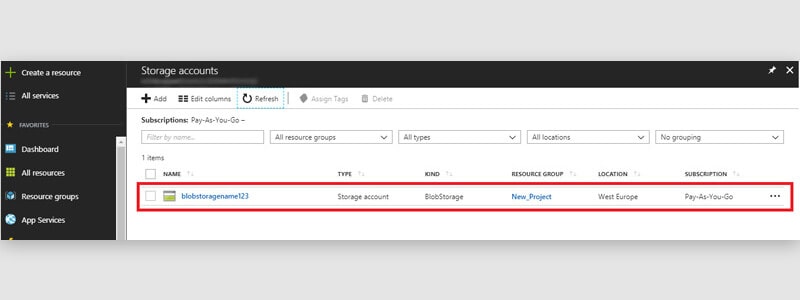
Assure that the created storage is available in the list of storage account.
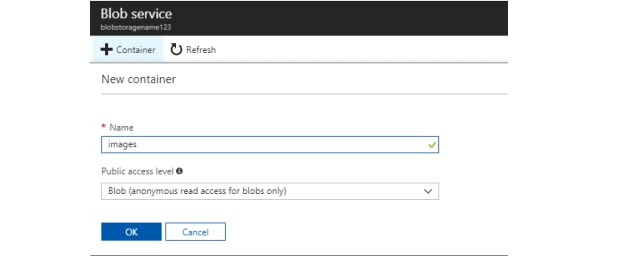
Create an Image Blob to store the image contents
- Name: Key in the Blob name
- Public access level: Select Blob
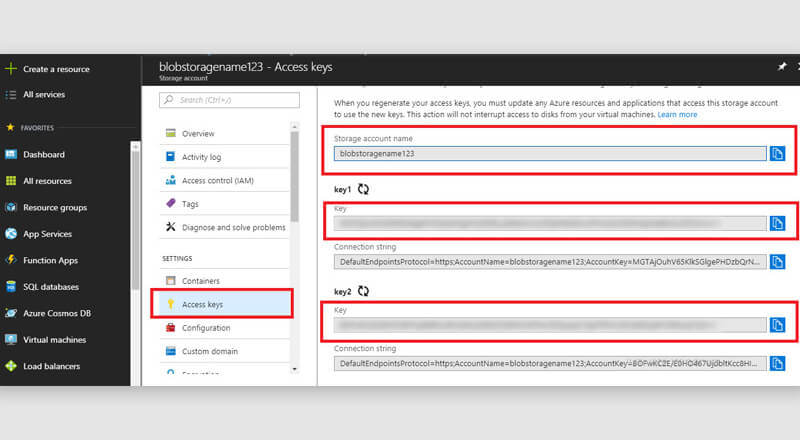
Accumulate the relevant Access Key details from the storage account and store into the CRM.
- Storage account name
- Key1
- Key2
Once we done with the above configuration we need to create JavaScript or .Net plugin to integrate Azure API.
[2] Upload the File to Azure
|
1 2 3 4 5 6 7 8 9 10 11 12 13 14 15 16 17 18 19 20 21 22 23 |
function UploadFileToBlobStorage(pByteData, pFileType, pSize, pName, pFileUrl) { var bRes = false; var currentDateTime = (new Date()).toGMTString(); var req = new XMLHttpRequest(); req.open("PUT", pFileUrl, false); req.setRequestHeader("x-ms-version", sVersion); req.setRequestHeader("x-ms-date", currentDateTime); req.setRequestHeader("Content-Type", pFileType); req.setRequestHeader("Content-Length", pSize); req.setRequestHeader("x-ms-blob-type", sBlobType); req.setRequestHeader("x-ms-blob-content-type", pFileType); //Prepare String for Signature---------------------------------------- var strSign = "PUT\n\n\n" + pSize + "\n\n" + pFileType + "\n\n\n\n\n\n\nx-ms-blob-content-type:" + pFileType + "\nx-ms-blob-type:" + sBlobType + "\nx-ms-date:" + currentDateTime + "\nx-ms-version:" + sVersion + "\n/" + sAccountName + "/" + sContainerName + "/" + GetFileNameFromURL(pFileUrl); req.setRequestHeader("Authorization", "SharedKey " + sAccountName + ":" + GetAuthorizationSignature(strSign)); req.onreadystatechange = function () { if (this.readyState == 4 /* complete */) { req.onreadystatechange = null; bRes = true; } }; req.send(pByteData); return bRes; } |
[3] Delete the File from Azure
|
1 2 3 4 5 6 7 8 9 10 11 12 13 14 15 16 17 18 19 |
function DeleteFileToBlobStorage(pFileUrl) { var bRes = false; var currentDateTime = (new Date()).toGMTString(); var req = new XMLHttpRequest(); req.open("DELETE", pFileUrl, false); req.setRequestHeader("x-ms-version", sVersion); req.setRequestHeader("x-ms-date", currentDateTime); req.setRequestHeader("x-ms-blob-type", sBlobType); var strSign = "DELETE\n\n\n\n\n\n\n\n\n\n\n\nx-ms-blob-type:" + sBlobType + "\nx-ms-date:" + currentDateTime + "\nx-ms-version:" + sVersion + "\n/" + sAccountName + "/" + sContainerName + "/" + GetFileNameFromURL(pFileUrl); req.setRequestHeader("Authorization", "SharedKey " + sAccountName + ":" + GetAuthorizationSignature(strSign)); req.onreadystatechange = function () { if (this.readyState == 4 /* complete */) { req.onreadystatechange = null; bRes = true; } }; req.send(); return bRes; } |
SharePoint Configuration
[1] Enable server-based integration from CRM
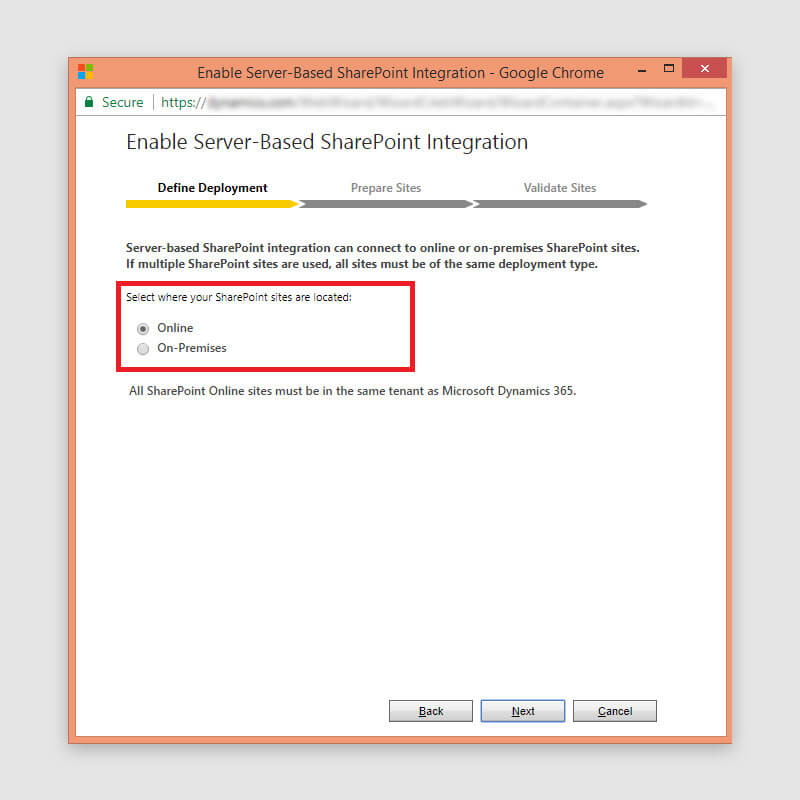
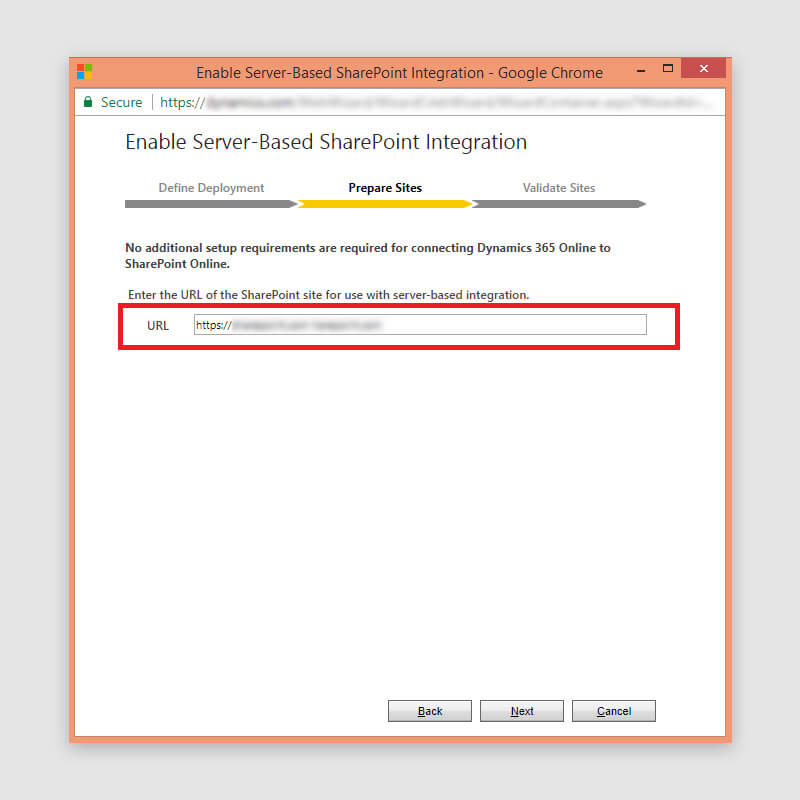
To Integrate SharePoint with the CRM, we need to enable the server-based integration from CRM Setting.
Follow the path: CRM Instance >> Setting >> Document Management >> Enabled Server Based SharePoint Integration
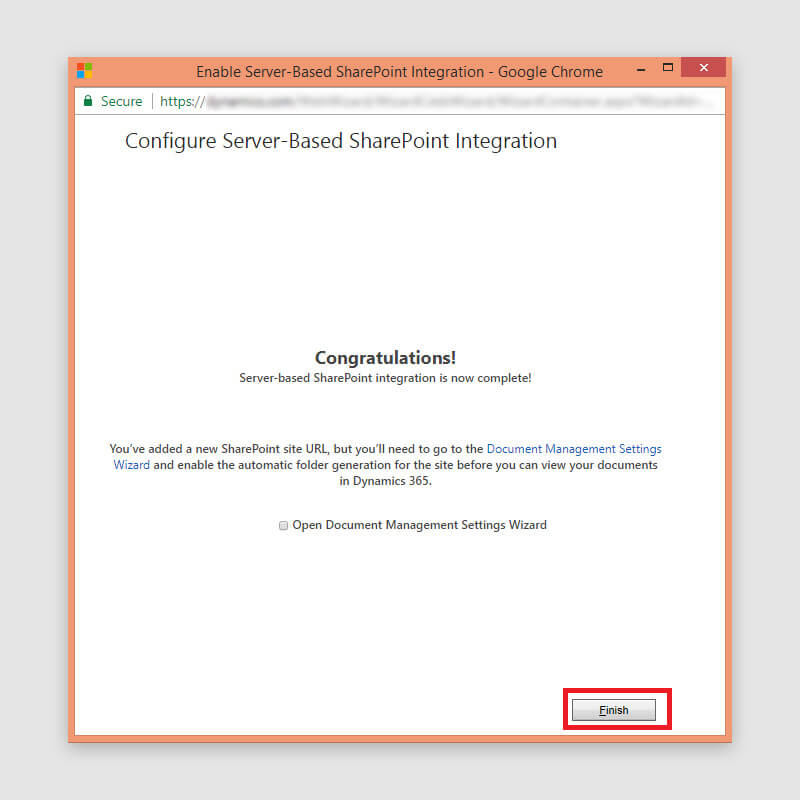
(a) Define Deployment
(b) Prepare Sites
(c) Validate Sites
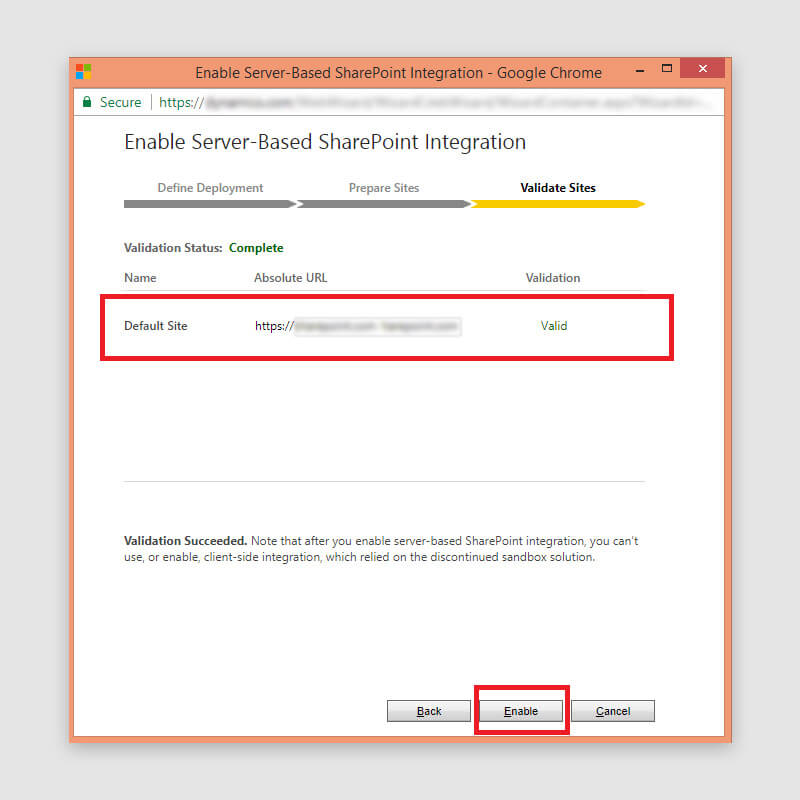
(d) Finish Sever Based integration
[2] Power Attachment Integration
There are several methods to configure SharePoint. Here is the one with Power Attachment integration. In order to upload documents to SharePoint, you can use Power Attachment, the add-on from PowerObjects. You need to add relevant information to the Power Attachment solution. Follow the described steps for the same.
- Enable SharePoint Integration
- Go to Setting Document Management >> Document Management Setting
- Select Entities
- SharePoint Site : https://<instance>.sharepoint.com/sites/documents
- Click Next and allow CRM to Create Folder Structure
- Finish the document creation
- Go to Setting Solutions >> PowerAttachment Solution
- Configure Profile Tab and check with “Test CRM Credentials”
- Configure Setup Tab and check with “Test SharePoint Credentials”
- Location Type: Share Point
- URL : https://<instance>.sharepoint.com
- Username: Enter CRM Admin User
- Password: Enter Password
- Document Liabrary: Create Sharepoint Document Library
- SharePoint Type: Online
- Attachment Types: “doc,docx,xls,xlsx,ppt,pptx,zip,rar,pdf”
- Overwrite File: No
- Service Provider: Central
- Save To Regarding Folder: Yes
Once the Power Attachment configuration is completed successfully, we can attach any document of the selected entities and the document will automatically be uploaded to SharePoint
[If you find any difficulties with configuration of Power Attachment, you can find the help at https://www.powerobjects.com/guides/powerattachment/]
[3] Facilitate to read Documents from SharePoint using Customized/Coding Flow
In order to facilitate the reading of documents from the SharePoint, we need to integrate an API that can access the data. Hence, the relevant setup and authentication process is required. Follow the described steps for the same.
[a] Register Add-In
It is necessary to register the Add-In in SharePoint where you want to access the information. Follow the steps described below to register the Add-In in SharePoint site.
- Login to SharePoint online site
- Use the URL https://<sitename>.SharePoint.com/_layouts/15/appregnew.aspx to Register Add-In page
- Visit App Information section, click the Generate button displayed next to Client Id and Client Secret textboxes to generate the respective values
- Title: Enter Add-In Title
- App Domain: as a localhost
- Redirect URL: as
https://localhost(Need to keep as localhost)
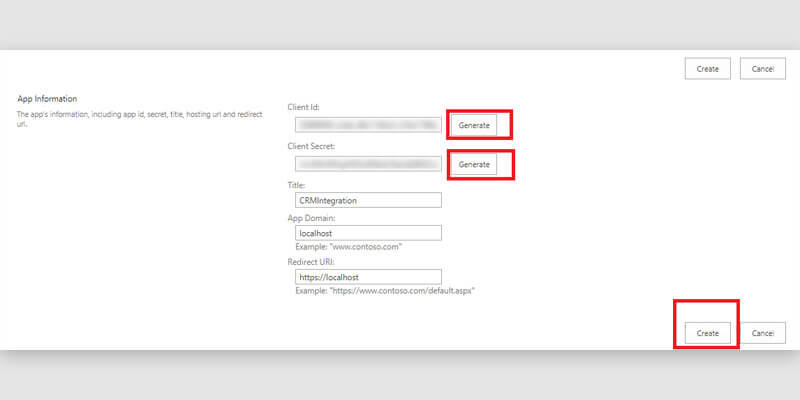
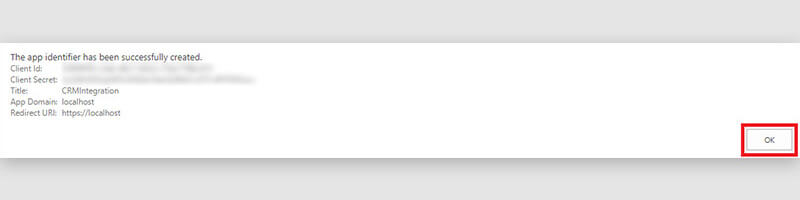
Click on Create button. The Add-In will be registered followed by the success message pop up. Carefully note down the displayed information.
[b] Grant Permissions to Add-In
Once you are done with registration Add-In, you need to set the permissions for that Add-In to access the SharePoint data. We will set the Read permission level to the web scope, so that we will be able to read the web information.
Navigate to the SharePoint site and enter the URL: “https ://< sitename>.sharepoint.com/_layouts/15/appinv.aspx” in the browser to get redirected to Grant permission page.
Enter the Client ID noted from Add-In registration success message in AppId textbox and click Lookup button. That will populate the value to other textboxes in Title, App Domain and URL
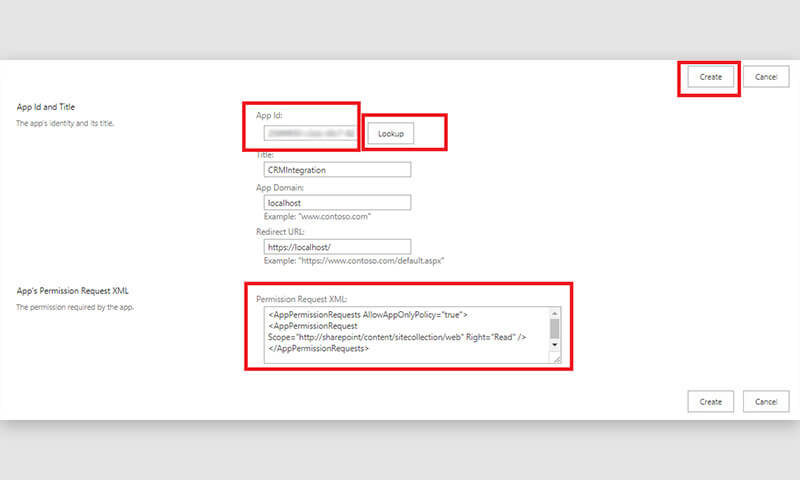
Enter the below permission request in XML format
|
1 2 3 4 |
<AppPermissionRequests AllowAppOnlyPolicy="true"> <AppPermissionRequest Scope="http://sharepoint/content/sitecollection/web" Right="Read" /> </AppPermissionRequests> |
Then click on Create button. This will redirect to you to the page displayed below as image. Here, you need to authorize the add-in as trusted to read items from website.

[c] Retrieve the Tenant Id and Resource Id
Once you are done with registration of the Client Id along with relevant the permissions, you are ready to access the SharePoint information from the external system or tools.
As a process, first you need to know the Tenant Id. Follow the steps described below to obtain that information from postman.
- Launch Postman Or other REST Client (chrome extension)
- Select Get Method, enter the URL given below in Request URL textbox “https://<sitename>/sharepoint.com/_vti_bin/client.svc/”
- Configure the below information in the header section to send along with the url requestMethod = Get Headers
|
Key |
Value |
|
Authorization |
Bearer |
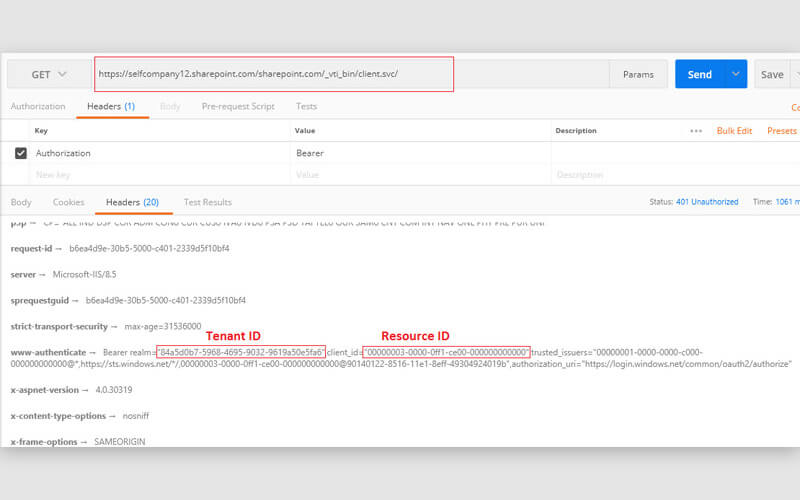
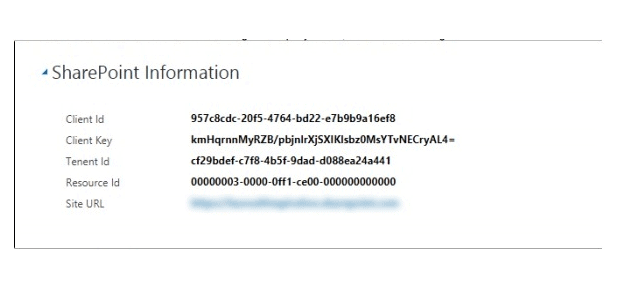
- Collect the relevant information required for the configuration such as
- Client Id: 45df14e8-1948-4ac2-aa01-8bb87b90862f
- Client Key: 9q+5iXvdExjoDFxmSKUy2EooSz9auxk8hXbh3u72v+0=
- Tenant Id: cf29bdef-c7f8-4b5f-9dad-d088ea24a441
- Resource Id: 00000003-0000-0ff1-ce00-000000000000
- We have to add this information under the Setting, same as below image.
Once we done with the above configuration we need to create JavaScript or .Net plugin to integrate SharePoint API.
Sample Code to Read File
|
1 2 3 4 5 6 7 8 9 10 11 12 13 14 15 16 17 18 19 20 21 22 23 24 25 26 27 28 29 30 31 32 33 34 35 36 37 38 39 40 41 42 43 44 45 46 47 48 49 50 51 52 53 54 55 56 57 58 59 60 61 62 63 64 65 66 67 68 69 70 71 72 73 74 75 76 77 78 79 80 81 82 83 84 85 86 87 88 89 90 91 92 93 |
string accessTocken = Utility.GetAccessTockenForSharePoint(siteURL, companyProfile); // To Get AccessTocken For SharePoint public static string GetAccessTockenForSharePoint(string siteURL, Entity myentity) { string tenentID = string.Empty; if (myentity.Attributes.Contains(AppConstants.EntityLogicalName.myentity_imm_sharepoint_tenantid)) { tenentID = myentity[AppConstants.EntityLogicalName.myentity_imm_sharepoint_tenantid] as string; } string clientId = string.Empty; if (myentity.Attributes.Contains(AppConstants.EntityLogicalName.myentity_imm_sharepoint_clientid)) { clientId = myentity[AppConstants.EntityLogicalName.myentity_imm_sharepoint_clientid] as string; } string clientKey = string.Empty; if (myentity.Attributes.Contains(AppConstants.EntityLogicalName.myentity_imm_sharepoint_clientkey)) { clientKey = myentity[AppConstants.EntityLogicalName.myentity_imm_sharepoint_clientkey] as string; } string resourceId = string.Empty; if (myentity.Attributes.Contains(AppConstants.EntityLogicalName.myentity_imm_sharepoint_resourceid)) { resourceId = myentity[AppConstants.EntityLogicalName.myentity_imm_sharepoint_resourceid] as string; } string accessTocken = string.Empty; HttpWebRequest request = (HttpWebRequest)WebRequest.Create("https://accounts.accesscontrol.windows.net/" + tenentID + "/tokens/OAuth/2"); request.ContentType = "application/x-www-form-urlencoded"; //request.Accept = "application/json; odata=verbose"; // request.Headers.Add("Authorization", "Bearer eyJ0eXAiOiJKV1QiLCJhbGciOiJSUzI1NiIsIng1dCI6IlZXVkljMVdEMVRrc2JiMzAxc2FzTTVrT3E1USIsImtpZCI6IlZXVkljMVdEMVRrc2JiMzAxc2FzTTVrT3E1USJ9.eyJhdWQiOiIwMDAwMDAwMy0wMDAwLTBmZjEtY2UwMC0wMDAwMDAwMDAwMDAvbGF1cnVzaXRpbnNwaXJhdGlvbi5zaGFyZXBvaW50LmNvbUBjZjI5YmRlZi1jN2Y4LTRiNWYtOWRhZC1kMDg4ZWEyNGE0NDEiLCJpc3MiOiIwMDAwMDAwMS0wMDAwLTAwMDAtYzAwMC0wMDAwMDAwMDAwMDBAY2YyOWJkZWYtYzdmOC00YjVmLTlkYWQtZDA4OGVhMjRhNDQxIiwiaWF0IjoxNTAzMzgwNTUxLCJuYmYiOjE1MDMzODA1NTEsImV4cCI6MTUwMzM4NDQ1MSwiaWRlbnRpdHlwcm92aWRlciI6IjAwMDAwMDAxLTAwMDAtMDAwMC1jMDAwLTAwMDAwMDAwMDAwMEBjZjI5YmRlZi1jN2Y4LTRiNWYtOWRhZC1kMDg4ZWEyNGE0NDEiLCJuYW1laWQiOiI5NTdjOGNkYy0yMGY1LTQ3NjQtYmQyMi1lN2I5YjlhMTZlZjhAY2YyOWJkZWYtYzdmOC00YjVmLTlkYWQtZDA4OGVhMjRhNDQxIiwib2lkIjoiY2M0NzQ0ZjQtZDJkNC00OWY3LWEwMWItY2ZmZDYyMDY4Y2NkIiwic3ViIjoiY2M0NzQ0ZjQtZDJkNC00OWY3LWEwMWItY2ZmZDYyMDY4Y2NkIiwidHJ1c3RlZGZvcmRlbGVnYXRpb24iOiJmYWxzZSJ9.Mwu6NvV1a9gUg7rvMBjFuV78Z7mci1eL6M4ObZ7VrcPNsHzvVNtd_vVeoMnOqNvyqkbPNM3xEKhbBGJlYd2PO-HBTWNGFD16q4g0ctyRWgGQlr0KlNMVvXflqqE0Fes50b6rSjqBM1-XZEKhEk8_Zn_I6K2vNfrVTUxRtAhaNQEPKGn-mtTbusHqE2yxMuOA4oqM6XvTwN9ZW5s_2qcm7m6EewS2wGuu4CPya40QD3p8eWKUqzAsGfiPHOkPDASsGWP4zct7Hn8qpg_5v_xTKAa18uvVed3CUEbeBXS8XFtwfxZllFXb-mryexhWHazF_Q8Q3bTGT3FFcgUJFqb8hA"); request.Method = "POST"; byte[] byteData = null; Stream postStream = null; string postData = "grant_type=client_credentials" + "&client_id=" + clientId + "@" + tenentID + "&client_secret=" + clientKey + "&resource=" + resourceId + "/" + siteURL.ToLower().Replace("http://", "").Replace("https://", "") + "@" + tenentID; byteData = UTF8Encoding.UTF8.GetBytes(postData); // Set the content length in the request headers request.ContentLength = byteData.Length; postStream = request.GetRequestStream(); postStream.Write(byteData, 0, byteData.Length); WebResponse webResponse = request.GetResponse(); StreamReader reader = new StreamReader(webResponse.GetResponseStream()); //' Console application output string response = reader.ReadToEnd(); using (MemoryStream DeSerializememoryStream = new MemoryStream()) { DataContractJsonSerializer serializer = new DataContractJsonSerializer(typeof(SharepointAccessClass)); //user stream writer to write JSON string data to memory stream StreamWriter writer = new StreamWriter(DeSerializememoryStream); writer.Write(response); writer.Flush(); DeSerializememoryStream.Position = 0; //get the Desrialized data in object of type Student SharepointAccessClass SerializedObject = (SharepointAccessClass)serializer.ReadObject(DeSerializememoryStream); accessTocken = SerializedObject.access_token; } return accessTocken; } ----------------------------------------------------------- Actual reading of the file string fileUrl = (oEntity[AppConstants.EntityLogicalName.ANNOTATION_NoteText] as string).Trim(); string surl = siteURL + "/_api/SP.AppContextSite(@target)/web/getfilebyserverrelativeurl('" + fileUrl.Replace(siteURL, "") + "')/$value?@target='" + siteURL + "'"; // Get File From Sharepoint Server HttpWebRequest request = (HttpWebRequest)WebRequest.Create(surl); request.Accept = "application/json; odata=verbose"; request.Headers.Add("Authorization", "Bearer " + accessTocken); request.Method = "GET"; // Manage Response To Get Base 64 of file WebResponse webResponse = request.GetResponse(); MemoryStream memoryStream = new MemoryStream(); using (Stream responseStream = request.GetResponse().GetResponseStream()) { byte[] buffer = new byte[0x1000]; int bytes; while ((bytes = responseStream.Read(buffer, 0, buffer.Length)) > 0) { memoryStream.Write(buffer, 0, bytes); } } var resultValue = memoryStream.ToArray(); string encodedGeneratedDocument = Convert.ToBase64String(resultValue); |
Conclusion
In this blog I have narrated the entire process of optimizing the storage capabilities of Microsoft Dynamics 365 using Azure Blob Storage and SharePoint Storage along with detailed configuration process. This integrated solution can optimize the storage capabilities of Microsoft Dynamics 365 largely.
This document contains proprietary information and is protected by copyright law.
Copyright © 2026 Red Gate Software Limited. All rights reserved
Load comments