One of the handiest features in SQL Server Integration Services (SSIS) is the ability to implement looping logic within your control flow. By using the Foreach Loop container, you can create a looping structure that iterates through a collection of objects or data values (the members) and take actions specific to each of those members. The Foreach Loop container lets you define a repeating workflow, similar to how you would define a Foreach looping structure in a procedural programming language.
For example, suppose you have a folder that contains a set of text files, and each of those files contains data you want to load into a SQL Server database. You can set up a Foreach Loop container in your control flow and then add a Data Flow task to the container. The Data Flow task will retrieve the data from the files and load the data into the database. Because you’ve set up a looping structure, the Foreach Loop container will execute the Data Flow task multiple times, once for each file in the folder.
And the Foreach Loop container is not limited to text files. The container lets you enumerate a variety of collection types, such as rows in a table, SQL Server Management Objects (SMO), the result set of an XML Path Language (XPath) expression, or schema information about a data source.
The best way to learn how to use the Foreach Loop container is to see it in action. To this end, the rest of the article demonstrates how to retrieve data from a single SQL Server view and insert that data into multiple comma-separated values (CSV) files. The source data comes from the vEmployee view in the AdventureWorks2008R2 database. The goal is to create a file for each technician type returned by the view. The files will include the technicians’ first and last names and be saved to a local folder.
NOTE: You can download the SSIS package used for this example from the bottom of the article.
Adding Your Variables
When you use the Foreach Loop container to loop through a collection, you need to define a variable that will provide a pointer to the current member, as you loop through the collection. You can define that variable in advance or when you configure the Foreach Loop container. In this case, I create the variable in advance so it’s ready when I need it. I assign the name JobTitle to the variable and configure it with the String data type. For its value, I use a set of quotation marks to represent an empty string; however, you can specify any initial value. If you’re going to implement breakpoints and set up watches to monitor variable values when you run the package, then you might want to assign a meaningful value to the JobTitle variable to provide a better milepost during the iterative process.
Next, I create a variable named JobTitles to hold the collection itself. You do not always need to create a second variable. It depends on the collection type. In this case, because I’ll be retrieving data from a view, I need a variable to hold the result set returned by my query, and that variable must be configured with the Object data type. However, I don’t need to assign an initial value to the variable. The value System.Object is automatically inserted, as shown in Figure 1.
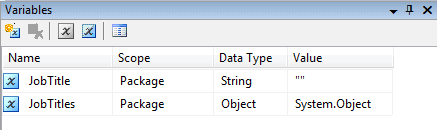
Figure 1: Adding the JobTitle and JobTitles variables to your SSIS package
Because I created the variables at a package scope, they’ll be available to all components in my control flow. I could have waited to create the JobTitle variable until after I added the Foreach Loop container, then I could have configured the variable at the scope of the container. I’ve seen it done both ways, and I’ve done it both ways. Keep in mind, however, if you plan to use the variable outside of the Foreach Loop container, make sure it has a package scope.
Configuring Your Control Flow
The first step in configuring the control flow is to add a connection manager to the AdventureWorks2008R2 database. In this case, I create a connection to the database on a local instance of SQL Server 2008 R2 and then name the connection manager AdventureWorks2008R2.
Next, I add an Execute SQL task to my control flow in order to retrieve a list of job titles from the vEmployee view. After I add the task, I open the task’s editor and update the value of the ResultSet property to Full result set. I use this setting because the task will return a result set that contains data from the vEmployee view. I then specify the AdventureWorks2008R2 connection manager in the Connection property, and assign the following Transact-SQL statement to the SQLStatement property:
|
1 2 3 |
SELECT DISTINCT JobTitle FROM HumanResources.vEmployee WHERE JobTitle LIKE '%technician%' |
My goal is to return a list of unique job titles that include the word technician. Figure 2 shows the General page of the Execute SQL Task editor after I add the Select statement.
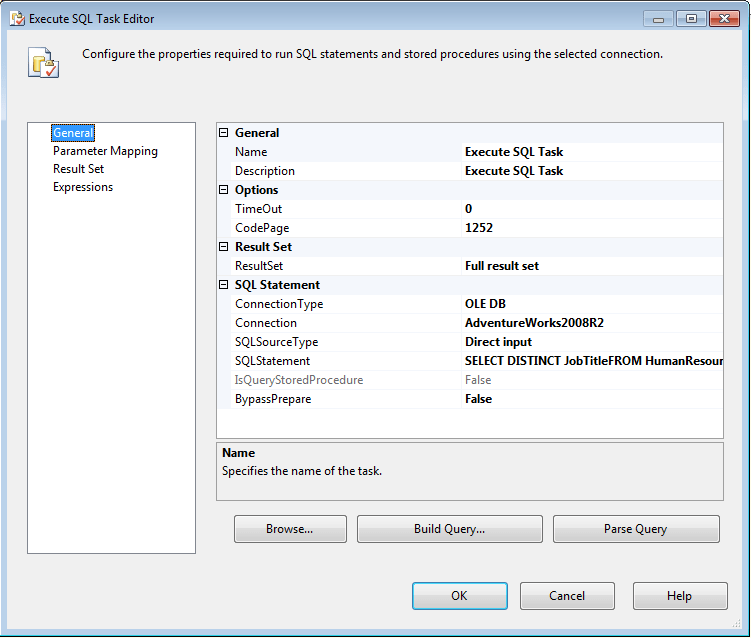
Figure 2: Configuring the General page of the Execute SQL Task editor
Because the Execute SQL task has been set up to return a result set, you need some place to put those results. That’s where the JobTitles variable comes in. The task will pass the result set to the variable as an ADO object, which is why the variable has to be configured with the Object data type. The variable can then be used to provide those results to the Foreach Loop container.
So the next step in configuring the Execute SQL task is to map the JobTitles variable to the result set, which I do on the Result Set page of the Execute SQL Task editor, shown in Figure 3.

Figure 3: Configuring the Result Set page of the Execute SQL Task editor
To create the mapping, I click Add and then specify the JobTitles variable in the first row of the VariableName column. Notice in the figure that I include the User namespace, followed by two colons. I then set the value in the Result Name column to 0.
That’s all you need to do to configure the Execute SQL task. The next step is to add a Foreach Loop container and connect the precedence constraint from the Execute SQL task to the container. Then you can configure the container. When doing so, you must select an enumerator type. The enumerator type indicates the type of collection you’re working with, such as files in a folder or rows in a table. In this case, because the result set is stored in the JobTitles variable as an ADO object, I select the Foreach ADO enumerator, as shown in Figure 4.
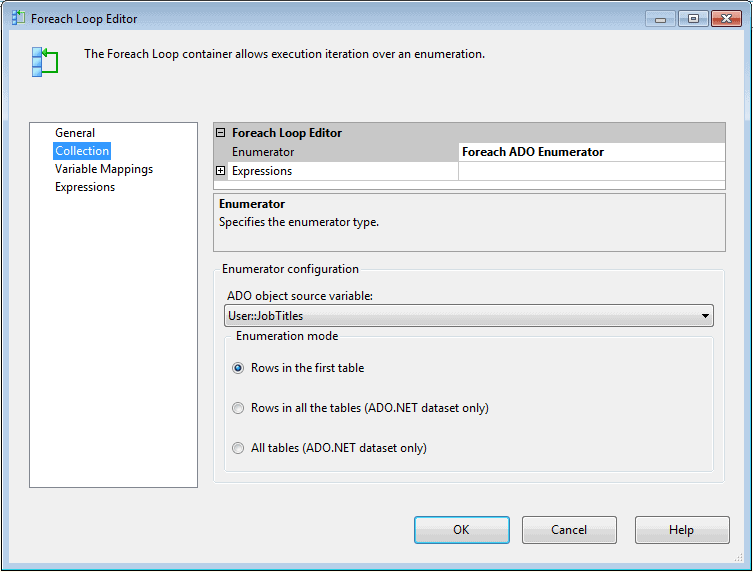
Figure 4: Configuring the Collection page of the Foreach Loop editor
The Foreach ADO enumerator lets you access rows of data in a variable configured with the Object data type. So once I select the enumerator type, I select the JobTitles variable from the ADO object source variable drop-down list. As for the Enumeration mode option, I leave that at its default setting, Rows in the first table, because there’s only one table (with only one column).
After you configure the Foreach Loop container with the collection, you must create a variable mapping that tells the container which variable to use to store the individual member during each loop. You configure variable mappings on the Variable Mappings page of the Foreach Loop editor, as shown in Figure 5.
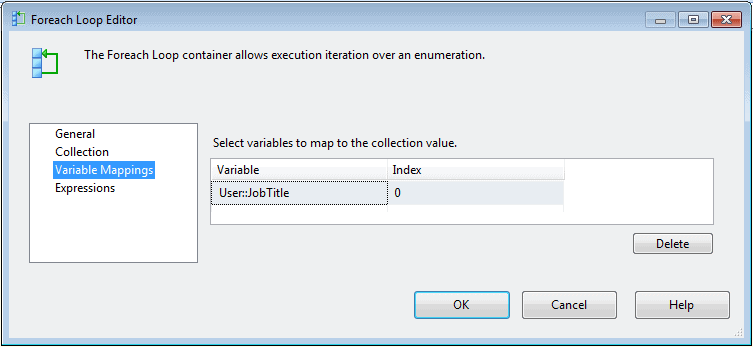
Figure 5: Configuring the Variable Mappings page of the Foreach Loop editor
For my example, I create a mapping to the JobTitle variable. To do this, I select the variable from the drop-down list in the first row of the Variable column, and set the index to 0. I use 0 because my collection is taken from the first column of the result set stored in the JobTitles variable. If there were more columns, the number would depend on the column position. The positions are based on a 0 cardinality, so the first column requires a 0 value in the Index column. If my result set included four columns and I was using the third column, my Index value would be 2.
That’s all there is to setting up the Foreach Loop container for this example. After I complete the setup, I add a Data Flow task to the container. My control flow now looks similar to the one shown in Figure 6.
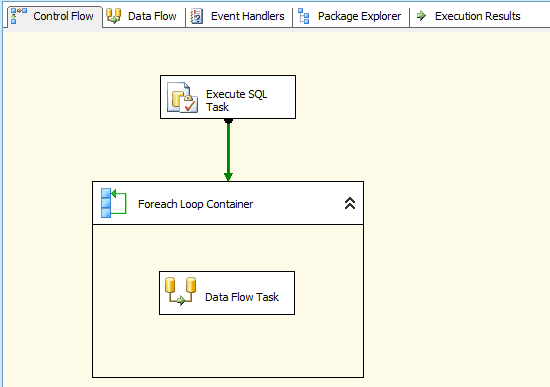
Figure 6: Setting up the control flow in your SSIS package
When you run the package, the Execute SQL task will retrieve a list of technician-related job titles and save that list to the JobTitles variable. The Foreach Loop container will iterate through the values in the variable. During each loop, the current job title will be saved to the JobTitle variable, and the container will execute any tasks or containers within the Foreach Loop container. In this case, it’s the Data Flow task. That means, for each technician-related job title, the Data Flow task will be executed. So let’s look at how to configure that task.
Configuring Your Data Flow
As you probably know, you edit the Data Flow task on the Data Flow tab of SSIS designer. For this example, I start by adding an OLE DB source component and opening its editor, as shown in Figure 7.
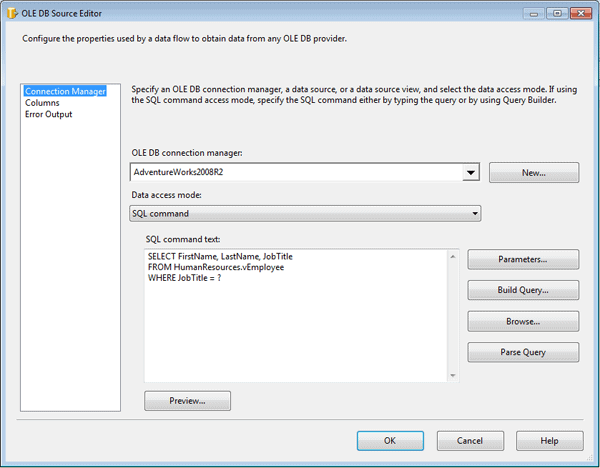
Figure 7: Configuring the OLE DB source
The first thing to notice is that I specify the AdventureWorks2008R2 connection manager in the OLE DB Connection manager drop-down list. I then select SQL Command from the Data access mode drop-down list and add the following Select statement to the SQL command text box:
|
1 2 3 |
SELECT FirstName, LastName, JobTitle FROM HumanResources.vEmployee WHERE JobTitle = ? |
The statement retrieves employee data from the vEmployee view. Notice that the WHERE clause includes a parameter placeholder (?) to indicate that a parameter value should be passed into the clause. Because I’ve included the parameter, I must now map it to a variable that can provide the necessary value to the WHERE condition. In this case, that variable is JobTitle, which will contain the job title associated with the current iteration of the Foreach Loop container.
NOTE: The query actually need only retrieve data from the FirstName and LastName columns. However, I also included that JobTitle column simply as a way to verify that the data populating the CSV files is the correct data.
To map the parameter to the variable, click the Parameters button on the Connection Manager page of the OLE DB Source editor. The button is to the right of where you add your Select statement. This launches the Set Query Parameters dialog box, shown in Figure 8.
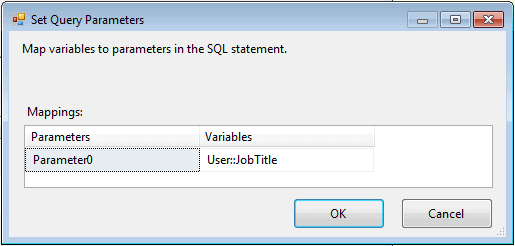
Figure 8: Mapping the JobTitle variable to the parameter in the SELECT statement
All I need to do to map the variable to the parameter is to select the variable from the drop-down list in the Variables column in the first row. Once this is done, I’ve completed configuring the OLE DB source and can now add my next component to the data flow: a Flat File destination.
There is nothing at all to configuring the destination itself. I simply add it to the data flow and connect the data flow path from the OLE DB source to the destination component. I then open the destination’s editor and specify that a new Flat File connection manager be created. This launches the Flat File Connection Manager editor, shown in Figure 9.
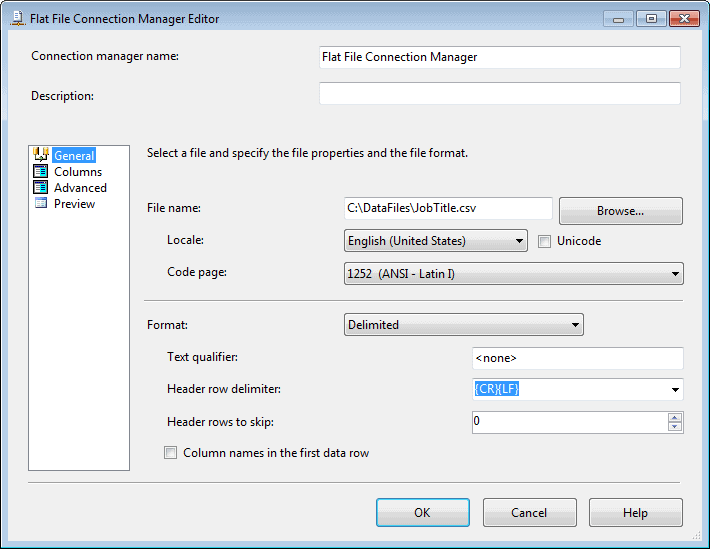
Figure 9: Configuring a Flat File connection manager
I stick with all the default settings for the connection manager, except that I add the following file path to the File Name text box: C:\DataFiles\JobTitle.csv. I then verify that the columns are mapped correctly (on the Columns page). Once I’ve configured the connection manager, my package is about ready to go-except for one important step.
The way the Flat File connection manager is currently configured, it will try to insert all data into the JobTitle.csv file. That means, each time the Foreach Loop container runs the Data Flow task, the job titles from the previous iteration will be overwritten, and the file will contain only those technicians with the job title associated with the final loop. However, one of the goals of this package is to create a file for each job title. That means we need to modify the Flat File connection manager by creating a property expression that changes the filename with each loop, based on the current value of the JobTitle variable.
The easiest way to create the property expression is to open the Properties pane for the connection manager and add a property expression, as shown in Figure 10.
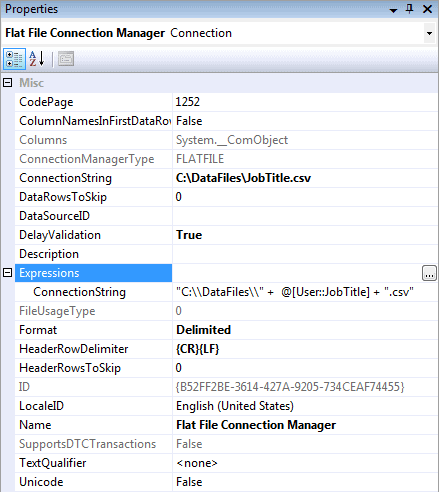
Figure 10: Defining a property expression on your Flat File connection manager
To create a unique file with each loop, I define a property expression for the ConnectionString property. The expression itself concatenates the file path with the JobTitle variable and the .csv file extension:
|
1 |
"C:\\DataFiles\\" + @[User::JobTitle] + ".csv" |
Notice that I have to escape the backslashes in the file path by using an additional backslash for each one. Now when I run the package, the current value in the JobTitle variable provides the actual file name when that file is saved to the target folder, thus creating a file for each job title. My data flow is now complete and looks similar to the one shown in Figure 11.
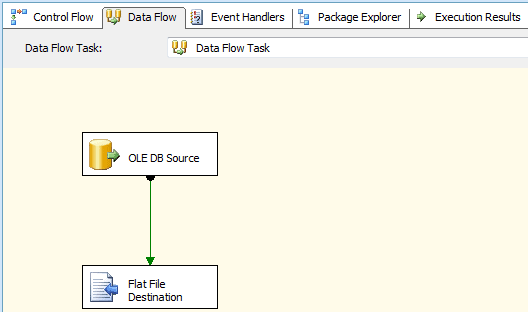
Figure 11: Setting up the data flow in your SSIS package
If you’ve been creating your own SSIS package as you’ve been working through this article, that package should now be ready to run. At this point, you might find it handy to add a breakpoint to the control flow so you can monitor the JobTitle variable as its value changes with each loop. If you do this, be sure to set the breakpoint on the Data Flow task, not the Foreach Loop container itself. The container runs only once, but the task runs multiple times, so that’s where you’ll see the variable value changing.
Otherwise, you should now have a good sense of how to implement the Foreach Loop container in an SSIS package. Note, however, because I was able to demonstrate only one of the enumerator types available to the container, I was unable to show you features specific to the other types. If you’d like to learn more about them, check out the topics “Foreach Loop Container” and “Foreach Loop Editor (Collection Page)” in SQL Server Books Online. But for now, what I’ve provided here should give you the basics you need to start implementing looping logic in your SSIS packages, regardless of the enumerator type used. And once you get those basics down, you’ll find that the Foreach Loop container is a valuable addition to your arsenal of SSIS tools.
Load comments