In Part One of this series, I covered the initial steps that were necessary in order to prepare a new server before installing an instance of SQL Server 2012. In this installment, I will discuss the next steps that are required when you actually install SQL Server 2012, assuming that you have already completed the steps in Part One.
One key item that I want to expand on before we dive into the actual SQL Server installation steps is the configuration and naming of your logical disks and directories.
Standardized Disk Naming Scheme
You should have a standardized naming convention for the logical drives and directories where you’ll be locating the various types of SQL Server files. This is especially useful when you have to maintain many servers, since it will be much easier to develop and maintain database backup and restore scripts if the drives and directories are setup consistently.
This is particularly important if you are going to use SQL Server 2012 AlwaysOn Availability Groups or database mirroring, since it will make it possible to add additional data files to an existing database without causing any issues for the availability replica or database mirror. It will save you a lot of work later if you have your logical drives provisioned and your directory structure in place before you install SQL Server. Table 1 shows an example naming standard and structure that I like to use.
|
Drive Letter and Directory |
Purpose |
|
C: |
System drive, Page file |
|
L:\SQLLogs K:\SQLLogs |
SQL Server Log drive(s) |
|
M:\SQLBackups N:\SQLBackups |
SQL Server Backup drive(s) |
|
P:\SQLData Q:\SQLData R:\SQLData S:SQLData |
SQL Server Data drive(s) |
|
T:\TempDB |
SQL Server TempDB |
|
Z: |
Optical drive |
Table 1: Naming Standards and Structure for Logical Drives
Depending on the number of databases, your anticipated overall workload and your Recovery Time Objective (RTO) requirements, you may need multiple logical drives for your SQL Server log files, data files, and backup files. This would give you more freedom of choice on where you locate the data and log files for your databases and database backup files. You might decide to have the data files for several, less mission critical databases on one drive, while reserving other drives for the data files of your most important database. It may make sense to have the transaction log file for your most write-intensive database by itself on a dedicated drive, while the other databases have their transaction log files on a different drive. You might also decide to use striped backups, where your database backup file is split across multiple drives, in order to get better performance for backup and restore.
Logical Disk Configuration Considerations
Depending on the type of workload, your available storage infrastructure and your available budget, there are many different possibilities for how you would want to configure your logical disks, with many associated tradeoffs. Different workload types will generate different types of disk access patterns for different types of SQL Server files that may vary considerably in the proportion of random and sequential access. You will also see major differences in read/write ratios for SQL Server files, depending on the workload, and whether you have technologies such as transactional replication, database mirroring, or AlwaysOn availability groups in place. These considerations will have a huge effect on how you configure your logical disks, in terms of spindle count, RAID level, etc. A full discussion of all of these variables is beyond the scope of this article, but I do cover it more detail in my SQL Server Hardware book.
Installing SQL Server 2012
There are a few key screens in the SQL Server 2012 interactive setup that I want to highlight, showing the most important configuration options that you need to be concerned with during setup.
Feature Selection
The first place where you need to make some important decisions is in the Feature Selection screen that is shown in Figure 1.

Figure 1: Feature Selection
You should already know which features you actually need on this instance of SQL Server. You need to resist any impulse to install any features that are currently unnecessary but which might be required in the future. Installing only the features you actually need will reduce your attack surface and it will speed future maintenance of the instance because there are fewer components to patch. With fewer services running, you will reduce unnecessary resource usage. If your needs change in the future, you can always install any other components later.
Server Configuration
It is important to use the credentials for those dedicated domain accounts that were created for the various SQL Server Services during the SQL Server installation as shown in Figure 2.
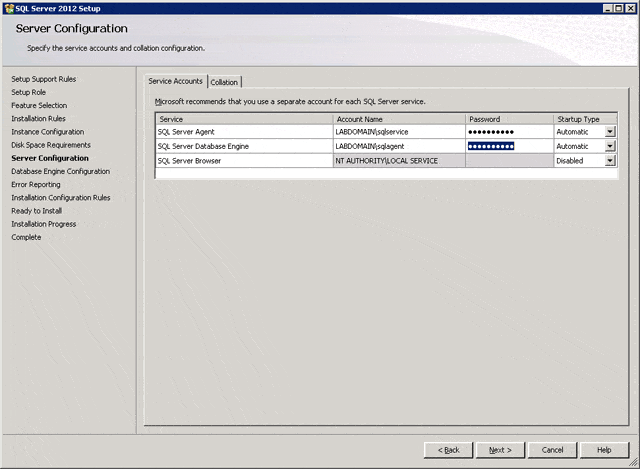
Figure 2: Server Configuration – Service Accounts
If you ever need to change these credentials, it is important that you use the SQL Server Configuration Manager to do it instead of using the Windows Server Services applet. For most SQL Server instances, you are going to want to change the Startup Type for the SQL Server Agent service from Manual to Automatic.
Database Engine Configuration – Server Configuration
The next important configuration screen is the Database Engine Configuration – Server Configuration tab shown in Figure 3.
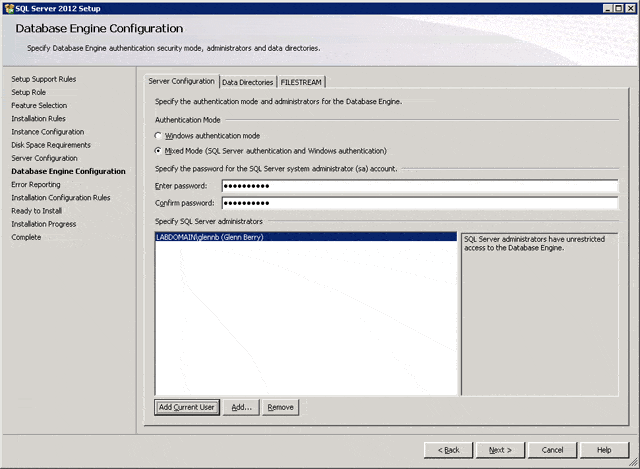
Figure 3: Database Engine Configuration – Server Configuration
This is where you choose the Authentication mode for this instance. Ideally, from a security perspective, you would choose Windows authentication mode, but many legacy applications still use SQL Server authentication, so you will often have to choose Mixed Mode authentication. If you do choose Mixed Mode authentication, you will have to enter a password for the system administrator (sa) account. This should be a “strong” password, with a combination of uppercase and lowercase letters, along with numbers and symbols. Do not choose a password that is found in the dictionary, since that will make the password vulnerable to a brute force dictionary attack (where every word in the dictionary is tried). You also want to make sure to remember the sa password! You will also want to add yourself as a SQL Server Administrator for the instance by clicking on the Add Current User button.
Database Engine Configuration – Data Directories
Before you click on the Next button, make sure to switch to the Data Directories tab, as shown in Figure 4.
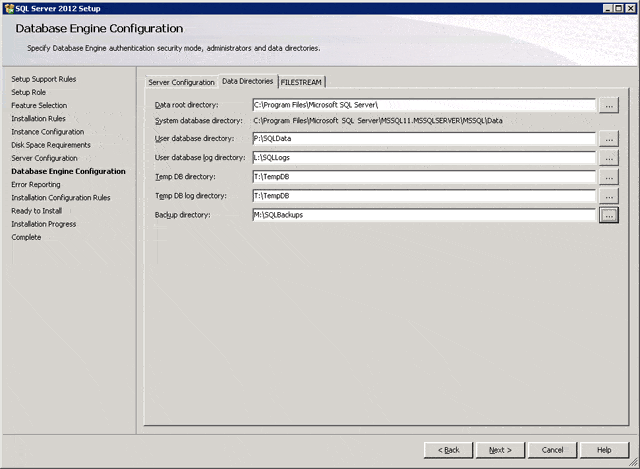
Figure 4: Database Engine Configuration – Data Directories
This tab is where you enter the default directories for your user database data files, user database log files, TempDB files, and the default Backup directory for the instance. These should match up with the drives and directories that you created from your common naming standards that are shown in Table 1. Far too many people never look at this tab, so they have all of their defaults, including the actual TempDB data and log files located on the C: drive.
Server Properties
If you miss this step during your SQL Server installation, you can change the default locations for data, log and backup files by right clicking on the instance in Object Explorer in SQL Server Management Studio (SSMS), choosing Properties, and then going to the Database Settings page, like you see in Figure 5. You can change the Database default locations for Data, Log, and Backup files from this dialog.
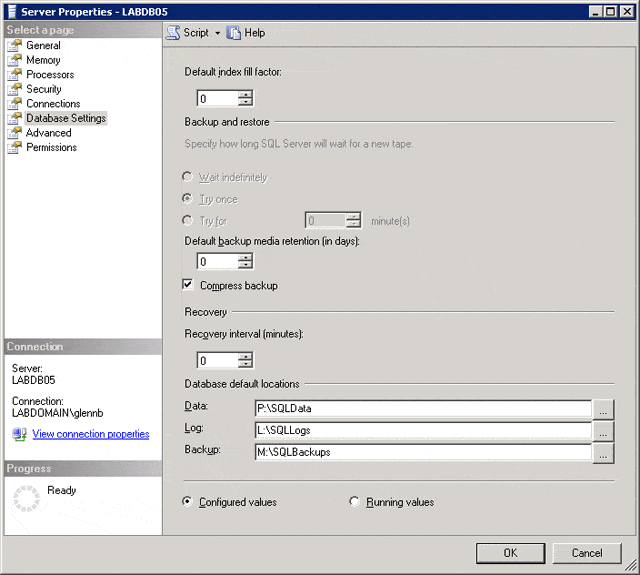
Figure 5: Server Properties – Database Settings
While you are on this page, you should strongly consider checking the Compress backup checkbox so that all database, differential and log backups will use native backup compression by default. Native backup compression is available in SQL Server 2008 R2 and SQL Server 2012 Standard Edition, and it is usually well worth using it, since you will get much smaller backup files and both your backups and restores will take significantly less time and I/O resources in exchange for slightly higher CPU utilization during the backup or restore. The extra CPU utilization is usually in the 5-10% range, and any modern server should not have any issues because of it, unless it is already under extreme CPU pressure.
If you have other SQL Server versions or editions (such as any edition of SQL Server 2005 or SQL Server 2008 Standard Edition) that do not support native backup compression, then a third-party tool such as SQL Backup Pro is a good alternative. It also offers a number of additional features that are not available with native backup compression.
While you are in the Server Properties dialog, you should look at the Memory page, as shown in Figure 6.
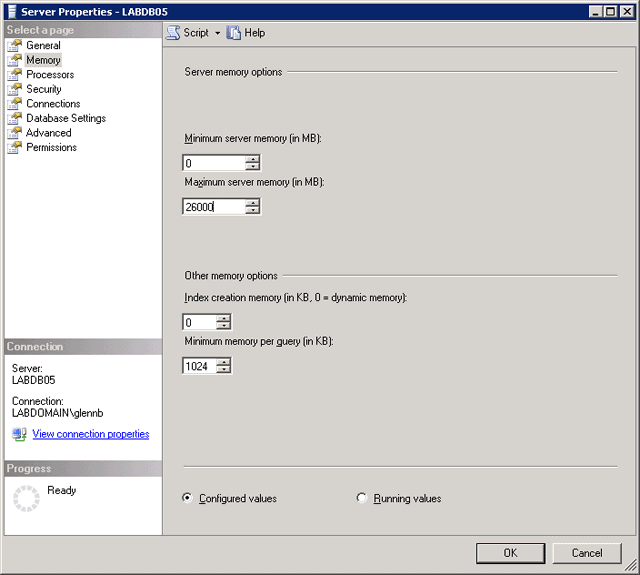
Figure 6: Server Properties – Memory
You will want to set an appropriate, non-default Maximum server memory (in MB) setting for your instance. This is particularly important if you have enabled Lock Pages in Memory (LPIM) for the instance. The value that you set here depends on a number of factors, including the amount of physical memory you have installed in the server, what SQL Server components (such as SSIS, SSAS, SSRS, Full-Text Search, etc.) are installed, and what other applications are installed and running on the database server. You should also be aware that Microsoft made changes to the Memory Manager in SQL Server 2012 that allow more components of the database engine to be controlled by this setting. This means that you may be able to set this value somewhat higher than in previous versions of SQL Server.
The main idea here is to make sure that the operating system is not under memory pressure and that other SQL Server components have sufficient memory to run properly. Rather than quoting a specific formula to calculate this setting, I will simply give some “rule of thumb” starting guidelines for a dedicated database server, only running the DB engine, (which is the ideal situation).
Physical RAM MaxServerMem Setting
8GB 6000
12GB 9000
16GB 12000
24GB 20000
32GB 27000
48GB 43000
64GB 58000
72GB 66000
96GB 90000
128GB 120000
192GB 184000
256GB 248000
I would start with these settings, and then monitor the Memory\Available Mbytes Windows performance counter after the server has been under a load, so as to ensure that the available memory to the operating system is always greater than 150MB. If this performance counter is consistently above this range, the “Max Server memory” setting can be increased to allocate additional memory to SQL Server. If you are in doubt about what setting to start with, it is better to start with a lower value and gradually increase the “Max Server memory” setting as necessary.
Next, you will want to go to the Advanced page in this dialog, as shown in Figure 7.
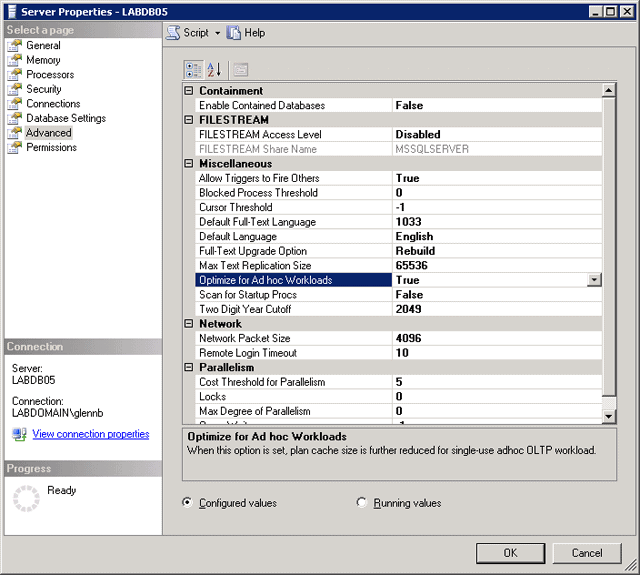
Figure 7: Server Properties – Advanced
You should change the “Optimize for Ad Hoc Workloads” setting from False to True. This setting was added in SQL Server 2008, and it is designed to help control the amount of memory that is used by single-use, ad hoc query plans in the plan cache. It allows SQL Server to store only a small stub of an ad hoc query plan in the plan cache the first time that the ad hoc plan is executed, which reduces the memory required for that plan in the plan cache. Unfortunately, this setting is not a panacea for single-use ad hoc query plans, since you will often see situations where a greater number of small plan stubs end up in the plan cache, so the memory savings may not be as much as you might hope for. One work-around for this situation is to periodically call DBCC FREESYSTEMCACHE (‘SQL Plans’); from a SQL Server Agent job to flush all of the ad hoc plans from the plan cache.
Checklist after Installing SQL Server 2012:
So now that we have SQL Server 2012 installed, here are the next steps:
- Install the most current Service Pack and/or Cumulative Update for SQL Server 2012
- Manually defrag your system drive after installing and patching SQL Server
- Add additional TempDB data files as necessary (see the Jonathan Keyhayias article here for more details)
- Enable the “Optimize for ad hoc workloads” instance level setting
- Enable the “Backup compression default” instance level setting
- Set an appropriate, non-default “Max server memory (MB)” setting for the instance
Summary
The second installment of this series has laid out the main steps required in order to install SQL Server properly, and then properly configure the instance level settings. This is to maximize performance, reliability, and security. By following these steps, you are more likely to experience a smooth operation with SQL Server, and thereby avoid a lot of headaches over the long term.
Load comments