Practical UI Test Automation – Locators and Asynchronous Loading
My previous article on user interface (UI) automation was a philosophical, hand-wavy thing, plus some practical thoughts on tooling. Now it’s time to dive into some mechanics. If you’re taking your first steps into UI test automation, then I have good news! We’re going to take a good look at both the most critical concept in UI automation (Locators), and one of the concepts that causes the most common gotchas (Asynchronous loading). Without further ado, let’s jump right in.
Locators: Everything Hinges Upon Them
The most critical concept for UI automation is that of element location. It’s called by several different names depending on what tool you’re using or who you’re talking to: find strategy, lookup, control identification, etc. The root concept is the same across all those vernaculars and toolsets: It’s how that tool’s scripts find the things on the page they need to interact with (or view, if you’re working mobile or desktop automation).
Poor locators will drive your team crazy for a number of reasons:
- Tests fail when the target element moves on the UI
- Tests fail when the UI changes elsewhere (new elements, elements deleted, elements moved, etc.)
- Tests fail when data changes-new rows appear on a grid, sort orders change, etc.
- Tests fail when locators are dynamically generated
Because locators are so critical to UI test automation, the first part article will walk through some fundamental concepts of how they work. I’ll focus on web automation; however, the concepts are the same for other types of UI technologies.
Before we start, there is one thing that’s critical to learn about locators: the strategies you learn on one project will change on the next. Locators are impacted by a tremendous number of variables:
- Stakeholders. They’re the ones defining how the system works.
- The technology stack you’re working with. ASP.NET creates web pages differently than Ruby on Rails, for example. A number of different libraries and tools on top of those can change how the UI is rendered.
- Controls. Regardless of whether you’re using commercial, open source, or in-house controls, you can bet they have their own approach to rendering.
- Designers. They do all this crazy layout and styling stuff that impacts how the DOM and page are structured.
- Developers. They’ve got to turn everything from the stakeholders, designers, and others into stuff that actually works. Their approach to building the pages has an extraordinary impact on how testable the UI is. They can be your worst nightmare. They can also be incredible allies who can give you lots of help in creating testable UIs. You choose how you want to relate to them…
Looking at the list above it’s easy to see how locator strategies will vary when you change projects. The best thing you can do is learn solid generalized approaches for working with locators, then learn how to adapt them when you move to another project.
Storing and Defining Locators
How you store your locators in your test scripts is critical. You absolutely must use some form of centralized definition for your locators. Avoid, at all costs, duplication of locator definition. Duplicated locators means you’ll have to edit ten, 50, or hundreds of files every time your UI changes. Note that’s when, not if your UI changes… That’s simply untenable over the long run. You’ll end up spending more time fixing broken tests than adding value elsewhere, and it’s guaranteed you’ll miss updating elements. Guaranteed.
There are several approaches to locator storage: dictionaries, static classes, and the page object pattern are just a few.
In this article I won’t be using any of these. I’m purposely leaving the definitions inline for clarity’s sake. Sometimes you do the wrong thing (or less-optimal-thing) when writing demo code, and this is one of those instances.
I’ll be covering page objects in a later article, but for now please remember: Kids, don’t do this in your production code!
How Locators Work
Locators give your test script a way to find objects of interest on the page or view. Locators rely on the structure of the page, properties of the target element, or sometimes both.
Let’s have a look at the Document Object Model (DOM) of a simple web page. Let’s imagine we’re writing a logon script that will be used as a component for other tests. In this case we’ll need to click the Login link, then fill in user name and password, and finally click the Login button.
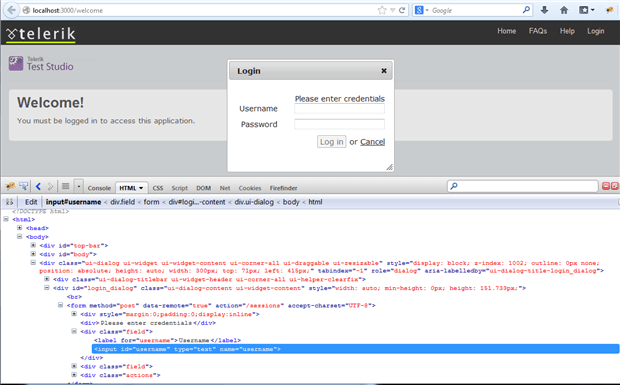
The image above shows part of the page’s structure including the elements for the Username label and input fields. The rest of the Locators discussion will focus on this example as we walk through different approaches for locating elements.
Unsurprisingly, locator mechanics differ between automation toolsets, and can also differ in how teams use those toolsets.
Types of Locators
Locators can be defined in several ways. You’ll absolutely need to know several different approaches for your project-it’s rare that every element in your page/view can be accessed with the same strategy.
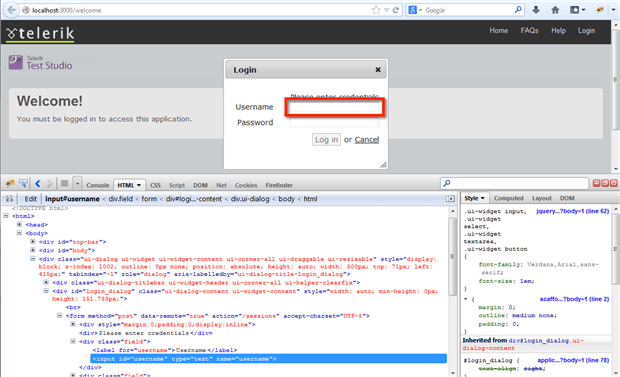
We’ll use the following screen as an example when walking through discussing the various locator types. We’ll focus in on locating the input element for the Username field-the one that’s highlighted on the page below and in the DOM displayed in the Firebug plugin for Firefox.
IDs
An ID is a value for an attribute in an HTML element. IDs aren’t required to be present, but can be generated by the platform stack, the control, libraries, or manually added/altered by the developer. If the page is valid HTML then every ID value must be unique across the entire page. Please note I explicitly said valid HTML. Invalid HTML pages might have duplicated IDs.
Using IDs in WebDriver is extremely simple as demonstrated by the following snippet of C# code which uses the browser object to find elements by their ID value and perform various actions on them:
|
1 2 3 4 5 6 7 8 9 10 11 12 |
browser.FindElement( By.Id("login_link")) .Click(); browser.FindElement( By.Id("username")) .SendKeys("testuser"); browser.FindElement( By.Id("password")) .SendKeys("abc123"); browser.FindElement( By.Id("login_button")) .Click(); |
IDs as locators bring us a couple tremendous benefits. First, because each ID value must be unique, our script can find that element regardless of changes to the page. Our element can move around, other elements can be added or removed on the page, but our script will always find the element we’re looking for.
There’s also a critical issue to consider about IDs: speed. Every browser resolves IDs lightning fast. Microseconds may not seem like much individually, but it can add up to significant blocks of time when you’re looking at a test suite with tens of thousands of tests and huge numbers of element resolutions.
With all these advantages, you’d think I’d say “It’s a Best Practice to always use IDs!” You’d be wrong. First off, there’s no such a thing as Best Practices (other than to use your brain) and secondly, there are times when using IDs will make your tests more brittle.
IDs Can Lead You Astray
Focus on always using IDs and you’ll run into failing tests immediately where those IDs are generated dynamically, meaning they change based on environmental conditions. Several factors may cause IDs in your system to be dynamically generated:
- Your platform. ASP.NET Webforms, for example, create IDs for controls based on their hierarchy in the control tree. Change the tree and all controls get new IDs.
- Your controls. Many controls, regardless of who makes them, generate IDs automatically for data they present-like rows in a grid.
- Your UI developers. Developers make many choices in constructing the systems. Some of those may impact how IDs get generated.
IDs are generally your friend. Know when to use them, but also keep a weather eye for situations in your testing where they’re not appropriate.
CSS
Cascading Style Sheet (CSS) class attributes can be used in a number of ways for element location.
First, you’re able to directly use the class attribute itself as a locator. Secondly, you can use JQuery-style selectors to find your elements.
CSS class attribute values don’t have to be unique. They rarely are since they’re intended to provide reusability of style definitions. That said, sometimes they’re unique1 enough to be used for the particular test you’re building.
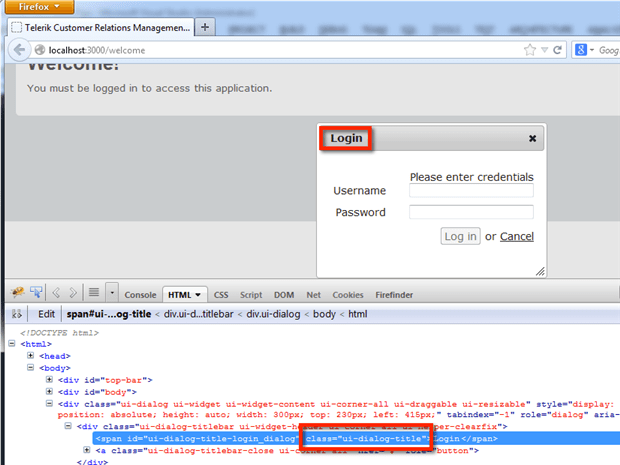
The Input field we’ve been looking at above doesn’t contain a class attribute, so we’ll use the Login title of the modal that pops up for an example:
CSS locators are nearly as fast as IDs when resolving in all browsers, so you don’t have to worry about speed impacts when rolling along with them.
CSS Selectors
CSS selectors enable you locate an element based on JQuery-like selector patterns. These selectors create a unique locator by piecing together values, element types, locations, and similar other items.
Below is a snippet showing the same C# code we used earlier for demonstrating IDs, but this time using CSS selectors:
|
1 2 3 4 5 6 7 8 9 10 11 12 |
browser.FindElement( By.CssSelector("a[id^='login']")) .Click(); browser.FindElement( By.CssSelector("label[for='username']+input")) .SendKeys("testuser"); browser.FindElement( By.CssSelector("label[for='password']+input")) .SendKeys("abc123"); browser.FindElement( By.CssSelector("input[value='Log in']")) .Click(); |
CSS selectors are fast to resolve, very flexible, and are fairly understandable to read. Unfortunately CSS selectors can only walk down the DOM; they can’t be used to move from one part of the DOM up and over to another area.
For that you’ll need our next locator type: XPath.
XPath
XPath may be one of the most abused, misunderstood, and outright hated technologies created in modern times. Perhaps ever. It contends with SharePoint and bad opera for the top place on my personal list of all things hated.
XPath is an extraordinarily powerful tool that enables you to inspect values of elements; navigate up, across, and down the DOM; and to create extremely powerful locator strategies.
It can also be extremely brittle and high-maintenance if poorly used. Additionally, XPath is the slowest locator strategy for all browsers, especially Internet Explorer.
Overly brittle XPath locators are those which rely on starting too high in the DOM, or which rely on risky indexing. Returning to our username input field, a poorly formed XPath might look like this:
/html/body/div[3]/div[2]/form/div[2]/input
Two main problems impact this XPath: it starts from the document’s root HTML element, and it uses fixed indexes to select which specific element from a group to use, e.g. div[3]/div[2]. This means nearly any change to the document’s structure will break the locator and cause the test to fail.
Instead of that messy XPath, let’s start from the input field we need, and look up and around the DOM for something unique that’s close by. The text label with Username will serve well for us! From there we can move up one level, over to the sibling input label and back down. We can now use a much simpler, much more flexible XPath of:
//label[text()='Username']/../input
This locator also shows XPath’s ability to walk up, over, and down the DOM to create complex locators.
XPath is a tool. Used with careful thought it’s a great tool. Used with reckless abandon it’s a recipe for lots of pain.
Text Content
There are cases where you’ll want to avoid fixed locators all together and instead think of querying objects on the page to retrieve information you need. I find myself doing this regularly when working with table or grid tests.
If you’re building a test that checks if you can properly retrieve data from a grid row, then you don’t want that test reliant on the specific order or number of the row in the grid. In this case it makes a lot of sense to avoid locators, and instead get rows from the table that match a particular criteria.
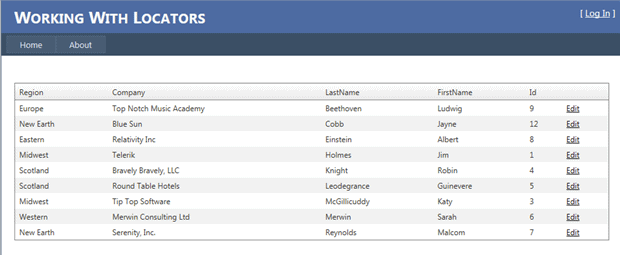
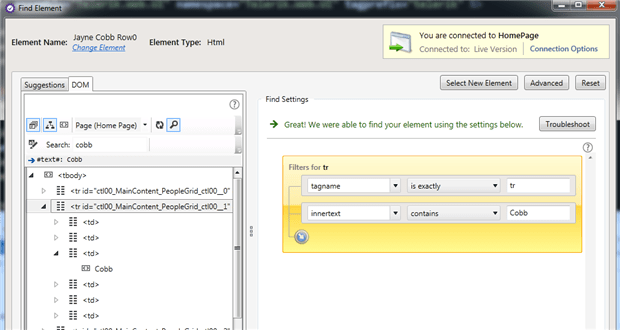
Using the table below, imagine a test whose purpose is to verify that clicking the Edit link on Jayne Cobb’s row pulls up an editing grid with the proper values pre-populated. I wouldn’t want this test to be dependent on the location of Jayne Cobb in the grid, nor would I want the test to fail if the Edit link changes columns.
There are a number of approaches for this. I could use an XPath query to return a collection of the table’s rows and iterate through that. I could use a different XPath query to return just the row I’m looking for. I could also get all the rows in the table and iterate through them to find the particular row I want. Text within an element can be used for element location; however, as with XPath you’ll need to be extremely careful how you go about using this strategy. You’ll also need to understand the difference between Text Content and Inner Text, and you’ll need to understand how your automation toolset supports this.
Text Content is the text, including whitespace, of the element you’re looking at. Only that element, not its children.
Inner Text is the text of the current node plus its children. There is no whitespace between the text of the elements, but text within each element is properly shown. Inner Text is extremely useful when you’re doing something like inspecting a menu for particular values. A quick “inner text contains ‘foo'” may be just the trick you need in that case.
The trick about Inner Text, or Text Content, is that it’s implemented differently depending on your automation driver, framework2, or tool. For example, WebDriver doesn’t actually support grabbing text or inner text for locators. Instead, you’ve got to get a reference to the element and check its Text property.
This makes finding specific row elements in a table a bit dramatic-you need to iterate through the rows and check each one for the text you’re looking for.
|
1 2 3 4 5 6 7 8 9 10 |
IWebElement table = browser.FindElement(By.Id(PeopleGrid)); IWebElement targetRow = null; IList rows = table.FindElements(By.TagName("tr")); foreach (var row in rows) { if (row.Text.Contains("Cobb")) { targetRow = row; } ? } |
Frankly, you’d be much better served in this case by using an XPath and its Contains function:
//table[@id='PeopleGrid']//tr[contains(.,'Cobb')]
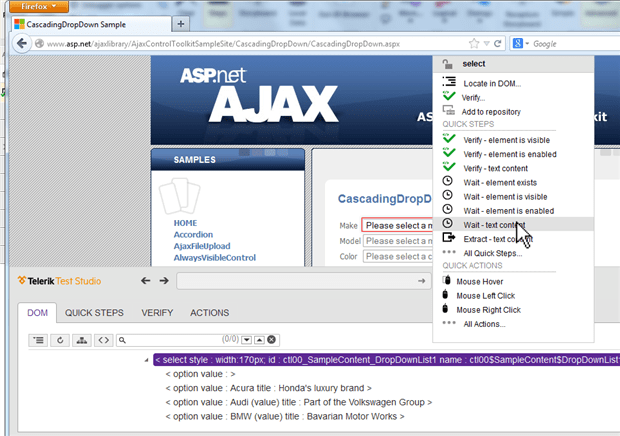
Some other drivers like Telerik Testing Framework, or tools like QuickTest Professional or Telerik Test Studio allow you to use TextContent or InnerText right in their locators:
Other Attributes
Other attributes may be handy when you’ve nothing else to fall back on. Image ‘src’ attributes, link targets, or ‘name’ attributes may all be good choices for locators.
None of these attribute types are mandated to be unique, but again, avoid thinking about perfect locators and look for a strategy that meets the need at hand.
Combining Strategies
Most automation toolsets enable you to string together strategies to form one locator. This lets you get precise, flexible locators when you’re unable to craft one directly for the element you’re targeting.
For example, I’ve often found myself missing an ID value on the element I want; however, there’s one close upstream in the DOM. In this case I can use that element’s ID and a short XPath to nail down the element I need. I could also use CSS/JQuery selectors in this example, but I think you get the point!
Developers Can Help With Locators!
I’m going to fall back to the regular refrain you frequently hear from me: testing works best when it’s a whole-team activity. Automation works especially well when you’re able to work closely with your systems’ developers. Developers can do awesome things to make your automation work much easier, especially when it comes to helping out with good locators.
Take a situation where you’re struggling because IDs for a control are dynamically generated by the platform you’re working with. ASP.NET is particularly bad in this regard, especially since the ID varies by the control’s position on the page. If another control is added to the hierarchy then the ID you’re relying on will change.
In this case developers can prepend or append a static value to the control, resulting in an ID you can use to lock in on.
Developers can also work to inject key values in dynamically generated IDs, binding those IDs to data drawn for user records, for example. In this case you can now use a locator for a row where previously you would have had to avoid it.
Get Comfy With Your Locators
Locator strategy is the most critical aspect of your system to learn, and you need to learn it right quickly. Understanding how your system’s platforms, toolset, and development team stack together to impact your locators will greatly ease your automation tasks. Understanding how working with developers can further ease your automation tasks will make you even more productive!
The Impact of Asynchronous Loading
Next, I’m going to focus on helping you avoid tearing out your hair over odd timing issues in your tests. Here’s a scenario very common to teams new to, or even moderately experienced with UI automation:
A test script is created and validated on the tester’s/developer’s system. It works, so it’s checked in to source control and added to the regular automation suite for regular execution.
Later that day the new test runs in a different environment (different execution systems, different application servers, etc.) and the test fails. The error message may be something rather strange indicating a target element or piece of data on the page couldn’t be found. You re-run the test in your local environment and the test passes.
A cycle of tweaking timing and re-testing begins as you and your team try to get the tests stable. Frustration mounts, wasted time increases, and occasionally teams abandon automation efforts completely due to the lack of value.
Why These Failures Happen
Timing problems like this occur because of differences between a browser loading an entire page versus updating a part of the page. (The same notion holds for desktop or mobile application views.) Understanding the differences is a critical step in building stable UI tests.
Understanding the Page Load Cycle
Loading or refreshing/reloading pages in a web browser is a blocking action. This means the browser stops until the page is finished loading. Breaking down the actions involved in a page load is very helpful in understanding what’s going on behind the scenes.
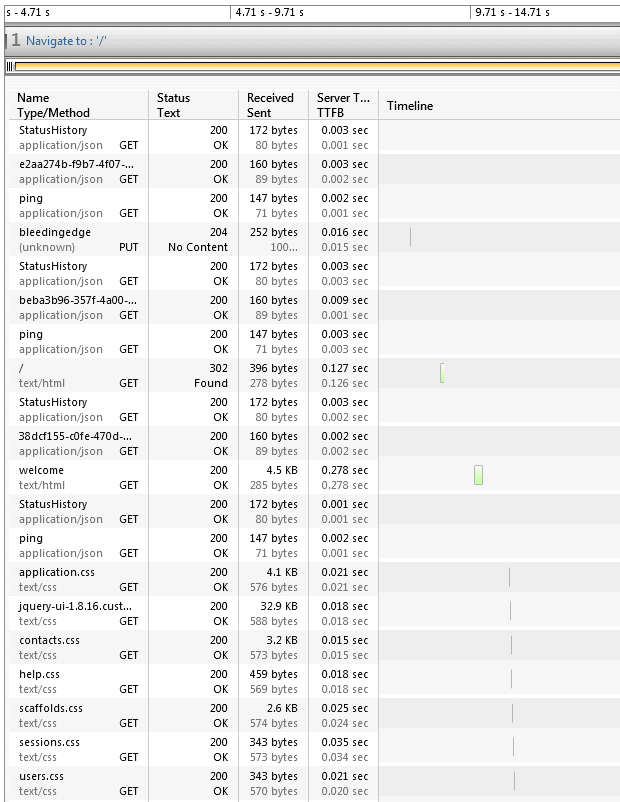
When a browser navigates to a new location a series of conversations kicks off between the browser client and the web server. The browser asks the server what it has available at that particular URL. The server responds by sending all the static items making up that page: text, images, CSS, JavaScript, etc. The image below is from Telerik’s Test Studio and shows parts of this conversation. (Many other tools give you the same sort of visual representation, too.)
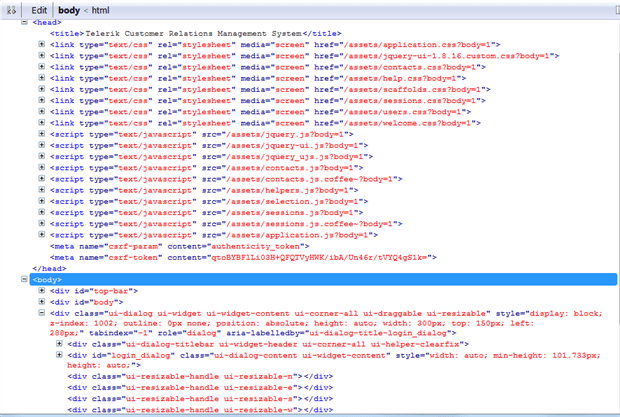
The resulting Document Object Model (DOM) hierarchy for this particular page looks like this:
It makes sense that a browser would stop all other actions while these pieces are being received and assembled. Every browser sets a metaphorical Stop! sign on the page’s DOM as this is occurring. The flag isn’t cleared until all the chunks of data are received and assembled/rendered on the page. Tools such as web automation drivers check the status of this flag before moving on to their next actions.
AJAX and Client-side Tools: A Wrench in the Works
Loading and reloading a page is an expensive action. It’s time consuming for the users and can directly impact your organzation’s costs if you’re paying for bandwidth usage. Moreover, it’s senseless to incur that hit when only a small part of the page has changed. AJAX is one technological approach that lets the client call back to a server and pull back only the data that’s needed for the page.
Automation problems arise in these situations because these calls are asynchronous-they don’t block the page via a page load/refresh-they’re specifically designed to avoid doing that in order to skip the time and bandwidth consuming process. Microsoft’s AJAX demo pages’ Cascading Drop Down example shows this issue perfectly. In the image below, the Make options are populated, but the Model aren’t.
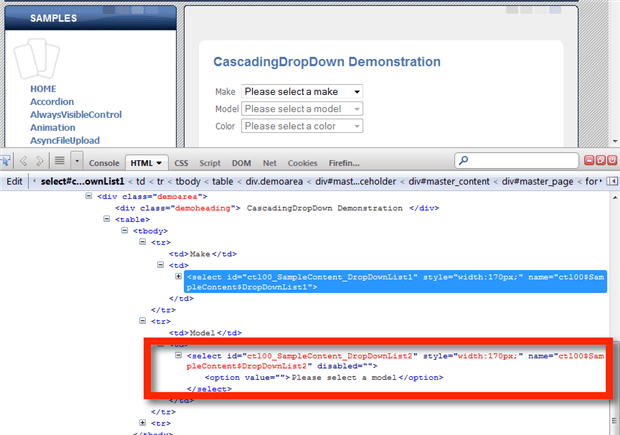
As a user selects a Make, there’s a callback to the server, and a new set of option items are added to the DOM:
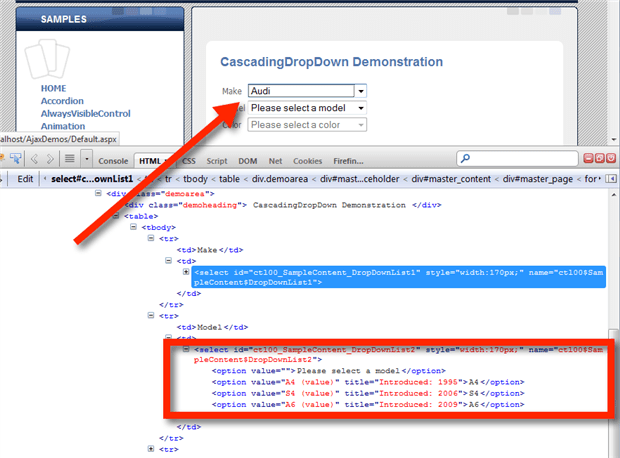
Because this is an AJAX call, there’s no page reload/refresh. As a result, there’s no change to the “stop sign” on the DOM. Browser automation tools don’t know to stop while the call is in progress. As a result, test failures pop up because of the delay as the server callback completes.
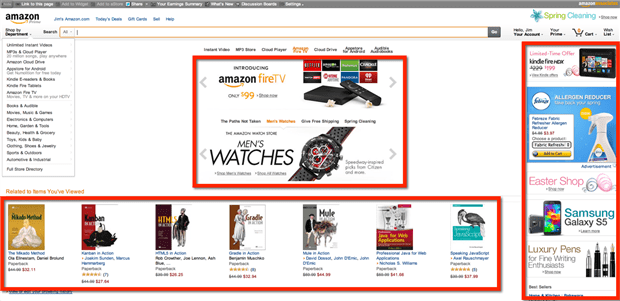
The example above is fairly simplistic-it’s just a series of one-at-a-time calls. The real world is much more complex. Think about Amazon’s homepage which has multiple concurrent AJAX calls going on simultaneously!
Even frameworks like JQuery, ember, and other client-side tools can also cause page updates without altering the page’s stop sign. Think about pages that cause new controls or content to appear based on the actions of a user. There might not be a server call involved; the UI may change based purely on state in the client!
Staying Sane With Reliable Solutions
Too often teams rely on bad workarounds for asynchronous operations, like falling back to scattering Thread.Sleep(30000) statements through a test suite. These hardwired pauses work, but they’re the completely wrong approach to solving the problem. These fixed delays add up to significantly slower test suites, especially when you’re talking hundreds of tests. Simple math shows 30 seconds of delay in 1,000 tests is 30,000 seconds. That’s over eight hours just in manual delays!
Manual pauses are a horrible way to solve timing issues in your tests. Instead, automated tests should rely on waiting for an explicit condition in the system-nearly always the condition that’s needed for the next step in the test.
Conditional Waits to the Rescue!
Rather than relying on hardwired manual delays, good automation suites leverage their toolsets’ support for dynamic polling that pauses only as long as needed until an explicitly defined condition is met. These patterns are supported by every automation toolset in one form or another.
Why Wait
Dynamic conditional waits have several advantages over manual pauses (Thread.Sleep(), etc.). First, you’ve explicitly set the condition to wait for. Clarity of intent in software is critical: people looking at the script later on understand exactly why the script is pausing. There’s far less chance for misunderstanding the script’s intent.
More importantly, the wait isn’t hardwired, it’s dynamic. That means your scripts will always adjust to varying conditions in your environment. Is the server bogged down with other work today? You won’t run into failures because your timing was set up for yesterday’s server speed. Network crushed by traffic? Again, no worries. Your explicit waits’ dynamic timeout periods will flex and cover you in non-extraordinary circumstances.
Finally, you won’t be adding hours to your test suites’ execution times because the dynamic waits take as long as needed for the condition to be met (or the timeout expires). Your suites will remain running as quickly as possible
How to Wait
Conditional wait statements (also called explicit waits) generally work like this:
- A condition to wait for is defined. The condition might be a specific item being loaded into a menu, a control appearing on the page, or text appearing in a search results box.
- Actions are taken on the page firing off the server callback or other dynamic action
- The explicit wait statement/step/action is reached, and a check is performed to see if the condition is met
- If the condition is met, the statement completes and the script moves on
- If the condition is unmet, the script sleeps for a moment
- Repeat this loop until the condition is met, or a timeout is reached
The exact mechanics of explicit waits varies by the automation tool you’re using. Selenium WebDriver provides the WebDriverWait class. Below is a snippet in C# showing how to handle the AJAX cascading menus shown earlier:
|
1 2 3 4 5 6 |
WebDriverWait wait = new WebDriverWait(browser, TimeSpan.FromSeconds(10)); wait.Until(ExpectedConditions.ElementExists( By.XPath("id('ctl00_SampleContent_DropDownList/option[text()='" + menu_item_to_wait_for + "']"))); |
Other tools handle explicit waits in different manners, but the concept’s the same. Telerik’s Test Studio, and other similar tools, give you the ability to add in explicit waits as you’re crafting your tests.
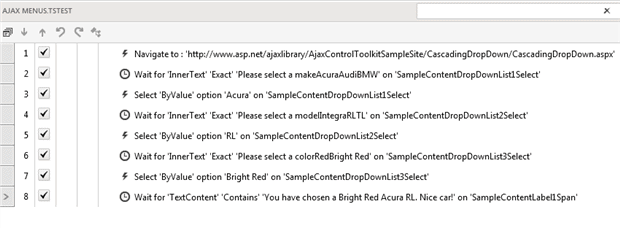
The resulting tests look similar to this:
What to Wait For
We’ve quickly run through the mechanics of how an explicit wait works, but we’ve left off a tricky piece of the puzzle: what condition you should wait on. This actually isn’t all that tricky a concept. The easy, rock-solid trick is this: wait on the exact condition you need for the next step in your automation script.
Take the cascading menu example shown earlier: If your test script is going to select an Audi for make, then your first wait would be for the list of menu options to contain “Audi.” If you’re selecting A4 for the model, then wait on “A4” to appear in the model list.
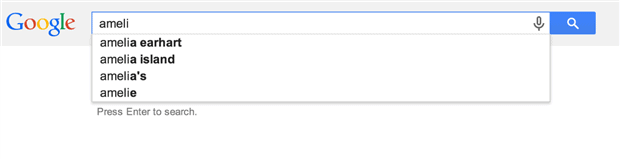
Dynamic search results lists are another common problem area, but they’re solved in exactly the same way. Consider Google, which uses AJAX calls to give you a “look ahead” feel as you’re typing your query in. If you’re wanting your script to search for Amelia Earhart, then you might input “ameli” to start the search. The proper wait condition for this example would be for the results list to contain “amelia earhart” at which point you know it’s safe to select that item and move on with the step that selects that entry.
Work with Developers
The scenarios above are fairly simple ones. Many times multiple AJAX calls will be happening concurrently, or there may be other UI complexities falling into place. Rather than struggling with dealing with these situations, teams working on UI automation should be working as a whole team-developers pairing up closely with testers or those creating automation scripts.
Developers are able to quickly clear up page lifecycle issues for testers. Moreover, developers can help make the system’s UI more testable in AJAX scenarios. It’s a trivial matter for a developer to add a hidden, empty HTML element on the page after a complex set of concurrent AJAX has completed. This gives testers something simple to latch their wait statements on, eliminating confusion around what particular conditions the script is trying to delay on.
Learn the Patterns, Learn Your System
Learning how to select and find locators in your applications, and when to change locator strategies, is an essential foundation of UI test automation. Similarly, learning to appropriately handle asynchronous situations in your systems’ user interfaces is a critical part of building stable, valuable automation suites that won’t kill your team with maintenance costs.
Take some time to learn how the pages in your system are structured, and how they deal with asynchronous situations, and ensure you’re spending lots of time talking with the developers responsible for those pages. You’ll find your frustration levels dropping and your success rates climbing.
1This brings up the important concept: locators don’t have to be perfect. They have to be good enough for the task at hand. Perfection is the enemy of getting stuff done!
2I talked about the difference between UI automation drivers and frameworks in an earlier article.
Load comments