Web developers generally get asked by friends to write them a plain simple web site for their own personal business. “It doesn’t have to be a truly professional thing,” they usually say while pleading you for help, “it just has to let me track my business activities.” This happened to me recently when a close friend of mine asked for a small web site that would enable her to stop having to record work tasks on her paper agenda. No big deal, I thought. I tried to tempt her with Google calendar and mobile apps, but she wanted to do it the way she’d grown used to. After a busy weekend, I served her a working prototype that had a bunch of HTML forms and a couple of SQL Server tables. She was so happy and started using the site immediately. Guess what? As expected, I was then swamped with a long list of small changes that ‘shouldn’t take much to do’ but would make the site much more enjoyable for her to use. One idea in particular intrigued me, and initially scared me a bit, I’ll admit. She wanted to take pictures and associate these with a work task.
Here’s how my friend described the use case: “When I’m busy doing a task, I might want to take a picture of what I’m doing, even when all I have with me is a smartphone. Can you modify the web site so that I can take a picture with the smartphone’s camera?”
I was about to say to her that it was impossible to do this from a web site page, and that she needed an ad-hoc mobile app for that. Then I paused for thought. Maybe you don’t need to use one of the HTML5-based frameworks that are used to build native apps. Then it hit me: Of course you can take pictures from within a web page, either through the camera or the webcam of a mobile phone, a tablet or even a laptop. This article explains how to do it with JavaScript and HTML. The final product is a plain HTML page that you visit using a standard browser on a mobile phone, a tablet or even a laptop.
The Media Capture specification
Back in 2014, the W3C issued a Media Capture specification to define the way that the HTML INPUT file element can be extended to access any media capture mechanisms that were available on a particular device. This device could be the camera, camcorder, microphone or just the library of media files. The Media Capture specification is defined here : http://www.w3.org/TR/html-media-capture/.
According to the specification, the INPUT file element features an additional attribute named ‘capture’. The recommended syntax is shown below:
|
1 2 3 4 |
<input type="file" name="uploader" id="uploader" accept="image/*" capture /> |
The accept attribute is not strictly related to the Media Capture specification. You can use it to simply suggest to the browser which files it has to show if you browse for a file to upload. Note also that the attribute is not widely supported by browsers, especially within the mobile segment. For more information on the accept attribute you can check http://caniuse.com/#feat=input-file-accept.
The most relevant part of the Media Capture specification is the capture attribute. According to the specification, the attribute is a Boolean value that indicates the preferred mechanism for picking the file to upload. If you set the attribute, then you’re telling the browser to use one of the capture mechanisms the device has available, instead of the file system.
This is the only the theory, however.
In practice, the net effect of the above HTML snippet changes depending on the browser and the form factor of the device (mobile, desktop). Furthermore, you’ll be surprised to see that, in practice, mobile browsers mostly ignore the capture attribute and pay greater account to the value of the accept attribute.
Taking Browsers to Capture Media Content
Let’s see what some browsers do when processing the HTML file input element with the capture attribute.
|
1 2 3 4 |
<input type="file" name="uploader" id="uploader" accept="image/*" capture /> |
Desktop browsers always show the Browse dialog box and use the value of the accept attribute to offer a filtered list of files. At present, desktop browsers completely ignore the capture element. Things are slightly different on the mobile side. You can find plenty of examples and posts discussing a slightly older Media Capture specification that uses the syntax below:
|
1 2 3 4 |
<input type="file" name="uploader" id="uploader" accept="image/*" capture="camera" /> |
As you can see, the capture element seems now to accept a string instead of a Boolean value. Feasible values for the capture attribute seem to be ‘microphone’, ‘camcorder’ and ‘camera’.
Both iOS 6 and Android 4—the oldest versions of the most popular mobile operating systems supporting file upload—completely ignore the capture attribute. At present, both the above code snippet and the code snippet below produce the same output.
|
1 2 3 |
<input type="file" name="uploader" id="uploader" accept="image/*" /> |
Only the value of the accept attribute is processed, and browsers use it to decide which options to offer to the actual user. Figure 1 shows the effect of the code snippet on a recent iPhone device. The user clicks the camera button to add a picture to the currently displayed record and the iOS device responds as shown. The screenshot is taken from a device equipped with iOS9.
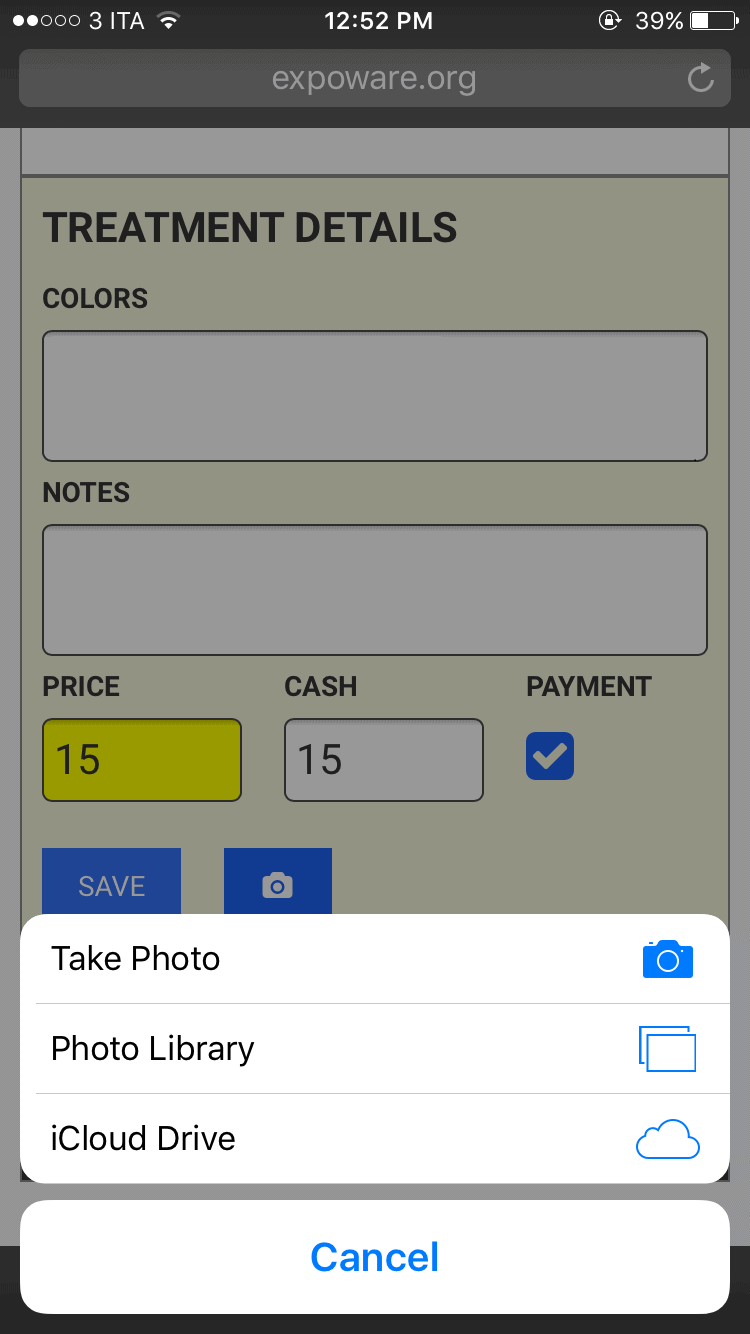
FIGURE 1. The HTML Input Element on iOS 6+ devices
In Figure 2 a sample HTML page shows what happens when you view it with an Android device.
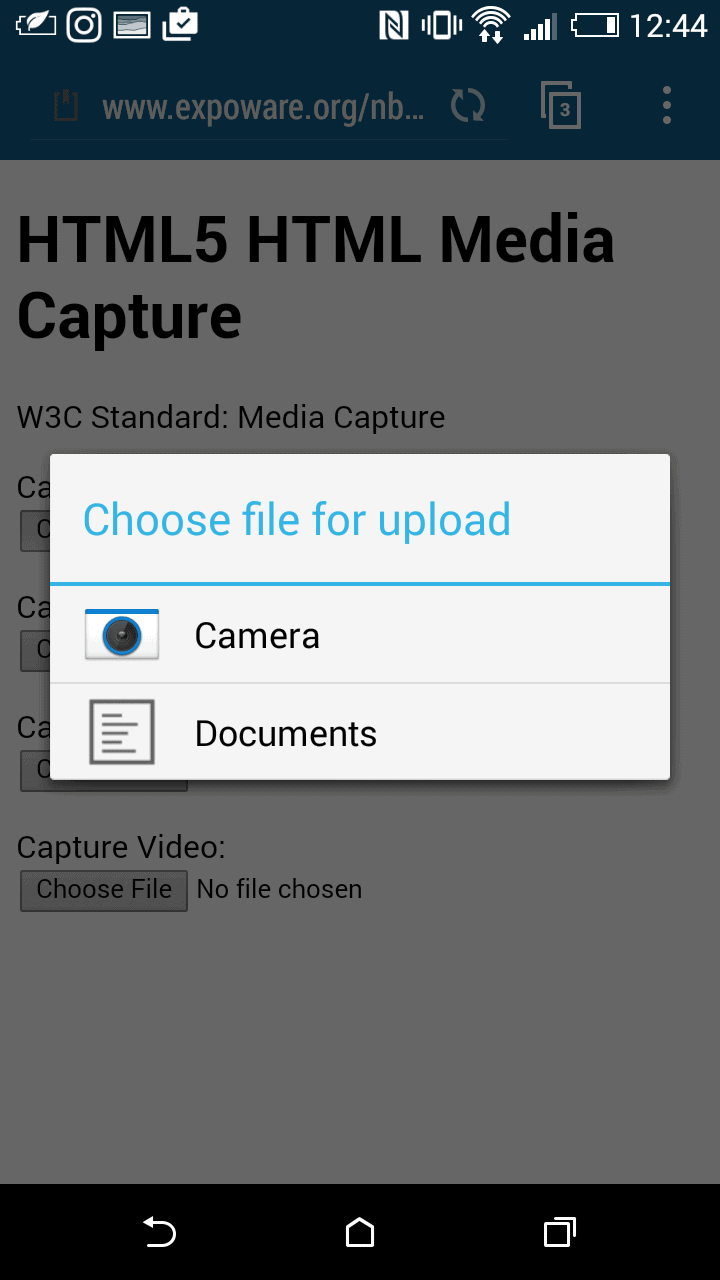
FIGURE 2. The HTML Input Element on Android 4+ devices
My friend wanted to use the camera to snap new pictures to upload to the web site. This was only relevant for a mobile device so the camera button had to appear on the website only when accessed from the mobile. This was one of those weird situations in which it wasn’t enough to use Bootstrap or responsive design to hide the camera button on the desktop. To make sure the Camera button only appears on mobile devices running on at least iOS 6 or Android 4, you need a specific device detection library. For the purpose, I used the community edition of WURFL.JS. (For more information, check out http://web.wurfl.io.)
The markup discussed so far, the old familiar INPUT file element with the extra accept attribute, serves well the purpose of letting mobile users to upload a picture that is already saved to the local gallery or to snap a new one. In fact, by selecting the Camera option (See Figure 2) the device will switch to the camera to let users tap and save a new photo.
This is only part of the work required, though, for a realistic web page. The process of selecting an existing photo or taking a new one is only the first part of a larger slice of work. Having got the image, how would you then upload the image to the server and store it?
Uploading the File to the Server
For an expert ASP.NET developer, it is no big deal to upload an image to the web server using the INPUT element. The browser does most of the work required on the client side. On the server side itis sufficient to arrange a controller endpoint that can accept a parameter of type HttpPostedFileBase, as below.
|
1 2 |
[HttpPost] public string AddPhoto(HttpPostedFileBase selectedPicture) { ... } |
Initially, I coded the file-selection and upload tasks in the traditional way. This involved placing the INPUT file element in a HTML form and letting the submit button of the form do the hard work of serializing the form’s data and uploading it via the browser. It worked fairly well as long as I tested it on the desktop. When I moved it to a staging web server and accessed the pages with a mobile device I noticed a couple of interesting things.
- First, submitting a form via the browser in the standard way is not a pleasant experience for the user: Not that this really comes as a surprise, but especially on an average mobile phone is can be painfully slow.
- Second, when you take a picture with a mobile device the resulting picture is typically quite large as most devices these days have amazing cameras.
The combination of these two factors made for a typical unacceptably long upload time with nearly no feedback for the user. My friend didn’t like it and asked for some improvement.
The primary improvement to the upload procedure is to change it to use XmlHttpRequest and FormData. You programmatically build up an HTML form using the FormData object and, when done, pass it to XmlHttpRequest to post to the remote URL. The server side of the code remains unchanged: a controller endpoint accepting a HttpPostedFileBase object.
To hook up into the upload client side procedure, you define a JavaScript handler for the onchange event of the INPUT file element.
|
1 2 3 |
<input type="file" name="selectedPicture" id="selectedPicture" accept="image/*" onchange="pictureSelected()" /> |
The onchange event fires every time a file is selected from either the browse dialog or the device gallery, or if it is taken with the camera. Here’s the skeleton of such an onchange event handler:
|
1 2 3 4 |
function pictureSelected() { var filename = document.getElementById('selectedPicture').files[0]; : } |
Retrieving the file name is an easy step. The code above shows how it could work with the DOM API. All files selected through the INPUT element are gathered in the files collection of the underlying DOM object. If you enabled multiple file selection on the INPUT element (by adding the multiple attribute) then all selected file names are made available through the files collection.
Once the names of the selected files are known, you have to find a way to upload their bits to the web server. There are a number of emerging API to read the content of local files through JavaScript. An interesting one is FileReader that you find described here https://developer.mozilla.org/en/docs/Web/API/FileReader. As with any relatively new web APIs, FileReader aims at making development super easy but at least initially browser support may be painful. Unless you can exercise a strict control over the browsers being used, I wouldn’t suggest you go for it now. Given my very particular requirements—a web site for a single user—it was definitely an option: I even made some tests with FileReader. In the end, though, I opted for a more traditional solution: filling up a form and posting via XmlHttpRequest. Here’s how.
|
1 2 3 4 5 6 7 8 9 10 11 |
var fd = new FormData(); fd.append("file", document.getElementById('camera').files[0]); fd.append("taskId", @Model.TaskId); // Add more data to the form (if required) : var xhr = new XMLHttpRequest(); if (xhr.upload) { // Use the ad hoc uploader to support // advanced features such as cancel/progress } |
If defined, the upload property indicates the XmlHttpRequest ability to support advanced monitoring features, such as a progress bar.
|
1 2 3 |
xhr.upload.addEventListener("progress", progress, false); xhr.addEventListener("load", complete, false); xhr.addEventListener("abort", canceled, false); |
The following code registers an event handler for reporting back the progress made on the upload, and to handle completion of the upload. Finally, you can even implement a cancel feature. Next, you simply start the Ajax post to the web server endpoint.
|
1 |
xhr.open("POST", url); |
Note that XmlHttpRequest may support progress events for both download and upload operation. However, download events fire on the XmlHttpRequest object itself whereas upload notifications are fired on the upload child object.
Refreshing the user interface
Figure 3 presents a screenshot of the upload feature of the sample application.
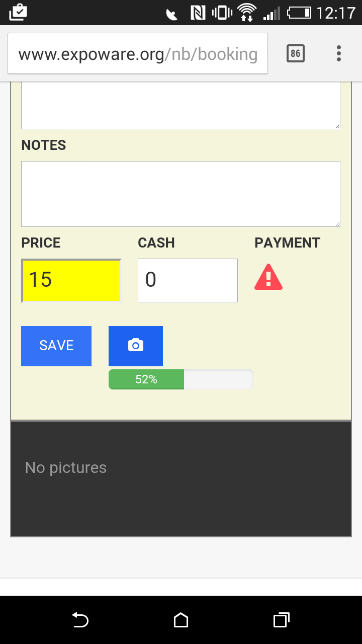
FIGURE 3. Monitoring the upload of a photo after taking it
One more tip for the user interface is to keep the actual user interface of the HTML INPUT element hidden and use a plain button to control it programmatically. In Figure 3, you can see a button with a camera icon. It’s a plain Bootstrap-styled client button. In the same page, hidden from view, there’s the INPUT file element. When the camera button is clicked, it simply passes the event on to the INPUT element.
|
1 2 3 4 5 6 7 |
<button type="button" class="btn btn-primary" onclick="takePicture()"> <i class="fa fa-camera"></i> </button> <input type="file" name="selectedPicture" id="selectedPicture" style="display:none;" accept="image/*" onchange="pictureSelected()" /> |
The click-handler of the button looks like below:
|
1 2 3 |
function takePicture() { $("#selectedPicture").click(); } |
You have an extra HTML element around, but the final effect on the user is much nicer.
Summary
When my friend wanted an application that allowed her to add iPhone picture from within a mobile web site, I admit that it looked like a very hard challenge to take on. In the end, though, I not I implemented the requested feature but I enjoyed doing it too. It led me to discover many features of the HTML DOM and XmlHttpRequest that I didn’t know about. The lesson I learned is that you don’t need a special mobile app to take pictures with an iPhone or Android device and upload them to a server endpoint: you can do it all in the HTML5 and ASP.NET that you’re familiar with. Yeah, and SQL Server too.
Load comments