Contents
- Acceptance Testing With FitNesse, The Overview
- On Acceptance Tests vs. Unit Tests
- The Two Worlds of FitNesse
- Developing a FitNesse Test
- FitNesse Organization
- Writing Fixtures to Support Test Cases
- Writing Application Code to Support Test Fixtures
- Test Suites and Other FitNesse Infrastructure
- Setting Up FitNesse
- Conclusion
FitNesse is an open-source framework for automating as much as possible of the process of writing acceptance tests for software systems.
|
Part 1: FitNesse Introduction and Walkthrough |
Acceptance tests compare what your software actually does with what the user of the software, or customer, has asked for. Wikipedia describes it quite succinctly: “Acceptance tests… are usually created by business customers and expressed in a business domain language. These are high-level tests to verify the completeness of… user stories.” Usually, the people for whom the application is written will test the software against the specification, in order to check that everything that was specified is being delivered. FitNesse is designed to make this task easier.
You write FitNesse tests in your browser using a very simple markup language, in much the same way as you would write a wiki. Actually, exactly like you would write a wiki, because that is what the front end is. Although you can create very complex and technical tests, written and maintained by developers or by testers, the elegance and power of FitNesse is that you can let your business stakeholders create tests. So the person who comes up with a use-case can actually “code” that use-case using FitNesse’s test/markup language customized by you, the developer, via FitNesse fixtures. Fixtures are adapter classes, ranging from the simple to the complex, that provide a well-defined and well-controlled API to your application code base.
On Acceptance Tests vs. Unit Tests
Do you need acceptance tests if you are well-covered with unit tests? Yes, you do. Carl Manaster states this eloquently on StackOverflow: “Acceptance tests tell you whether your code is broken, while unit tests tell you where it’s broken; these are complementary and valuable bits of information. Acceptance tests are better at letting you know when you’re done.” From FitNesse’s own website: “unit tests support building the code right whereas acceptance tests support building the right code“. This implies that acceptance tests should be essential in any software implementation project.
Both acceptance tests and unit tests can-and I would argue-should be done with test-driven development (TDD). Conceptually this is quite straightforward on a single level: First you write your test which will inevitably fail since the code hasn’t been written: Then you write just enough code to make it pass, at which point you are finished. 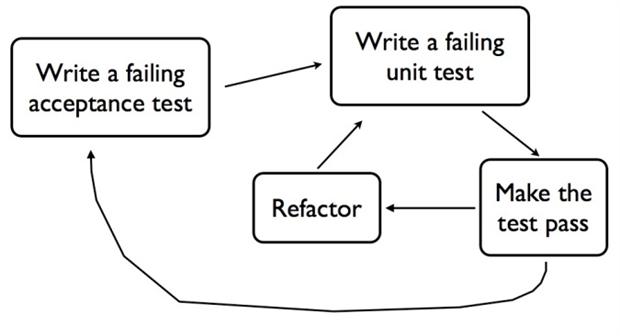 When applying this approach to unit and acceptance tests together, you simply combine the steps in their natural order: write an acceptance test, design the code to support that and write unit tests, then finally write the code to make the unit tests pass, and thereby make the acceptance test pass. This process is known as Double Loop TDD, part of the credo of the London School TDD design technique, among others. Emily Bache presents a very eloquent and concise description of this process in Outside-In development with Double Loop TDD and gave her kind permission to use the illustration at right that sums up double loop TDD in a nutshell.
The Two Worlds of FitNesse
I was going to target this series of articles to those readers who are familiar with FitNesse but when my editor started asking about why I wanted to do an article about exercise, I realized the necessity for a proper introduction to the topic. So this first article covers a complete example illustrating the use of FitNesse using TDD. Subsequent installments in this series will then delve deep into the tips and techniques for maximizing your FitNesse productivity.
FitNesse, out of the box, is for Java development. With the supplemental fitSharp library, it is a simple matter to use it for .NET development instead. (Either way, though, the FitNesse server that you run on your local machine requires a Java runtime.) Most applications will also require database interaction as well, which requires the separate DbFit library, available for either Java or .Net. While the basic principles of this article are applicable to both Java and .NET, the code-behind presented is all in C# and the subsequent installments will be .NET-centric as well.
Developing a FitNesse Test
Converting Use-cases to FitNesse Tests
To illustrate how to develop an acceptance test, we’ll need a simple example. We face the problem that a real acceptance test based on a ‘user story’ will be rather too complicated to put into an article as an example, and would risk distracting the reader. We won’t attempt this: Instead we’ll assume that one of the many capabilities of the system you are developing is to simply determine the frequency of word use in an arbitrary text passage. In this string, for example, “black blue black blue red black green green” you want to be able to tell that there are 2 occurrences of blue, 3 occurrences of black, and so forth. And you want these reported in order of decreasing frequency. Putting that in tabular format:
| Name | Count |
|---|---|
| black | 3 |
| blue | 2 |
| green | 2 |
| red | 1 |
You also want to get a summary for the most frequently-occurring word as well as the passage to which it belongs:
| Word? | Occurrences? | Different Words? | Total Words? |
|---|---|---|---|
| black | 3 | 4 | 5 |
Let’s now use FitNesse with a TDD approach to specify this. Ready? Here it is:
| Word Count | black blue black blue red black green green | |
|---|---|---|
| Name | Count | |
| Black | 3 | |
| blue | 2 | |
| green | 2 | |
| red | 1 | |
| Input | Word? | Occurrences? | Different Words? | Total Words? |
|---|---|---|---|---|
| black blue black blue red black green green | black | 3 | 4 | 8 |
But wait, you’re thinking, I haven’t done anything! Ah, but I did: I added an input to each of the original conceptual tables, because it would be rather challenging to come up with the correct outputs without feeding any input. Those tables themselves are the test code! The expected outcomes are automatically treated as testable assertions by FitNesse. The proof is in the pudding. The next section presents the pudding.
Executing FitNesse Tests
Figure 1 presents the actual execution of the above test. Because it would be less interesting to have everything working just right, I have deliberately introduced an error in the expected results so you can see how FitNesse reports it.

Figure 1 Actual execution results of the FitNesse test table.
Figure 1 includes a few other elements that I’ve introduced to improve the structure of the code, but all of them are optional:
- The variable definition: though it does not appear that that variable is actually used, it is used in both subsequent test tables-FitNesse displays the value of the variable upon use rather than the name of the variable, eliminating duplication in the “source code” for the test.
- The import block: equivalent to the c# using statement, this obviates having to type fully-qualified class names in the two subsequent test tables.
- The included SetUp page: FitNesse allows creating a few special pages, like the SetUp page near the top of Figure 1. This lets you put common code in one place, avoiding code duplication. SetUp pages are automatically inherited from parent pages but for this simple test page I have overridden the inherited SetUp with a local one that is completely empty.
There are a few necessary items that, though not shown in Figure 1 (see Using FitNesse with fitSharp), must be defined, typically on your root-level page (http://localhost:port/root). The Setting Up FitNesse section near the end has links to fitSharp to explain these further:
- Path directives: equivalent to references in Visual Studio, these tell FitNesse where your DLLs are located.
- Special variable definitions: For running FitNesse with .NET you must define COMMAND_PATTERN, TEST_RUNNER, and PATH_SEPARATOR variables.
Source Code vs. Displayed Code
Writing tests in FitNesse is different from regular languages. In C# you write source code, compile it for the machine to understand, then execute it. In FitNesse you first write source code, then render it for humans to understand, and then finally execute it. That is, you write your tests in a wiki markup language in FitNesse’s text editor. When you save the test you go from edit mode back to display mode, which displays the test tables just like you have seen above. Here is the source code for the test page shown above:
|
1 2 3 4 5 6 7 8 9 10 11 12 13 14 15 |
!|import | |CleanCodeFixtures.Demo| !define InputText (black blue black blue red black green green) !|Word Count |${InputText}|4 | |Name |Count | |black |3 | |blue |2 | |green |2 | |red |1 | !|Top Word | |Input |Word? |Occurrences?|Different Words?|Total Words?| |${InputText}|black |3 |4 |7 | |
The source code closely resembles the displayed code, except you do not have the graphic tables and you can see the definition and use of the InputText variable mentioned earlier. Figure 2 shows a more comprehensive example, labeling some of the key parts of interest.
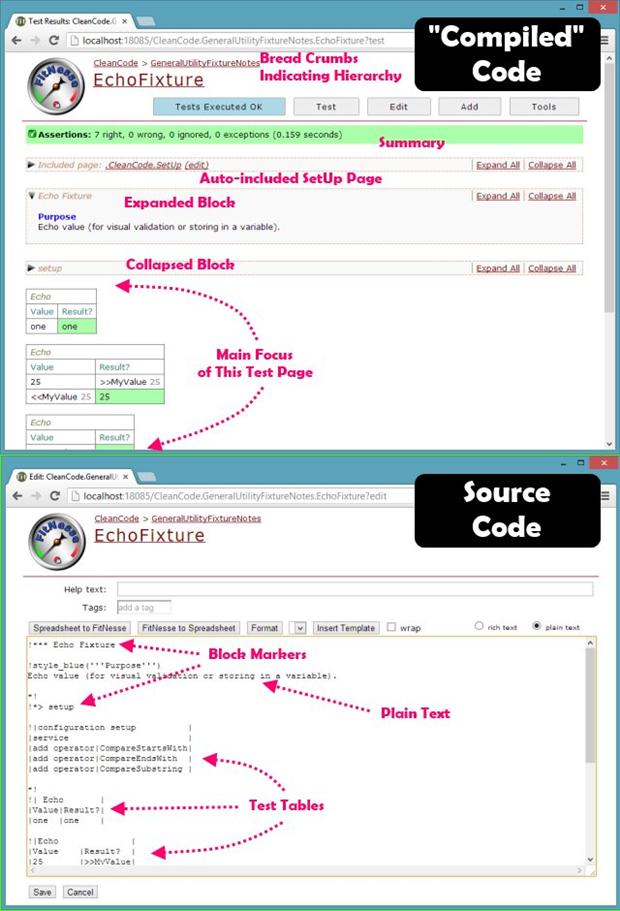
Figure 2 Source code (bottom) and “compiled” or displayed code (top) for the same FitNesse test page.
FitNesse Organization
The bottom of the first page of the FitNesse user guide has a detailed diagram of the FitNesse architecture, but I prefer the simpler view shown in Figure 3, illustrating just the parts you need to create.
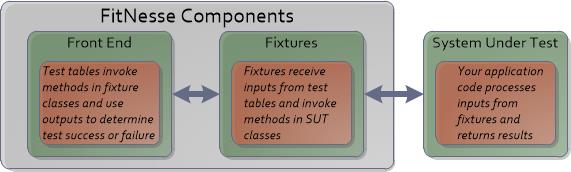
Figure 3 FitNesse components you need to develop.
The components in Figure 2 are separated so as to make it easy to delegate responsibilities to fit your organization. Here are a couple typical ways of dividing up the tasks:
| Test Tables | Fixture Code | Application Code | |
| Scenario 1 | users | QA | developers |
| Scenario 2 | QA | developers | developers |
Writing Fixtures to Support Test Cases
Referring back to the test execution shown in Figure 1, I ought to emphasize that I am displaying the test output that you’d see after you have written fixture code and after you have written application code. FitNesse lends itself well to TDD development, because you can write the above tests without any code to stand behind it. Upon executing, FitNesse reports all the fixture classes and methods are undefined, but that is as it should be. So next, you proceed to write some fixture code to support those tests.
One Row of Output per Set of Inputs: ColumnFixture
Consider the Top Word fixture first-here it is again-and its code-behind. This type of test is characterized by a set of inputs yielding a single, related set of outputs. Think of it as being like a SQL query returning exactly one row of data. This behavior is wired up by subclassing ColumnFixture.
|
1 2 3 |
!|Top Word | |Input |Word?|Occurrences?|Different Words?|Total Words?| |${InputText}|black|3 |4 |7 | |
|
1 2 3 4 5 6 7 8 9 10 11 12 13 14 15 16 17 18 19 20 |
namespace CleanCodeFixtures.Demo { public class TopWordFixture : ColumnFixture { // inputs public string Input { get; set; } // outputs public string Word() { return WordFrequency.MostFrequentDetails(Input, 1).First().Name; } public int Occurrences() { return WordFrequency.MostFrequentDetails(Input, 1).First().Count; } public int DifferentWords() { return WordFrequency.GenerateWordFrequencyList(Input).Count(); } public int TotalWords() { return WordFrequency.RawWordList(Input).Count(); } } } |
There are several things to note as you compare the test above with the fixture-implementation below:
- Distinguish inputs from outputs in the test above by the presence of question marks in the field name row. (Alternately you could use parentheses instead of a question mark. That means, for example, that Word() or Word? are the same.)
- The fixture name itself may omit the word fixture if the class has that (i.e. TopWordFixture is referenced as just TopWord).
- Class and method names may introduce whitespace at word boundaries for easier readability in the test (hence TopWord becomes Top Word and DifferentWords becomes Different Words.
- Any public properties with setters or public fields are available as inputs on the test; similarly, any public properties with setters, public fields, or public methods are available as outputs on the test.
- The fixture code is not at all optimized but it is quite sufficient for demonstration purposes.
Multiple Rows of Output per Set of Inputs: RowFixture
The other type of test table given above is characterized by a set of inputs yielding zero or more rows of outputs. This behavior is wired up by subclassing RowFixture. Here is the test table again and its code-behind fixture.
|
1 2 3 4 5 6 |
!|Word Count|${InputText}|4| |Name |Count | |black |3 | |blue |2 | |green |2 | |red |1 | |
|
1 2 3 4 5 6 7 8 9 10 11 12 13 14 15 |
namespace CleanCodeFixtures.Demo { public class WordCountFixture : RowFixture { public override Type GetTargetClass() { return typeof(WordItem); } public override object[] Query() { var input = GetArgumentInput<string>(0); var quantity = GetArgumentInput<int>(1); List<WordItem> mostFrequentDetails = WordFrequency.MostFrequentDetails(input, quantity); return mostFrequentDetails.Cast<object>().ToArray(); } } } |
Notes on this test:
- Subclassing a RowFixture requires override the GetTargetClass method with the type of the class you are returning (i.e. the container that holds all the output fields in your test).
- It also requires overriding the Query method to return all the rows of data as an object array.
- Test inputs are retrieved in a very different fashion than in a ColumnFixture (as you may have surmised from the different location of the input in the test table). Use the GetArgumentInput method to retrieve any of the arguments in a zero-based argument collection.
- The first argument, input, is the text passage to analyze.
- The second argument, quantity, specifies how many rows of output to return.
- Row ordering is not significant-notice that blue and green both have two reported occurrences; it does not matter which comes first in your expected test outputs.
Writing Application Code to Support Test Fixtures
With the fixtures in place, the tests are still failing of course; they cannot compile successfully without the application code of the backend itself. Thanks to LINQ, the backend code for this portion of the application is quite simple, as shown below. Working from the bottom, RawWordList splits the input text passage into words (yes, it does not account for punctuation to keep it simple!). GenerateWordFrequencyList groups that output by word and feeds a list of WordItem records to MostFrequentDetails, which sorts and truncates the list to the required number of items.
The principal method, MostFrequentDetails, is used by both the TopWordFixture and the WordCountFixture above. In fact, you could easily put the entire algorithm in a single LINQ chain in that method, but it is split into three levels here. This is because TopWordFixture wants to report/verify some of the component values.
|
1 2 3 4 5 6 7 8 9 10 11 12 13 14 15 16 17 18 19 20 21 22 23 24 25 26 27 28 29 30 31 32 33 34 35 36 |
namespace CleanCodeFixtures.Demo { public class WordFrequency { // Adapted http://scottchamberlin.tumblr.com/post/55152416452/linqinterview public static IEnumerable<WordItem> MostFrequentDetails(string s, int quantity) { var wordCounts = GenerateWordFrequencyList(s); return wordCounts .OrderByDescending(x => x.Count) .Take(quantity) .ToList(); } public static IEnumerable<WordItem> GenerateWordFrequencyList(string s) { var words = RawWordList(s); var wordCounts = words .ToLookup(x => x) .Select(x => new WordItem{Name = x.Key, Count = x.Count()}); return wordCounts; } public static string[] RawWordList(string s) { var words = s.Split(' '); return words; } } public struct WordItem { public string Name { get; set; } public int Count { get; set; } } } |
Test Suites and Other FitNesse Infrastructure
Thus far, this article has focused on a single test page. But FitNesse is capable of supporting multiple tests arranged into suites and sub-suites. Figure 4 shows the top-level page for the suite of FitNesse tests that I have put together to illustrate concepts for this series of articles. Note the hierarchical list of suites and tests down the page. You can drill down to a suite or a test and execute from that point, thereby allowing you to test as little or as much as you want at any given moment. A test suite will have the Suite button in the top control-panel whereas an individual test will label the same button Test. Either way, it executes tests from the current context with its child contexts, if any.
FitNesse automatically places textual icons on suites and tests as indicated in the figure, so you can tell at a glance what is executable. This sample page also shows a couple of instances of a SetUp page, which again provides common code for the current context or below. The other buttons in the control-panel are for managing your test wiki, from editing the current page, adding new pages, or doing such maintenance as moving, renaming, or changing page properties.
Finally, note the URL-remember FitNesse runs in your browser!-which will typically begin with localhost:port, where port must match the port with which you launched your FitNesse server from the command line. You then have the current page, in the form top-level page.sub–page.sub-page…. That is, it is just like a normal URL except it uses periods instead of virgules as path separators. This page does not have a mode, which is why it is parenthesized in the figure, but the mode appears on any page other than a default, unexecuted page. Examples: when you edit a page the URL will show url?edit; an executed test will display url?test, and so forth.
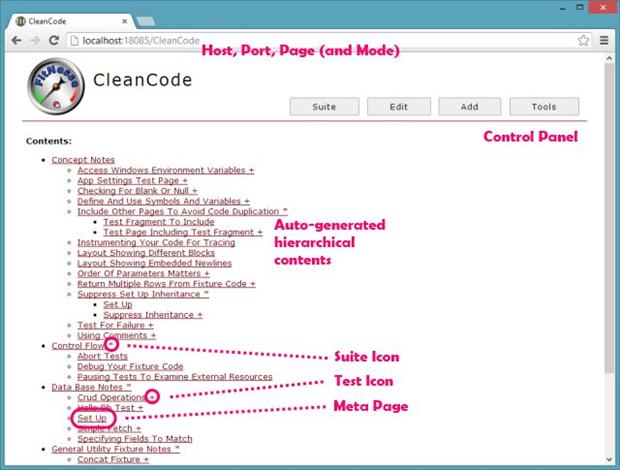
Figure 4 Top-level page for my sample, hierarchically arranged FitNesse test suite.
You have seen an example of an executed test (Figure 2). Figure 5 shows an example of an executed suite. As you can see, it presents a one-line executive summary of all tests at the top, followed by a one-line per test summary of each test, and-not visible in the figure-the output of every test below that.
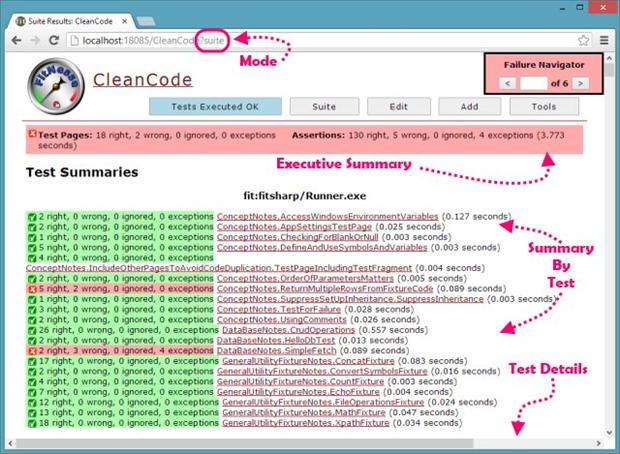
Figure 5 The results of executing my sample FitNesse suite.
Figure 5 displays results for the test suite after it has just executed, but FitNesse has a powerful history mechanism as well. You can select the Test History under the Tools menu to see historical information on each test: besides the timestamp and the result of the latest run, you also get the pass/fail history of the last 20 executions (Figure 6). Everything is hyperlinked! Clicking on one of the 20 executions takes you directly to the past test so that you can quickly view the actual failing line of a broken test. If, on the other hand, you click on the test name in the test history then you can see a more expansive history for just that test, and again drill down further.

Figure 6 FitNesse’s extensively linked test history.
Setting Up FitNesse
Setting up FitNesse is mostly straightforward, complicated only by the fact that there are three independent components needed to run in a .NET environment.
- Start with the instructions for FitNesse itself, which essentially involves just downloading and running with Java a single jar file that unpacks and launches the FitNesse server.
- There are no complete instructions for fitSharp; indeed, the fitSharp site does not even have a link to the download site! But all you need to do is unpack it in a folder next to FitNesseRoot then edit your root wiki page per these setup instructions.
- Download DbFit here and see its startup instructions here.
(Note that DbFit includes the FitNesse-standalone.jar file to run FitNesse as well as the fitSharp.dll library needed to support fitSharp so that is all you really need.)
Accompanying this article is a project archive that contains a Visual Studio project with both the system under test and the fixtures, as well as the front-end FitNesse page to exercise them. For convenience in getting you up and running quickly, the project already includes fitSharp and DbFit but not the core fitnesse jar file. Download that and install it in the FitnesseRunner directory (you will see a place holder there). Then you should be able to launch fitnesse and browse to http://localhost:your-port-number in your browser. Once you have confirmed it is reachable, you can drill down-or browse directly-to the demo page in Figure 1 at: http://localhost:your-port-number/CleanCode.ConceptNotes.GettingStarted.WordFrequencyDemo
Conclusion
Now that you have, I hope, acquired a taste for the capabilities of FitNesse, and the ease with which tests can be constructed, subsequent installments in this series will give you “tips from the trenches”: overcoming a variety of minor issues as well as detailing workflow techniques to maximize your productivity running user-acceptance tests with FitNesse.
Load comments