


Database CI with Redgate SQL Change Automation, PowerShell and Jenkins
Alex Yates shows how to set up automated processes for SQL Server database source control, build and continuous integration using Redgate SQL Toolbelt, Subversion, and Jenkins
Updated June 2018
While the practice of Continuous Integration (CI) started with application code, you can apply the same principles to databases. Database CI is the process by which we build, test and deploy the database on commit of every database change, and report any errors. In this way, CI reduces your feedback loop such that changes that break the build are caught as soon as they are committed to source control
I’ve used various build, test and deployment tools to implement CI, but one customer asked for a database CI demo using the Redgate tools and Jenkins. I got it up and running in about an hour, despite the fact I’d never used Jenkins before. This article documents the process for a SQL Server database. If you use an Oracle database, you should go here instead. For a very similar process, but using Git and Azure DevOps, see my article: Database Continuous Integration with the Redgate SQL Toolbelt and Azure DevOps
Before you start, here’s what you need
- SQL Server LocalDB. Failing that, a SQL Server instance that you can connect to.
- Redgate SQL Source Control to connect your database to a source control repository. For my source control repository, I’m using Subversion (SVN) with the Tortoise SVN client, which is open source.
- Database source control is a prerequisite for database CI. If you don’t source control your database, you will need to sort that out first. If you work in SSMS, SQL Source Control will make versioning your database trivial.
- Redgate SQL Change Automation for the Redgate PowerShell cmdlets. You can use the free 14-day trial to follow this tutorial.
- PowerShell v3 or later.
- The latest build of Jenkins CI (open source).
For a Proof of Concept, you can just run everything locally, but a more typical set up may look something like Figure 1.
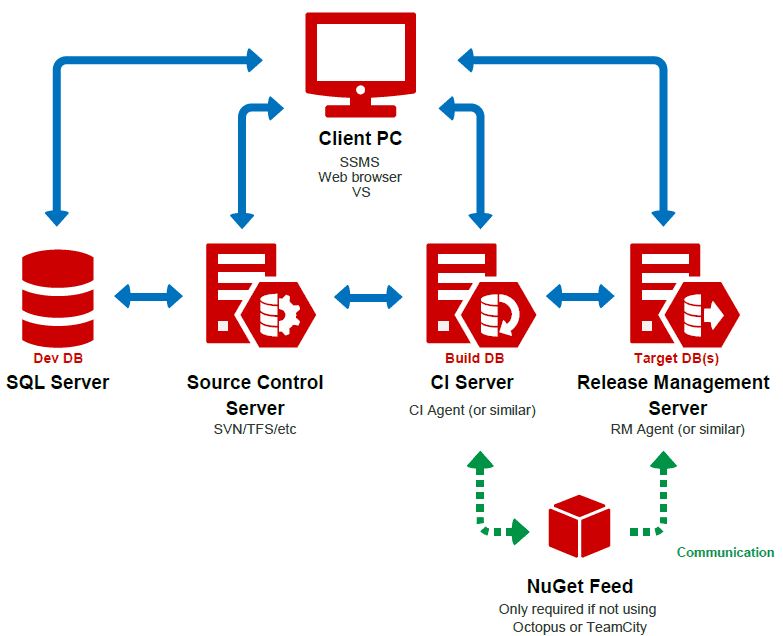
Figure 1
Your Jenkins node needs to run on a Microsoft OS and have a clear line of communication to your source control repository. You need to have SQL Change Automation installed on your Jenkins node. LocalDB (if you are using it) also needs to be installed on your Jenkins node, otherwise the account Jenkins runs needs to have access to an alternate SQL Server instance.
This post assumes you already have SQL Source Control set up with SVN and that you broadly understand how it works, but the process is very similar for any other version control system. If you have these bits and pieces in place, you’re ready to follow in my footsteps!
Step 1: Create your PowerShell build script
We need to write a PowerShell script to build, test and deploy your database. You should test this PowerShell script locally before trying to run it from Jenkins.
We are going to use the Redgate SQL Change Automation PowerShell cmdlets which use the Redgate SQL Compare engine, NuGet, SQL CMD and various other tools to do the heavy lifting.
SQL Change Automation will take our source code, create a new temporary database in LocalDB and deploy our source code to it to ensure the code compiles (a process called schema validation). This ensures your syntax is accurate and will catch any broken dependencies that would render your source code undeployable. If you prefer, you can build your databases on a named SQL Server instance instead. This can be useful if LocalDB doesn’t support all the features you need, or if you have dependencies on other databases.
Once validated, SQL Change Automation will delete the temporary database because if we’re running builds on every commit, we don’t want hundreds of test databases left on the server. Finally, it creates a NuGet package for this version of the database in an output directory.
Finally, you have the option to run two additional actions (commented out by default in Listing 1):
- You can run your tSQLt tests against the package. If you consult the documentation, you’ll also find the -RunOnly syntax for running a subset of your tSQLt tests. For example, you might want to run the quick tests on every build but the longer running tests in a separate job or on a different cadence.
- Deploy the latest (tested) code to a persistent integration or test database.
Open PowerShell ISE and copy Listing 1 into the top section:
|
1 2 3 4 5 6 7 8 9 10 11 12 13 14 15 16 17 18 19 20 21 22 23 24 25 26 27 28 29 30 31 32 33 34 35 36 37 38 39 40 41 42 43 44 45 46 47 48 |
# Script created 11/11/2016 by Alex Yates of DLM Consultants # Shared freely, but a beer would be appreciated if you find this useful and we are ever in the same pub # Full documentation for Redgate SQL Change Automation PowerShell cmdlets at: # https://documentation.red-gate.com/display/sca3/Cmdlet+reference # Variables (fill these in) # Required - the location of your source code $scriptsFolder = "C:\where\is\your\DB\source\code" # Required - package name and version number (must not already exist in output directory) $packageID = "aNameForYourPackage" $packageVersion = 0.1 # Required - An output directory in which to save your build artifacts (must already exist) $outputDir = "C:\JenkinsDrops" # Optional - If using an alternate SQL instance for schema validation provide details here. Also, uncomment this parameter from line 34 below. #$buildDb = "Data Source=.\SQL2014" # Required for sync step only - the database you wish to deploy to. Uncomment below and also lines 46-8 if running a sync step. #$targetServerInstance = ".\SQL2014" #$targetDatabaseName = "AdventureWorks" # Optional - If using SQL Auth for target DB add a username and password. Also, uncomment these parameters from line 42 below. #$username = "myUsername" #$password = "myPassword" # Script to build DB (you can probably leave this as is) $errorActionPreference = "stop" # Validate the scripts folder $validatedScriptsFolder = Invoke-DatabaseBuild $scriptsFolder # -TemporaryDatabaseServer $buildDb # Export NuGet package $package = New-DatabaseBuildArtifact $validatedScriptsFolder -PackageId $packageID -PackageVersion $packageVersion Export-DatabaseBuildArtifact $package -Path $outputDir # Script to run tests and/or deploy to an integration DB (uncomment as appropriate) # # Run tSQLt unit tests # Invoke-DatabaseTests $package | Export-DatabaseTestResults -OutputFile "$outputDir\$packageID.$packageVersion.junit.xml" # # Sync a test database # $targetDB = New-DatabaseConnection -ServerInstance $targetServerInstance -Database $targetDatabaseName # -Username $username -Password $password # Test-DatabaseConnection $targetDB # Sync-DatabaseSchema -Source $package -Target $targetDB |
Listing 1
To run it in your environment:
- Edit the package and folder name variables at the top appropriately and run the script to ensure it works. Note that if you run it multiple times, you’ll need to increment the version number or delete old packages from the output directory.
- Optionally, uncomment the appropriate sections if you want to run tSQLt tests and/or deploy to an integration/test database.
- Once the script works in the PowerShell ISE, change the values of the
$scriptsFolderand$packageVersionparameters toargs[0]andargs[1]. We’ll pass these variables into the script from Jenkins later. You may also want to think about parameterizing and encrypting your passwords if you have included them (if using WinAuth, you don’t need passwords – make sure the Jenkins service is running as an appropriate user). To learn how to do that, check out this post, but I’d worry about that later, after you have something basic working in Jenkins. - Save your script to a file called buildDatabase.ps1, somewhere in your source control repository – but not in the same directory at which you have pointed SQL Source Control.
Step 2: Create a new job in Jenkins CI
- Install Jenkins. For a Proof of Concept, it’s perfectly fine to do this on your local machine. (Download. Next, Next, Next, etc. It should only take a minute or two).
- Create the job – from the Jenkins home screen click New Job (top left) and give it a name, something like [MyDatabase] build, and select the radio button to Build a free-style software project.
- Select your source control system and add the location of your source control repository where it says Repository URL. For my Proof of Concept, running everything from my local machine, I used file:///C:/SVNRepository/, which I copied from the Tortoise SVN repo browser. Now when a job runs, Jenkins will check out the latest source code.
- Finally set up a build trigger so Jenkins knows when to run the build. The easiest way is to set it up to poll your SVN repo once a minute (copy five stars separated by spaces, * * * * *, into the text field). In time, you may want a push trigger to improve performance but this is a quick way to get started.
Now Jenkins knows how to find your source code and when to run a build, but we haven’t told Jenkins to do anything with the source code yet. We’ll cover that in step 3.
Step 3: Configure your build step
There are various ways to run PowerShell scripts from Jenkins:
- Use the PowerShell plug-in to run a script from your source code
- Use the PowerShell plug-in to run a script saved in Jenkins
- Use a regular Windows batch command to call a PowerShell script from your source code
We’re going to use the third option, because it avoids installing any additional Jenkins plugins. However, if you already have the PowerShell plug-in installed or you can easily install it, then it’s fine to use that instead.
- Click Add build step and select Execute Windows batch command.
- Paste the following command, replacing the two file paths appropriately, and save:
|
1 2 |
powershell -command "relative\path\to\BuildScript.ps1 \"%WORKSPACE%\relative\path\to\dbSourceCode\" 0.%BUILD_NUMBER%; exit $LASTEXITCODE" |
Now, each time you commit to source control, within 60 seconds Jenkins will run that batch command. This will execute your PowerShell script with two custom parameters, one for the location to which Jenkins has checked out your database source code, and the other for the Jenkins build number, which will be used as the NuGet package version number.
And that’s that. Now commit something to source control and see if it works. If it doesn’t, check the build log to troubleshoot it. If you get it working first time, you did better than me on my first attempt! It took me four or five builds before everything worked because of mistakes in the way I configured Jenkins or my PowerShell/parameters and so on. If your builds fail, check the logs. I’ve listed some of the other common mistakes (and fixes) below to help with troubleshooting:
- Your version of PowerShell is older than v3. Upgrade PowerShell.
- You have not restarted your machine since installing SQL Change Automation. Reboot.
- You have made mistakes with your database connection details. Check all database names, server names and users/passwords are correct.
- The user the Jenkins service is running as does not have access to SQL Server. Add an appropriate user or set the Jenkins service to run as a different user and restart the Jenkins service.
- Your database is behind a firewall. Set up an appropriate firewall rule.
Final thoughts
It isn’t that hard and doesn’t take that long to set up in practice. Now you can catch mistakes early using Jenkins and SQL Change Automation, and if you set up automated deployment using a release management tool, you’ll easily be able to deploy your databases throughout your pipeline.
Tools in this post
You may also like
-

Article
Simple SQL Change Automation Scripting: The Release Object
Once you understand the SCA data objects, it can give you a certain glow of to discover, suddenly, that SCA can do some complicated and time-consuming tasks with just a few lines of code. Phil Factor demonstrates how to get the most of SCA's Release object.
-

Article
Unearthing Bad Deployments with SQL Monitor and Redgate's Database DevOps Tools
Sudden performance issues in SQL Server can have many causes, ranging all the way from malfunctioning hardware, through to simple misconfiguration, or perhaps just end users doing things they shouldn't. But one particularly common culprit is when deployments go wrong: I don't know a single DBA who hasn't been burned by a bad release.
-
Article
Picking over the Bones of a SQL Injection Attack
The best way to learn how to protect your databases from SQL Injection is to to see it in action and confront its consequences. This article tells the story of an attack on a vulnerable SQL Server REST interface, explaining how the attack unfolds, the mistakes that made it possible, and SQL Monitor's role as the 'canary in the mine'.
-

Article
How to build multiple database versions from the same source: pre-deploy migration scripts
The final part of Alex Yates's three-part series tackles the complicated issue of automating deployments when the same table might have a different structure, in different production versions of the database.
-
Forums
SQL Change Automation Forum
Continuous integration and automated deployments for your SQL Server database


